Page 4 of 7
1 2 3 4 5 6 7
October 2016 – Page 4 – Homesteader Depot

Month: October 2016

  • Tips to Keep Rodents OUT This Winter

    Tips to Keep Rodents OUT This Winter

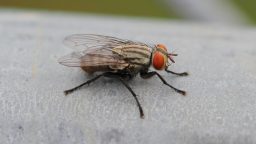
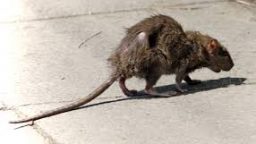
    As the temperature drops and food sources diminish, rodents are likely to want to relocate, and your home is going to be high on their list.  They might start out in your garage, attic, or crawl space, but with the reproductive rate of rodents, they will soon be spreading out from there.  Allowing these furry freeloaders to share your space isn’t only likely to lead to property damage, but it will also put you and your family in proximity to diseases like the hantavirus and the bubonic plague.  Here are a few steps you can take to keep rodents where they belong this winter.

    Restrict Access

    The first step should be to make it harder to gain access to your home.  Trim back tree branches that would give them easy access to your roof, use metal wire mesh to cover attic vents, and seal cracks around doors and crawl spaces.  Hopefully,  they will move on if it’s hard to get it.

    Protect Food

    If they do make it inside, they are less likely to stay, or worse, breed, if there isn’t access to food.  Keep your home clean, what is a small amount of food for a human can be a feast for a mouse.  Store your food, and feed for your animals in containers that are sealed.  All animal feed that you keep outside or in areas that are easily accessible should be kept in containers that rodents cannot chew through.

    New POWERFUL Laundry Magnets — NEVER BUY Detergent Again!  Learn More Here>>>

    Fight Back

    There are a number of ways to kill your rodent intruders on the market these days, but they all fall into one of two categories.  Poison or traps.  Poison has its conveniences, but your animals might ingest it, predators like owls might eat exposed rodents and die (which would lead to greater numbers of pests in the long run), or they could die in your walls where you can’t get to their rotting carcass.  Traps, especially electronic traps are probably a better option in most cases.  They also make live traps for mice and squirrels, but then you have to figure out what to do with them without getting bit.

    Related Article:  4 Completely Natural Ways to Rid Your Property of Mice

    Clean Up

    If you see signs of a rodent, clean up after them.  Especially after you have eliminated them.  Cleaning up the area will not only make your home healthier by removing their waste, but it will also decrease the chances of further invasion.  Mice and rats leave urine trails where they walk, a urine trail will tell other mice and rats that there is a home with potential food here.

    Rodents can damage your home and spread serious illness.  Take the proper steps to keep your home and your family safe this winter.

    If you liked this, you might also enjoy…

    Natural Healing Techniques Doctors Don’t Want You to Know about…

    Ultimate Woodworking Course — Build Anything You Can DREAM of>>>

  • Homemade Root Cellar

    Freezing your food is a great way to preserve it.  But if your freezer breaks, there’s no reason to take it to the dump.  You can still use it to preserve your food by converting it to a mini-root-cellar.  You will be able to store potatoes, carrots, onions, and other crops through winter and into spring without the need for electricity.  Here’s how…

    The first step is to remove the mechanical components.  This could include Freon, which involves using more care and disposing of it properly so you don’t contaminate your area.

    After you have stripped the freezer you are going to cut two circular holes in the sides.  The holes will be used to install PVC pipes for ventilation, so cut them to the size of the pipes that you will be using.  Ventilation is important to prevent spoiling so don’t go too small, the larger the freezer the more ventilation you will need.  The holes should be directly above each other, one neat the top of the freezer, the other near the bottom.

    Next, assemble your PVC pipes.  Place short pieces in the holes in the freezer, then hold a longer piece (it needs to extend at least 1 inch below the bottom hole, and about 12 inches about the top of the freezer (more in places with harsh winters).  Mark on the longer vertical pipe where you will need to cut it to attach it to both shorter pieces that enter the holes on your freezer.

    Once you have assembled the PVC pipes, they should look like upside-down “F”s.  Next, carefully drill some holes near the end of the vertical pipe.  These will be your root cellars only ventilation so you want to drill plenty of holes.  Then cap the top and bottom of the vertical pipe.

    Next, attach the assembled PVC “F”s to your freezer, caulk them in place to secure them, seal the gap, and insulate.  Next, wrap some wire mesh over the ends of the pipes and attach this to the pipes with hose clamps.  This is to keep out bugs and rodents.

    At this point, your freezer is ready to be buried.  If you live in a place with a harsh winter you will want to bury your freezer so that the top is at least 12 inches from the ground level, this is why you needed to make your vertical pipes longer than those with mild winters.  If you live in a place with a mild winter you can make the top of your freezer nearly flush with ground and cover it with plywood and a tarp or whatever you have available, you are done.  If you have your freezer deeper to avoid freezing, you will need to fill in the gap with something light enough to remove when you want to access your root cellar, but that will insulate well enough to prevent freezing.

    Don’t waste time and energy growing crops that end up spoiling because you don’t have room to properly store them.  Make yourself a root cellar this year so you can enjoy all the fruits of your labor.

    If you liked this, you might also enjoy…

    Learn to Heal and Treat Illnesses Naturally…

    An Ancient Secret to Slimmer Waists…

    Learn to be a Master Carpenter at Home...

  • Dandelion Balm for Aches and Pains

    Dandelion Balm for Aches and Pains

    Keeping your homestead in working order is bound to give you sore muscles, joint pain, and irritated skin from time to time.  Luckily you probably have the cure outside in your lawn.  Dandelions can be used in a balm to help treat soreness and skin irritation.  All you need other than dandelions are some oil (olive, coconut, almond, or sunflower will work), bee’s wax, and some canning jars.


    How to Make Dandelion Balm

    1. Gather up all the dandelions that you have available.
    2. Next, you want to dry them out so that your balm isn’t watered down.  Spread them out in a single layer on some cardboard, lay some paper towels over them, and put them somewhere they won’t be disturbed.  Preferably where they can get some light from a window to speed the drying.
    3. Once they have dried out (this could take a day or even two depending on the moisture in your environment) you can infuse the oil.
    4. Fill a canning jar no more than ¾ of the way up with your dry dandelions.  Then pour your oil over them until it is an inch or two higher, or near the top.
    5. Place the filled jar in a pot with a few inches of water in it, and bring it to a low heat.  You will need to continue to heat the oil for several hours.  The color of the dandelions should bleed out and change the color of the oil.  If you want your balm to be stronger, you can let the infused oil sit for a few days in the dark, or if you have more dandelions you can strain out the used ones and redo the process with new dried dandelions.
    6. Now you need your wax, you will need about 1 part wax for every 7 parts infused oil.
    7. Put the oil and the wax in a container(s) that can hold both of them and be heated, like a canning jar, and put these into a few inches of water to heat just as before.  This time, you only need to heat it until all of the mixture has melted together.  Then while it is still liquid, pour it into smaller jars.  If you leave it in a quart jar you will have a hard time getting it out with your fingers to apply when it gets lower than 20 ounces since it will be out of reach.

    Don’t let aches and pains keep you from getting work on your homestead done when the cure is right outside.

    If you liked this, you might also enjoy…

    Natural Healing Techniques Doctors Don’t Want You to Know…

    The Weight-Reducing Magic of Yoga…

    The Ultimate Woodworking Course..


  • Food That Magically Re-Grows Itself

    Food That Magically Re-Grows Itself

    I recently found this awesome infographic on Pinterest that depicts several foods that can regrow themselves, no garden needed! It’s from WholeFoods.com. Most of these you can do on your counter, windowsill or on your porch, and it’s a great way to re-use scraps from vegetables (which, if you’re shopping at Whole Foods, will probably have cost a lot!)

    This is also a fun idea for winter. As your garden dies out, you can grow celery or what have you on your countertop! Not to mention, this would be a great little science project for kids, especially homeschoolers. Why should the learning and gardening stop because the weather gets cold?

    Enjoy!

    food-that-regrows


    If you liked this, you might also enjoy…

    Natural Healing Techniques Doctors Don’t Want You to Know…

    The Weight-Reducing Magic of Yoga…

    The Ultimate Woodworking Course..

  • Benefits of Homesteading for the Kids

    Benefits of Homesteading for the Kids

    Kids today are very different from kids a hundred years ago, and the idea of homesteading and sustainable living might seem very foreign to them. This is especially true if you are introducing this sort of lifestyle to a child who has already passed a couple of years old. However, living sustainably is very important, and you need to be the one to guide the children.

    One of the first things you have to do is show them the importance of sustainable living. Explain to them why it is so important that they learn to reuse items and to learn to eat from the garden rather than the grocery store. Kids will learn a number of valuable skills when they are part of homesteading family that they would not have otherwise.

    There are many practical skills about living and survival that are no longer taught to children. Kids don’t know how to plant and grow food. In fact, many have no idea where their food comes from. This is especially true when it comes to meat.

    In addition, children tend to learn responsibility in homesteading households. They are given chores – just like children hundred years ago – and they are expected to complete them. If they don’t, it could mean that the family doesn’t have enough food that night on the dinner table.

    By having the homesteading life, children will become more respectful of the things that they have. In addition, because everyone has to work together to make this type of lifestyle work, they tend to have a much closer family life.

    As you can see, kids who are learning the homesteading life can find quite a few benefits. In the beginning, it can be difficult to get some of the older children involved, but with perseverance, they will come around.


    If you liked this, you might also enjoy…

    Learn to Heal and Treat Illnesses Naturally…

    An Ancient Secret to Slimmer Waists…

    Learn to be a Master Carpenter at Home...

  • How to Make a Fly Trap

    How to Make a Fly Trap

    Not only are flies annoying, but they are disgusting too.  They can spread diseases just by landing on your food, without your even noticing.  They can ruin the time you spend outside trying to relax, and they can sneak inside every time you open the door.  And while raising animals and having a compost pile may increase their numbers, even if you have no animals and a near sterile yard, they can fly on over from your neighbor’s.  What can you do about it?  Trap them with a few things you probably already have laying around the house, and here’s how.

    How to make a fly trap:

    1. First gather up some materials, a symmetrical smooth plastic bottle (it can’t be a milk bottle or any type of bottle with a handle or ridges), some string or wire, some sugar, and some yeast or bread crumbs.
    2. Next, cut the bottle in two about 1/3 of the way down.  Remove the lid.
    3. Turn the upper portion of the bottle upside down and slide it into the lower portion until the two cut ends meet.
    4. This should leave the bottle top a few inches from the bottle of the bottle.
    5. Now, make a couple of holes through both pieces on opposite sides of the bottle just below the cut line that is now the top.  Thread the string or wire through the holes in whatever manner you like so as to allow you to use the string to hang the bottle by later.
    6. Finally, put a few spoons full of sugar and yeast or bread crumbs into the bottle, then carefully add water so that it comes about ½ inches or so from touching the upside down bottle top.  The trap will not work if the water line is too far below, or if it touches the bottle top.

    The trap functions by attracting the flies in, they have to land on the narrow opening and crawl in, but they will tend want to fly away instead of crawl around searching for an exit.  This will have them either up in the corners where they can’t get out, or drowning in the yeasty water that attracted them.

    Once your bottle trap is ready, hang it up in a tree or on a fence near your place.  Since it’s pretty easy and inexpensive to make, you might want to put one at each corner of your yard and one near your garbage can.  If you don’t see flies in your trap, adjust the water line or change your bait.  When the trap is full of dead flies you can wash it out if you like, but since it’s made out of trash anyway you can just throw it away and save yourself from a nasty task. Happy fly hunting!

    If you liked this, you might also enjoy…

    Learn to Heal and Treat Illnesses Naturally…

    An Ancient Secret to Slimmer Waists…

    Learn to be a Master Carpenter at Home...


  • Using Rain Catchment Water on Your Homestead

    Using Rain Catchment Water on Your Homestead

    If your homestead is off-grid, then water catchment is essential.  But even if you are connected to the grid, why pay for a resource that you can get for free?  No matter where your homestead is, water catchment is not an option that you should dismiss without consideration.


    Why use Water Catchment?

    If your homestead is off-grid then you will either have to haul water, or run a generator to power a pump to get your water.  Both of these options require you to have a steady supply of fuel for either your vehicle, or your generator, and that they are running when you need them to.  Mechanical failure or bad weather can easily have you without water if you don’t have another source.

    For those with a suburban homestead water catchment can still help.  Rainwater is what your garden is expecting in the first place.  It doesn’t contain chlorine or other chemicals found in municipal water.  And though it doesn’t have the mineral content that ground water has it can be used to provide drinking water for your animals, or in an emergency even for you.  Best of all it will cut down on your dependency on outside resources and your water bill.

    How to Catch Water

    To catch water that is suitable for your garden, bathing, washing clothes, or giving to your animals, you will need a clean surface on which to catch the water, and large enough container to collect the water in.  Painted metal is one of the best surfaces.  If you have an asphalt shingled roof, this won’t work, the water will be contaminated with chemicals.  However; you can use an asphalt roof if you have sealed it with several coats of roof sealant.  If your home’s roof won’t work, consider using a tool shed.  You won’t get the same amount of water, because your surface area is lower, but it will still work.

    Install gutters and down spouts on whatever structure’s roof you will use to catch the rain.  You will want to down spouts to end about 4 feet from the ground so that you can place a container under them.  Use any clean container like a new trashcan, or 55-gallon plastic drum.  Cut some black landscaping cloth so that it is large enough to cover the top of the container and overlap the sides by several inches.  Then using a bungee cord secure the landscape cloth over the top of the container.  This will allow the water to flow in, but will not allow debris or bugs like mosquitos to get into your supply.


    As with anything these days there are ridiculous laws restricting one’s rights to catch rainwater for their own use.  So be discreet with your catchment system and know your local laws.  But don’t let this free resource go untapped, start you utilizing rainwater on your homestead.

    If you liked this, you might also enjoy…

    Natural Healing Techniques Doctors Don’t Want You to Know…

    The Weight-Reducing Magic of Yoga…

    The Ultimate Woodworking Course..


  • Brewing Mead at Home

    Brewing Mead at Home

    Winter’s coming up, and on top of being cold, it can be boring!  You’re stuck inside, there aren’t many chores to take care of, things to do or fun to have. With lots of free indoor time during winter, it’s a great time to try your hand at brewing some mead! It’s lots of fun to drink as well.  If you’re a fan of fermenting already or simply would like to give brewing a try, it’s a great fermenting project for winter time.


    Why Brew Mead?

    If  you’ve never heard of mead, it is essentially wine brewed with honey instead of grapes. Sounds good, right? Other than the great taste and the buzz, there are actually health benefits to drinking mead!  Drinking it responsibly and in moderation, anyway.  Honey already has antibacterial properties, but after being fermented, mead can help fight off pathogens even more than honey.

    What You Need

    Other than standard kitchen items, some water, and the honey, you will also need at least one carboy, a “s” shaped bubbling carboy airlock, a lemon, and some yeast.

    • Pure, filtered water
    • Honey
    • At least one carboy
    • an “s” shaped bubbling carboy airlock
    • a lemon
    • yeast (you can use brewer’s yeast, wine yeast, and although it won’t taste quite as good, you can also use regular baking yeast)

    How to Brew Mead

    Note: The amount of honey, water, and yeast you use will depend upon the size of carboy that you have and the strength you desire.  If you don’t want it to be too strong, or too weak. 3 pints of honey per gallon is a good ballpark.

    1. Sanitize your materials so that you do not contaminate your brew with outside yeast or bacteria.
    2. In a saucepan, heat your honey over a low flame, adding a little water if you need to, until it becomes viscous. Be careful not to boil the honey.
    3. Fill your carboy about half way up with the filtered water
    4. Funnel your viscous honey into the carboy, leaving a few inches of room at the top.
    5. Juice the lemon and strain off all the pulp.  Then, add the juice to the carboy.
    6. Add your yeast of choice
    7. Cork the carboy with your airlock.  Fill it with water according to the manufacturer’s directions.

    Now, comes the fermenting. Store the carboy in a cool dark area that won’t freeze for about a month.  Check the airlock regularly.  If it is not bubbling anymore, then the fermentation is done.

    If you are planning on bottling your mead, you might want to open the carboy, stir the mead, and recap it with the airlock so make sure the fermentation is over.  If it is not, disturbing it while bottling may reactivate it by providing additional oxygen, and it will continue to produce carbon dioxide and could burst your bottles.  Otherwise, you can transfer it to another clean carboy and cork it for storage.  It can be consumed immediately, but the taste will improve if you let it sit for another month or so.  But it can spoil so don’t wait too long!

    Drink to your health this winter with some homemade mead! Enjoy!

    If you liked this, you might also enjoy…

    Learn to Heal and Treat Illnesses Naturally…

    An Ancient Secret to Slimmer Waists…

    Learn to be a Master Carpenter at Home...