Page 14 of 81
1 12 13 14 15 16 81
Ethan Archer – Page 14 – Homesteader Depot

Author: Ethan Archer

  • 6 Things You Should Do Before Getting Piglets

    6 Things You Should Do Before Getting Piglets

    I’ve raved quite a  bit in the past about how great pigs are. You can buy them as piglets for a very affordable price, and within a season have a hog big enough to fill your freezer with meat. For the initial start-up cost, space they need, food they eat, and meat they yield, they’re incredibly efficient animals to raise for meat. And, as someone who hates waste, I just love how much you can feed them!

    It’s also relatively easy to feed them virtually for free, which is another big plus. When you buy pork at the supermarket, you have no idea what the animals have been eating, and since pigs virtually retain everything they eat, conventionally-raised pork can be literally quite toxic. But if you raise them yourself, and can control what they consume, there’s no better source of clean, green, delicious pork!

    However, you should definitely know what you’re getting into before you run out and buy a small herd of piglets.

    Here are five things every aspiring pig farmer should know before bringing home piglets:

    1. Find a butcher

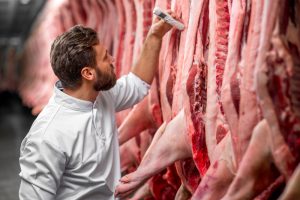
    No, seriously. If you live in an area where it’s quite common for local farmers to bring their animals to a butcher after slaughtering, they can be booked up months in advance. If you don’t plan on butchering the animal yourself, which is wise for your first season of pig farming, find yourself someone to butcher it for you before you invest in pigs so you’re sure when the time comes, you’ll be able to bring it in.
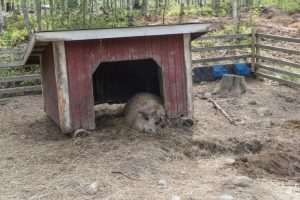
    2. Secure housing 

     .

    There are a couple of different options for a secure pigpen, and whatever you choose, make sure it is secure. Pigs are diggers, and many amateur pig farmers can attest to how easily they can plow through improvised fencing. An electric fence is a great option if you can afford it. Do some research into what pig farmers in your area do, as depending on the soil and the amount of rain you get, you might have to bury your fence pretty deep.

    Your pigs will also need adequate shelter to live comfortably, and for both shelter and fencing, you’ll have to bear in mind how big your pigs will get. They’re quite small as piglets, so make sure to think ahead and anticipate how much room they’ll need as they grow.

    The Secret to Sustainable Homestead Energy…

    3. Make a meal plan

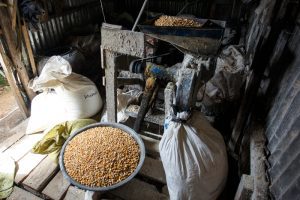
    Ok, so it’s not going to be nearly as complicated as making a plan to feed your family, but before you bring piglets home, you’ll want to do some research into what you can feed them and where you’ll get it. You can feed pigs scraps from your kitchen and garden for sure, but they will most likely want more than that–a lot more. I already mentioned the many ways you can feed a pig for free, so check those suggestions out and see what you can find for free in your area before you get piglets so you’ve already got a game plan.

    4. Secure their water 

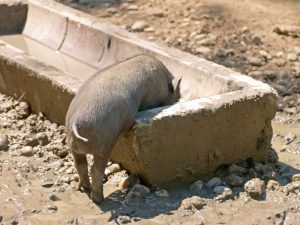
    Pigs aren’t the most delicate of creatures, and especially for little ones, you’ll want to make sure you can get them regular fresh water in a container they can’t tip over…or play with. You’re probably very familiar with the cliche of pigs rolling in the mud and well, it’s true, pigs love to play in the mud, and if you don’t secure their water trough, they’ll be playing in that as well. A heavy, metal trough that can’t be tipped over or easily accessed by the pigs will be your best bet to keep them hydrated and safe.

    The BEST Diet Hacks for a Primal Lifestyle…

    5. Arrange transportation 

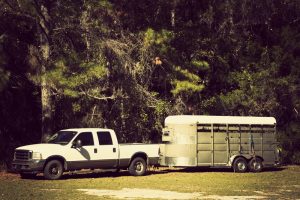
    Another aspect of #1 is to make sure you can get them to the butcher when it time comes! Transporting piglets is easy, but transporting a full-sized hog is a totally different story. If you have a truck and trailer, make sure you have a means of herding the pig into the trailer. But don’t just expect them to saunter on up a ramp and into the back of a trailer, pigs won’t be naturally inclined to do that. If that’s your plan, make sure you start training them to do that right away, by doing practice runs starting at a young age. Kind of morbid to train a pig to virtually walk to his own death, I know, but just comfort yourself with the thought of all that delicious meat that will fill your freezer.

    6. Know your breed

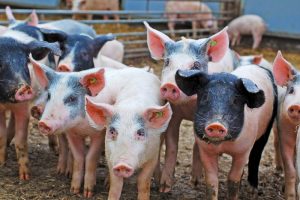
    When you buy the piglets, make sure to ask the farmer who sells them to you all about the breed, and jots down their answers if necessary. You’ll want to know how big these porkers will get, what their personality is like, what cuts are the best on them, how tenacious they are at trying to escape, etc. Not all pigs are the same, and fortunately, if you buy your piglets right from the farmer, you can talk directly to the person who raised their parents so they can give you a good idea of what to expect from your own herd.

    Defeat Body Pain at Any Age…


  • Composting: Good Materials, Bad Materials, and Special Materials (Infographic)

    Composting: Good Materials, Bad Materials, and Special Materials (Infographic)

    Composting. So simple, at yet so complicated. On the one hand, I feel like it’s really easy to just throw together some biodegradable, nutrient-rich material, wet it, and let nature do it’s thing. On the other hand, there are a lot of important considerations to keep in mind when adding to compost piles, and there are items that are not great to have in your compost pile, for many reasons.

    While for the most part, it’s not too complicated to start your own compost pile, there are are few “what not to do” considerations to keep in mind, and I thought this infographic from MarcLanders.com was a great little guide. It’s got some items that are great to add to compost piles, some items to avoid, and some items that you can add, but require special preparation, and the instructions on how to do that.

    If you want to grow your own compost to naturally amend and fertilize your soil, it’s not too tricky to do it right, just follow these simple guidelines and you’re sure to have success. Enjoy!

    If you enjoyed this, you might also like….

    Can You Defend Your Family When SHTF?

    Natural Healing Secrets You Need to Know…

    Effective Primal Diet Hacks…

  • Stump Removal Hack: Epsom Salt

    Stump Removal Hack: Epsom Salt

    If you have any experience with removing a stump, you know what a headache it can be. It will either cost you hours, possibly days, of backbreaking, arduous labor, or way too much money to pay someone to do it for you.

    No matter how successful you are at cutting down a tree, the truck is a whole different story. Part of what makes stump removal so difficult is that a well-established root network will keep that stump alive, and, if not dealt with, will continue to grow and even sprout off new shoots. There are chemicals that can kill a stump and make the removal easier, but there are many disadvantages to these.

    For instance, rock salt or caustic lye are often used to dry out the wood, making it easier to remove. But these will leave high levels of sodium in the soil, which might make the soil impossible to plant in after you’ve removed the stump. Potassium nitrate, on the other hand, which is another common stump removal chemical, can help speed along decomposition, but often fail to fully kill the stump.

    Enter Epsom salt. Epsom salt is a wonderful tool for the organic gardener and homesteader, and it can aid tremendously in the removal of a stubborn stump. Otherwise known as magnesium sulfate, Epsom salt will draw moisture out of the wood, which will slowly kill the tree and root system.

    Not only will this successfully kill a living stump, it will also actually improve the soil it’s being removed from, as opposed to the other chemicals you might consider using. It adds magnesium and sulfur to the soil, which are great for plants.

    What You Need

    • 100% Epsom salt
    • electric drill with 1″ spade bit
    • mattock or grub hoe
    • water

    How To Use 

    It’s very simple to apply the Epsom salt to a stump to aid with removal.

    1.  Drill holes all over the top of the stump. Begin drilling 3″ from the perimeter of the stump, and space each hole around 3-4″ apart from each other. Drill as deeply as you can, you’ll want them to be at least 8″ deep.
    2. Pour the Epsom salt in all the holes.
    3. Add enough water to each hole to moisten the Epsom salt. The water will then disperse the salt throughout the cells of the tree, drying them out and, subsequently killing them.
    4. Use your mattock or grub hoe to uncover as much of the root structure as you can.
    5. Pour Epsom salt all over these roots, to prevent nutrients and moisture from being carried to the base of the tree.

    Now, you wait. Depending on the size of the stump, it could take up to a few months to die, in this case, you’ll want to re-apply Epsom salt every three weeks.

    Look for the signs that the stump is dead: dark, brittle wood is a good sign, soft, light wood will need more Epsom salt.

    Hope this is helpful for the removal of any stubborn, well-established stumps on your property.

    If you enjoyed this, you might also like….

    Do You Have What You Need to Hold Down the Fort?

    Natural Healing Secrets You Need to Know…

    Effective Primal Diet Hacks…


  • How to Make Sourdough Without a Recipe (Video)

    How to Make Sourdough Without a Recipe (Video)

    I’m a huge fan of home fermenting and culturing of all kinds. Yogurt, kefir, kombucha, pickled vegetables, and my personal favorite, sourdough bread.

    Sourdough is not just a distinct flavor of bread, it gets its rich, sour flavor from the leavening culture that causes it both to rise, and changes the metabolic structure of the wheat. Sourdough is actually much healthier than breads that are not naturally fermented, because the culturing process actually breaks down the antinutrients that can make wheat difficult to digest. Some people who can’t otherwise eat gluten can still eat sourdough, actually!

    I have made sourdough at home for a few years, but I haven’t ever put a whole lot of time into learning the techniques that would make my homebaked loaves as good as those delicious boules you can get at chic, foodie restaurants and bakeries. My loaves are usually pretty dense, and while they have the delicious flavor of sourdough, they lack the air bubbles and lightness that make professionally baked sourdough loaves so delicious. Also, without those air bubbles to help with the rise and create that light dough, I get small loaves that are gone in a flash.

    There are a lot of very specific recipes out there for sourdough, and many people even recommend measuring your ingredients on a kitchen scale to get the ratio of flour, water, and starter just right. This does make a lot of sense, of course, considering breadmaking is a very specialized science, but it actually doesn’t have to be so complicated.

    So, how can you make delicious sourdough boules right at home, without the stress and headache of measuring ingredients or seeing recipes fail you because they simply don’t work in the climate of your kitchen or with your culture?

    By feel. 

    The thing about sourdough is, not all flour, sourdough starters, or kitchen climates are created equal, and your dough simply might not turn out the way it’s supposed to following an exact recipe.

    This excellent video walks you through the process of making a sourdough loaf without measuring, and by creating a dough that looks and feels a certain way, and how to handle it so it will get those coveted air pockets.

    I don’t know about you but I can’t wait to get my hands in some dough and try this out! Check it out:

    If you enjoyed this, you might also like….

    Do You Have What You Need to Hold Down the Fort?

    Natural Healing Secrets You Need to Know…

    Effective Primal Diet Hacks…

  • 5 Mistakes First-Time Chicken Farmers Make

    5 Mistakes First-Time Chicken Farmers Make

    When it comes to homesteading of all kinds, trial and error is a great way to learn. However, when you’re raising animals like chickens, you probably want to reduce the possible mistakes you can make.

    If you’re considering starting your own chicken flock, you’ll want to do it right. We’ve got a list of five common mistakes people make when they first start keeping chickens to help you avoid making them yourself.

    1. Not protecting against predators

    Like a fox in a hen house, many predators out there, depending on your region, will see your chickens as a delicious, juicy, jackpot. When you set yourself up with a coop or enclosure, make sure you know which animals in your area would like to get their hands (or paws, or claws…you know what I mean) on your chickens, and research which kind of barricade will keep them out the best.

    And be prepared by a threat from land, sky, even underground, in some cases. Hawks, foxes, coyotes, skunks, raccoons, weasels, bobcats, hawks, and even rats and domesticated dogs and cats, will have their eyes on your chickens, so secure accordingly. Having a guard dog that is trained not to harm the chickens themselves can greatly reduce the threat to your chickens, but you’ll also have to be realistic about a bit of trial and error here, as sad as it is. You might have to learn the hard way at some point that a predator might still be able to penetrate your barriers, so when you first start a flock, mentally prepare yourself for the possibility of this. It might cost you a few chickens, but learning the hard way is still learning.

    2. Failing to check local laws 

    Predators aren’t the only creatures that pose a threat to your chicken-raising operation; bureaucrats do too! Before you even begin to think about planning to raise chickens, check your local ordinances first. Not just zoning laws, but local homeowner’s associations as well. This will mostly apply to urban and suburban homesteaders, particularly if you live in some kind of gated community or apartment or condo complex. But even if you own your own home and have a decent-sized yard, there still might be strict regulations regarding the raising of poultry. If you are a homesteader on your own property, this is unlikely to affect you much, but you should check anyway, just to be safe, particularly if you plan on selling your eggs, meat, chicks, or chickens at any point.

    NEVER Buy Laundry Detergent Again>>>

    3. Not preparing for injury or sickness 

    Chickens are creatures like any other and are subject to injury or illness. There are a number of conditions that can affect birds, such as skin conditions on their feet, mites or pocks, thrush, botulism, cholera, and one you’ve probably heard of quite a bit in the news: bird flu.

    Familiarize yourself with common bird conditions, join local forums for chicken farmers so you know what’s in your area, and get yourself a good chicken first aid kit. There are a lot of great natural remedies for less severe conditions, as well as more conventional remedies you can stock up on beforehand to be prepared. You’ll also have to prepare yourself, at least mentally, for the possibility of having to separate a sick or injured bird from the flock; a simple dog or rodent kennel can work great for this but keep in mind that chickens can sometimes attack a sick or injured bird, so you’ll have to read up on re-introducing them to the flock.

    4. Taking on too many chickens

    Just because you have an established flock and a good coop doesn’t necessarily mean you’re equipped to take on new hens a neighbor or friend might be giving away. The size of your coop absolutely has to be appropriate for the number of chickens you have, and two or three extra can create cramped, unpleasant living conditions for all the chickens.

    When you set up a coop, make sure you’ve got enough space for each chicken. 5 sq feet per bird is a standard recommendation, not to mention enough a roost and nesting box for each hen (they only sleep in their nesting boxes when they’re sitting on eggs, otherwise they like to perch). If you want to be equipped for extra hens further down the road, and this is quite prudent if you plan on raising more chickens, set yourself up with a coop that can easily be added to and expanded on.

    5. Starting with chicks

    It’s quite standard to start with chicks when you’re beginning a flock, and many farm supply stores sell freshly hatched chicks, along with feeders, water bottles, and heat lamps to keep them warm. While certainly millions of chickens have been raised just fine like this, if you want to go an easier, cheaper, and more sustainable route, just get hens and a rooster. This might cost more money up front than a few chicks, but you’ll need fewer supplies, and, well, if you get a rooster, your chickens will be making their own chicks, for free, in no times.

    The thing is, hens take care of baby chicks infinitely more efficiently than humans do. All the gadgets people buy to raise up chicks are just meant to imitate what a mama hen will do for them instinctively. For the price of some chicken feed, you’ll get something much better than a heat lamp that’s totally sustainable: a hen to sit on the chicks when they’re cold, and direct them to food and water, not to mention keep track of them all day while you tend to all your other homestead tasks.

    If you let your hens raise up their own chicks, keep in mind you’ll still need to make sure there’s feed small enough for the baby chicks, and a water container they’re able to access, but otherwise, the mama will do the work for you.

    Hope this helps you prepare for chickens and avoid some common mistakes!

    Power Efficiency…This Simple Device Will Change the World Forever>>>


  • North American Butterflies and the Flowers They Love (Infographic)

    North American Butterflies and the Flowers They Love (Infographic)

    When you think of pollination, you probably think of bees, and we’ve posted infographics in the past about how to attract bees to your garden by planting the flowers they love.

    Well, bees aren’t the only insects that help with pollination in the garden, butterflies do too! If you have a garden, small children, or simply enjoy seeing butterflies around your home, you’ll love this infographic.

    It has all 23 North American butterflies, their indicated regions, and the flowers they love. There are some great ideas for flowers to plant here, as well as the sorts of flowers or sap they gravitate towards, which can help one look for them. Pick out some blossoms for the butterflies in your region and see if you can attract them this year!

    Enjoy:

    If you enjoyed this, you might also like….

    Do You Have What You Need to Hold Down the Fort?

    Natural Healing Secrets You Need to Know…

    Effective Primal Diet Hacks…

  • Making Chicken Feed: Pros and Cons (Video)

    Making Chicken Feed: Pros and Cons (Video)

    As with all things DIY, I’ve always assumed that making your own chicken feed would be healthier, and more affordable. However, I’ve been reading that while that can be true, it’s not always the case.

    These homesteaders and YouTubers have been making their own chicken feed, and received a lot of questions about how to do it and how it’s been working out, so they made this video in response. They break down the pros and cons of the method they’re using, how they store it, how they’re chickens like it, and the ingredients of their feed.

    It seems to me these ingredients could end up being more affordable in the long run than store-bought chicken feed, if you can buy the ingredients in bulk at a good price, but I think whether or not you could find the ingredients in bulk. Food and grain prices vary from region to region, so you’re most likely going to have to improvise and see what works for you, your region, and your chickens and needs for them.

    At any rate, I always really enjoy hearing directly from other homesteaders about projects like this, so this was a very informative and useful video overall. Check it out:

    If you enjoyed this, you might also like….

    Do You Have What You Need to Hold Down the Fort?

    Natural Healing Secrets You Need to Know…

    Effective Primal Diet Hacks…

  • Simple Steps to Greater Self-Sufficiency

    Simple Steps to Greater Self-Sufficiency

    The goal of everyone who is interested in homesteading is to become more independent and less reliant on the “machine” that seems to run the lives of most people. Many today have no real idea of where their food comes from or what would happen if they no longer had easy access to electricity. They need the modern conveniences of the world to live. You do not want to be like those people, and you do not have to. The following are some easy things that you can start doing now, and expanding upon later, to help increase your level of self-sufficiency.

    Step #1 – Learn to Grow and Preserve Food

    You can do this whether you have a large plot of land for your homestead or you are still living in the suburbs and waiting to make the change. Start a garden and learn how to grow different types of vegetables and fruit that your family likes to eat. You can start out with a small garden and then expand when you start to learn more. Once it is time to harvest, make sure you are preserving and canning items that you will not be eating right away. Dehydrate some of the food or freeze it, as well. With a large enough garden, you will find that you can have the food you need through much of the year.

    In addition, it is a good idea to start researching the wild plants that grow in your area so you will have a better idea of how to forage if the need should arise.

    Step #2 – Start Collecting Water

    If you are sick and tired of having high water bills, or you worry about your well running dry, it is time that you started to collect water. You can get rain barrels and collect the rain that comes down from the gutters of your home. You could even set up tarps that can funnel the water down into barrels if you would like to collect even more. There are plenty of things you can do with the water that you collect, such as water your plants or wash things down.

    Step #3 – Learn to Reuse and Repurpose Items

    Many people are far too willing to throw away the items that they own when they feel they are no longer useful. However, you will want to start looking at them with a different eye and find ways that you might be able to use them in other capacities. In some cases, you might want to cannibalize parts from an item that you can use in other projects or repair different items.

    Step #4 – Learn to Make Your Own

    Another thing to do is to start learning how to make things on your own. Even if you are not a skilled woodworker, for example, you can start to learn the basics of woodworking now and create much of the furniture that you use in the homestead. You can learn to make your own candles, soap, and much more.

    Starting with these simple steps, you can start to reduce your reliance on others for some of the basic things that our ancestors were doing for themselves. You will feel more confidence, and you will find that many of these things will help you to save some money.

    If you enjoyed this, you might also like….

    Do You Have What You Need to Hold Down the Fort?

    Natural Healing Secrets You Need to Know…

    Effective Primal Diet Hacks…