Page 21 of 81
1 19 20 21 22 23 81
Ethan Archer – Page 21 – Homesteader Depot

Author: Ethan Archer

  • Soaking and Sprouting Times for Seeds (Infographic)

    Soaking and Sprouting Times for Seeds (Infographic)

    I shared an article last week on sprouting alfalfa, and I did mention that you can use many other kinds of seeds and beans as well, using this method.

    It is definitely true that the basic principle of soaking, draining, and sprouting applies to many seeds and beans, they vary, sometimes quite drastically, in ideal soaking time and the amount of days it takes for them to sprout.

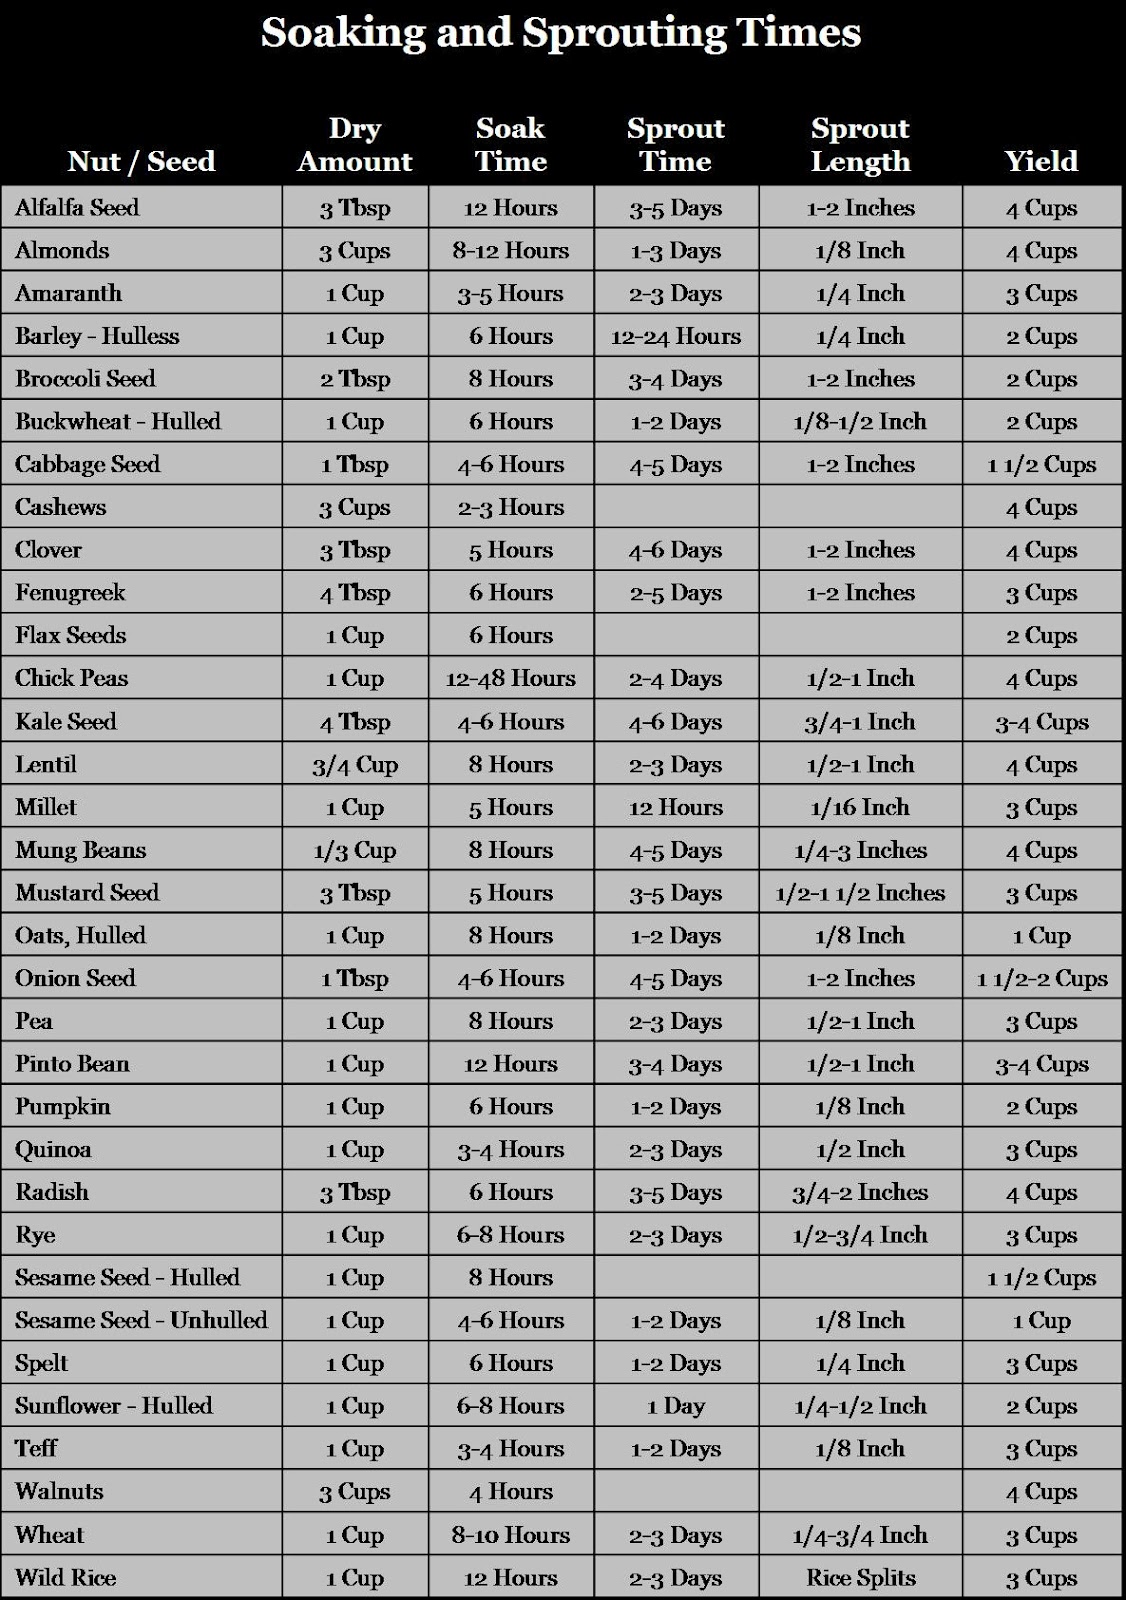
    Here is a great resource from nourishsystem.com for any aspiring sprouters out there. This is a chart that lists many of the popular sprouting seeds, grains, nuts, and beans, and all the information you’ll need to sprout them.

    What is particularly helpful about this chart, that I haven’t seen in other similar infographics, is that it includes the dry amount of seeds you’ll need, and what that will yield in sprouted greens. This is a great resource, so you can measure out exactly what you’d like to use and anticipate how long it will last you once sprouted. I’m definitely keeping this up on my fridge for future sprouting.

    If you enjoyed this, you might also like….

    Can You Defend Your Family When SHTF?

    Natural Healing Secrets You Need to Know…

    Effective Primal Diet Hacks…

  • Tips and Tricks for Starting Seeds

    Tips and Tricks for Starting Seeds

    Winter is on its last legs and it’s time to get ready for this year’s garden! If you’re in a zone with a shorter growing season or just want to stagger your crops for a richer harvest, check out these easy seed starting tricks. We already mentioned the first two in a post on frugal ways to start seeds, so check that post out for a more detailed description of how to do them:

    • Cut and fold paper tubes to use as a biodegradable seedling planter. Use the tubes from toilet paper, paper towels, or wrapping paper.
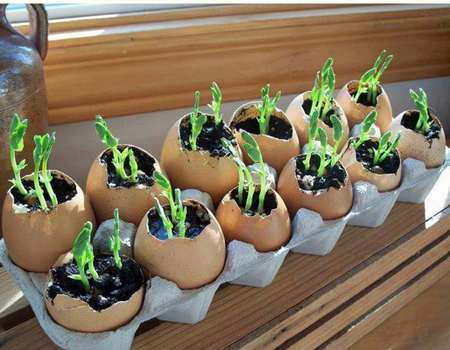
    • Start your seeds in compostable food waste such as egg shells or citrus rinds. Keep in mind the acidity of the soil when choosing one of these no-waste methods.
    • Save on seeds and grow new plants from cuttings. This works with basil, celery, onions, beets, and many more.
    • Place coffee filters in your seed trays and planters before filling with soil. This helps to keep soil from falling through holes in the vessel and makes removing the root ball for transplanting a breeze!
    • Test the germination rate and viability of saved seeds by sprouting them on a wet paper towel. Larger seeds can be soaked overnight, rinsed, and drained. Plant those that sprout immediately!
    • Save popsicle sticks to label seedlings. Unless you want a mystery garden, use these handy little markers!
    • Use spices as a natural antifungal to prevent damping off disease.  Cinnamon, turmeric, clove, and mustard applied at sowing and after every other watering will help your seedlings survive!
    • Give your seedlings a nitrogen boost with old coffee or tea. For acid-loving plants, you can water your plants almost every time with leftover coffee or tea. For other plants, just give them a drink once a month.
    • Thin your seedlings! So many people neglect to do this because it seems counterproductive to kill extra seedlings. Still, plant spacing is extremely important and your plants will be healthier with less competition from crowded neighbors. If you hate waste, simply rinse thinned seedlings and add them to a salad!


    Most of us still have several more weeks before we can get in our gardens for a dirt therapy session. Start seeds indoors to get your gardening fix and get a head start on the season!

  • How to Make Moss Grafitti

    How to Make Moss Grafitti

    Moss Grafitti is a really cool new trend which involves growing moss in certain formations to create words or images. It’s the height of urban-dwelling earth-loving hipster culture, but you can easily do it on your homestead to add some beauty and creativity.

    Maybe you’re looking to give your barn a bit of visual appeal, mark your property line on some trees, or just have fun with a new artistic medium. Painting with moss is a unique and ecologically-sound way to release your inner artist around the homestead.

    Here’s how:

    Choose your spot

    First, choose the appropriate place to grow your grafitti moss. Avoid walls and fences that get more than six hours of direct sun each day. Too much unfiltered sunlight does not make a good environment for moisture-loving moss. Try to choose a spot near a water source. The shallow root system of moss will thrive on almost any surface, but it needs to be porous. Glass, polished stone, and similar surfaces will not work. The best time to create your moss artwork is in the spring or fall.

    Plan and sketch

    Next, use a temporary marker or chalk to sketch your design on your chosen surface. For more intricate designs, plot a guiding grid first.

    Gather your materials

    Next, get together what you need to complete the project:

    • Two handful-size bunches of moss
    • Two cups of buttermilk or yogurt
    • 1/2 teaspoon of sugar
    • 2 cups of water
    • Blender
    • Paintbrush
    • Container for the finished product
    • Corn syrup for thickening the consistency, if needed

    Make Your Paint:

    1. Rinse and remove as much soil from the roots of your moss as possible.
    2. Break it apart into small pieces and add it to the blender.
    3. Add the buttermilk, water, and sugar.
    4. Blend until completely smooth.
    5. Test the consistency with your paintbrush.
    6. If it drips like thin paint, add enough corn syrup to achieve a thicker, viscous consistency.
    7. You want it thin enough to paint with but thick enough not to drip.
    8. Transfer to your container and refrigerate until ready to use.

    Paint! 

    When you are ready to paint your chosen surface, simply paint as you would on a canvas! Use a variety of brushes for broad strokes or fine details. Stencils also work very well. After your “moss-terpiece” takes root and begins to grow, you can trim or remove areas with a knife to shade or lighten the image. You can also spray the moss with lime juice which acts as a natural “Round-Up” on moss.


    Maintain Your Moss

    Remember, your moss medium is a living organism. You want to care for it the way you would a member of your garden. Use a spray bottle to thoroughly mist the moss every other day. In springtime and fall, the moisture in the air should be sufficient and you should only need to mist it once per week.


    Enjoy your new living artwork!

    If you enjoyed this, you might also like….

    Do You Have What You Need to Hold Down the Fort?

    Natural Healing Secrets You Need to Know…

    Effective Primal Diet Hacks…

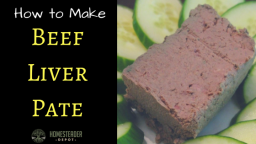
  • Delicious Beef Liver Pate Recipe

    Delicious Beef Liver Pate Recipe

    I recently shared a post on the health benefits of liver, and I did promise I’d post a liver pate recipe.

    Liver pate is a great way to eat liver, it’s super delicious and actually very good for you, at least in moderation, as while it includes lots of healthy fats, it’s still pretty caloric.

    It is a classic example of fattening-but-healthy French food, and liver pate from France has gained a worldwide reputation for its decadent flavor.

    And it’s really not too hard to make at home! I chose a very basic recipe that calls for ingredients you already have, nothing too fancy. It calls for beef liver, but you can use chicken if you like, just skip soaking it in meat. While many recipes you may come across call for cognac, this calls for a simple American bourbon, which I figured most people probably already have at home, but you can of course use the classic cognac as well.

    So, get your wine and crackers ready, and let’s get started!

    Ingredients: 

    • 2 lbs beef liver
    • 3 cups whole milk
    • 2 tablespoons olive oil
    • 3/4 cup butter
    • 1 onion, minced
    • 1 tbs thyme
    • 1/2 cup bourbon
    • 1/2 cup heavy cream
    • 1/2 cup coconut oil
    • salt & pepper

    Directions: 

    1. The night before you’d like to prepare the pate, (which should be two nights before you’d like to eat the pate, as after initial preparation it will have to set overnight in the fridge) soak the beef liver in the milk in the fridge, covered in milk.
    2. In the morning, drain the milk and discard.
    3. Rinse the liver with cool liver, and gently dry with paper towels.
    4. Preheat a skillet or grill, and then rub the liver with oil and sprinkle with salt and pepper.
    5. Place the liver on the grill or in the hot skillet, and cook for about five minutes or so on each side, until it is nice and charred but still slightly pink on the inside.
    6. In a saucepan, melt the butter over low heat.
    7. When melted, add the onions and thyme, and cook until softened.
    8. When softened, add the bourbon carefully. It might ignite for a moment, so proceed onto this step at your own risk! It will most likely die down in a moment.
    9. Cook for a few minutes after reducing the heat slightly.
    10. Roughly chop the cooked liver, then add to a food processor with the butter mixture, as well as the rest of the ingredients.
    11. Puree until smooth.
    12. Pack the pate into jars and cover. Let sit in the fridge overnight.

    The pate will keep for up to four days in the fridge, so I usually just put most of it in the freezer in small ramekins and take one out at a time to enjoy in small portions.

    If you enjoyed this, you might also like….

    Do You Have What You Need to Hold Down the Fort?

    Natural Healing Secrets You Need to Know…

    Effective Primal Diet Hacks…

  • The Simplest Way to Peel Garlic. Period. (Video)

    The Simplest Way to Peel Garlic. Period. (Video)

    Garlic is a homestead kitchen staple, but let’s face it; it’s more than a little tedious to fidget with the papery skin of each individual clove.

    Sure, you could smash your garlic with a knife or a mallet and make a big mess. If you have half an hour or more to spare, you could soften the skins in hot water. If you need to peel enough garlic to season food for an army, or make a hefty portion of a natural remedy like honey-infused garlic, you can shake them into oblivion between two bowls, but that’s more trouble than you really need to go through. And let’s not even get started with the weird, artificial flavor of pre-processed garlic available in the store.

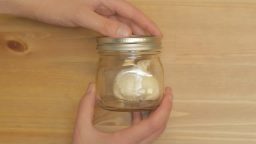
    So what’s the homestead cook to do? I shared a video about the bowl method last year, but this video shows an even easier, ridiculously simple kitchen hack for the home chef in a hurry who won’t settle for less than fresh, pungent garlic. It’s as easy as tossing the head of garlic into a jar, closing it, and shaking the living daylights out of it for less than half a minute. After 20 seconds, tip the jar to pour out your fresh peeled garlic cloves.

    Wasn’t that easy?


    If you enjoyed this, you might also like….

    Are We In The End Times?

    Complete Health Transformation Without Drugs or Surgery…

    Having Trouble Sticking With Paleo?

  • Frugal Ways to Start Seeds

    Frugal Ways to Start Seeds

    It’s almost time for spring planting, are you ready? This is a great time to start your seedlings indoors to transfer to prepped garden beds in a few weeks. However, if you’re not set up with lots of fancy seed trays and want to get started anyway, here are a few frugal hacks for starting seeds indoors.

    Egg shells

    Did you know you can actually start seeds in egg shells? It’s true, and really cool too! All you need to do is save your egg shells, clean them with warm water and soap, and let dry. Collect enough to start some seeds, put some potting soil in each one, and plant 2-3 seeds. Once they’re sprouted, thin back the less hardy seedlings, stick in the ground, and squeeze a bit to break up the egg shell slightly so the roots can poke through. The egg shell with decompose over time, lending great nutrients to the soil as your plant grows!

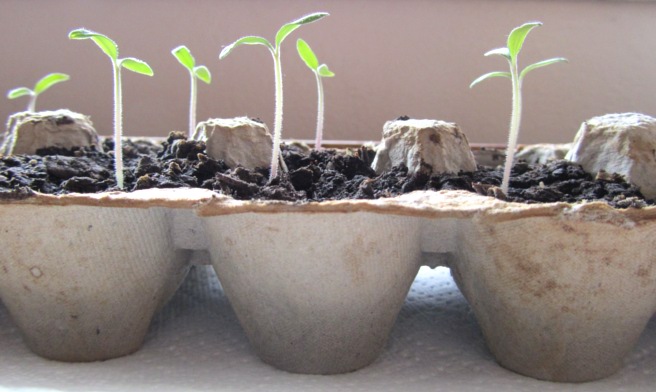
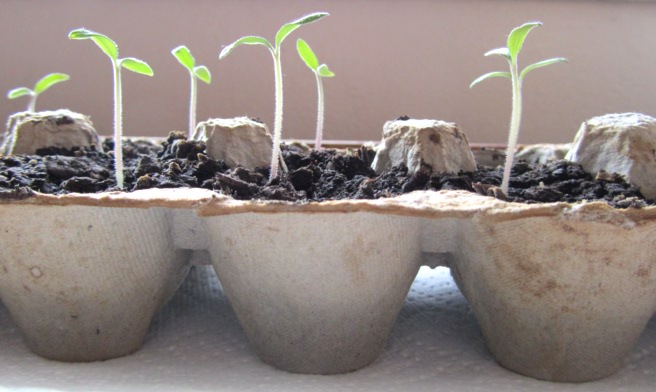
    Egg cartons

    You can skip the egg shell if you don’t have enough and just plant directly in cardboard egg cartons too! Simply fill each compartment with potting soil, and plant directly in it. Once your seedlings are sprouted, just carefully break apart each compartment and plant right in the soil. The cardboard will decompose quickly.

    Toilet Paper Tubes

    You can also start seeds in discarded toilet paper or paper towel tubes! Simply cut in half (for toilet paper tubes) or in fourths (for paper towel tubes), line up on a tray, or wrap in brown packing paper and secure with some twine to secure the bottom. Fill with potting soil, plant your seeds, and transfer to the garden.


    There’s nothing like saving money in the garden, and using materials that will naturally decompose and lend nutrients to the soil. Try one of these frugal seed starting methods to get your garden started off right this year!

    If you enjoyed this, you might also like….

    Are We In The End Times?

    Complete Health Transformation Without Drugs or Surgery…

    Having Trouble Sticking With Paleo?

  • Most Caloric Foods for Long-Term Storage

    Most Caloric Foods for Long-Term Storage

    Whether you’re a homesteader or not, it is always prudent to have a good supply of emergency food for when disaster strikes. And while stocking up on your own canned peaches and tomatoes is definitely great, you want to make sure to have high-calorie foods stored up as well. Fat and protein can be more difficult to store than other foods, but they’re what you need the most to keep your strength up. High-calorie foods are also more efficient, as it takes less food to fill you up, which means more sustenance for less storage space.

    Here are a few ideas for high-calorie foods, rich in protein and/or fat, for your survival stash:

    Nuts

    Nuts are rich in fat, protein, vitamins and minerals, and are a great addition to your long-term food storage. While they can go rancid easily, there are many ways to store them to preserve them for long periods of time, including vacuum canning, which is quick, easy, and mess-free.

    Pemmican 

    Native American staple pemmican is a classic homesteader survival food, made out of dehydrated meat and fruit. Preserving meat for long periods of time can be difficult, even homemade jerky will only last a few months on the shelf, but pemmican can last much longer. It was used by Native Americans to keep their meat through the winter, and early settlers in North America adapted it quickly. It is highly nutritious, often referred to as a “survival superfood”, and you can easily make your own at home.

    Quinoa 

    Quinoa is a great source of both protein and carbohydrates, and keeps very well on the shelf. One serving of quinoa has 16% protein content, so even a small portion will sustain you for a long time. Coupled with the carbohydrates, the protein content of quinoa makes for a great survival food.

    Dried Fruit

    Dried fruit deserves an honorary mention, because while it is not very high in fat or protein, it still has a high amount of concentrated calories in carbohydrates, which are still important macronutrients for long-term survival. Dried fruit like cherries and raisins have about 150 calories per 1/4 cup, which is pretty whopping, and makes them highly efficient to store.

    If you enjoyed this, you might also like….

    Can You Defend Your Family When SHTF?

    Natural Healing Secrets You Need to Know…

    Effective Primal Diet Hacks…

  • More Ways to Profit Off Your Land

    More Ways to Profit Off Your Land

    A few weeks ago, we wrote an article on ways to profit off your land as a homesteader, and we promised there’d be more, so here it is!

    This week’s post on how to profit off your land is all about livestock, dairy, and meat. Being able to raise, consume, and sell your own animal byproducts is one of the biggest appeals of homesteading, and, with the right set-up, experience, and a bit of time, you can conceivably pull quite a profit.

    We already covered eggs, which is a really good start and has relatively low overhead. It’s a great small-scale farming operation, that can bring at least some nice pocket change that will more than offset the cost of feeding and housing your chickens. Here are five ideas for ways to profit off your land by raising and selling animals and/or their byproducts.

    1. Sell Milk

    Raw milk from farm-raised cows is all the rage these days, if you are legally allowed to sell it. A lot of farmers all over the country pull a very nice profit selling fresh raw milk, and it doesn’t take a whole lot to get set up to do it. You can milk by hand or get a commercial milker, just make sure you handle it safely. While in many states it is entirely up to the customer’s discretion if they want to take the “risk” of consuming raw milk, you’ll still want to ensure it is safe, healthy, and clean.

    2. Sell Chickens

    If you have a nice-sized flock of chickens, sell your chicks or extra hens for another source of side cash. A lot of people will be eager to buy hens who have already matured to egg-laying age, or large fryers to eat.

    3. Sell pigs

    Pigs are a very efficient way to raise meat, as they are cheap as piglets, don’t require a lot of space to live, and also mature very quickly. Due to these factors, they’re actually far more cost efficient to raise for meat than cows. You can sell piglets when your sow gives birth, but you’ll make far more money selling fully grown hogs for meat. You can get about $250-300 dollars for one mature hog!

    4. Sell goat cheese

    Goat cheese is a coveted artisan food product, and it’s not too complicated to make. Goats are easy to keep and feed, and can be pretty cost-effective. You can make delicious, fresh, homemade cheese to sell at farmer’s markets and charge a very decent price.

    5. Sell cows

    As opposed to piglets, calves can actually be sold at a very high price. Of course, you typically only get one per cow, you can sell them for $70-$150, and, if you want to keep your cow’s milk all to yourself, this might be a desirable option for you once the calf is big enough to leave her mother.


    These are a few more ideas for ways to profit off your homestead land. Let us know if you’ve got ideas and we’ll feature them on an upcoming post.

    If you enjoyed this, you might also like….
    Are We In The End Times?

    Complete Health Transformation Without Drugs or Surgery…

    Having Trouble Sticking With Paleo?