Page 66 of 81
1 64 65 66 67 68 81
Ethan Archer – Page 66 – Homesteader Depot

Author: Ethan Archer

  • All About Alpacas

    All About Alpacas

    Finances can be a determining factor in the success or failure of your homestead.  Finding a way to make a living on your homestead, or better yet, through your homestead, can have you go from scraping by to rolling in money.  That may sound like an exaggeration, but it’s been done before.  One way is to raise alpacas.
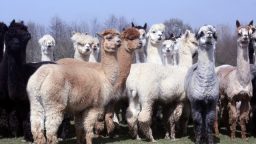
     

    What is an Alpaca?

    Alpacas are basically a half size llama.  But unlike llamas alpacas are not bred to be pack animals, they are bred for their fiber (it is similar to sheep’s wool but softer and contains no lanolin), or for their meat.

    Benefits

    Unlike their larger relatives the llama, alpacas do not have a bad temperament, alpacas are gentle and curious, but do not like to handled excessively.

    They have a rather unique behavior of not leaving manure where they eat the way most grazers like cows or horses do.   This is one reason that they do not require as much area as other grazers, since they do not need to rotate their pasture as often.  This will also cut down on vet bills since they will come in contact with less parasites like intestinal-worms that can be present in feces.

    They can save money on your initial investment by not requiring the same fencing that other grazers like cows do, alpacas can be contained with minimal fencing and will learn their boundaries, and once learned they will not desire to stray from them.

    Unlike sheep, alpacas are highly territorial and will defend themselves and each other from predators like dogs and coyotes.

    Alpacas do not need to be killed to harvest their produce, their fiber is a renewable income earning resource.


    Aplacas will not fit into everyone’s life or onto everyone’s homestead.  But for those who do have a place for them, these animals have brought in a handsome profit.


    If you liked this, you might also enjoy…

    Natural Healing Techniques Doctors Don’t Want You to Know…

    The Weight-Reducing Magic of Yoga…

    The Ultimate Woodworking Course..


  • How to Make Bone Broth (Video)

    How to Make Bone Broth (Video)

    This time of year is perfect for bone broth. It’s finally cool enough to have something cooking in your kitchen for a long period of time, and odds are, if you raise animals and are slaughtering some for the winter, you’ll have lots of extra bones lying around. Bone broth is a great way to use up these bones, and it’s incredibly nutritious as well. As flu and cold season rolls around, you’ll be glad to have a nice supply of hearty,  nutritious broth to help you heal. But it’s healthy on a daily basis too, and you can use as a base for other hearty winter dishes like soups, stews, casseroles and sauces.

    This helpful video details how to make it, it’s quite simple!


    If you liked this, you might also enjoy…

    Learn to Heal and Treat Illnesses Naturally…

    An Ancient Secret to Slimmer Waists…

    Learn to be a Master Carpenter at Home...

  • Winterizing Small Engines

    Winterizing Small Engines

    Tools aren’t cheap, but preventative maintenance is.  Don’t overlook properly winterizing your small engines this year.  If you do, it could mean having to spend hundreds of dollars on repairs next spring.  Instead, follow these easy steps to take care of your tools.


    Clean Them

    Spray off your mower or trimmer with a pressure washer and soapy water.  If you don’t have a pressure washer just use a hose, or what you have available, and a scrub brush.  Make sure you remove all debris.  Spray WD-40 into any tight areas, or areas that you notice any rust.

    Change Oil

    Old oil that is allowed to sit all winter can turn into a corrosive type of sludge that can cause serious damage to your engines.  Perform an oil change according to the owner’s manual for your tool.

    Remove Gas

    Drain the fuel from the tank.  Then start and run the machine until it dies to make sure to remove any excess fuel that is still in the lines and carburetor.  Try to restart it just in case.

    Change Sparkplug

    After the engine has cooled, remove the spark plug.  Prior to installing the new spark plug, pour about a tablespoon of engine oil into the cylinder, then pull the starter cord slowly to turn the engine over a few times allowing the oil to move over the cylinder and pistons.  Then replace the spark plug with a new one and reconnect.

    Make a list

    Now your small engine is safe for storage, but there still might be plenty of work to do prior to using it again next spring.  Now is the time to look over your machines and make a list of any other work that needs to be done that you can take care of during your down time this winter.


    You’ve spent a lot of money on your tools, don’t neglect them now.  If you do, you will might be kicking yourself in the spring!

    If you liked this, you might also enjoy…

    Natural Healing Techniques Doctors Don’t Want You to Know…

    The Weight-Reducing Magic of Yoga…

    The Ultimate Woodworking Course..


  • Storing and Protecting Summer Clothes

    Storing and Protecting Summer Clothes

    Getting ready for the winter doesn’t just require getting out your warm clothes, but also packing up your summer ones.  Depending on where you live, this might mean that your clothes will be packed up for 4 to 5 months.  Improperly storing clothing for that period of time could result in damaged or ruined summer wear by the time it gets warm again.  The biggest threats are typically mold and moths.  Here are a few tips on how to fight these threats and keep your summer clothes safe all winter long.


    Combating Mold

    Nobody wants to wear moldy clothes.  Aside from the way they smell, mold can cause health problems.  The main way to combat mold is to eliminate moisture.  The first and most important thing to do is to get your clothes as dry as possible before storing them away.  Line drying is probably not going to be good enough if you live in a humid area.  If you do not have access to a dryer, bring your clothes in off the line and hang them near your wood stove.  When they are completely dry, let them cool, fold them up, and pack them away in a container that will not allow moisture in.  If you don’t have a sturdy airtight container you can use trash bags.  To help keep the clothing from absorbing moisture, put some dry rice or baking soda in a sachet or an old sock without a mate and store that with your clothes.


    Repelling Moths

    You could use traditional moth balls, but they smell horrible, are toxic, and cost money.  Hopefully, you have some lavender in your herb garden or some cedar chips, if not you can buy some and at least avoid the toxins and the smell of conventional moth balls. As with the rice, put the lavender or cedar chips in a sachet or an old sock and store this with your clothes.  Not only will this keep bugs out, but your clothes will smell fresh instead of toxic when you get them out next year.


    It might seem like a needless time-consuming step right now, when you have plenty of other winter preparations to see too, but taking these steps to properly store your clothing could save you from spending plenty of money next year replacing moth-eaten or moldy clothes that were stored improperly.


    If you liked this, you might also enjoy…

    Natural Healing Techniques Doctors Don’t Want You to Know…

    The Weight-Reducing Magic of Yoga…

    The Ultimate Woodworking Course..

  • Slaughtering Pigs: A Simple Guide

    Slaughtering Pigs: A Simple Guide


    After investing so much time, energy, money, and emotion into raising your pigs you want things to go right when you slaughter them.  If it is your first time slaughtering a pig, a sloppy kill and messing butchering can really turn you off from wanting to raise pigs in the future.  The following are directions and tips on slaughtering and butchering pigs.  Make sure to thoroughly plan things out before you begin, you will not be able to stop half way through and finish it later.


    Clean Kill

    Plain and simple, shot the pig between the eyes.  You do not want to try to bludgeon, or stab an animal that is as large and powerful as a pig.  It could easily only injure the animal, prolonging its suffering and putting you at risk for retaliation.  To get a clean shot, put some tempting feed in a container on the edge of its pen, this will put the pig in one area, holding still, with its head down.

    Cut the Throat

    Cutting the pig’s throat immediately after shooting it will allow it bleed out quickly while the heart is still pumping.

    Clean the Pig

    Get the pig out of the pen and hose it off so that you are working with a pig covered in mud and manure.  Pay close attention to the feet, they are the dirtiest part.

    Raise it

    If you have the ability to get the pig off the ground it will keep things cleaner and easier, though it can be done on the ground if you have to.  Cut into the pig’s legs behind the hoof so that you can pass the knife behind the tendon, leaving the tendon intact.  Pass a rope or chain through the holes and wench the animal to a height that is comfortable for you to work at.

    Remove Skin and Hair

    If you can dunk the whole pig, or half at a time, in hot water, the job will be easier.  But you can get it done just by pouring pots of boiling water on one area at a time.  You can use a specified tool, a “hog scraper”, or just a sharp knife or razor to scrap the hair and outer skin off the animal.

    Remove the Head and Innards

    Unless your pig is still small and you are going to roast it whole, now is when you will want to remove the head.  Then, make your cut to open the pig up.  Start just in front of the anus on the belly side, and go down to the sternum, starting shallow.  If you can open the belly up slowly and then cut around the anus carefully so as not to open the intestines, push the anus through the hole and out the hole in the belly, then remove the intestines and all innards.


    At this point you can cut the pig in half with a bone saw, dividing the pig left and right.  Or if the pig is smaller and you have room, you can store the pig whole and butcher it to your preference later.  It’s not for those with a weak stomach.  Before raising a pig, carefully and honestly consider if you are going to be willing and able to process that pig into meat.  If not, raising pigs just isn’t for you.

    If you liked this, you might also enjoy…

    Natural Healing Techniques Doctors Don’t Want You to Know…

    The Weight-Reducing Magic of Yoga…

    The Ultimate Woodworking Course..

  • Getting the Homestead Ready for the Winter

    Getting the Homestead Ready for the Winter

    Days are getting shorter and nights are getting colder. Are you and your homestead ready for the changing season? Here are a few tips on getting ready for the winter so that you don’t get caught out in the cold.

    Preparing the Home
    The first preparation should be firewood. If you don’t already have a nice big pile of wood cut and dry, then you are going to go buy a cord of wood or have it delivered. Locate gaps and cracks that will cause drafts, fill them with caulk or foam to help insulate your home. If your home is large your fuel demands are going to be high, to help conserve your fuel close off unnecessary rooms to concentrate the heat. Give it a good cleaning and out the mouse traps because your home is about to look much more inviting than it did in the summer.
    Preparing the Garden
    As your crops finish up, prepare each bed that is done for the winter. Add compost and a thick layer of mulch to insulate the ground and provide food for the organisms that keep your soil healthy. Take some compost and soil inside where it won’t freeze if you plan on doing some indoor early spring planting.
    Preparing Animals
    Make sure that your animals have a warm place to sleep. If it snows in area, make sure that the structure will stand up to a layer of snow on the roof. If you have pigs, or chickens that are older and unproductive layers, now is a good time to start butchering them since it will save you feed costs and the meat will be easier to process in the cold weather. Make sure they have lots of straw on the ground, and consider leaving in their manure since the decomposition will give off heat.

    Winter is inevitable, and it’s not too far off. Prepare now so that you can enjoy it instead of suffering through it.

    If you liked this, you might also enjoy…

    Learn to Heal and Treat Illnesses Naturally…

    An Ancient Secret to Slimmer Waists…

    Learn to be a Master Carpenter at Home...

  • Safe Homemade Weed Killer (Video)

    Safe Homemade Weed Killer (Video)

    If you are homesteading and have not heard about the dangers of using chemical herbicides like Round Up, then you have probably been living under a rock.  For everyone else, controlling weeds with natural methods can be time consuming and energy intense.  Aside from mulching your garden heavily, what can you do?  Here is a short video of a recipe for homemade weed killer, it even shows some of the results at the end.


    If you liked this, you might also enjoy…

    Natural Healing Techniques Doctors Don’t Want You to Know…

    The Weight-Reducing Magic of Yoga…

    The Ultimate Woodworking Course..

  • Preserving Meat with Salt

    Preserving Meat with Salt

    Whether your homestead is off-grid, you don’t have enough room in your freezer, or you want meat that could last when power is interrupted, salting is a great time-tested option.  In this article, we will discuss dry salting.  The process works by using the salt to draw out the moisture from the meat and any potentially harmful bacteria until microbial growth is prohibited.  It is basically chemically induced dehydration.  There is always a risk of food poisoning when one is consuming meat that is moths, or even a year old, get properly prepared and use caution when salting your meat so that you can benefit from a method of food preservation that has helped keep people alive for thousands of years.


    Getting Started

    To get started you will need containers, preferably ceramic or glass, that will be able to hold all the meat that you want to preserve and have room left to accommodate the salt.  You will also need to locate a place to store the meat while it is curing.  Ideally, you are looking for an area that is dry and that will remain above 32 degrees Fahrenheit and below 40 degrees Fahrenheit.

    Prepping the Meat

    Cut the meat into pieces, the smaller the pieces are the more surface area of meat will be exposed to the salt, and therefore the quicker the curing.  Most sources will tell you that 1 ounce of salt will cure up to 25 pounds of meat.  But salt is not expensive and food poisoning is deadly so I would error on the side of caution.  Put a thin layer of salt on the bottom of your container, start adding meat that you have rubbed with salt to the container leaving a thin gap on the sides of the container and in between each piece of meat, fill in the gaps with more salt, put a thin layer of salt on top and cover with a cheese cloth.  Store this in a cool dry location.  The curing should be done in a month.

    Checking on the Meat

    Check on the meat periodically.  If the meat still contained a lot of blood, or if moisture got in the area you are storing the meat, the salt may become so moist that it cannot sufficiently dehydrate the meat.  If this occurs, simply remove the meat, clean the container, and repack it with fresh salt.  After the curing is successfully completed you can remove the meat and wrap it in moisture-proof paper or plastic and can store at room temperature.


    Dry salting can keep meat for months, this could be what you need to get you through the winter or a disaster that leaves you without power.


    If you liked this, you might also enjoy…

    Natural Healing Techniques Doctors Don’t Want You to Know…

    The Weight-Reducing Magic of Yoga…

    The Ultimate Woodworking Course..