Tag: butter

  • How to Can Butter (Yes, Really!)

    How to Can Butter (Yes, Really!)

    Lately, butter has come raging back as nutritionists reveal it’s actually quite healthy for you. For a few decades, butter was demonized as too fattening and unhealthy, but as vegetable-oil based alternatives were introduced, we saw obesity rates skyrocket. Not sure why no one ever noticed the correlation, but it turns out that in fact, the saturated fats that come from butter are not only better for you, they can ultimately help lose weight when coupled with a balanced diet full of “good” fats, and free of processed foods and sugars.

    I personally love butter, and was really excited to discover that you could, in fact, can it. How cool is that? Not only do you get to enjoy all the deliciously fatty butter you want, (goodbye, margarine!) you can also preserve it at room temperature for your survival or homestead pantry! I’m sold.

    So, here’s how you do it.

    First, you will need: 

    • Butter (you will need roughly 3 jars for each lb of butter)
    • 8-oz canning jars
    • Lids
    • Water bath canning kit
    • Ladle 
    • Canning funnel 

    Directions: 

    1. First, heat your jars up in a 250 degree oven for 20 minutes.
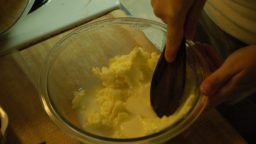
    2. Next, melt your butter in a saucepan over low heat. If you’re using a lot of butter, you might want to do this in batches.
    3. Stir gently to prevent burning, and let the butter melt and simmer a bit until there is a white foam at the top.
    4. As you’re doing this, place your lids in another pot over the stove, cover with water, and bring to a boil. Turn the heat to low to keep them warm while you work.
    5. Once the butter is melted and has a foam lip, ladle it into your jars, using your canning funnel. Leave 3/4″ head space at the top.
    6. Once the butter is poured into the jars, prepared your water bath.
    7. Wipe the jars off with a clean, damp rag to remove any butter that may have spilled on them. They won’t seal if they’re greasy!
    8. Place the lids and rings on the jar, and tighten loosely.
    9. Once the water in your water bath is warm, put the jars in. They need to be in at least 1″ of water.
    10. Once the water boils, set a timer for 10 minutes. When 10 minutes is up, let cool for another 10 minutes.
    11. Now, remove from the bath and place on a towel to dry. As you clean up, try to remember to shake the jars every few minutes, so the butter will remain a uniform consistency.
    12. Once it is cool, it’s ready to store! Keep in a cool, dark place, and enjoy!

    If you enjoyed this, you might also like….

    Are We In The End Times?

    Complete Health Transformation Without Drugs or Surgery…

    Having Trouble Sticking With Paleo?

  • How to Make Your Own Butter

    How to Make Your Own Butter

    You don’t have to have your own cow to make butter at home, although of course it helps. There’s nothing like fresh, homemade butter from your own dairy cow to make you feel like the ultimate self-reliant homesteader. But even urban homesteaders can easily whip (literally) up their own batch of delicious homemade butter with raw milk from a farmer or even cream from the store.

    The ingredients and process are simple: cream + agitation + time = butter. The process of making butter basically involves agitating the cream long enough to separate the fat from what will become buttermilk (so you’re really getting two dairy products out of this) into delicious creamy butter. You mostly just need patience and maybe a little practice, but with today’s modern kitchen gadgets, it’s pretty simple compared to spending hours in the barn with an old-fashioned butter churner!

    She doesn't look too happy!
    She doesn’t look too happy!

    What you need

    • Cream, either from the top of fresh, raw cow’s milk or purchased at the store. If it is store-bought, make sure it is organic, preferably grass-fed and never ultra-pasteurized
    • 1 tbs buttermilk, either from the store or left over from a previous batch of butter
    • A stand mixer, food processor or blender

    What you do

    1. If using fresh milk separate the cream from the milk. It will usually be right on the top if the milk has been resting and you can spoon it off. You’d ideally like to have a cup or so, but use what you can get!
    2. Combine the buttermilk with and cream in a container you can seal and leave on the counter for eight hours. This will culture the cream, which allows the bacteria to convert the sugars in the milk into lactic acid.
    3. After 8 hours, you’re ready to churn! Put the mixture in your blender, stand mixer or food processor, and mix on low.
    4. This will take some time, but the cream will slowly start to get lumpier until eventually, it’s completely separated from the buttermilk until it looks distinctly like clumps of butter floating in milk. You should be able to take the butter out and loosely pack into a form (which might not happen until after the next step). Strain the buttermilk off the butter and continue to try to gather it into a ball.
    5. Finally, rinse the butter in water, kneading and forming as you go. After a few minutes, you should have a nice, smooth ball of butter. You can now salt as desired or even add herbs or garlic!
    6. Keep the butter and buttermilk in the fridge for up to a week, or if you plan to keep either for longer, in the freezer.

    This is the most popular sous vide cooker on amazon

    Build ANY Shed with no woodworking experience!

    Check Out These Competition BBQ Secrets