Like so many food products we take for granted, sour cream can be naturally fermented at home! Most of us think of sour cream as a slightly decadent topping for baked potatoes or beef stroganoff, but it doesn’t have to come in a plastic tub from the supermarket.
With some good quality cream, some time, and an adventurous spirit, you too can make delicious, homemade, naturally fermented sour cream right at home! Culturing experts Cultures for Health share in this short and easy-to-follow video how:
We’ve covered a lot about culturing in the past, and kombucha tea absolutely needs to be mentioned. It is one of the easiest home cultures to make and a great place to start if you’d like to get started with culturing.
Kombucha is created using a fermentation process, it contains a large number of healthy bacteria known as probiotics. These bacteria strengthen your digestive tract and support your immune system, as they absorb nutrients, fight infection, and illness.
Your digestive system is the second largest part of your neurological system and with 80 percent of your immune system located in your gut, it’s no surprise that the gut is considered your second brain.
Kombucha can help maintain peak immune health, which also has an impressive number of benefits for your overall health.
Avoiding health issues on a homestead is imperative to survival, you may be miles and miles away from your nearest doctor.
In this great video from Cultures for Health, you’ll see the very basic, bare bones process for making kombucha at home. Enjoy!
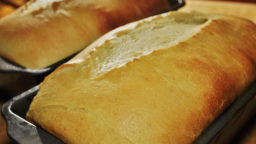
I’m a huge fan of home fermenting and culturing of all kinds. Yogurt, kefir, kombucha, pickled vegetables, and my personal favorite, sourdough bread.
Sourdough is not just a distinct flavor of bread, it gets its rich, sour flavor from the leavening culture that causes it both to rise, and changes the metabolic structure of the wheat. Sourdough is actually much healthier than breads that are not naturally fermented, because the culturing process actually breaks down the antinutrients that can make wheat difficult to digest. Some people who can’t otherwise eat gluten can still eat sourdough, actually!
I have made sourdough at home for a few years, but I haven’t ever put a whole lot of time into learning the techniques that would make my homebaked loaves as good as those delicious boules you can get at chic, foodie restaurants and bakeries. My loaves are usually pretty dense, and while they have the delicious flavor of sourdough, they lack the air bubbles and lightness that make professionally baked sourdough loaves so delicious. Also, without those air bubbles to help with the rise and create that light dough, I get small loaves that are gone in a flash.
There are a lot of very specific recipes out there for sourdough, and many people even recommend measuring your ingredients on a kitchen scale to get the ratio of flour, water, and starter just right. This does make a lot of sense, of course, considering breadmaking is a very specialized science, but it actually doesn’t have to be so complicated.
So, how can you make delicious sourdough boules right at home, without the stress and headache of measuring ingredients or seeing recipes fail you because they simply don’t work in the climate of your kitchen or with your culture?
By feel.
The thing about sourdough is, not all flour, sourdough starters, or kitchen climates are created equal, and your dough simply might not turn out the way it’s supposed to following an exact recipe.
This excellent video walks you through the process of making a sourdough loaf without measuring, and by creating a dough that looks and feels a certain way, and how to handle it so it will get those coveted air pockets.
I don’t know about you but I can’t wait to get my hands in some dough and try this out! Check it out:
Kombucha is basically a mushroom that grows in caffeinated tea. Its origin is unclear, but it has been consumed all over the world for hundreds of years at least. Kombucha has become folk medicine, with claims that it can treat anything from cancer to diabetes. While its specific benefits are largely unproven, it is known that fermented foods do offer a wide variety of health benefits especially for digestive issues. What is undisputed about kombucha is that buying it from Whole Foods is not healthy for your budget. The good news is that you only need to do it once to easily brew your own kombucha at home, again and again. Here’s how…
You will need:
1 bottle of kombucha from the store
1 quart canning jar
1 gallon glass container with a spigot
8 bags of black tea
2 cups of white sugar
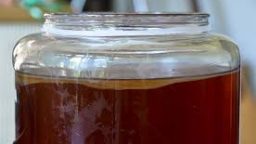
First start by growing your SCOBY. SCOBY stands for symbiotic colony of bacteria and yeast. To get one simply pour a bottle of kombucha into a quart canning jar (you might want to take a sip first if you haven’t tried kombucha so you know what yours should taste like when it’s finished). Then cover the jar with a cheese cloth or two, or a paper towel, use a rubber band to make sure it is held tight to the top. Put it in an area that it will not get direct light and will remain at room temperature. Let this sit for about a week, you should notice a firm film develop on the surface, this is your SCOBY.
Second, brew your black tea. Stir in the sugar while it is still hot and then let it sit until it has reached room temperature.
Third, pour your room temperature tea and sugar into your clean gallon container with a spigot. Then, gently pour your SCOBY into the tea being careful not to tear it. Pour the whole contents of the SCOBY jar into the gallon container. The extra liquid will help prevent other bacteria from colonizing and ruining your brew. Cover with a cheese cloth and put in a dark room temperature area just like your SCOBY.
Finally, let this mixture sit for 1 week. At this point you should see a new, larger SCOBY growing on the surface. You can taste test your brew now. If it tastes like your original kombucha but not quite as strong, you can let it sit another week. If after 2 weeks it does not taste like kombucha, then something went wrong. To improve your luck next time, try to ensure that your containers are very clean, make sure that they are covered in a way that prevents contamination, make your tea a little stronger, add a little more sugar, and try adding some apple cider vinegar into the mix with you pour your SCOBY into the tea.
Next time, you can reuse your full-size SCOBY by just adding room temperature tea and sugar to your gallon container, or by carefully transferring it to another container.
Even if you don’t receive all of the disputed health benefits, at least you will be saving tons of money compared to buying your kombucha from the store.
Sourdough starters can be purchased online or you might even have a friend or relative who’s already making them who’d be willing to share. They’re easy to pass around, and you can use just a small amount to grow as much as you want! That’s the beauty of sourdough.
To grow your own, you don’t need anything more than flour, water, and time. Let’s begin!
What you need:
a mason jar or similar sized glass or plastic container, no metal
measuring cups and spoons
plastic wrap
flour (at least a pound to be safe)
What you do:
Combine 3/4 cup of water with 3/4 cup + 2 tbs flour and stir vigorously in your container. Once bubbles are formed and you have a nice, thick, evenly combined batter, cover with plastic wrap and set on your counter. It will need to be placed somewhere that is warm, at least 70 degrees F, where it won’t be disturbed.
Over the next 24 hours, bubbles should start to appear. During this period, stir the mixture occasionally to attract more yeast and air into the starter. The bubbles mean the yeast is becoming active and alive, that’s what you want!
On the third day, its time to feed the yeast! Add another 3/4 cup flour and 3/4 cup water and stir vigorously, then cover and let sit once again.
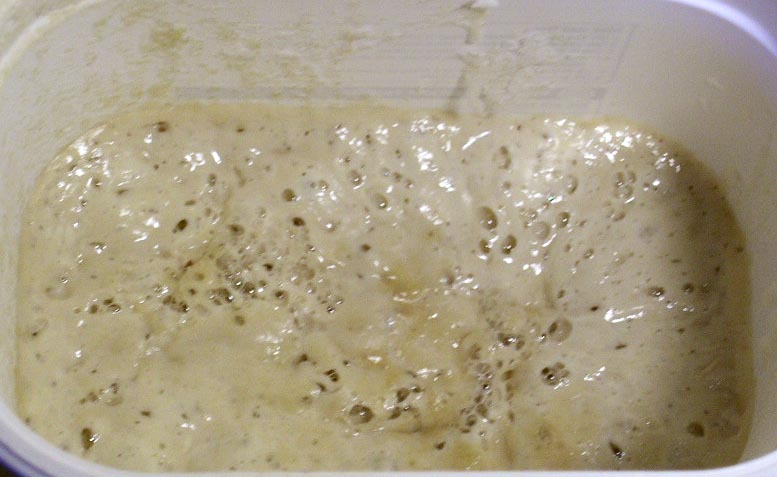
On the fourth day, your starter should be noticeably bubbly and have doubled in size. You will also notice that very distinct sour smell that is signature to sourdough. It is active when it is light with many big bubbles, like
in the photo.
If your starter is not this active yet-don’t worry! Just keep feeding it, it might just need another day or so. Every climate and local yeast available is going to be different.
If your starter is ready-you can use it! Take about half out and use in a sourdough recipe of choice. Just make sure to add the same amount of flour and water back to your starter. Let it become active again, and either continue to reuse, or put it in the fridge to be “dormant”. Just make sure that if you do want to do this, that it is active before adding it to the fridge, and also don’t put an airtight top on it-or it might explode! You can put a sealed top on it after a few days, but let it breathe at first.
And your done! What’s your favorite sourdough recipe?


 very distinct sour smell that is signature to sourdough. It is active when it is light with many big bubbles, like