Like so many food products we take for granted, sour cream can be naturally fermented at home! Most of us think of sour cream as a slightly decadent topping for baked potatoes or beef stroganoff, but it doesn’t have to come in a plastic tub from the supermarket.
With some good quality cream, some time, and an adventurous spirit, you too can make delicious, homemade, naturally fermented sour cream right at home! Culturing experts Cultures for Health share in this short and easy-to-follow video how:
I’m a huge fan of home fermenting and culturing of all kinds. Yogurt, kefir, kombucha, pickled vegetables, and my personal favorite, sourdough bread.
Sourdough is not just a distinct flavor of bread, it gets its rich, sour flavor from the leavening culture that causes it both to rise, and changes the metabolic structure of the wheat. Sourdough is actually much healthier than breads that are not naturally fermented, because the culturing process actually breaks down the antinutrients that can make wheat difficult to digest. Some people who can’t otherwise eat gluten can still eat sourdough, actually!
I have made sourdough at home for a few years, but I haven’t ever put a whole lot of time into learning the techniques that would make my homebaked loaves as good as those delicious boules you can get at chic, foodie restaurants and bakeries. My loaves are usually pretty dense, and while they have the delicious flavor of sourdough, they lack the air bubbles and lightness that make professionally baked sourdough loaves so delicious. Also, without those air bubbles to help with the rise and create that light dough, I get small loaves that are gone in a flash.
There are a lot of very specific recipes out there for sourdough, and many people even recommend measuring your ingredients on a kitchen scale to get the ratio of flour, water, and starter just right. This does make a lot of sense, of course, considering breadmaking is a very specialized science, but it actually doesn’t have to be so complicated.
So, how can you make delicious sourdough boules right at home, without the stress and headache of measuring ingredients or seeing recipes fail you because they simply don’t work in the climate of your kitchen or with your culture?
By feel.
The thing about sourdough is, not all flour, sourdough starters, or kitchen climates are created equal, and your dough simply might not turn out the way it’s supposed to following an exact recipe.
This excellent video walks you through the process of making a sourdough loaf without measuring, and by creating a dough that looks and feels a certain way, and how to handle it so it will get those coveted air pockets.
I don’t know about you but I can’t wait to get my hands in some dough and try this out! Check it out:
Winter’s coming up, and on top of being cold, it can be boring! You’re stuck inside, there aren’t many chores to take care of, things to do or fun to have. With lots of free indoor time during winter, it’s a great time to try your hand at brewing some mead! It’s lots of fun to drink as well. If you’re a fan of fermenting already or simply would like to give brewing a try, it’s a great fermenting project for winter time.
Why Brew Mead?
If you’ve never heard of mead, it is essentially wine brewed with honey instead of grapes. Sounds good, right? Other than the great taste and the buzz, there are actually health benefits to drinking mead! Drinking it responsibly and in moderation, anyway. Honey already has antibacterial properties, but after being fermented, mead can help fight off pathogens even more than honey.
What You Need
Other than standard kitchen items, some water, and the honey, you will also need at least one carboy, a “s” shaped bubbling carboy airlock, a lemon, and some yeast.
Pure, filtered water
Honey
At least one carboy
an “s” shaped bubbling carboy airlock
a lemon
yeast (you can use brewer’s yeast, wine yeast, and although it won’t taste quite as good, you can also use regular baking yeast)
How to Brew Mead
Note: The amount of honey, water, and yeast you use will depend upon the size of carboy that you have and the strength you desire. If you don’t want it to be too strong, or too weak. 3 pints of honey per gallon is a good ballpark.
Sanitize your materials so that you do not contaminate your brew with outside yeast or bacteria.
In a saucepan, heat your honey over a low flame, adding a little water if you need to, until it becomes viscous. Be careful not to boil the honey.
Fill your carboy about half way up with the filtered water
Funnel your viscous honey into the carboy, leaving a few inches of room at the top.
Juice the lemon and strain off all the pulp. Then, add the juice to the carboy.
Add your yeast of choice
Cork the carboy with your airlock. Fill it with water according to the manufacturer’s directions.
Now, comes the fermenting. Store the carboy in a cool dark area that won’t freeze for about a month. Check the airlock regularly. If it is not bubbling anymore, then the fermentation is done.
If you are planning on bottling your mead, you might want to open the carboy, stir the mead, and recap it with the airlock so make sure the fermentation is over. If it is not, disturbing it while bottling may reactivate it by providing additional oxygen, and it will continue to produce carbon dioxide and could burst your bottles. Otherwise, you can transfer it to another clean carboy and cork it for storage. It can be consumed immediately, but the taste will improve if you let it sit for another month or so. But it can spoil so don’t wait too long!
Drink to your health this winter with some homemade mead! Enjoy!
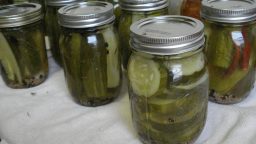
Do you and your family love the taste of fresh crunchy pickles? If you do, and you are a homesteader, you have probably been trying to make your own pickles. It is not a difficult process, but you might’ve found that pickles you’ve made don’t quite have the same snap and crunch that you really like. Fortunately, you don’t have to live with soggy, bendy pickles for much longer. Just use the tips that follow and you will find that your pickles will have a much more significant crunch.
One of the first things you want to do is make sure you’re using the freshest cucumbers possible. When you go to the grocery store to buy cucumbers or, even better since you are a homesteader, go out to the garden and pick the cucumbers, you want to use them right away. The fresher the better, as this will typically mean the texture is going to be crisper.
Another good tip is to cut off the blossom end of the cucumbers. This is one of the best ways to make sure the cucumbers are nice and crisp. The reason for this is because this area of the cucumber has microbes that can cause the pickles to become soft. Also, make sure that you do not keep the pickles in the canning pot for too long. Be aware of what the timer says when you are making the pickles and take them off right away. Otherwise, the additional heat has the potential to soften the texture. Just make sure they have enough heat to kill any bacteria that may be on the vegetables.
Now that you have a few more tips on your belt for making pickles, get out there grab some cucumbers so you can start making the best pickles of your pickling career!