Tag: food processing

  • The Easy Way to Make Milk Kefir

    The Easy Way to Make Milk Kefir

    Kefir is a cultured dairy product made from milk which turns out similar in flavor to yogurt but with a thinner, drinkable consistency. Because of the culturing process, kefir is packed with beneficial bacteria and yeasts. To make kefir, you will need the starter culture (called “grains), which can be purchased online.


    Directions:

    1. Add a heaping tablespoon of kefir grains to a quart-sized glass jar and fill it up with milk. You can almost any type of dairy milk- cow, goat, pasteurized, unpasteurized, full fat, skim. If you wish to make more or less than a quart at a time, simply add grains in a 1 tablespoon-to-1 quart ratio.
    2. Loosely cover the jar and let sit on your kitchen counter 2-3 days. Shake or stir once a day or more (not mandatory, but helpful). Use an untightened mason jar lid and band, plastic lid, or cheesecloth secured with a rubber band (preferred).
    3. After a day or two (depending on the temperature in your kitchen), you should notice the milk starting to pull away from the walls of the jar with an almost gel-like consistency. Your kefir is ready to strain!
    4. With a slotted wooden spoon, sift the kefir grains from the top of the finished kefir. Once strained, your kefir is ready to use or refrigerate! Transfer the grains to a new jar, fill with fresh milk, and start a new batch! If you’re not re


    As you make more batches of kefir, your grains will reproduce and grow, much like any starter culture. If you find yourself overrun with grains, you can give some away to friends, feed them to livestock, or compost them!

    If you need a break from making kefir, just cover your sifted grains with milk, cover and label the jar, and place it in the fridge. Replace with fresh milk every week of “hibernation” to keep the grains alive, and use fresh milk again when you’re ready to make a new batch.


    Kefir is a delicious, healthful alternative to plain milk and can be enjoyed plain, blended into a smoothie, or in any recipe that calls for milk!

    If you enjoyed this, you might also like….

    Can You Defend Your Family When SHTF?

    Natural Healing Secrets You Need to Know…

    Effective Primal Diet Hacks…

  • How (And Why) To Cure Potatoes Before Storing Them

    How (And Why) To Cure Potatoes Before Storing Them

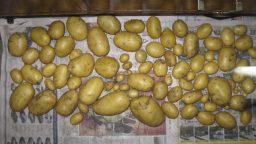
    Potatoes are such a great garden crop, if you can manage to grow them. They can keep for months throughout the winter, and are a great source of nutrients and calories. While they keep well in a dark, cool area like a root cellar or even a garage, there is a very important step you must take before storage: curing. 

    What is curing? 

    Curing potatoes is essentially letting them dry out before storing away. There are several advantages to curing:

    • All wet spots dry out that might otherwise contribute to rot
    • The skins will harden, allowing the potatoes to keep for much longer
    • Damaged spots of the potatoes can heal
    • You get a chance to inspect all of your potatoes and sort out the bad ones
    • You can sort by size and type, if desired

    How to cure potatoes

    It’s really very simple to cure potatoes, if you follow a few easy guidelines. The process is pretty simple, to start, you want to spread all your potatoes out on a surface, ideally covered with newspaper or torn up paper bags, and let sit for about 10 days or so.

    Air flow is the number one factor when choosing where and how to cure your potatoes. You want the potatoes to get plenty of air flow between each of them so spread them out, and you also want to be doing this in a well-ventilated area. In a well-ventilated garage or basement with a small fan, for example, might be ideal, but of course, since this might take up a lot of room you might have to improvise.

    Keep it dark: the darker this area, the better. You will of course have to turn on the light to check your potatoes from time to time and this won’t hurt, but don’t set up in an area that has a lot of windows and regular, 12-hour daylight. Light will ruin your potatoes.

    Keep it cold, as cooler temperatures, below 60 degrees, will keep the potatoes fresh and move along the curing process.

    Once your potatoes are all dried out, and this might involve inspecting them pretty carefully, they’re ready to store! There are multiple ways to store potatoes (which we might have to cover at some point in the future!) but the same rules for curing apply: somewhere dark, cool, and with decent airflow. If your curing was successful, they’ll keep for months!

    If you enjoyed this, you might also like….
    Home Defense in the End Times…

    Natural Healing Secrets You Need to Know…

    Eat Like Your Ancestors…

  • Overnight Oats-5 Different Ways (Video)

    Overnight Oats-5 Different Ways (Video)

    I absolutely love overnight oats. They’re such a great, healthy way to have a quick, easy breakfast waiting for you in the morning.

    Overnight oats are a staple in Europe, they typically use muesli and let it sit in yogurt and/or milk overnight. Not only does the yogurt really draw out a delicious flavor in the oats, because it is acidic, it also breaks down the “antinutrients” in the grains, making them easier to digest.

    Grains are not inherently bad for you, they just typically need to have these antinutrients broken down using methods such as soaking, sprouting, or souring. Before modern industrial forms of harvesting and processing grains, one of these three steps was usually a normal part of the pre-industrial processing, so this might be one reason we have so much gluten intolerance and autoimmune disorders today! I personally find that I feel much healthier when I avoid grains for the most part, but since I am such a big fan of grains in general, I love to find healthier ways to eat them that make them easier to digest, like sourdough bread or, of course, overnight oats!

    Oats are already naturally gluten-free, but if you are gluten intolerant, make sure to choose a brand that is labeled gluten free. Oats are commonly processed on the same equipment as wheat so unless otherwise indicated, they can contain trace bits of gluten.

    This video features five delicious and creative ways to prepare overnight oats that seriously made me drool. But it’s also a great demonstration of just how creative you can get! You can use just plain oats and yogurt, or add in any number of the ingredients she recommends. Odds are you have some kind of dried or fresh fruit, nuts, etc. in your fridge or pantry that would be delicious in overnight oats. Enjoy!

    If you liked this, you might also enjoy…

    Holistic Medicine Basics

    Ever Considered Taking Yoga? Read this

    The Ultimate Woodworking Course..

  • How to Make Bone Broth (Video)

    How to Make Bone Broth (Video)

    This time of year is perfect for bone broth. It’s finally cool enough to have something cooking in your kitchen for a long period of time, and odds are, if you raise animals and are slaughtering some for the winter, you’ll have lots of extra bones lying around. Bone broth is a great way to use up these bones, and it’s incredibly nutritious as well. As flu and cold season rolls around, you’ll be glad to have a nice supply of hearty,  nutritious broth to help you heal. But it’s healthy on a daily basis too, and you can use as a base for other hearty winter dishes like soups, stews, casseroles and sauces.

    This helpful video details how to make it, it’s quite simple!


    If you liked this, you might also enjoy…

    Learn to Heal and Treat Illnesses Naturally…

    An Ancient Secret to Slimmer Waists…

    Learn to be a Master Carpenter at Home...

  • Slaughtering Pigs: A Simple Guide

    Slaughtering Pigs: A Simple Guide


    After investing so much time, energy, money, and emotion into raising your pigs you want things to go right when you slaughter them.  If it is your first time slaughtering a pig, a sloppy kill and messing butchering can really turn you off from wanting to raise pigs in the future.  The following are directions and tips on slaughtering and butchering pigs.  Make sure to thoroughly plan things out before you begin, you will not be able to stop half way through and finish it later.


    Clean Kill

    Plain and simple, shot the pig between the eyes.  You do not want to try to bludgeon, or stab an animal that is as large and powerful as a pig.  It could easily only injure the animal, prolonging its suffering and putting you at risk for retaliation.  To get a clean shot, put some tempting feed in a container on the edge of its pen, this will put the pig in one area, holding still, with its head down.

    Cut the Throat

    Cutting the pig’s throat immediately after shooting it will allow it bleed out quickly while the heart is still pumping.

    Clean the Pig

    Get the pig out of the pen and hose it off so that you are working with a pig covered in mud and manure.  Pay close attention to the feet, they are the dirtiest part.

    Raise it

    If you have the ability to get the pig off the ground it will keep things cleaner and easier, though it can be done on the ground if you have to.  Cut into the pig’s legs behind the hoof so that you can pass the knife behind the tendon, leaving the tendon intact.  Pass a rope or chain through the holes and wench the animal to a height that is comfortable for you to work at.

    Remove Skin and Hair

    If you can dunk the whole pig, or half at a time, in hot water, the job will be easier.  But you can get it done just by pouring pots of boiling water on one area at a time.  You can use a specified tool, a “hog scraper”, or just a sharp knife or razor to scrap the hair and outer skin off the animal.

    Remove the Head and Innards

    Unless your pig is still small and you are going to roast it whole, now is when you will want to remove the head.  Then, make your cut to open the pig up.  Start just in front of the anus on the belly side, and go down to the sternum, starting shallow.  If you can open the belly up slowly and then cut around the anus carefully so as not to open the intestines, push the anus through the hole and out the hole in the belly, then remove the intestines and all innards.


    At this point you can cut the pig in half with a bone saw, dividing the pig left and right.  Or if the pig is smaller and you have room, you can store the pig whole and butcher it to your preference later.  It’s not for those with a weak stomach.  Before raising a pig, carefully and honestly consider if you are going to be willing and able to process that pig into meat.  If not, raising pigs just isn’t for you.

    If you liked this, you might also enjoy…

    Natural Healing Techniques Doctors Don’t Want You to Know…

    The Weight-Reducing Magic of Yoga…

    The Ultimate Woodworking Course..