Page 12 of 23
1 10 11 12 13 14 23
gardening – Page 12 – Homesteader Depot

Tag: gardening

  • Benefits of Aquaponics

    Benefits of Aquaponics

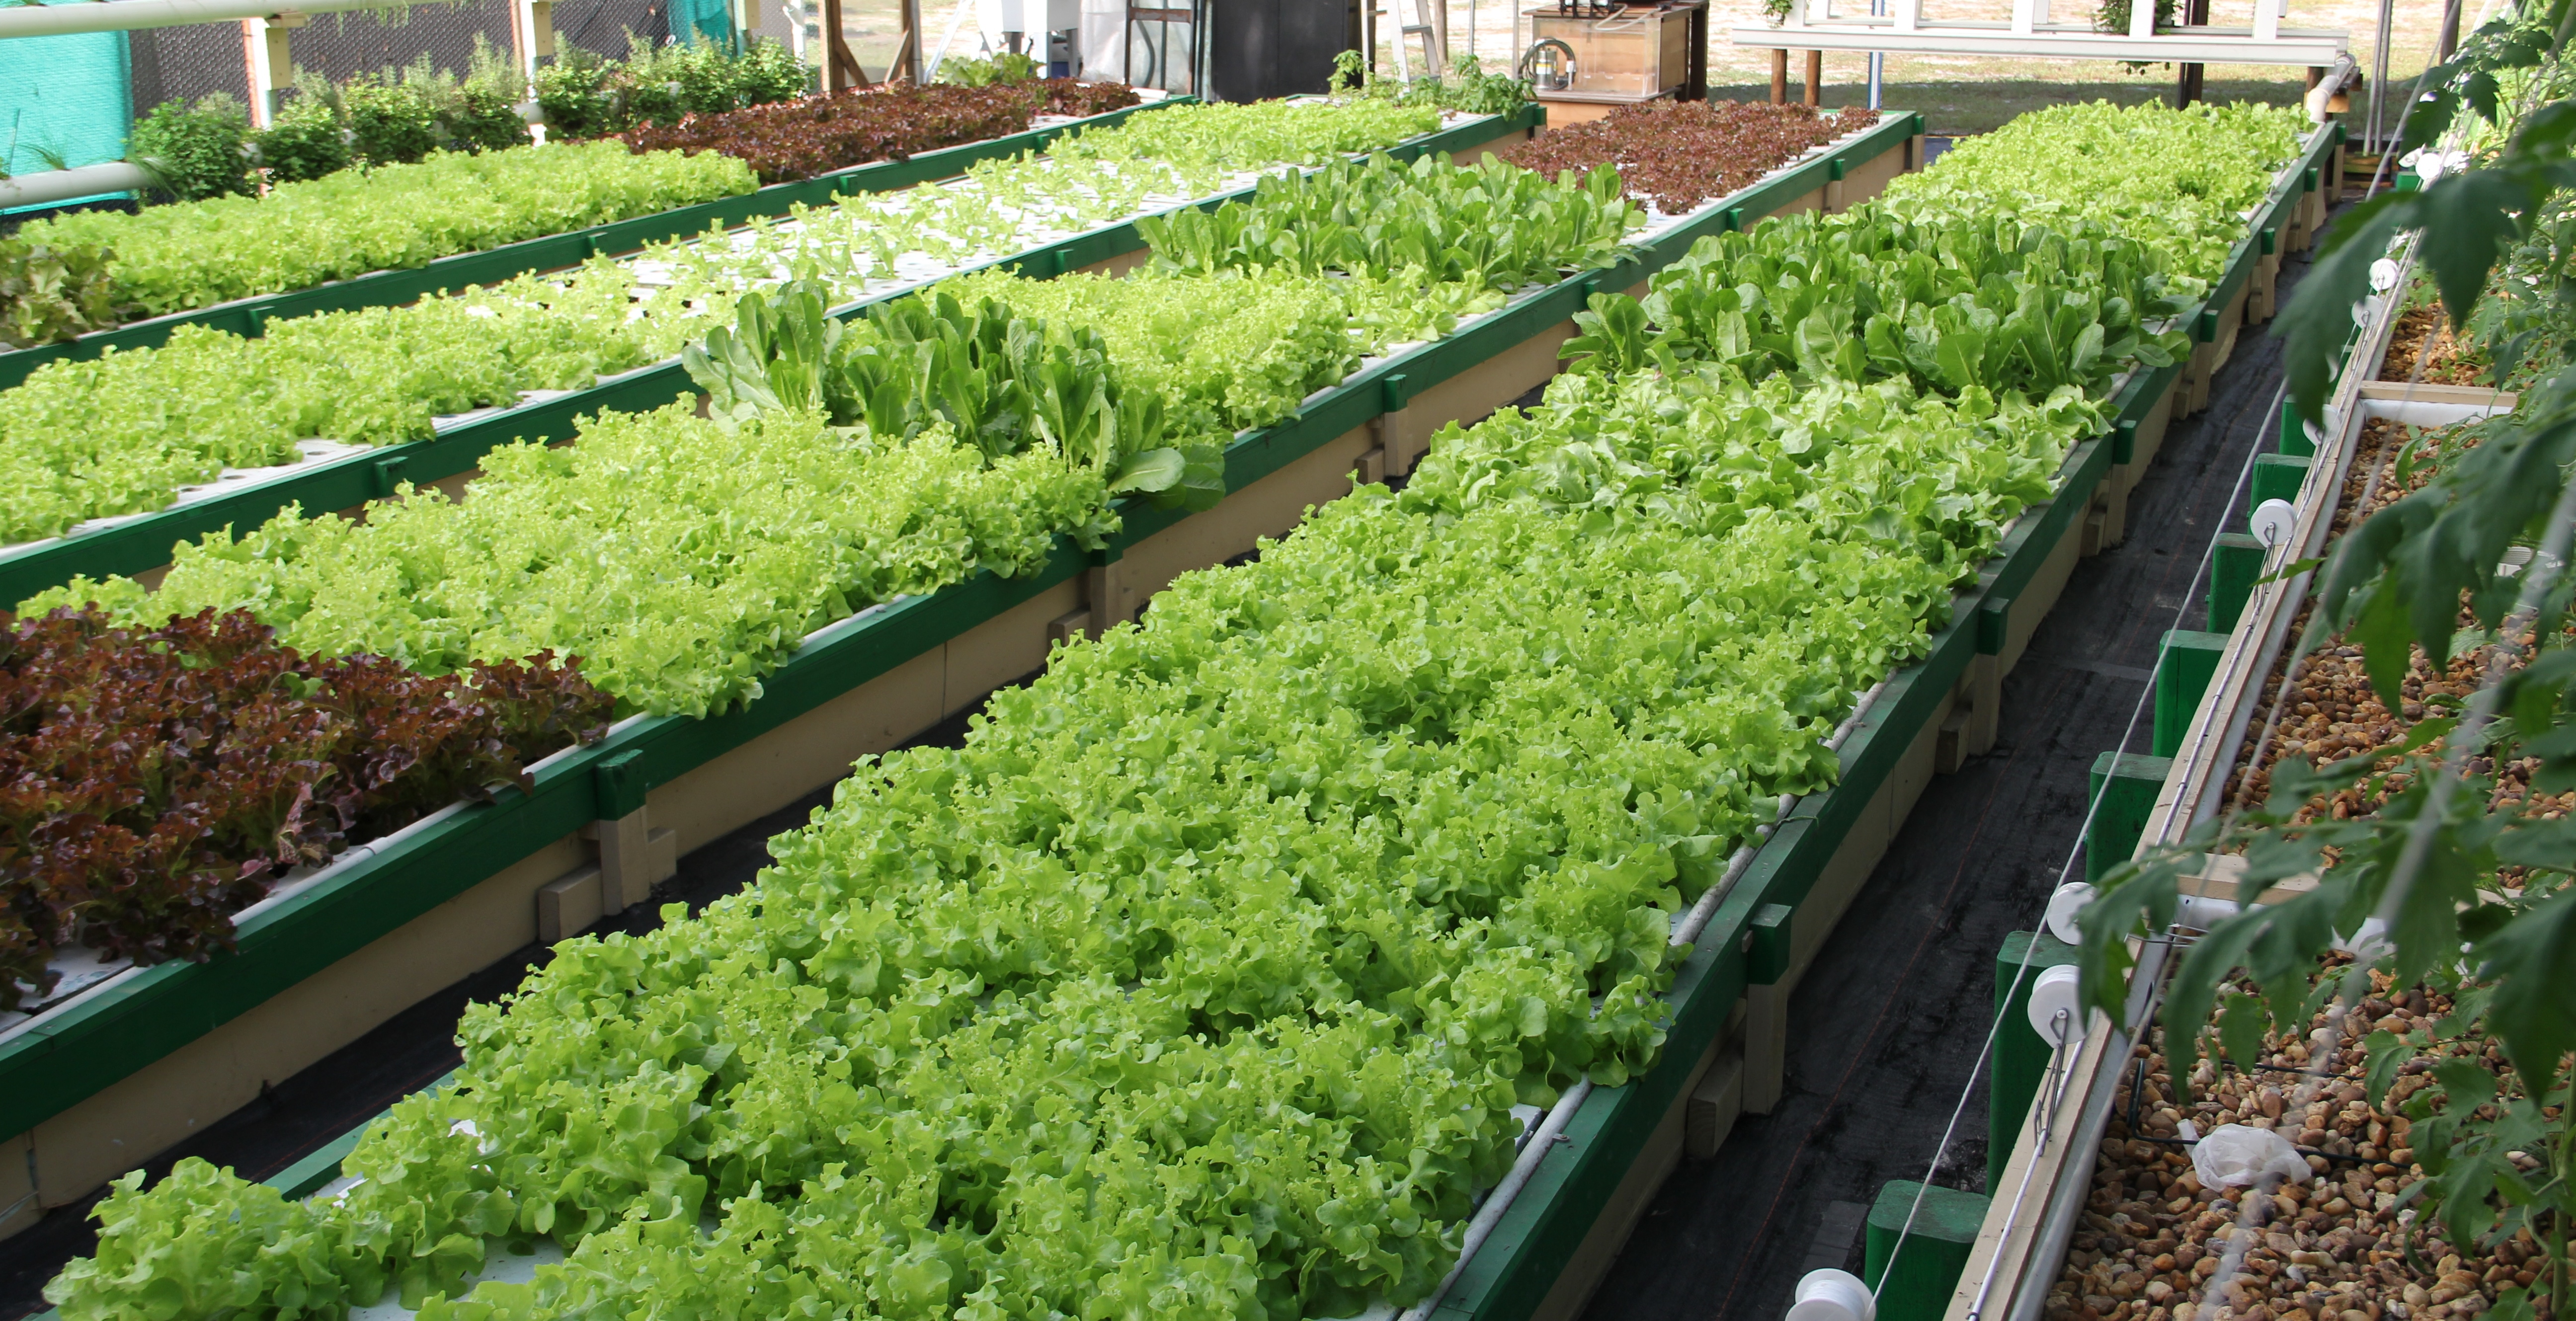
    Aquaponics, which has grown in popularity in recent years, is a combination of hydroponics, growing plants in water, and aquaculture, the practice of raising fish in containers. The idea is that the waste produced by the fish provides fertilizer to the plants, and the plants provide food for the fish.

    It might sound rather complicated, but there are a lot of resources available to you to get started if you’re interested. It does require a bit of a set-up but it doesn’t have to be too fancy. It might be worth the investment when you weigh the benefits.

    Here are some of the reasons you might want to consider aquaponics for your homestead:

    1. Space

    Because plants don’t compete for water and nutrients as they would in the ground, aquaponics allows you to grow more food in a smaller space. High yields are a great reason to consider aquaponics

    2. Free fertilizer

    The fish provide the fertilizer so you don’t ever have to worry about compost, soil amendment, or fertilizer of any kind! Keeping track of when to fertilize and the state of your soil can be a big hassle, so this is much less of a headache than traditional gardening.

    3. Less water 

    Although the system runs on water, it is a closed system so you use far less water overall than you would to regularly water a garden in the ground. Plus, you don’t have to worry about constant watering! This is great if you live in an area where water is scarce or water bills are high.

    4. No weeding

    One of the most time-consuming aspects of growing a garden is staying on top of regular weeding. But with aquaponics, you don’t have to!

    5. Extra protein

    Perhaps the coolest aspect of aquaponics, of course, is that you are growing plants in a symbiotic relationship with fish. This means you are also growing fish along with your plants, that can be harvested and eaten as well!


    If you’re sold on aquaponics, we’d highly recommend researching further to see if it is right for your homestead! These are definitely some very appealing reasons to give this trendy gardening method a try.

    If you liked this, you might also enjoy…

    Become A Master Healer With This Revolutionary Course…

    Traditional Hindu Yoga for Weight Loss

    Improve Your Carpentry Skills Quickly and Easily…


  • Easiest Herbs to Grow Indoors (Infographic)

    It’s winter time and you’re probably missing having fresh produce from your garden or farmer’s market. This time of year it can be hard to find local herbs and greens. Do you want a way to continue to have access to fresh herbs without braving the cold?

    Winter is a common time of year for folks with green thumbs to invest in an indoor herb garden.  You can grow these year-round, and keep them right on your kitchen windowsill to add to dishes. There really is no flavor like fresh herbs and it can change the flavor of a very simple dish to something exotic and gourmet with a few sprigs or handfuls of your favorite herbs.

    This great infographic from Desima.com is a quick and easy cheat sheet for the best herbs to grow indoors and

    80063554e9b39b000071c18e173dc568

    If you liked this, you might also enjoy…

    Become a Master Healer at Home

    Anaerobic Weight Loss Fitness…

    The Ultimate Woodworking Course..

  • Growing Turmeric

    Growing Turmeric

    Do you ever go inside after gardening with sore hands and stiff knees?  Instead of reaching for some Advil or other store bought anti-inflammatory medicine, why not grow your own?  Turmeric is a great medicinal plant because not only does it offer a wide array of health benefits, but it is one of the easiest plants to grow, and to harvest.  Just head to your local Asian grocery store and look for a piece of turmeric root that you can use to grow your own plants from.  Here’s how, and why you might want to.


    To Plant

    • Simply purchase a live turmeric root, usually only available at health food stores or Asian grocery stores.
    • When weather is warm outside, plant it in a container with good soil. It can be grown in the ground, but I like to get it started in a pot off the ground.
    • In about 120 to 150 days it should be ready to harvest.
    • If it is still in the pot you can simply pull it up and knock the dirt off the root, which is the part you are after. Remember to save some of the root to plant again so you don’t need to buy more.

    Why Grow Turmeric

    • Turmeric contains curcumin. This is the active ingredient for all of its health benefits.
    • It can be used as an anti-inflammatory.
    • It has powerful anti-oxidant properties and has been linked to reduced cancer rates.
    • It can be used to treat infections, cuts, burns, and sore throats.
    • It is very easy to grow, all it requires is some decent soil, warm weather, and water.

    I’m not a doctor so I don’t want to make any medical assertions about the potential for turmeric, but it has been used for thousands of years and there is no shortage of people who claim to have benefited greatly from this easy to grow plant.


    If you enjoyed this, you might also like….

    Home Defense in the End Times…

    Natural Healing Secrets You Need to Know…

    Eat Like Your Ancestors…


  • Tips for Better Tomatoes

    Tips for Better Tomatoes

    Homegrown tomatoes taste a far cry better than anything you will find at the grocery store. You know exactly what’s in your soil and what you are putting on the plant, so you don’t have to worry about pesticides getting you or your family sick. Here are some quick and simple tips you can use to improve the tomatoes in your garden.

    Plant Deep

    First, you always want to make sure you are planting your tomatoes as deeply as possible, without having any of the leaves touch the ground. This way, the plant will produce a stronger root system, which can increase the moisture content, since the plants are taking in more water. Another reason to plant deep is so the roots can better hold the plant in place in the event of a bad storm or wind.

    Remove the Lower Leaves

    Once your plants have started to grow and reach about two feet high, it’s a good idea to remove the lower leaves. This allows the nutrients to promote growth higher up in the plant. The leaves at the bottom, which wouldn’t be getting much sunshine anyway, are essentially useless, so there is no harm in removing them.

    Use Mulch

    Using mulch with your tomatoes will help you to conserve water. In addition, it will keep the soil warm and help to foster a strong root system. Another one of the benefits of using mulch is that it can help to prevent diseases in the plant.

    Tomato Cages

    Using tomato cages can help ensure your plants don’t topple over. Once a plant starts to grow and develop fruit, it can get top heavy. Using the cage ensures it stays upright and continues to grow. Another one of the benefits is that the stalks are under less stress, which means bigger tomatoes.

    These are some simple tips you can start using the next time you plant your tomatoes. Happy harvesting!

    If you liked this, you might also enjoy…

    Natural Healing Techniques for Regular People…

    Ever Wanted to Try Yoga?

    Learn Basic Carpentry at Home…


  • Seed Tape   

    Seed Tape  


    At $3 or more per packet, seeds can be one of the primary costs of gardening, especially if you are starting a new garden or expanding the crops you are growing.  To some extent, it is an unavoidable cost, but all too often seeds are wasted and the cost of your garden grows needlessly.  One of the most common causes for this is not properly spacing the seeds when they are planted.  Seed tape is a great way to prevent this from happening and save you a lot of money on your garden budget.  Here’s what you need and now to get started.


    Materials

    • Seeds, you really only need to make seed tape for seeds that are so small they are difficult to handle individually with your fingers.
    • 2-ply toilet paper
    • All purpose flour
    • Water

    How to Make it

    1. Measure out a length of toilet paper to the length of your raised beds, or the shortest length if your beds are not the same size.
    2. Split the toilet paper. Separating the 2 plies from each other.  This will give you more paper to work with and make it easier on your seeds to sprout.  You don’t want to leave it intact.
    3. Spread the toilet paper out on a surface large enough to work on.
    4. Mix the flour and water together until you have a paste. This paste will be used to hold the seeds in place on the toilet paper.  It should be a little thinner than toothpaste.
    5. Spoon out a small amount, about the size of your thumbnail, of the flour paste on to the separated toilet paper. Place a dab of paste every 3 to 4 inches down the paper, about one per square on most toilet papers.  Do not place the dab directly in the center of the paper, but rather about 1/3 of the way up from the bottom.  This is to allow for the top to be folded down on top of it later when you are done.
    6. Now, place a seed, or two seeds if you are using seeds with a low germination rate, on each dab of flour paste. When you reach the end of the toilet paper, fold the top over.
    7. Carefully roll the tape back up, and then just unroll the tape in your garden bed and cover with a light layer or soil or fine compost and water in.

    In only a few minutes you can make several feet of seed tape, and at the price of seeds, and of pre-made seed tape it is well worth the time and effort.

    Natural Healing Techniques Doctors Don’t Want You to Know…

    The Weight-Reducing Magic of Yoga…

    The Ultimate Woodworking Course..

  • Does Tap Water Kill Garden Bacteria?   

    Does Tap Water Kill Garden Bacteria?  


    Some people believe that the chemicals used in treating tap water, namely chlorine, will kill or harm the bacteria in their garden soil.  Since bacteria are the base of the food web in your garden it’s important to keep them healthy and happy.  Because of this some gardeners have resorted to filtering their water with costly filtrations systems, or letting it sit out for hours or even days in watering cans to allow the chlorine to evaporate.  But is any of this necessary?  In this video we are shown the painstakingly scientific evaluation of this hypothesis.  The experiment takes place in Alberta Canada, and other areas will have slightly different treatment levels in their water, but the results are not likely to be drastically different from the ones shown in the video.  Hope this helps.

    If you liked this, you might also enjoy…

    Become A Master Healer With This Revolutionary Course…

    Traditional Hindu Yoga for Weight Loss

    Improve Your Carpentry Skills Quickly and Easily…


  • When to Harvest Vegetables and Herbs

    When to Harvest Vegetables and Herbs

    Time is a key factor in determining when to harvest vegetables. You want to be sure to harvest them when they are on the verge of maturity. The time of day is also a factor in assuring that you harvest vegetables appropriately.
    It’s helpful to keep the seed packet or plant identification marker for each item you plant in your garden. This is where you will find information regarding the estimated time to maturity. If you keep a garden journal, you can write that information in your journal. There are also plenty of charts available on line that list the average time for specific plants to reach maturity. Even with that information available, soil conditions and weather conditions can affect the exact amount of days it takes your vegetables to reach the harvesting stage. Therefore, consistent attention to your garden is the best way to determine when a vegetable is ready to be harvested.

    It’s important that you harvest vegetables based on their individuality. For example, not all beans should be picked at the same length. Pole beans are ready for harvest when they are approximately five inches long. On the other hand, yard long beans or Asian beans should be at least 15 inches long before they are picked. You can’t base your harvesting time solely on appearance. Peppers are ready to be harvested when they are full size, even though they’re still green. If you leave them on the vine until they turn red, they will lose some of their crispness. Hot peppers left on the vine will continue to get hotter. It’s generally best to harvest vegetables when they are young and tender. It’s also essential that you handle these tender vegetables carefully to avoid bruising them. Don’t leave the vegetables you pick sitting outside in the hot sun. Take them indoors immediately after harvesting them.

    It’s best to harvest vegetables in the early morning hours, just after sunrise. This is when your vegetables will have the highest water content. If harvesting in the morning doesn’t fit into your schedule, your next best option is early evening. Once harvest time arrives, you should check your garden daily. You might be amazed at how fast tomatoes ripen and squash grow. If you’re pinched for time and are struggling to keep up with your rapidly maturing vegetables, you can delay harvesting the root vegetables you planted such as onions, potatoes and carrots.

    Herbs should be harvested after the morning dew dries and before the afternoon sun heats up the day. Herbs should be harvested before they flower. Herbs are less prolific after they bloom. You can begin harvesting herbs early in the season. You can harvest between 50% and 70% of the plant at one time. Typically, annual herbs can be harvested until frost.

    Once you’ve invested time and effort into growing a garden, you want to be diligent with your harvesting routine. Picking the vegetables at precisely the right time is the best way to enjoy their flavor and freshness.

    If you liked this, you might also enjoy…

    Naturopathic Medicine at Home…

    Always Wanted to Try Yoga? Read this…

    Easy Carpentry Courses for the Average Person...

  • Succession Staggered Planting

    Succession Staggered Planting

    As a home gardener, your goal is to grow fresh vegetables that you and your family can enjoy from spring until fall. Regardless of whether you’re growing a traditional garden in your backyard or are among those using the space-saving raised bed style of gardening, succession planting will enable you to enjoy a more bountiful, long-term harvest. Succession planting is a simple concept that can be done in two different ways. One method is to stagger the time frame in which you plant the same type of vegetable. The second method is to harvest one crop, then plant a different crop in that same location.

    The key to successful succession planting is careful planning. If organization isn’t a strong skill for you, don’t despair, there’s an online spread sheet template you can use to create a personalized plan. If that seems too detailed for you, many online garden sites offer excellent garden design charts that can be adapted to the area you live in and assist you in selecting the most appropriate vegetables for your garden.

    To assure that you get the best yield possible from each crop you plant, you’ll need to consider the differences in temperature and weather conditions as the month’s progress. For example, if you’re planting seeds, you need to keep in mind that the amount of days to maturity printed on the back of the pack is typically based on spring plantings. You can anticipate it taking more time for a plant to reach maturity when planted later in the season. This is due in part to the change in temperature. It is also generally recommended that seeds be planted about twice as deep in the summer as in the spring. If you replace one plant with another plant, you will need to be attentive to the amount of water the new plant requires in the warmer temperatures.

    You will be more successful with your succession garden if you take some time to observe your garden area carefully. As the seasons progress from spring to fall, the amount of sunlight and shade in your garden area will change. The warm sunshine that was beneficial to your plants in the spring may become a hazard for your plants in the summer. In order for your plants to survive and thrive in a succession garden, you may need to create some shade. You can do this by adding a trellis and some climbing plants throughout your garden. If you are growing your garden on a deck or patio, you might need to use shade cloths to keep the hot summer sun from destroying your plants.

    Succession planting is a gardening method that complements today’s busy lifestyle. Hectic schedules typically don’t allow for hours to be spent in the kitchen preserving vegetables that have arrived in abundance. Staggered planting means your vegetables will be ready for harvest at manageable intervals. You can enjoy garden fresh vegetables for an extended period of time.

    If you enjoyed this, you might also like….

    Home Defense in the End Times…

    Natural Healing Secrets You Need to Know…

    Eat Like Your Ancestors…