Page 13 of 23
1 11 12 13 14 15 23
gardening – Page 13 – Homesteader Depot

Tag: gardening

  • Black Fly Control

    Black Fly Control

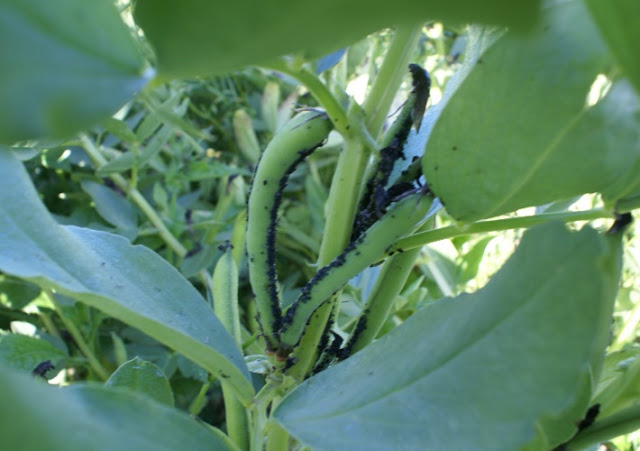
    If you have been growing fava beans then it’s likely that you have run into black flies.  Black flies love to damage fava bean plants and ruin your production.  But there are a few simple ways to fight back if you notice an infection and even measures you can take to prevent your plants from ever getting infected while increasing the food you get out of your plants.  Here’s how.


    • Check your plants regularly. Black flies will only ever affect the tops of the plants, so keep a close eye on the tops especially.
    • If you see black flies on the plants spray them with soapy water.
    • If the infestation is serious, cut the tops after spraying them with soapy water. Put them in a plastic bag, tie the top to seal it and throw it away. Do not compost any plant material that is infected with anything as it could spread to other plants near your pile, and in the case of some diseases, even survive in the compost pile and infect the plants that the compost is later applied to.
    • To help prevent black flies from becoming a problem keep your plants from getting too high. Since the flies only like the tops of the plants, cut off the tender tops about 3 to 4 inches below the tip.  When they regrow, cut them again.
    • If you beat the black flies to the tips of your plants there is no reason to throw them out, or even compost them. The tops can be steamed or lightly boiled and eaten.  With a little butter and salt they can taste pretty good.

    Pest control doesn’t have to mean harsh chemicals, it doesn’t have to mean hard work, it doesn’t even have to mean that you lose out on production.  In this case you can actually eat more from your plants by preventing black flies.

    If you liked this, you might also enjoy…

    Holistic Medicine Basics

    Ever Considered Taking Yoga? Read this

    The Ultimate Woodworking Course..

  • Soil Tests

    Soil Tests


    Soil test kits are one of the most under-used tools for backyard homesteaders in their gardens.  Most gardeners seem to prefer to treat all soil as equal, equally bad, or equally good.  Adding compost and fertilizer to every square inch of growing space, and treating soil for every crop that goes in.  But money and hours of hard work can be saved though testing your soil for pH and mineral content.


    pH

    Without knowing what the pH of their soil is, most people will add acidic soil amendments like elemental sulfur to their soil if they are planting crops like blueberries that thrive in acidic soils.  But what if your soil is already acidic?  Then you will waste your money on the soil amendments, and likely damage or even kill your blueberries that you spent time and energy planting.

    Mineral Content

    If you have a large garden, then more than likely you are composting more than just kitchen waste.  You probably go out of your way to gather material like leaves that require raking, or even going and getting bags of coffee grounds from your local coffee shop.  Then, if you don’t test your soil, you probably apply that compost to every area of your garden.  But time, energy, and resources can be saved if you test your soil.  Areas that are rich in minerals can be maintained simply by mulching with comfrey and wood chips.

    Guess Work

    Knowing the soil in each area of your garden will give you a better idea of where to plant what, and will help in determining why some crops might not be doing as well as you would like them to be doing.


    Soil tests don’t need to be performed regularly, they don’t take long, and don’t cost much.  But they can give you valuable knowledge about the soil in your garden.

  • Saving Space While Growing Corn

    Saving Space While Growing Corn


    Corn is a crop that has disappointed many backyard gardeners.  Mostly because they watch lush green stalks grow up with anticipation, only to find that the ears didn’t produce any corn.  One of the more common reasons why is that they didn’t plant enough corn.  In order for corn to properly pollinate it needs to be planted in several rows, if you are planting in rows.  This can take up more space than most backyard gardeners have, or are willing to give to one crop.  But there is a way to grow corn successfully without using so much space.


    • Make some space throughout your garden, it doesn’t have to all be in the same bed, but try not to have each space separated by more than a few feet.
    • Mound some compost into a “hill” several inches high and about 2 feet across in each of the spaces that you have available. Corn is a heavy feeder, so rich compost is important if you want nice corn.
    • I recommend mulching the mounds even before the seeds have sprouted with a thin layer of coffee grounds. They are rich in nitrogen which will help the seedlings get started, and the sprouts will have no problem pushing a little coffee out of the way.
    • Thin any extra sprouts, or sprouts that are too close together. Preferably you should have about 6 plants left after thinning on each mound.  If you have less they will not pollinate.
    • Make sure that you keep them well watered and as the corn grows add thicker mulch to help with water retention and add nutrients as they grow.

    With 6 mounds, and 6 stalks on each mound, and each stalk producing 2 or three ears, you can end up with over 100 ears of corn without sacrificing a large area of your garden.

    If you enjoyed this, you might also like….

    Eat Like Your Ancestors Did…

    Home Defense in the End Times…

    Natural Healing Secrets You Need to Know…

  • Protecting the Garden From Animals

    Protecting the Garden From Animals

    After you have invested time, physical effort and money into creating a garden from which you plan to enjoy a variety of fresh vegetables, the last thing you want to see is an invasion of wildlife. In a single evening, devastation can occur as a result of unwanted four-legged visitors. A slower method of destruction can occur from casual nibblers and from critters who destroy your plants from underground.

    Individual species of animals attack your garden in different ways. Animals such as rabbits and deer simply move along throughout your garden nibbling on or possibly entirely consuming some plants. Other animals such as mice and woodchucks attract your plants from underground. Your garden can also be damaged, although typically not totally destroyed by dogs and cats trampling the plants or digging up some of the plants. The area you live in often determines the type of animals you are most likely to be in competition with when it comes to enjoying garden vegetables, fruits and even flowers.

    Fencing is the most assuredly effective way to protect your garden. Various factors enter into the type of fencing you use. An electric fence is considered to be the ultimate protective fencing. However, if you have young children, this may not be the best option for you. There are a variety of safer options available as an alternative to electric fencing.

    You can purchase a product that is marketed as deer fencing. Poly fencing does not hamper your view of your garden. This is a good option for a garden that is located in a neighborhood or in an area where it is a visible part of the landscape. Deer fencing made of wire is one of your strongest defenses against deer and other furry invaders. Taking time to observe the unwanted visitors to your garden will help you determine the type of barrier you need to install.

    When appearance is a priority, decorative fencing may be your preferred choice of protective fencing. Reed fencing is a way to increase privacy and protect your garden. If you enclose your garden with wood fencing, you’ll need to add poultry netting to the base to keep out small intruders.

    Moles, voles and chipmunks attract your garden from underground. To prevent your garden from an underground attract, you will need to dig a trench 6″ to 8″ below the ground and begin your fencing there.

    Perimeter fencing has been shown to be the most effective way to protect a garden from the numerous animals waiting to enjoy the fruits of your labor. However, if a permanent fence or temporary fencing is not a possible option for you, there are alternatives. You can interplant animal-deterrent plants such as catmint, sage, zinnia, marigolds, garlic and onion within your garden or use these plants as a living border for your garden to deter unwanted visitors. Some gardeners have found that planting a dense hedge or thorny rose bushes around the garden will deter rabbits and dogs from entering the garden.

    If you liked this, you might also enjoy…

    Become a Master Healer at Home

    Anaerobic Weight Loss Fitness…

    The Ultimate Woodworking Course..

  • Act Now to Garden in the Spring

    Act Now to Garden in the Spring

    If you don’t already have a garden, then waiting until the spring isn’t going to help you at all.  Even if you pour your time and resources into gardening starting in the spring you won’t be seeing the result until summer, and then it will still be limited.  But, if you act now and prepare, you can hit the ground running as spring comes around.  Here are some steps that you can take now to get starting growing food next year.


    Building Beds

    Especially for those of us that aren’t carpenters and use salvaged material, getting your raised beds built now will give you a huge head start.  If you are working full time and only gardening on the weekend, then building beds, then getting them in place, filling them, and planting them, could, especially if things don’t go your way, take several weekends.  That’s weeks that you could be growing but aren’t.

    Composting

    If you live in a cold zone, then this isn’t going to be as effective, but at least saving the material and getting it in place will.  Turning waste into compost could take months, so don’t wait until you need it to start the process.

    Starter Box

    Getting a starter box, or even a room if you have the resources, put together now will allow you to start seeds up to a month before your last frost.  This is s huge advantage by lengthening your growing season and getting you started faster.

    Stock Piling

    There are a lot of materials that you will need to get a garden started, tools, soil, stakes, boards, fencing, seeds, containers for starts.  All of these cost money, and buying them all at once can be a real burden or even impossible.  Buying some now, before you need them, will keep you from breaking the bank come spring.


    The last thing that ever helped anyone in gardening was procrastination.  There is always something that can be done now to help later.

    If you liked this, you might also enjoy…

    Natural Healing Techniques for Regular People…

    Ever Wanted to Try Yoga?

    Learn Basic Carpentry at Home…

  • DIY Clones   

    DIY Clones  


    Downtime in the garden can really kill your productivity and efficiency.  Cloning plants, such as tomatoes, will greatly reduce the time, space, and resources like potting soil.  It will also give you a more predictable result, since you are not starting seeds with unknown traits, but cloning only the best plants in your garden.  Here’s how to get started cloning your own plants.


    First, you will need a few supplies:

    1. Razor blade
    2. Clone plugs
    3. Clone tray with plastic cover
    4. Root tone


    Directions

    1. Most important is the selection of mother plants. You want to not only look for the most productive plants, but also plants that show no signs of disease or susceptibility to pests.
    2. Once you have selected your mother, find a branch that is still tender and young to make a cutting from. Starting from the tip, count back three branches or points of growth.  This is usually only a few inches on the branch.  This is where you want to make your cut.
    3. Using a clean razor blade, make a split in the bottom of the new cutting, about ½ of an inch long. This is to increase the amount of surface area that will be exposed to the root tone.
    4. Dip the split cutting into your root tone.
    5. Insert the cutting into a plug, set the plug in it an empty hole in a tray and repeat the process until you have enough clones or until you run out potential cuttings or room in the tray.
    6. Put some water in the bottom of the tray so that the plugs can wick water to your cuttings and cover the tray with the clear plastic dome.
    7. Place the covered tray of new clones in a location where it will not receive direct sunlight. The clones will be vulnerable to heat and welting until they have produced roots.
    8. Check on your clones every day to make sure they are not getting too hot and have enough water. If you notice any that are not looking healthy, remove them so that they do not spread illness to other clones.
    9. After a week or so, lift the tray up and look underneath to check for roots. Once you see some roots your clones are ready for transplant.

    Once you have completed the process you will realize how easy it is and how much time and resources can be saved by making your own clones.

    If you enjoyed this, you might also like….

    Home Defense in the End Times…

    Natural Healing Secrets You Need to Know…

    Eat Like Your Ancestors…

  • Harvesting Sugar Cane (Video)

    Harvesting Sugar Cane (Video)

    Sugar is a huge part of the American diet, and yet a lot of people don’t even think about how it grows or how it’s harvested. Entire nations and states have had their entire economies centered around sugar, a very valuable commodity that is pretty labor-intensive.

    These days, big agro sugar cane fields have plenty of industrial equipment to make this labor-intensive crop easier to plant, tend and harvest.

    I thought this video of harvesting sugar cane on a homestead was pretty cool. I love seeing how things are/were done without big industrial equipment, especially by small homesteaders. Check it out!

    If you enjoyed this, you might also like….

    Home Defense in the End Times…

    Natural Healing Secrets You Need to Know…

    Eat Like Your Ancestors…

  • How to Grow Blueberries

    How to Grow Blueberries

    Blueberries are a delicious “superfood”.  They are full in antioxidants like anthocyanin and offer numerous health benefits.  They can get quite costly at the store, especially when they are out of season.  But since blueberries are a perennial shrub, there is no reason for you to be spending money over and over again at the store one these “super” fruits.  Here’s how to get started.


    1. Since blueberries have specific growing requirements, and people often have trouble getting conditions just right for them, they are one of the few crops that I would suggest growing them in containers. They will grow as high as 6 feet tall, so you will need a sizeable pot, and since they will last for years you want to get a nice pot.  A wooden pot, or a frost resistant terracotta pot would be best.  You can always start in a 1-gallon black plastic pot and transplant it later.
    2. The main requirement for blueberries that differs from most other crops in your garden is that they really love acidic soil. When you are starting out, it would probably be best to just purchase one bag of compost or soil that is specifically marketed for acid loving plants like blueberries.  As time goes on, you can always top dress with citrus peels as needed.  Despite what so many people will tell you, pine needles will not affect the pH of your soil.
    3. When your shrub starts to produce plump fruit the birds will likely beat you to it. So you will want to net it before they get a chance.
    4. After a few years you will want to start pruning the old wood back to increase new growth and increase production. Cut back about 1/3 of the old wood each year, alternating sections each time.

    The main thing to remember is the pH, they like a low pH.  Get that right and you will have years of blueberries without spending tons of money at the store.

    If you liked this, you might also enjoy…

    Become A Master Healer With This Revolutionary Course…

    Traditional Hindu Yoga for Weight Loss

    Improve Your Carpentry Skills Quickly and Easily..