Tag: outdoors

  • 5 Fantastic Benefits of Living in a Yurt

    5 Fantastic Benefits of Living in a Yurt


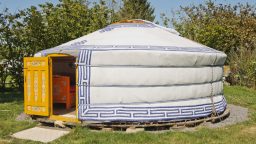
    Yurts are the ultimate example of efficiency in residential construction.  Their structural design, insulation and covering keep them cool in summer, warm in winter, and extremely wind resistant.  A yurt’s round walls allow for much less surface area for interior heat to escape while letting the wind move more organically around it instead of pushing against it.

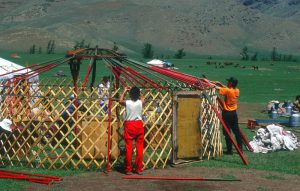
    The framing of the support system is completely self-sufficient and a wonder of engineering.  The roof is supported by the use of a tension band and compression ring leaving the interior completely open and available to any interior design you could need.


    A Brief History of the Yurt

    Even though the practicality of yurt design and living didn’t reach the United States until after the second half of the 20th century, the design has been the primary traditional form of housing in Central Asia as far back as the 13th century.  Even today in many of the same regions, the Yurt is the only design used in most homes in Mongolia and other Central Asian areas.


    Yurts are Especially Friendly to the Environment

    Yurts are constructed on a raised platform supported by posts, versus a concrete slab directly on the ground.

    When properly anchored, these platforms create very little change to the area they are situated on.  Today’s structural beams and fabric coverings are often constructed through environmentally conscious methods and sustainable resources.

    The insulation fabrics used take up a very small footprint.  Additionally, it’s been reported that people who exhibit chemical sensitivities to other insulation materials used in modern building don’t react adversely to yurt insulation fabrics.

    Yurts are Especially Compatible with their Environment

    Yurts blend in nicely into whatever environment they are placed in. Their rounded form lends a more organic shape to the dwelling, versus the standard straight lines typical rectangular and square shapes do.  The overall appearance provides a much more attractive and serene feel to the residential space.


    Yurts Can be Moved and Lived in Just About Anywhere

    The construction makes a yurt extremely portable, allowing the owner to transition to just about any area a support platform can be contrasted.  This same construction also makes it incredibly strong and able to hold up to strong winds, heavy rain and snow and even earthquakes.

    With a yurt you can move from the desert to the beach to the mountaintops, taking your yurt along for the ride in each setting.

    Yurts Provide Incredible Flexibility of Use

    Since the design of the yurt doesn’t require any interior walls, you have an enormous open space to work with when you start planning the inside.  Whether you decide to put in permanent walls, movable dividers or build a loft for even more usable space, there is any number of ways you can use your yurt interior.  Smaller ones can be used as workout/yoga studios, guest homes, or even just temperature-controlled storage buildings.


    Suggested: Self Reliant Power Source For Your Yurt


    Yurts Encourage Inner Healing and Spiritual Enlightenment

    The aesthetics of a yurt’s construction, particularly its shape and openness, can be seen in other cultures throughout the globe. Round dwellings can be seen on just about every contentment throughout history, from traditional grass huts in Africa, igloos in the Arctic region, and the Teepees of many Native American tribes.

    Their very construction adapts not only to their physical surroundings but naturally allows a freer flow of energy inside and out.  These attributes aid in creating a more healing, creative and spiritual environment.


    Ready to Change Your Life?

    Or at least your home?  We’ve touched on just some of the benefits and fun Yurt living can bring to your life.  If you are looking for a more efficient and environmentally friendly living space, the yurt should be at the top of your list.


    [Did You Know]  What really happens when you bury a shipping container?  Learn Here>>>

  • Identifying and Understanding Poison Ivy

    Identifying and Understanding Poison Ivy

    The bane of every campers’ weekend getaway, poison ivy, interestingly enough is not actually in the ivy family.  It’s a relative of the almond family.  Who knew?

    Most of the time, you only have to worry about avoiding it when you are in the great outdoors and away from urban areas.  However, occasionally it will pop up in your yard.  If this happens, you’ll want to make sure you wear protective clothing and accessories like gloves and even a mask to avoid the worst itching you can ever imagine.

    Also, you’ll want to be very cautious about how you dispose of it, so no one else accidentally comes in contact with it either.  And, whatever you do, do NOT burn it!

    The smoke produced by burning poison ivy takes all of its poison airborne.


    Identifying Poison Ivy

    If you grew up in a more rural community, you might already know some of the rhymes used to recognize the plant and its different features.  If you didn’t learn any of these, take note, they could come in handy someday.


    1. If Butterflies Land There, Don’t Put Your Hand There

    Butterflies can safely land on poison ivy.  They do it to protect themselves from predators.

    1. Berries White – Run in Fright or Danger in Sight

    Describes the light gray to white colored berries seen in the fall.

    1. Hairy Vine – No Friend of Mine. Ragged Rope – Don’t be a Dope

    Refers to the shaggy appearance its vine exhibits.

    1. Leaves of Three Let It Be
    2. Longer Middle Stem – Stay Away from Them

    The middle leaf of a cluster of three is typically longer than the side leaves.

    1. Red Leaflets in the Spring, it’s a Dangerous Thing

    The leaf color changes with the seasons.  Red in spring, Green in summer, Reddish-orange in fall.

    1. Side Leaves like Mittens Will Itch Like the Dickens

    A few varieties have side leaves that resemble a mitten with a thumb sticking out.

    What to do if You are Exposed to Poison Ivy

    If you discover you’ve been exposed, there are actions you can take to reduce the severity.

    • First, carefully remove your clothing and put them directly into the washer so they can’t spread the oil to other surfaces.
    • If it has been less than 10 minutes since exposure, wash your hands with soap and water and any other areas that have come in contact with the plant.
    • If it has been over 10 minutes, you still want to wash up, but you’ll also be needing a remedy for the rash that is headed your way.


    Poison Ivy Remedies

    There are several effective over the counter treatments for Poison Ivy.  There are also a few home remedies that work.


    Apple Cider Vinegar

    ACV gets rid of the itch almost immediately and helps neutralize the poison.  Apply with cotton balls or with a spray bottle several times a day to relieve itching and help the skin start to heal.

    Just be prepared to smell like a salad for a while.


    Baking Soda and Oatmeal Paste

    1. You’ll have to do a little cooking for this one, but it’s worth it. This “recipe” can be made in bulk and stored to apply several times over the course of your recovery.
    2. Start by bringing 1 part rolled oats to 2 parts water to a boil.  Remove from the heat and cover until all the water is absorbed by the oats.
    3. Stir in 1 Tbsp Baking Soda for every ¼ Cup oats and mix well.
    4. If the paste is still very hot, you can add some cold water or an ice cube to bring it down to warm.
    5. Apply the paste thoroughly to the affected areas.  Relax while you let it dry out, then carefully brush off the dried paste.
    6. Repeat 2 times a day as needed.
    7. For an all over treatment, mix the paste into a lukewarm back and soak for a while.

    Conclusion

    If possible, just stay away from poison ivy.

  • How to Make a Fly Trap

    How to Make a Fly Trap

    Not only are flies annoying, but they are disgusting too.  They can spread diseases just by landing on your food, without your even noticing.  They can ruin the time you spend outside trying to relax, and they can sneak inside every time you open the door.  And while raising animals and having a compost pile may increase their numbers, even if you have no animals and a near sterile yard, they can fly on over from your neighbor’s.  What can you do about it?  Trap them with a few things you probably already have laying around the house, and here’s how.

    How to make a fly trap:

    1. First gather up some materials, a symmetrical smooth plastic bottle (it can’t be a milk bottle or any type of bottle with a handle or ridges), some string or wire, some sugar, and some yeast or bread crumbs.
    2. Next, cut the bottle in two about 1/3 of the way down.  Remove the lid.
    3. Turn the upper portion of the bottle upside down and slide it into the lower portion until the two cut ends meet.
    4. This should leave the bottle top a few inches from the bottle of the bottle.
    5. Now, make a couple of holes through both pieces on opposite sides of the bottle just below the cut line that is now the top.  Thread the string or wire through the holes in whatever manner you like so as to allow you to use the string to hang the bottle by later.
    6. Finally, put a few spoons full of sugar and yeast or bread crumbs into the bottle, then carefully add water so that it comes about ½ inches or so from touching the upside down bottle top.  The trap will not work if the water line is too far below, or if it touches the bottle top.

    The trap functions by attracting the flies in, they have to land on the narrow opening and crawl in, but they will tend want to fly away instead of crawl around searching for an exit.  This will have them either up in the corners where they can’t get out, or drowning in the yeasty water that attracted them.

    Once your bottle trap is ready, hang it up in a tree or on a fence near your place.  Since it’s pretty easy and inexpensive to make, you might want to put one at each corner of your yard and one near your garbage can.  If you don’t see flies in your trap, adjust the water line or change your bait.  When the trap is full of dead flies you can wash it out if you like, but since it’s made out of trash anyway you can just throw it away and save yourself from a nasty task. Happy fly hunting!

    If you liked this, you might also enjoy…

    Learn to Heal and Treat Illnesses Naturally…

    An Ancient Secret to Slimmer Waists…

    Learn to be a Master Carpenter at Home...


  • Tips for Repelling Ticks

    Tips for Repelling Ticks

    If you have to live in the woods, you’re probably very familiar with ticks. They are not a fun creature deal with, and they can cause Lyme disease. Whether you’re trying to protect yourself, your children, or pets, you need to have some tips for making sure you can keep ticks at bay.

    Garlic is said to work quite well at repelling ticks. However, you probably don’t want rub garlic all over yourself. Eating garlic or garlic pills can provide the same results though. Something to remember is that garlic is not good for pets such as dogs and cats. So do not give it to them.

    Utilizing insect repellent that contains DEET can help as well. You can spray your clothing, as well as your shoes and socks. This works very well to keep the ticks away. If you’re going to be in an area where you know ticks are present, keep your pant legs tucked into your socks. It might look silly, but you can be sure the ticks are not going to get inside and onto your skin. You can also look for products that you can give to your pets that will help to repel or kill the ticks.

    Always take some time to check yourself, your loved ones, and your pets after you’ve come back from an area where there are ticks. If you find any ticks, use tweezers with a fine tip to grab the tick. You want to grab as close to the surface of the skin is possible. Then, pull upward with a steady pressure. Never twist or yank the tick. This could cause the head or parts of the mouth to break off inside the skin. Then, clean the area.

    To dispose of a tick, you can drown in alcohol. It can also be flushed down the toilet. You do not want to crush it with your finger.

    Be aware of the ticks that might be in your area, and start taking precautions if you haven’t already.

    If you liked this, you might also enjoy…

    Natural Healing Techniques Doctors Don’t Want You to Know…

    The Weight-Reducing Magic of Yoga…

    The Ultimate Woodworking Course..


  • Campsite Chores for Kids

    Campsite Chores for Kids

    Running your home efficiently takes effort from everyone. In the same way, a campsite is set up and maintained much easier if everyone pitches in. But when you are only camping a few times a year, it can be hard to know exactly what chores you can assign to children, and which you should handle yourself. This list will help you find duties that your children can do based on their age or relative ability level:kids

    Younger Children…

    They can help remove rocks, twigs, and leaves from the campsite area. Be sure that they focus on the fire pit, getting any kind of debris away from where you’ll eventually be lighting a fire. They can also help pick up small kindling, or collect rocks to weigh down tarps or tent corners. Any chores that they do at home, such as helping collect dirty dishes after dinner, can also be performed while camping.

    Older Children…

    They can collect firewood, help put up the tent, hang up wet clothing or gear, set up chairs, and begin learning how to start and maintain a fire. If your children are already learning to cook at home, campsite cooking is a great skill for them to learn. They could also collect water, and even filter it through your filtration system.

    Related Article:  Camp More Comfortably

    Adults…

    Certain chores, such as gathering trash left by previous campers, or having the ultimate responsibility for putting out the fire, should be left to the adults. Trash may have dangerous glass or other debris, and campfire safety is too important to leave solely in the hands of a child, no matter their age.

    With everyone pitching in around the campsite, you’ll find that you can avoid the dreaded “working vacation” syndrome. Instead, you’ll enjoy the trip as much as anyone else, and return to your daily life relaxed and refreshed.

    If you enjoyed this you might also like:

    DIY Home Energy System…

    Click Here To Get The Best Survival Medical Course…

    Check Out These Mind Blowing Survival Skills…