Tag: planting

  • Preventing Tomato Worms

    Preventing Tomato Worms

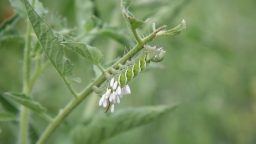
    Is your garden plagued with hornworms or tobacco worms? Also known as tomato worms, these pests can destroy your plants, as they’ll eat the leaves, stems, and even the fruit, leaving pretty much nothing behind. If you enjoy fresh tomatoes – as well as the pleasant experience of growing them – this is a problem. You need to take care of these pests as soon as possible.

    Till Your Soil Well

    Since tomato worms are the progeny of moths (and they turn into moths over the course of a few months), they appear at the same time every single year. Moths lay their eggs on the ground, those eggs hatch in the spring, and before you know it, you have tomato worms eating your crops. The best thing to do is to till your soil up extremely well before planting season begins. This kills the eggs, either burying them deep underground or destroying them before they ever have a chance to hatch. Plus, well-tilled soil leads to some great tomato plants, as it brings all of the nutrients up to the surface. Your plants will thank you.

    Know the Signs

    If you’ve tilled your soil, but are still worried about a tomato worm infestation, then you need to keep an eye on your plants. The main signs to look for include giant holes in the leaves, as well as plants that have leaves one day and very few the next. These worms grow to be about four inches long, and have small horns on their heads (hence their official name – hornworms.) They are the same green shade as the leaves, making them tough to see. With that said, they do become active at night, so you’ll see them crawling around.

    Pick Them Off of Your Plants

    Although it’s not ideal, you can pick hornworms off of your plants. Just put on some gloves, head out to your garden at dusk, nighttime, or during the waking hours, and individually remove them from the plant. You might want to put on some magnifying glasses to help you see them, and you’ll need some sort of portable light. Although it will take some time to remove all of these little guys off of your plants, doing so doesn’t really harm the worms – that is, unless you squish them. Feel free to rehome them to the other side of your house, away from your tomato plants.

    Spray Them with a Hose

    If picking the hornworms off doesn’t sound like your idea of a good time, then spray them off with a hose. Many of them cling to the undersides of the leaves or on the stems. Although they are somewhat stubborn and will hang on tight, you can indeed remove them by spraying their hiding spots with a hose. Just don’t use too strong a spray, or your plants may become damaged. If you do this right, then you won’t have to go with the non-organic “nuclear” option: a non-systemic insecticide.

    Use Insecticide

    Although this should be your last resort, insecticides do work well. There are types made to deal with hornworms that won’t harm any other insects. Make sure to read the label to ensure that you’re purchasing the right kind. In addition, choose a non-systemic insecticide. This type stays on the leaves of the plants and doesn’t soak into the fruit or stems. It only harms the insects that it intends to. Everything else stays safe. Insecticides aren’t ideal, but if you don’t want to spend hours upon hours picking tomato worms off of your plants, you may not have much of a choice. Sometimes you have to make do.
    Electric Companies Have Already Gathered An Army of Lawyers To Take This Down — Take Advantage Before it’s Gone>>>

  • Why are my Vegetables not Growing?

    Why are my Vegetables not Growing?

    You’ve planted your vegetables, and have tended to them properly (you think, anyway), but they still aren’t growing. Instead, you have tomato plants without flowers, tiny zucchinis that wither on the plant, and cucumbers that just won’t grow. Something went wrong, and it’s time to find out what. There are a number of issues that can cause your vegetable plant plans to go awry. Here are some of the most common problems.

    Everything Is Planted too Close Together

    This happens to the best-intentioned gardeners. You start off with tiny seedlings that are transplanted into the ground or a series of grow bags (depending on the plant and how much space you’re working with.) It’s easy to place them close to one another because they’re so small. You didn’t even think to consider how large they’ll get as they grow. The problem here is that since they’re too close to one another, they don’t have any room to grow. They don’t develop properly and will choke one another out as they compete for the same sunlight, water, and root space.

    You Don’t Bother to Weed

    Your plant beds need to be taken care of, and this includes weeding them regularly. It’s easy to think that those weeds won’t cause any damage, but they will. Weeds take up space, hog the nutrients in the soil, and introduce pests to your plants. As a result, your vegetables simply won’t grow properly.

    Weird Energy Solution…Portable Solar Energy System>>>

    They Were Put Into the Ground Too Soon

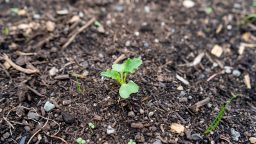
    Cold weather can damage your plants. Some types of seeds, such as tomatoes, won’t even germinate in temperatures that are below 50 degrees. If you want your vegetables to grow, you need to pay attention to the weather. Starting your seeds too early or in the wrong conditions can leave you with sickly plants that don’t produce anything. On top of this, if you plant the seedlings before the last frost of the year, they could die or become damaged by the cold. The results will be plants that don’t really do anything because they just aren’t healthy enough.

    Suggested Article: Why Use a Plastic Sheet in Your Garden?

    You Didn’t Plan Your Garden Properly

    Gardens need to be planned. Certain crops pair well together, while others simply don’t like each other. For example, the three sisters – corn, beans, and squash – will thrive if they’re placed close together because they protect each other and provide the right growing conditions. In order for your garden to be the best that it possibly can, you’ll need to do some research on the vegetables that you want to plant, and then plan everything out accordingly.

    Fertilizer? What’s That?

    If you don’t fertilize your plants, they won’t have the nutrients that they need in order to grow. There are many different types of fertilizer, so you should have no issues finding the best organic or non-organic one for your needs. As we mentioned above, you need to do a bit of research in order to see which types of fertilizer work best for your vegetable plants, and then apply them using the instructions on the package.

    Related Article: 5 Common Fertilizer Mistakes

    There’s Not Enough Sunlight

    Anyone who’s ever tried to plant vegetables in the shade knows what will happen. Without plenty of sunlight, those crops just won’t grow properly. In order to determine the best place for your garden, spend some time looking around your yard at all hours of the day. The spaces that get the most sunlight will be the best place for your plants. Very few vegetable plants will actually survive and thrive in low light conditions. Your garden placement might be to blame for your lack of output.

  • Seed Starter Chart By Temperature (Infographic)

    Seed Starter Chart By Temperature (Infographic)

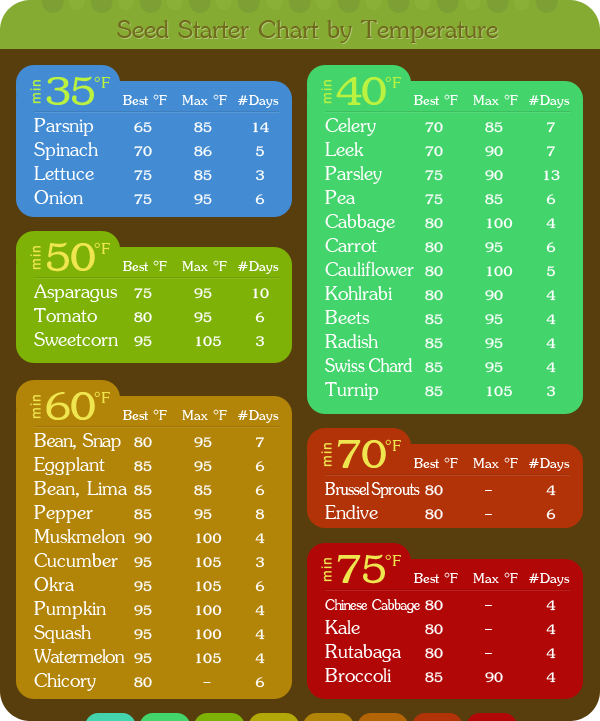
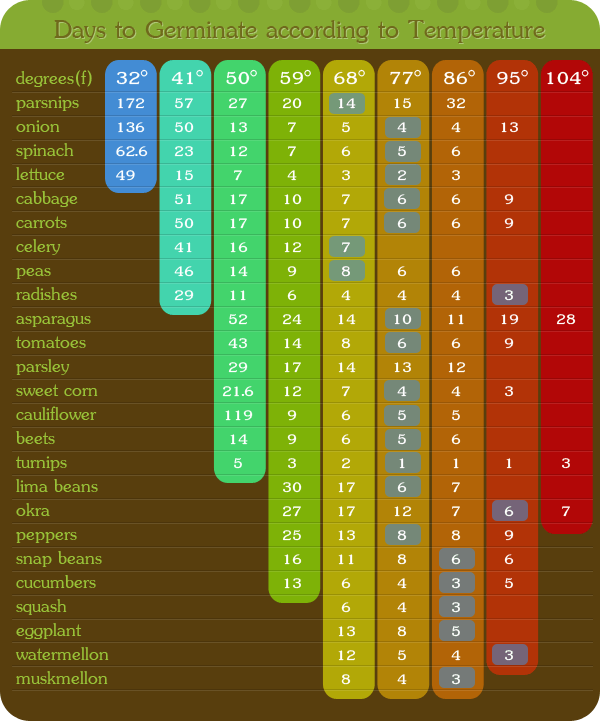
    It’s been officially spring for a few weeks now, but depending on where you live in the country, you could be already wearing your summer clothes, or still shoveling your driveway.

    Temperature is a far better indication of official spring weather than the calendar, and I thought these handy infographics from Cultivatorcorner.com were a great resource to determine what you can plant and when. If you’re already ordering seeds and planning out your garden, this is a great quick-glance guide for when you can get them started.

    Enjoy, and happy planting!

    If you enjoyed this, you might also like….

    How to Lock Down Your Homestead…

    The Ultimate Guide to Natural Health…

    Effective Primal Diet Hacks…

  • How to Make Your Own Seed Tape

    How to Make Your Own Seed Tape

    Continuing in the theme of spring from our last few posts, let’s talk about seed tape today, and how easy it is to make your own!

    Seed tape is a great way to easily plant your first spring crops, because you can guarantee proper placement and spreading of the seeds, as well as greatly reduce your time spent planting.

    Not to mention, the tape itself helps germination, by keeping the seeds protected and moist.

    Here is a very simple tutorial for how to make your own seed tape, that will certainly save you time and money. It only takes a few basic supplies, that are usually easy to find at any grocery store. Let’s get started so you can get planting!

    What you need: 

    • White party streamers
    • Measuring tape
    • Thin-tipped marker
    • Seeds you plan on planting
    • 1 tbs cornstarch
    • 1 cup water
    • 1 small paintbrush

    Directions

    1. In a small saucepan, combine the cornstarch with one cup of water, and mix well.
    2. Cook mixture over medium heat, stirring constantly, until it becomes thick and gel-like.
    3. Once it has a gel-like consistency, remove from heat and let cool to room temperature.
    4. As your cornstarch “glue” is cooling, cut your streamers into the length you’d like your rows to be.
    5. Using your marker and ruler, and referring to the seed packets, mark the points on the streamer you’d like to put your seeds. So, for example, if you are planting kale seeds that need to be 2″ apart from each other, make a hash mark on every 2″ on your streamer.
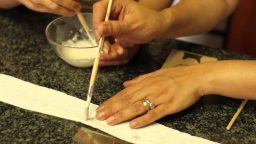
    6. One the glue is cooled, using your paintbrush, dab some on the streamer at each hashmark, and stick the seed to this, completing with another dab of glue if needed. Repeat until you’ve completed the whole length of the streamer.
    7. When you’re finished, paint a thin strip of glue along one side of the streamer, so you can roll it in on itself, making a long tube to plant.
    8. Once the glue has dried completely, it’s ready to be rolled up and stored or planted.

    That’s it! Happy planting 🙂

    If you enjoyed this, you might also like….

    Do You Have What You Need to Hold Down the Fort?

    Natural Healing Secrets You Need to Know…

    Effective Primal Diet Hacks…