Tag: recycling

  • DIY Recycled Planters

    DIY Recycled Planters


    When you are getting ready to start seeds for spring planting, you may find yourself with more seeds than starter containers.

    Instead of running right out and buying some at your local garden center, try digging through your plastic recycling bin instead.  Empty plastic soda and water bottles are durable enough to handle taking on plants but easy to cut down, trim and otherwise alter to create a handy little planter to suit your needs. Here are two options to create plastic planters.


    Standard Planter

    Cut or punch drain holes around the bottom of the bottle. Any easy way to accomplish this is to turn the bottle upside down and use an awl, drill or screw and screwdriver to punch through the plastic.

    Most bottles have a built-in pattern you can follow.  Just place a hole in the center of each raised area of the bottom, so when its flipped back over, the holes will be evenly spaced at the very bottom of the bottle.

    If you need to make the initial holes wider, a large screw will force the holes open more.

    Remove the top of the bottle. In case you were wondering why we didn’t do this first, leaving the top on makes the bottle more stable and easier to work with when punching the holes in the bottom.

    A good guide to measure how far down to cut is to remove the part above the top of the label on the bottle.  If that has worn off or been removed already, your best guess will be fine.

    A sharp pair of utility scissors, or a utility knife or box cutter are good options to make a clean cut all the way around the bottle.

    And, there you have it, a basic round planter that will provide good drainage for your fledgling plants.

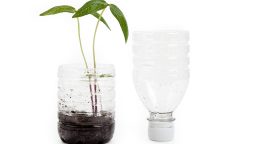
    Self-Watering Seed Starters

    This method not only lets you keep the moisture level of your soil easier to control, but it also uses the entire bottle, even the cap, so there is no waste material going back into the recycling bin.

    1. Cut your plastic bottle in half, separating the top from the bottom.
    2. Punch a hole into the middle of the bottle cap.
    3. Take 12-18 inches of yarn or string, fold it in half and tie a loop at the end of the folded side.
    4. Thread the loop through the hole in the cap so that the knotted loop will be located on the inside of the bottle cap with the two ends hanging out the other side.
    5. Screw the cap back onto the top of the bottle, making sure the loop sits loosely inside the top of the bottle.
    6. Fill the bottom part of the bottle with a few inches of water and the place the top upside down in the bottom so that the two ends hang from the cap and get submerged in the water.

    Once everything is in place, the string/yarn will draw water up into the soil that surrounds the loop in the top.  To add water, you’ll only need to lift the top part out, fill the bottom area and replace the top.

    You’ll be able to see exactly how much water is there and know precisely when its time to top it off.

    Suggested Article: DIY Plant Propagating

    Now You Can Get Planting

    Once completed, you can use these upcycled planters like you would any other to get your seeds started.  Place them all together on a shelf in your kitchen or back porch for a delightful display that is also practical and useful.


    Take a look at this “Medicine Chest” — how to deal with a disaster using alternative medicine.  Check it out here>>>


  • Ways to Recycle Sawdust

    Ways to Recycle Sawdust


    Woodworking projects and home repairs top the to-do lists of many homesteaders, but they generate a copious amount of a largely unwanted byproduct: sawdust. Before dumping your next shovelful of sawdust into the trash, take a look at this list of creative ways to make good use of it:

    • Use for traction when you’re stuck in the snow. Sawdust is traditionally used by logging truck drivers to prevent slipping and getting stuck in harsh winter road conditions. Keep a sealed bag or two of it in your trunk to spread around your tires for extra traction if you get stuck.
    • Keep on hand as a spill kit must-have. Sawdust is a very absorbent material and can quickly contain any spills such as oil or paint. Once the spill is soaked up, the sawdust sweeps up easily and with minimal dust.
    • Decorate with fake snow. Mix with white paint (acrylic or whatever is on hand) and glue to use for seasonal arts and crafts.
    • DIY firestarter bricks. Melt candle wax in a nonstick pot, add sawdust to achieve a thick consistency, pour into an ice cube tray or egg carton, and cool, and store with your camping gear or fireplace items. Use just like storebought firestarters.

      Power Efficiency Guide Will Change Our World Forever>>>

    • Keep weeds under control. Walnut sawdust has natural weed-killing properties. Sweep into the cracks of your driveway or walkway to prevent weed growth.
    • Use as a cement additive. Sawdust mixed into mortar aids in bonding building materials together. It also makes for a good recipe for casting moisture-loving planters.
    • Create a decorative garden path. Spread and tamp sawdust into a dirt walkway to curb erosion and create a soft, fragrant path through your garden or wooded lot.
    • Compost and fertilizer. Mix a little bit of sawdust with manure or a nitrogen source like blood meal. This both fertilizes plants and aids in water retention.
    • Mix with wood glue to fill cracks and holes. Mixed into a putty consistency with wood glue, very fine sawdust is often used by flooring professionals as a cheap, stainable wood filler.
    • Clean concrete floors. Lightly wet a small pile of sawdust with water and use a push broom to spread it around the concrete floor of any workspace. The wet sawdust will bind and absorb grime and hazardous fine dust.

        Check out THESE Effective Primal Diet Hacks…

  • Homemade Root Cellar

    Freezing your food is a great way to preserve it.  But if your freezer breaks, there’s no reason to take it to the dump.  You can still use it to preserve your food by converting it to a mini-root-cellar.  You will be able to store potatoes, carrots, onions, and other crops through winter and into spring without the need for electricity.  Here’s how…

    The first step is to remove the mechanical components.  This could include Freon, which involves using more care and disposing of it properly so you don’t contaminate your area.

    After you have stripped the freezer you are going to cut two circular holes in the sides.  The holes will be used to install PVC pipes for ventilation, so cut them to the size of the pipes that you will be using.  Ventilation is important to prevent spoiling so don’t go too small, the larger the freezer the more ventilation you will need.  The holes should be directly above each other, one neat the top of the freezer, the other near the bottom.

    Next, assemble your PVC pipes.  Place short pieces in the holes in the freezer, then hold a longer piece (it needs to extend at least 1 inch below the bottom hole, and about 12 inches about the top of the freezer (more in places with harsh winters).  Mark on the longer vertical pipe where you will need to cut it to attach it to both shorter pieces that enter the holes on your freezer.

    Once you have assembled the PVC pipes, they should look like upside-down “F”s.  Next, carefully drill some holes near the end of the vertical pipe.  These will be your root cellars only ventilation so you want to drill plenty of holes.  Then cap the top and bottom of the vertical pipe.

    Next, attach the assembled PVC “F”s to your freezer, caulk them in place to secure them, seal the gap, and insulate.  Next, wrap some wire mesh over the ends of the pipes and attach this to the pipes with hose clamps.  This is to keep out bugs and rodents.

    At this point, your freezer is ready to be buried.  If you live in a place with a harsh winter you will want to bury your freezer so that the top is at least 12 inches from the ground level, this is why you needed to make your vertical pipes longer than those with mild winters.  If you live in a place with a mild winter you can make the top of your freezer nearly flush with ground and cover it with plywood and a tarp or whatever you have available, you are done.  If you have your freezer deeper to avoid freezing, you will need to fill in the gap with something light enough to remove when you want to access your root cellar, but that will insulate well enough to prevent freezing.

    Don’t waste time and energy growing crops that end up spoiling because you don’t have room to properly store them.  Make yourself a root cellar this year so you can enjoy all the fruits of your labor.

    If you liked this, you might also enjoy…

    Learn to Heal and Treat Illnesses Naturally…

    An Ancient Secret to Slimmer Waists…

    Learn to be a Master Carpenter at Home...