Tag: stockpile

  • Advantages of Aquaponic Farming

    Advantages of Aquaponic Farming

    Aquaponics is a new way of approaching farming. Unlike traditional agriculture where you needed plants to grow vegetables, with aquaponics you need water and fish in order to have healthy food on your table each and every day. Basically, aquaponics relies on the interdependence between fish and plants: the fish produces bio-nutrients for the plants, while the plants clean the water, creating a perfect environment for the fish to grow and develop. It is a blend of aquaculture and hydroponics that has plenty of advantages. If you need some reasons to get your own aquaponic system started, then here are some of the advantages you will get once you assemble it.

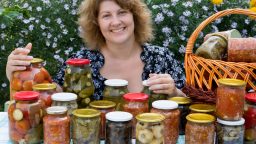
    First of all, you will have fresh organic food on your table each and every day, regardless of the hour when you decide to cook your meals. You simply take your tomato, cucumber of your basil from the aquaponic “field” and use it for your meals. It is as easy as it sounds.

    The second best thing about it is that you not only grow vegetables, but you also have plenty of fish. Whether you want them for cooking tasty meals or simply for your décor, they are a great addition to your home! They also have a practical purpose, as you will never have to use chemical fertilizers on your plants, thus obtaining real organic food.

    If you ask how difficult is this system to put in practice, the answer is extremely simple. Not only will you be able to assemble it all by yourself, without the help of your family or neighbors, but you can also put it wherever you want. If you move from one house to another, then you simply disassemble the system and take it with you! What can be easier than that?

    Another great advantage of the hydroponic farming is that it offers you financial independence and control over your money. You know exactly how much you need to spend on your food and you will no longer depend on the market for your veggies’ supplies.

    Related Article: “5 Things to Consider When Building an Aquaponic System”

    Last, but not least, it involves no dirty hands and clothes, no bending and digging, no land and little maintenance time, so it will be like your veggies and fish grow all by themselves! Quite an easy to put in practice system, suitable for all types of people, even for busy and impatient ones!

    There are plenty advantages that the aquaponic system can offer you! Your health and your comfort will be improved, while your savings will considerably grow with the constant use of the aquaponic type of farming! If this is what you want, then why not give it a try? 

    [Boost Your Plants Growth] Step by Step how to build your own Aquaponics System <<<Access Here>>>

  • 7 Steps for Easy Canning

    7 Steps for Easy Canning

    If you decide to get into the wonderful world of canning, be prepared to experience some of the more flavorful food you’ve ever experienced at a fraction of the cost. Canning allows you to pick or buy produce when it’s at its peak maturity and preserve that flavor year-round. The simplest canning process is Water Bath Canning.

    To get started you’ll need a few inexpensive basics, many of which you may already have, or be able to find at your local thrift store or flea market. The absolute essential musts are:

    • A pot that holds enough water to cover any sized jar.
    • A Jar Lifter or Canning Rack, or at least something to help you remove the jars from boiling hot water.
    • A set of jars with the seals and rings intact.

    I found this inexpensive, complete set on Amazon “9 piece canning set”

    Getting to Work

    Step 1

    Fill your canning pot about one-third full of water and a secondary pot completely full.  Heat water until hot, not boiling.

    Step 2

    Wash your jars seals and lids, then keep warm until ready to be filled.

    Step 3

    Prepare food and fill jars according to the recipe you are using. Remove air bubbles by running a non-metallic utensil around the inside of the jar. Wipe the rim of the jar with a clean, damp dish towel or paper towel.

    Step 4

    Place the seal and ring on the jar and gently finger tighten.

    Canning is a great way to “stockpile food”, check out this “Complete System for Building a Delicious Food Stockpile”

    Step 5

    Place a small board or hand towel in the bottom of your canning pot to keep the jars from making contact with the bottom.  Place jars in your canning pot making sure the water can flow freely around the jars. Add hot water as needed until the jars are covered at least halfway up.

    Step 6

    Cover and bring to a full boil. Start timing according to your recipe.

    Step 7

    When your time is up, turn off the heat, carefully remove the jars and set upright to cool. As the jars cool, the seals pull down into the vacuum that is created and compress with a small pop.

    When They’re Cool

    After jars have cooled, press on the lid to check the seal.  It should be sucked down, not popped up.

    If you find a jar didn’t seal, just put it in the fridge and use the food within 2-3 days like you would leftovers.

    Caps will sometimes rust if left on during storage so it’s a good idea to remove the screw caps then wash the jars.  If one gets stuck, just leave it one and try to use that jar of food first.

    Label the jar with the food type and date and store them in a dark, dry and relatively cool area like a kitchen pantry.  Avoid storing them in direct sunlight, or in utility rooms with where they will be exposed to heat or high humidity.

    A Note on Jelly, Jam, and Preserves – What’s the Difference?

    They may all look the same in their jars, but there are differences, mostly in what form the fruit is in when it’s prepared for canning.

    Preserves

    Once upon a time, preserved fruit was just that. Whole or large chunks of fruit preserved in sugar for use out of season. Not designed to spread on toast, they were more often opened and served as a side dish in the absence of fresh produce.

    Jams

    These still contain pieces of fruit but they have been pulverized into pulp.  Lately, Jams and preserves have become almost interchangeable but at one time there was a considered difference between the two.

    Jelly

    Jellies are made using only the juice of the fruit that is then thickened so it can stand on its own.  Usually with pectin, sometimes with gelatin.

    Tip: How to Properly Store Your Food and Increase its Shelf Life