Tag: trees

  • Harvesting Your Own Maple in Just a Few Simple Steps

    Harvesting Your Own Maple in Just a Few Simple Steps

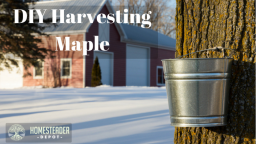
    Tapping maple trees for sap may seem like a daunting task. However, it really is not hard to do. In fact, this outside activity can be fun as the days get warmer in anticipation of springtime.

    But what if you are not sure which trees are maple? Or which maple trees are the best to tap? Be assured that being self-sufficient doesn’t mean you need to be a pro at tapping. Why not start out with tapping just a few trees? You could join in with neighbors or homesteading friends to see if it is something you want to do every year.

    The time of year to do the tapping depends on when the temperature warms up over 32 degrees in the day but still freezes at night, generally from February through late March or early April. With the following tips, you’ll be serving homemade pancakes with maple syrup in a matter of a few weeks.

    Preparing to Tap

    The tools needed are a hammer, a bucket with a cover (or buy a maple pail at the local home improvement store), a drill of some sort, 5/16 or 7/16 drill bit, and a few spiles (or taps). To cook the sap, having two crockpots (a large and a medium size) works best but you can also use large and medium-size pots. You need a colander, some coffee filters, jars for the syrup, and something like a giant pitcher to store the sap.

    Finding the Best Maples

    If you didn’t get the chance last fall to mark the trees you want to tap, identifying the right type of maple trees by other means is possible with a few tips from us. The best kind of sap to tap comes from the sugar (aka hard, black, or rock) maple and you can tell a sugar maple by the type of branches they have. Their branches are what is called “opposite” as opposed to “alternate” branching. Opposite means the branches shoot out from the stem directly across from each other in opposite directions in a uniform manner, whereas alternate branching means that the branches shoot out from the stem alternating without being directly across from each other. If there are any leaves left on the tree or on the ground to examine, sugar maples are usually big with a smooth outline of the leaf, not real jagged or tooth-like. Don’t worry if you get the wrong kind of maple; you will still get some sap.

    Tapping

    Look for older large size sugar maples so you can put two or three taps in one tree. You should drill the hole for the spiles on the south side of the tree about at chest height at a slightly upward angle so when you hang the bucket, it won’t slide off the spile. Pound the spile into the hole with the hammer and place the bucket with the cover on it to keep pieces of wood or leaves from getting blown into the sap. To get the sap to start flowing, you may need to blow your hot breath into the spile. Once it starts, you should check the buckets every day and remove sap to store in the fridge until you have enough to start cooking a batch in a large crockpot.

    Making Maple Syrup

    You should cook the sap within seven days of harvesting it. The best way to prepare sap is in a large crockpot. To strain the sap, place a colander with several coffee filters spread out and flattened to pour the sap through into the crockpot. Fill the crockpot almost full with sap. Bring it to a simmer on high setting and then turn down to low until it has reduced down to half, which will take about eight hours or overnight. If you have more sap to cook, pour the melted amount into another smaller crockpot. Keep on warm until it gets darker and the consistency of syrup. Keep filling the large crockpot with more until you are finished with the season’s amount.

    Conclusion

    Now, that wasn’t so hard, was it? You may have surprised everyone with more than you expected. If so, you can always have pancakes for breakfast, lunch, and dinner, plus give some away as gifts!

    [Discover] The ONLY battery reconditioning resource that lets you easily bring nearly any type of dead battery back to life…<<<Learn How Here>>>

  • What Is Guerrilla Tree Planting?

    What Is Guerrilla Tree Planting?

    A lot of people out there would love to live a more sustainable lifestyle. One in which you give back to the environment from which we take so much. If you live in a city or suburb, or even if you’re homesteading, it might feel like there’s only so much you can do to make a positive impact on our natural world beyond your own small life.

    When it comes to living a greener life, there are so many great ways you live more in a more sustainable and self-reliant way. Whatever your views on environmental policy, I think everyone would agree that being a good steward of the earth we live on is not only moral, it is prudent and efficient.

    For this reason, many people are motivated by considerations of future generations when they try to live in a more sustainable way.

    But there is a very cool, and easy way, to spread your good intentions around to others, beyond your own front door or homestead.

    It’s called guerilla tree planting. 

    Remember Johnny Appleseed? He was definitely on to something. Wherever you live and whatever seeds you’re able to get your hands on, you too can leave something awesome for the next generation by planting seeds stealthily and wherever you can.

    One option would be to simply save your apple seeds, or stone fruit seeds, avocado pits, nuts, whatever you’re able to get your hands on. Of course, consider the climate you live in or will be visiting, and plant what makes sense to plant there. Food trees are a wonderful gift to give back, for sure, but don’t feel limited to edible plants. Try to save the seeds and pods from wonderful shade and wood trees as well.

    If you want to go a step further, you could even start seedlings in your backyard, and disperse these throughout your community. Take them to the park, to vacant lots, hiking trails, friend’s property, wherever you can find a patch of land in want of more trees. If you have children, they’ll love joining in, and returning to visit these trees to see how they grow as they themselves grow up.

    Give a little back to the amazing creation that sustains you!

    If you enjoyed this, you might also like….

    Long-Term Survival for Homesteaders…

    Natural Healing Secrets You Need to Know…

    Effective Primal Diet Hacks…


  • Stump Removal Hack: Epsom Salt

    Stump Removal Hack: Epsom Salt

    If you have any experience with removing a stump, you know what a headache it can be. It will either cost you hours, possibly days, of backbreaking, arduous labor, or way too much money to pay someone to do it for you.

    No matter how successful you are at cutting down a tree, the truck is a whole different story. Part of what makes stump removal so difficult is that a well-established root network will keep that stump alive, and, if not dealt with, will continue to grow and even sprout off new shoots. There are chemicals that can kill a stump and make the removal easier, but there are many disadvantages to these.

    For instance, rock salt or caustic lye are often used to dry out the wood, making it easier to remove. But these will leave high levels of sodium in the soil, which might make the soil impossible to plant in after you’ve removed the stump. Potassium nitrate, on the other hand, which is another common stump removal chemical, can help speed along decomposition, but often fail to fully kill the stump.

    Enter Epsom salt. Epsom salt is a wonderful tool for the organic gardener and homesteader, and it can aid tremendously in the removal of a stubborn stump. Otherwise known as magnesium sulfate, Epsom salt will draw moisture out of the wood, which will slowly kill the tree and root system.

    Not only will this successfully kill a living stump, it will also actually improve the soil it’s being removed from, as opposed to the other chemicals you might consider using. It adds magnesium and sulfur to the soil, which are great for plants.

    What You Need

    • 100% Epsom salt
    • electric drill with 1″ spade bit
    • mattock or grub hoe
    • water

    How To Use 

    It’s very simple to apply the Epsom salt to a stump to aid with removal.

    1.  Drill holes all over the top of the stump. Begin drilling 3″ from the perimeter of the stump, and space each hole around 3-4″ apart from each other. Drill as deeply as you can, you’ll want them to be at least 8″ deep.
    2. Pour the Epsom salt in all the holes.
    3. Add enough water to each hole to moisten the Epsom salt. The water will then disperse the salt throughout the cells of the tree, drying them out and, subsequently killing them.
    4. Use your mattock or grub hoe to uncover as much of the root structure as you can.
    5. Pour Epsom salt all over these roots, to prevent nutrients and moisture from being carried to the base of the tree.

    Now, you wait. Depending on the size of the stump, it could take up to a few months to die, in this case, you’ll want to re-apply Epsom salt every three weeks.

    Look for the signs that the stump is dead: dark, brittle wood is a good sign, soft, light wood will need more Epsom salt.

    Hope this is helpful for the removal of any stubborn, well-established stumps on your property.

    If you enjoyed this, you might also like….

    Do You Have What You Need to Hold Down the Fort?

    Natural Healing Secrets You Need to Know…

    Effective Primal Diet Hacks…


  • Stump Removal (VIDEO)   

    Stump Removal (VIDEO)  

    Getting rid of an unwanted tree doesn’t end with cutting it down (that’s the easy part!) Even after cutting it up and hauling it off or chipping it, you will be left with a stump, and this can be where the real work starts.

    I’ve seen people try to get around this with various methods, including burning the stump, which is so dangerous I can’t believe people do it.  The fire can easily travel underground through the roots, starting other fires.  But in this video, the method of using a farm jack to lift the stump while cutting the roots is clearly demonstrated.  This method might not be as easy as burning the stump, but it is quicker, and much safer.

    If you liked this, you might also enjoy…

    Learn Natural, Holistic Medicine Skills at Home…

    Ever Considered Taking Yoga? Watch This

    The Ultimate Woodworking Course..


  • Tips for Pruning Fruit Trees

    Tips for Pruning Fruit Trees


    Fruit trees, like all perennials, are a great source of food for years to come, and should therefore be taken care of to keep them healthy and productive.  Some find it hard to bring themselves to cut anything from their fruit trees thinking that pruning will harm the tree, or that it will reduce productivity since in other cases in the garden, the more the plant grows the more food that it will be able to produce.  But this isn’t the case, fruit trees can benefit greatly from pruning when it is done correctly.  Here are a few tips for pruning your fruit trees.


    Clean Cut

    Always use a sharp saw or sharp snips.  If your tools are dull you can cause the branches to break or split rather than produce a clean cut.  Splitting will increase the risk of disease and will cause the affected portion of the tree to die back.  When removing a large heavy branch make a cut at least two feet from the crotch since the weight will likely cause a snap, then the final cut can be made at the crotch after the weight has been removed.

    Selection

    It’s important to know which branches to remove.  Focus on broken or sick branches first.  Then look for branches that interfere with each other or point back to the center of the tree.  Branches with sharp angles are likely to split when weighed down with fruit, remove branches with angles sharper than 10 o’clock and 2 o’clock.  All shoots coming from the roots can be removed, they will only interfere with the top branches are unlikely to produce good fruit.

    Timing

    Pruning should be done when the tree is dormant.  This is when the tree is not growing, for the most part this will be in the winter or the fall.  Emergency pruning, like branches that have been damaged by wind or broken under the weight of fruit should always be removed as soon as possible and not left until winter.  Root shoots can also be removed out of season.


    Proper pruning can help your fruit trees, so don’t shy away from removing a few well-selected branches this winter.

    If you liked this, you might also enjoy…

    Become A Master Healer With This Revolutionary Course…

    Traditional Hindu Yoga for Weight Loss

    Improve Your Carpentry Skills Quickly and Easily..