
From Cavemen to Robin Hood and our own Native American neighbors, a well-crafted bow and arrow set has provided food and protection for humans for thousands of years. And while the technology has certainly advanced, if you find yourself in need of a weapon for hunting or protection, the tried and true “primitive” design of old will give you what you need every time.
First, some vocabulary:
Belly: the inside of the bend when a bow faces you while in use.
Back: the outside of the bend.
Handhold: the center area of the bow
Upper limb: the area above the handhold
Lower limb: the area below the handhold
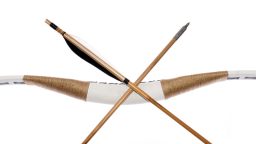
Fletchings: the feathers or other material attached to the back of the arrows
Tiller: tillering is the adjustment of tiller by removing material from a bow limb or limbs.
Selecting Your Stick
There are some things to be aware of when selecting raw wood for your bow. The piece should be dead and dry but not so old that it’s cracking, brittle or fraying. Hardwoods work best, these include oak, hickory, yew, lemon tree, black locust or teak.
Make sure the stick is free of knots, twists or protruding limbs and preferably be thicker at the center. Keep the length between 5-6 feet long
Finally, the length must be flexible.
Green wood pieces cut from a living tree can be used in a pinch, but don’t provide the same force and power that a dried piece will. If you are doing this at home and can plan ahead, cutting several that meet all the criteria and letting them dry for a few months will ensure you have the best possible start for your project.
If you are doing this in a survival scenario, then just do the best you can with the options you have available.
Every stick has its own natural curve, to find this, put one end of your stick on the ground while lightly holding the top with a hand. Next, use your other hand to lightly press into the sticks center. The stick will swivel as pressure is applied and the center bends. To determine the handhold area. Do this by marking 3 inches above and below the center point of the stick to create a 6-inch span.
Shaping the Bow
Always work only on the belly side. Keeping the back area untouched will allow the natural strength of the wood to stay intact under the pressure it experiences during use.
Begin to shave wood off the less flexible areas of the bow until both limbs curve in a similar manner to each other. As you work, you want your bow to be thickest in the handhold area.
Tip: If you live off the grid, on a homestead or simply want to learn natural remedies and more “Lost Ways” of living <<<Click Here Now>>>
You can check your progress regularly by flexing the wood. When both limbs are more flexible and symmetrical to each other in curve and diameter, you are ready for the next step.
Cut notches 1-2 inches from each end to hold the bow string. They don’t have to be very deep, just enough to hold the string in place and not compromise the tips’ strength.

Bow String
Your string should be rigid, not stretchable. Possible options include:
- Rawhide
- Nylon Cord
- Hemp Cord
- Fishing Line
- Twine
Cut your string a little shorter than the length of the bow stick. Then, tie a loose loop with a secure knot at each end of the string. Slip it over the lower limb and then the upper limb.
Finally, “Tiller” the bow to check for evenness as the limbs flex. To do this hang it upside down by the handhold from a tree branch or similar. Pull downward on your string slowly to look for areas that are flexing unevenly. At this point, you can make final adjustments by carving out wood as required and re-checking. Once completed, your bow should tolerate being bent a distance equivalent to the length between your hand and your jaw.
Constructing the Arrows
Arrow wood should be in the same condition as bow wood, just half as long and thinner.
First, shape your arrows. If you can’t find completely straight options, you can do it yourself by carefully heating the areas over hot coals, making sure you don’t burn or mar the wood.
Next, you need to use a knife or other sharp tool to smooth the stick all the way around the length and carve a notch in the back to hold the bow string when aiming.
The most readily available way to create an arrowhead is to sharpen the front of the arrow into a point. This area can then be hardened by carefully heating it in the coals of a fire.
Fletchings act similarly to rudders on a ship and can improve an arrow’s range of flight and accuracy. Depending on your needs at the time, the choice to add this feature is up to you.
To include fletching, split the back of the arrow and slide the feathers in. Then tightly wrap a thin thread around the fletching and arrow.
Now, go out and test your new creation, taking precautions not to harm anything or anyone you aren’t intending to. Remember, bows and arrows are weapons and should be treated as such.