Page 2 of 7
1 2 3 4 7
October 2016 – Page 2 – Homesteader Depot

Month: October 2016

  • How to Make Elderberry Syrup

    How to Make Elderberry Syrup

    Elderberries are a favorite for natural health enthusiasts, for their healing and soothing properties for colds and flus. Elderberry syrup is a popular way to consume it, and is far healthier that over-the-counter cough syrup full of chemicals, sugar, and drugs.

    They contain a high amount of vitamins A, B and C, which support the immune system and help fight off sickness. If taken before getting sick, they can help prevent an infection from spreading throughout the body, and if taken after getting sick they can help prevent the infection from spreading into the respiratory tract, making the sickness much worse.

    You can find elderberry syrup at your local health food store, but it can often be quite pricey. Making your own is a great alternative, it’s easy and far more affordable!

    What You Need:
    • ⅔ cup dried black elderberries
    • 2 Tablespoons fresh or dried ginger root
    • 1 teaspoon cinnamon
    • ½ teaspoon cloves or clove powder
    • 1 cup raw honey or maple syrup
    • mason jar or bottle
    • strainer
    Instructions:
    1. Put all the ingredients except the honey in a medium saucepan with about 3.5 cups filtered water
    2. Bring the mixture to a boil, and then reduce the heat to low and let simmer for about 45 minutes. After 45 minutes it should have reduced to about half.
    3. Remove from heat, and gently mash the elderberries
    4. Strain
    5. Let the mixture cool
    6. Once it is fully cool, and the honey and stir well
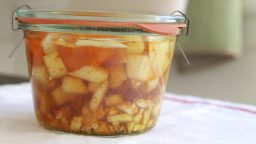
    7. Pour into a jar or bottle

    Keep your freshly made elderberry syrup in the fridge and take as needed. It can be taken daily as an immune-boosting supplement or when trying to prevent or heal sickness, although when you are sick, you will probably want to take or administer one does every 2-3 hours. A typical dose is .5-1 tbs for adults and .5-1 tsp for children.

    If you liked this, you might also enjoy…

    Natural Healing Techniques Doctors Don’t Want You to Know…

    The Weight-Reducing Magic of Yoga…

    The Ultimate Woodworking Course..

  • DIY PVC Hoop House (Video Instructions)

    DIY PVC Hoop House (Video Instructions)


    It’s getting cold, and your crops are certainly feeling it when they are left exposed.  A greenhouse is a great thing to have, but they are also expensive.  A cheaper alternative is a hoop house.  There are lots of videos that people have put online of their hoop houses and how they built them, but they all seem to still involve framing out the back and front with lumber and putting a swinging door on.  These luxuries can double the cost and difficulty of constructing it for those that aren’t carpenters or don’t have the tools necessary.  Here is a video of step by step instructions showing how to make a PVC hoop house using only PVC conduit, rebar, rope, wooden stakes, and the plastic sheeting that covers it.  The hoop house in the video is for large row crops, but the basic design could easily be sized down to cover raised beds in your garden.  One detail that he does leave out that might help you is to leave the PVC out in the sun to heat up to make it more flexible.  And remember, even if your garden has already stopped production, having a hoop house can also add to your growing season by allowing you to start your crops earlier in the spring.  Hope this helps!


    If you liked this, you might also enjoy…

    Learn to Heal and Treat Illnesses Naturally…

    An Ancient Secret to Slimmer Waists…

    Learn to be a Master Carpenter at Home...

  • How to Keep Rabbits Away from the Garden

    How to Keep Rabbits Away from the Garden

    Sure, they might look cute, but wild rabbits can be a lot more trouble than they’re worth when it comes to the safety of your garden. If you and your family depend on the garden for your food, you can have rabbits coming in and devouring everything in sight. If you are proactive when you first see a rabbit in the garden, it could save your crops. Fortunately, there are some simple things you can do to keep the rabbits away from your veggies.

    While some rabbits are overly picky, there are certain types of vegetables that they tend to avoid. By planting some vegetables that they don’t like, you have a lower risk of rabbit problems. Some of the plants that they don’t tend to eat much of include cucumbers, corn, squash, tomatoes, and peppers.

    Of course, you should be able to plant the crops that you want. Therefore, you will want to look at some of the other options for keeping the rabbits out of the garden. One of the best, which will work for rabbits as well as some other creatures, is to build a fence. Having a wire fence – chicken wire work well – around the garden can help to keep the rabbits out. However, you want to make sure that you bury the bottom of the fence down about six inches into the dirt. This will discourage the rabbits from trying to dig their way under.

    Another good trick is to spray urine or blood from coyotes or foxes around the area. You can find it online and in many hunting and outdoor stores. You can also collect it yourself if you trap or hunt coyotes or foxes.

    You can also put some cages around the plants help keep them safe. Additionally, you could put some cage traps around the garden to capture the rabbits and then relocate them. Of course, you can always put out other types of traps rabbits and then utilize their meat and fur.

    With these simple tips, you should be able to keep the rabbits out of garden.

    If you liked this, you might also enjoy…

    Learn to Heal and Treat Illnesses Naturally…

    An Ancient Secret to Slimmer Waists…

    Learn to be a Master Carpenter at Home...


  • Winter Composting Tips

    Winter Composting Tips

    A compost pile that has done fine all year long can freeze solid on you in the winter.  This could leave you having to buy soil or compost in the spring when you are planting again.  To avoid this, keep these tips in mind this winter for your compost pile.


    Build it Big

    A large compost pile will remain hotter than a small pile.  There will be more food in it for composting organisms and the outer portion will insulate the center.  When temperatures drop, worms and other organisms will simply migrate to the center of the pile until it warms up again, rather than dying off leaving your pile in stasis.

    Put it in the Sun

    Place your winter compost pile where it can receive the most sunlight.

    Cover It

    Cover your compost pile with plastic.  This will allow you to control the moisture level and insulate it from the cold.  If possible, use black plastic since it will absorb the most sunlight and heat up more.

    Add hot Material

    Make sure to keep feeding your composters with the material that heats up your pile.  Grass clippings will probably not be on the menu for them in the winter but coffee grounds are a favorite of composters.

    Don’t Turn

    Turning your compost pile in cold weather will allow all the heat to escape the warm center which could be fatal to your composters.  When you adding more food for them, like coffee grounds, instead of turning the pile make a hole in it with a long stick.  The handle of a shovel should work, jab it into the center of your pile and wiggle it around until you have a hole that you can pour your grounds into.  Then fill the hole back up with you done.


    Don’t think that because the days are too short to grow vegetables this time of year that you have nothing to do in the garden.  Staying on your compost in the winter will give you the ability to get your garden going quicker and with better results in the spring time.


    If you liked this, you might also enjoy…

    Learn to Heal and Treat Illnesses Naturally…

    An Ancient Secret to Slimmer Waists…

    Learn to be a Master Carpenter at Home...

    Edit

  • Fire Cider Recipe

    Fire Cider Recipe

    Fire cider is a great recipe for health through the winter and warding off colds and flus. You can take regularly or whenever you are sick, as a remedy. It’s an old folk recipe that has many variations, this is just one of course. If you know anyone who makes it, ask them how they do it!

    It takes a month to properly ferment, but once it is complete you can take it by the spoonful as needed or add to juice or even as a flavoring to chicken or rice dishes. It lasts a long time so make a big batch once or twice a year and see how many different ways you can incorporate it into your cooking or health routine. Those who make it generally rave about it so give it a try and see how you like it.

    Ingredients: 

    • 1/2 cup grated ginger root
    • 1/2 cup grated horseradish
    • 3 tbs grated turmeric root or 1 tbs powdered turmeric
    • zest and juice from 1 lemon
    • 1 onion, chopped
    • 2 large hot peppers, chopped
    • 10 cloves of garlic, chopped
    • 2-3 sprigs of fresh rosemary or 2 tbs dried rosemary
    • 2-3 cayenne peppers or 1 tbs cayenne powder
    • apple cider vinegar
    • raw honey

    Recipe:

    Note: you will probably want to wear gloves while preparing this, and have your kitchen well-ventilated! If you are sensitive to onions and peppers, you might even want to consider covering your face and breathing carefully while you chop the onion and peppers.

    1. Prepare all your ingredients, carefully, and place them in a quart-sized jar.
    2. Cover with the apple cider vinegar. Stir all the ingredients vigorously.
    3. Place a piece of thin cloth over the top, and secure the lid over it.
    4. After a month, strain out the pulp and pour into a bottle or jar. Make sure to arefully squeeze all the juice out of the pulp.
    5. Once in your bottle or jar, stir in the honey. Add as much or as little as you like to get the desired sweetness
    6. Keep in  your cupboard and use as desired!

    If you liked this, you might also enjoy…

    Natural Healing Techniques Doctors Don’t Want You to Know…

    The Weight-Reducing Magic of Yoga…

    The Ultimate Woodworking Course..

  • 3 Things You Should Stop Doing in Your Garden

    3 Things You Should Stop Doing in Your Garden

    There is no one right way to garden, everyone’s resources differ and everyone’s approach will also differ.  That being said, there are some practices that will tend to yield better results, and there are some that should be avoided.  This is a list 3 things that people commonly do in their garden that you should not be doing in yours, and why.


    Tilling

    Tilling hard, or weed-covered ground to get it ready for row planting is a common practice.  But it can be counterproductive to the reasons why most people chose to do it.  First, it can destroy soil structure and kill beneficial organisms.  This can lead to the soil becoming more compact over time.  The other reason many chose to till is to clean weeds, but tilling can result in bringing weed seeds to the surface.  It would be better to save the money, time, and energy building raised beds that will never become compacted, and won’t have a seed store of weeds in them.

    Comfrey Tea

    Many people wanting to grow organically have turned to comfrey as an alternative, and for good reason. But while comfrey tea boasts many beneficial properties, it can take time an energy to make and can be a bit overrated. It smells like hog manure at best, I’m not exaggerating.  It takes weeks to get and space to store and “brew”.  The same advantages and more can be had by simply cutting your comfrey leaves and mulching with them.  In fact, the tea doesn’t even provide mulch, which will in time become food for beneficial organisms and become plant available on a similar timeline to making “tea” from the leaves.

    Using Synthetic Fertilizers

    Most of the people who chose to use synthetic fertilizers do so because they are cheaper than store bought organic fertilizers.  But a better approach would be to help strengthen the natural food web in your garden by supplying natural (and often free) food for beneficial organism.  You can do this by using green manure, comfrey, coffee grounds, wood chips, grass clippings, egg shells, and homemade compost.  Consider testing your soil as well, it might be more nutrient rich than you think.  Avoiding synthetic chemicals in your garden is healthier for the food web, your plants, and therefore you.


    Your garden is yours, you can do what you want in it.  But replacing these practices with the suggested alternatives will get you more enjoyment and more food out of your garden with less hassle.

    Natural Healing Techniques Doctors Don’t Want You to Know…

    The Weight-Reducing Magic of Yoga…

    The Ultimate Woodworking Course..


  • Making Non-Toxic Paint

    Making Non-Toxic Paint

    Buckets of paint don’t come with severe warnings about the dangers of the near inevitable contact with skin or inhalation of the vapors coming off the paint for no reason.  Many people think that there is just no alternative to using these toxic substances in their homes.  But what did people use prior to toxic commercially produced modern paints?  One old time paint recipe that some still use today, especially in baby rooms, is made from milk and a few other ingredients.  So before you coat your baby’s crib or the walls of his room with carcinogenic substances consider this non-toxic alternative.


    Ingredients

    For approximately 1 gallon of paint you will need 1 gallon of skim milk, 2 cups white vinegar or lemon juice, ¾ cup of hydrated lime, and 8 ounces of dry pigment.

    Making the Paint

    Pour 1 gallon of milk into a container that holds 1 gallon and allows for more room.  Let the milk sit out until it reaches room temperature.

    Pour in the vinegar or lemon juice and stir.  Curdling should begin immediately, stop stirring and allow this mixture to sit over night at room temperature.

    Now get all your other ingredients ready so that you can mix them with the milk and use the paint quickly since milk paint will spoil.

    Mix your pigment with equal an equal amount of water until it becomes a homogeneous paste.

    Mix the lime with 1 ½ cups of water until it is evenly moist.

    Pour the milk that has now separated into a colander that is lined with cheese cloth so that can collect the solids, this is the portion that you will be using in the paint.

    Transfer the curd solids into your paint bucket, then add in the wet lime paste and stir until it becomes the consistency of paint.  You may need to break down some of the larger pieces.  Then add in your wet pigment and thoroughly mix.

    You will need to continue to stir regularly while you applying the paint.

    Unused paint can be stored in your refrigerator for a few days, but it works best when fresh and should be thrown away when separation occurs.


    Even paints that are marketed for being “green” have warnings on the containers about toxic fumes and other dangers.  Instead of paying more for a slightly different mixture of toxins, why not make your own food based paint so you don’t have to worry about it?


    If you enjoyed this, you might also like….

    Last Resort Home Defense and More…

    Natural Healing Secrets You Need to Know…

    The Healthy Primal Diet Everyone Should Try…


  • Home Kombucha Brewing

    Home Kombucha Brewing

    Kombucha is basically a mushroom that grows in caffeinated tea.  Its origin is unclear, but it has been consumed all over the world for hundreds of years at least.  Kombucha has become folk medicine, with claims that it can treat anything from cancer to diabetes.  While its specific benefits are largely unproven, it is known that fermented foods do offer a wide variety of health benefits especially for digestive issues.  What is undisputed about kombucha is that buying it from Whole Foods is not healthy for your budget.  The good news is that you only need to do it once to easily brew your own kombucha at home, again and again.  Here’s how…


    You will need:

    • 1 bottle of kombucha from the store
    • 1 quart canning jar
    •  1 gallon glass container with a spigot
    • 8 bags of black tea
    • 2 cups of white sugar

    First start by growing your SCOBY.  SCOBY stands for symbiotic colony of bacteria and yeast.  To get one simply pour a bottle of kombucha into a quart canning jar (you might want to take a sip first if you haven’t tried kombucha so you know what yours should taste like when it’s finished).   Then cover the jar with a cheese cloth or two, or a paper towel, use a rubber band to make sure it is held tight to the top.  Put it in an area that it will not get direct light and will remain at room temperature.  Let this sit for about a week, you should notice a firm film develop on the surface, this is your SCOBY.

    Second, brew your black tea.  Stir in the sugar while it is still hot and then let it sit until it has reached room temperature.

    Third, pour your room temperature tea and sugar into your clean gallon container with a spigot.  Then, gently pour your SCOBY into the tea being careful not to tear it.  Pour the whole contents of the SCOBY jar into the gallon container.  The extra liquid will help prevent other bacteria from colonizing and ruining your brew.  Cover with a cheese cloth and put in a dark room temperature area just like your SCOBY.

    Finally, let this mixture sit for 1 week.  At this point you should see a new, larger SCOBY growing on the surface.  You can taste test your brew now.  If it tastes like your original kombucha but not quite as strong, you can let it sit another week.  If after 2 weeks it does not taste like kombucha, then something went wrong.  To improve your luck next time, try to ensure that your containers are very clean, make sure that they are covered in a way that prevents contamination, make your tea a little stronger, add a little more sugar, and try adding some apple cider vinegar into the mix with you pour your SCOBY into the tea.

    Next time, you can reuse your full-size SCOBY by just adding room temperature tea and sugar to your gallon container, or by carefully transferring it to another container.


    Even if you don’t receive all of the disputed health benefits, at least you will be saving tons of money compared to buying your kombucha from the store.


    If you liked this, you might also enjoy…

    Natural Healing Techniques Doctors Don’t Want You to Know…

    The Weight-Reducing Magic of Yoga…

    The Ultimate Woodworking Course..