Page 73 of 81
1 71 72 73 74 75 81
Ethan Archer – Page 73 – Homesteader Depot

Author: Ethan Archer

  • How to Make Your Own Butter

    How to Make Your Own Butter

    You don’t have to have your own cow to make butter at home, although of course it helps. There’s nothing like fresh, homemade butter from your own dairy cow to make you feel like the ultimate self-reliant homesteader. But even urban homesteaders can easily whip (literally) up their own batch of delicious homemade butter with raw milk from a farmer or even cream from the store.

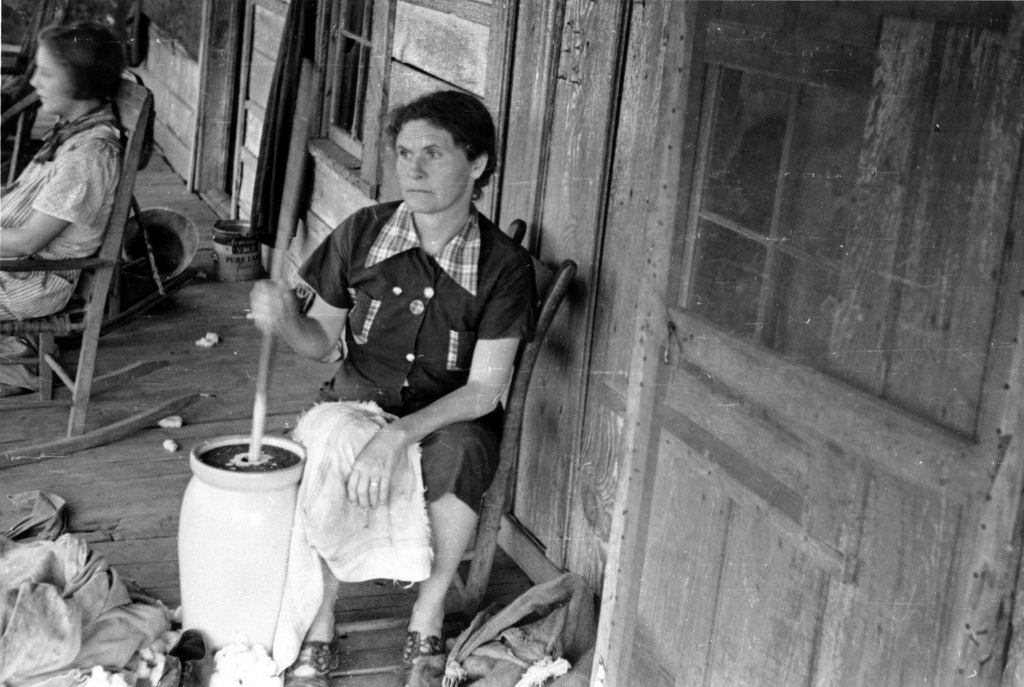
    The ingredients and process are simple: cream + agitation + time = butter. The process of making butter basically involves agitating the cream long enough to separate the fat from what will become buttermilk (so you’re really getting two dairy products out of this) into delicious creamy butter. You mostly just need patience and maybe a little practice, but with today’s modern kitchen gadgets, it’s pretty simple compared to spending hours in the barn with an old-fashioned butter churner!

    She doesn't look too happy!
    She doesn’t look too happy!

    What you need

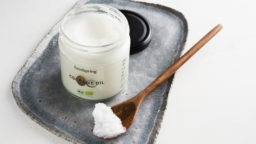
    • Cream, either from the top of fresh, raw cow’s milk or purchased at the store. If it is store-bought, make sure it is organic, preferably grass-fed and never ultra-pasteurized
    • 1 tbs buttermilk, either from the store or left over from a previous batch of butter
    • A stand mixer, food processor or blender

    What you do

    1. If using fresh milk separate the cream from the milk. It will usually be right on the top if the milk has been resting and you can spoon it off. You’d ideally like to have a cup or so, but use what you can get!
    2. Combine the buttermilk with and cream in a container you can seal and leave on the counter for eight hours. This will culture the cream, which allows the bacteria to convert the sugars in the milk into lactic acid.
    3. After 8 hours, you’re ready to churn! Put the mixture in your blender, stand mixer or food processor, and mix on low.
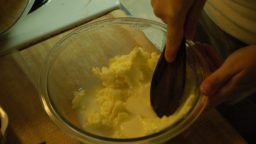
    4. This will take some time, but the cream will slowly start to get lumpier until eventually, it’s completely separated from the buttermilk until it looks distinctly like clumps of butter floating in milk. You should be able to take the butter out and loosely pack into a form (which might not happen until after the next step). Strain the buttermilk off the butter and continue to try to gather it into a ball.
    5. Finally, rinse the butter in water, kneading and forming as you go. After a few minutes, you should have a nice, smooth ball of butter. You can now salt as desired or even add herbs or garlic!
    6. Keep the butter and buttermilk in the fridge for up to a week, or if you plan to keep either for longer, in the freezer.

    This is the most popular sous vide cooker on amazon

    Build ANY Shed with no woodworking experience!

    Check Out These Competition BBQ Secrets

  • Are Quail a Good Choice for Your Homestead?

    Are Quail a Good Choice for Your Homestead?

    Quail have been growing in popularity in recent years, but they’ve been favorites of north American farmers and hunters alike for centuries.

    Theses small birds offer delicious meat, but it’s their incredibly nutritious eggs that most people are after. Despite being smaller than chicken eggs, quail eggs have three to five times the amount of essential nutrients and minerals like vitamin b1, iron and potassium. Also, while chicken eggs are 11% protein, quail eggs are 13% protein.

    Quails may or may not be a good choice for your homestead, depending on a few factors:

    Feed

    Quails are much smaller birds than chickens, hence, they eat considerably less. And, unlike chickens, all they eat are seeds and grain, so their feed is cheaper as well. You can feed them things wild bird seed mix, oats, and flax seeds.

    Space

    Despite having been domesticated for centuries, quail are still not reliable to stick in one place like a flock of free range chickens, so they will have to be enclosed. This is perhaps the biggest challenge of raising quail. As with any animal, you don’t want to box them in too much, so having enough space for them to move around yet remain contained is important. But again, they are smaller than chickens,  so you don’t need anything bigger than the average mid-sized chicken coop. They will also need a sizable roof to keep themselves dry and lay their eggs safely, many people repurpose old dog houses for this.

    Safety

    Quail offer both delicious meat and eggs to humans-and predators alike. So make sure you keep your enclosure secure, and as close to your house as possible. If you have a trusty guard dog, make sure the enclosure is somewhere he or she can keep an eye on it and that you’ll hear barking or confrontation with any critters that may take a shot at stealing some quail.

    Nesting

    Your quail will need plenty of dry bedding, as they are ground nesters and of course you want to give them plenty of material to build their nests and lay in them. Their enclosures will need to be at least superficially cleaned weekly, their droppings raked out and fresh bedding provided. So, if your homestead already produces wood chips or hay, for example, these are great options for bedding.


    Cost

    One final factor that might convince you to raise quail is the price of their eggs! For how nutritious, and delicious, quail eggs are, they are very pricey at the supermarket as well as difficult to find. The average quail hen produces one pound of eggs for two pounds of feed, which is really quite cheap.


    Hopefully this has given you some idea as to whether or not quail are a good choice for your homestead. They’re delightful little creatures with delicious eggs and meat, and easy to raise as well, so if you do decide to raise them they will be a great addition to your homestead.

    If you liked this, you might also like:

    Important Survival Gardening & Stockpiling Info…

    Learn life-saving survival medicine in an afternoon…

  • DIY Pumpkin Spice-From Your Own Garden!

    DIY Pumpkin Spice-From Your Own Garden!

    Everyone goes nuts this time of year for Starbucks’ famous pumpkin spice lattes, and pumpkin spice products in general are very popular.

    If you’re a homesteader, however, you’re probably more preoccupied with what to do with all your pumpkin! Pumpkin vines can be very productive and you end up with more pumpkin than you know what to do with.

    One great way to use up spare pumpkin is by making your own pumpkin spice syrup, which is the base for pumpkin spice lattes and other yummy pumpkin spice goodies (here’s the recipe for the latte itself if you’re interested)

    What you need:

    • Raw pumpkin, cut in half
    • 1 tbs pumpkin pie spice (how to make your own)
    • 2/3 cup brown sugar
    • 1/2 tsp vanilla extract

    Recipe:

    1. Scrape the seeds out of the halved pumpkin and put on a cookie sheet in a preheated 350 degree oven for 30 minutes.
    2. Remove from the oven, let cool slightly, and scrape the pumpkin out of the skin and into a blender. Puree.
    3. Set aside all but 1/3 cup pumpkin puree for other pumpkin recipes. You can let cool completely and refrigerate or freeze for soups, pie, muffins, etc.
    4. Put the 1/3 cup of puree in a medium saucepan with the sugar, water and spices. Bring to a boil, stirring occasionally, and reduce heat to medium low and simmer for 3 minutes until slightly thickened. Remove from heat, let cool.
    5. Keep in a sealed, refrigerated container for up to a week.

    You can use this syrup as you would regular syrup, over pancakes, in muffins or cookies, or raw vegan deserts. And of course, you can use as the base for your own pumpkin spice latte. You can even play around and make a pumpkin spice tea latte or iced pumpkin spice latte!

    Have fun and happy fall!

    If you like this, you might also like:

    Advanced Gardening Course To Accelerate Your Food Production…

    Survival Medicine & Wilderness Survival…

    Survival Techniques From Long Ago, Re-purposed For The Modern Era…

  • Homemade Toothpaste

    Homemade Toothpaste

    It’s really fun, wallet-friendly and healthy to make your own personal hygiene products at home. A great place to start is with homemade toothpaste! It’s really easy and cheap, and quite possibly much better for your teeth than conventional toothpaste.

    This recipe includes coconut oil, which is great for your teeth. The oil naturally attracts the bacteria that contributes to plaque build-up and decay, and leaves a protective layer on your teeth to help prevent more bacteria from settling on your teeth.

    It also includes an optional essential oil, which can kill bacteria as well, and prevent bad breath. One of the nicest sensations from store-bought toothpaste is the refreshing, minty taste it leaves in your mouth, so you can easily mimic that with peppermint essential oil! Tea tree oil, on the other hand, will clean just as effectively and is great at killing germs. You can also use clove oil, which is very effective for cleaning and helps contribute to overall gum health.

    Let’s get started!

    What you need:

    • A small jar
    • Baking soda
    • Coconut oil
    • Essential oil of choice (peppermint, tea tree, clove, lemon, or oil of choice. Feel free to play around!)

    What you do:

    1. Fill about 1/3 of your jar with coconut oil. Begin to pour in your baking soda and combine thoroughly until you get a smooth paste. Bear in mind the consistency will change based on temperature because of the coconut oil, so if your bathroom is warmer than your kitchen, it might turn into liquid, if its colder, it will get more solid. You might want to leave the coconut oil in the bathroom for 24 hours before making the toothpaste so its the same consistency it will be when made into toothpaste and stored in the bathroom.
    2. Once you have a paste that is the consistency you’d like, add your essential oils. How much you add will vary based on the size of your jar, but for a 1 oz jar, about 10-20 drops essential oil will probably be sufficient. Once you’ve added the oils, mix thoroughly again to evenly distribute throughout the paste.
    3. Cover tightly and store in the bathroom. You can apply to your toothpaste using a popsicle stick or small spoon. Use as you would normal toothpaste, adding essential oils as needed if the coconut or baking soda taste is too overwhelming.

    The Only Survival Medical Course You’ll Ever Need…

    Essential Survival Skills You Need to Know…

    See what is happening in this country and what you can do to prepare…

  • Tried-and-True Recipe for De-Skunking A Dog

    Tried-and-True Recipe for De-Skunking A Dog

    Country dogs are by far the happiest dogs. Dogs take pride in protecting your other animals and maybe even helping to herd them. They will take their status as guard and protector seriously, and if you’ve got small animals that wild prey would very much like to eat, like rabbits or chickens, dogs will surely keep these predators at bay.

    Unfortunately, sometimes dogs will try to keep a skunk away and get sprayed. We still appreciate their duties as skunks can be predators too, but the skunk’s natural defense system,a putrid-smelling veil of wid-reaching spray, can be very unpleasant and difficult to get rid of.

    Fortunately, there is a surefire method for deodorizing a skunk-sprayed pooch. The classic method is a tomato juice bath, and this can definitely help, especially if you’d like to go a more natural route.

    The following recipe is still very non-toxic, depending on what ingredients you use. It is a scrub made of simply baking soda, hydrogen peroxide and dish soap. If you use eco-friendly, non-toxic dish soap, it is still very effective and perfectly natural. However, if you need a little extra power, blue Dawn dish soap works wonders.

    A quick note on blue Dawn: If you keep one non-natural cleaning product in your home, it should  be blue Dawn dish soap. It’s a powerful de-greaser, so this is useful not just for skunk spray, but also if you spill petroleum products on your clothes or hands. There’s definitely a reason they brag that it’s used for oil spill clean-ups.

    So, in the case of dog deskunking, the choice of soap is entirely up to you, but you and your dog might really appreciate the extra effectiveness of Dawn soap.

    What You Need: 

    • Dishsoap
    • Baking soda
    • Hydrogen peroxide

    What You Do: 

    1. Combine the ingredients in an open container
    2. Put your dog in the bathing area, either a bath or outside by the hose (if its warm enough)
    3. Without wetting the dog, spread the mixture all over him or her, from their collar to their tail. Apply to the head very carefully, avoiding the eyes as the hydrogen peroxide can burn them
    4. Rinse thoroughly. Smell the dog and repeat above process as needed
    5. Rince one or two more times, then shampoo with a pH-balanced dog shampoo

    Remember, removing skunk smell can be quite unpleasant, but having skunks kill your chickens would be worse, so make sure to let your dog know how much you appreciate his loyal protection of your homestead.

    If you like this, you might also like:

    Advanced Gardening Course To Accelerate Your Food Production…

    Survival Medicine & Wilderness Survival…

    Survival Techniques From Long Ago, Re-purposed For The Modern Era…

  • What Breed of Goat Should You Buy? (Infographic)

    Goats are such great animals for homesteaders. They can provide milk, meat, weed control, fiber, even company! But of course, not all breeds of goat are the same. Some are better for meat, others for dairy, etc.

    This very handy infographic from the excellent homesteading site, The Prairie Homesteader, covers what breed of goat is best for what purpose.

    Before buying goats, a very good first step to make is identifying what you want the goats for. This will help you determine the best breed for you. This infographic can serve as a starting point for you, to give you an idea of the most common breeds and their best purposes.

    You’ll want to take into account your area, the size of the space you have for the goats, a need for structure, their medical needs, etc. as well, so consider these factors as well when researching goat breeds.

    Goats are such lovely homestead animals, pick the right breeds for your needs and you’re sure to be very happy with these amazing creatures!

    goat-breeds-infographic-1

    If you like this, you might also like:

    Advanced Gardening Course To Accelerate Your Food Production…

    Survival Medicine & Wilderness Survival…

    Survival Techniques From Long Ago, Re-purposed For The Modern Era…

  • Homemade Apple Cider

    Homemade Apple Cider

    Fall is right around the corner! And while pumpkin spice has gotten very popular in recent years, a timeless fall classic is apple cider. Hot apple cider has long been a staple of fall and the delicious combination of apples and warm spices couldn’t be more classic for the season.

    And it’s very easy to make at home for yourself! Not only is it a very simple process, but the smell of apple cider mulling on the stove will fill your house with the delightful aroma of fall. It’s great to prepare a big batch for a gathering or holiday dinner, there’s nothing quite as classic as a warm pot of apple cider to warm your guests up after their journey.

    What you need:

    • 10-12 apples, washed and quartered
    • 2 oranges, washed and quartered
    • 4 cinnamon sticks
    • 2 tsp ground nutmeg
    • 1 tbs whole cloves or 1 tsp ground cloves
    • 1 gallon of filtered water
    • 1/2 cup sugar, brown sugar, or sweetener of choice

    Instructions: 

    1. Put all the ingredients in a large stock pot, stir to get the spices evenly distributed, and bring to a simmer, stirring occasionally.
    2. Reduce the heat to low, cover, and let simmer for 2 hours
    3. Once the apples have started to soften, gently break apart with a fork and mash gently
    4. After three hours, remove from heat and allow to cool slightly. Then strain through cheesecloth or a fine-mesh strainer into the container you would like to serve from. This can be another pot, a punch bowl, or a pitcher. To get the most flavor out of the fruit, you can try to squeeze the apples and oranges in the strainer or cheesecloth.
    5. Once strained, stir in your sweetener until combined, to taste.
    6. Serve hot and enjoy!

    If you like this, you might also like:

    Advanced Gardening Course To Accelerate Your Food Production…

    Survival Medicine & Wilderness Survival…

    Survival Techniques From Long Ago, Re-purposed For The Modern Era…


  • Surviving Life Unplugged

    Surviving Life Unplugged

    Living off-grid can be a hard transition, and it may include life without internet or cell service, at least for a time. If you are considering at least a temporary transition to unplugged life, here are some tips to stay connected when you’re not…connected.

    Keep Your Smartphone

    If you don’t have internet access and/or cell service on your homestead, it’s probably useful to keep your smartphone, even if you can’t always use it at home it will be your lifeline when you do go into cell range and can check in with email and social media. This probably seems like a no-brainer to anyone who has one, but if you’re one of the few hangers-on who never got a smartphone, living off-grid is actually one lifestyle that a smartphone can be surprisingly useful for. Also, you keep it on airplane mode when you’re out of range, the battery will last significantly longer and you can still utilize offline apps, like the camera, calculator, listen to music, read ebooks, or utilize offline apps.

    Use the Library

    Libraries usually have public internet computers and often even WiFi. All you need is a library card! If you drive into town frequently for shopping or to check mail, the library can just be another stop. Also, if you’re missing TV or streaming media, libraries often have DVDs to rent, and they’re usually very cheap. Extra bonus: rediscover physical books! If you’re new to the area you’re homesteading in, or new to homesteading in general, your library will likely have region-specific books for gardening and animal husbandry.

    Download Media

    Videos, e-books, podcasts and even blogs can all be downloaded for offline viewing. As a homesteader, there are invaluable resources on the internet for information, so when you’re in town, either at the library or on your data plan, take some time to browse your favorite channels and blogs and collect resources. Apps like Pocket, Stitcher, Kindle and websites like Videograbby.com can help you download the -ebooks, blogs podcasts and videos you love for offline viewing.

    Enjoy Yourself

    We’ve gotten so used to constant communication that it can be kind of intimidating thinking of life without. But a mere twenty years ago most people did not have constant access to the internet and cell phones. Life is completely possible, and definitely greatly enriched by life unplugged. If you’re homesteading, you can have the best of both worlds, with all the wonderful resources available on the internet and the technology to take it home without an internet connection, you can enjoy the peace and quiet of a simpler life without being completely unplugged.

    A Survival Medical Course That Will Change the Way You Look at Modern Medicine…

    Essential Skills for Any Disaster…

    Understanding Current Events and How to Protect Yourself…