Page 9 of 20
1 7 8 9 10 11 20
Health – Page 9 – Homesteader Depot

Category: Health

  • How to Make Delicious Homemade Butter

    How to Make Delicious Homemade Butter


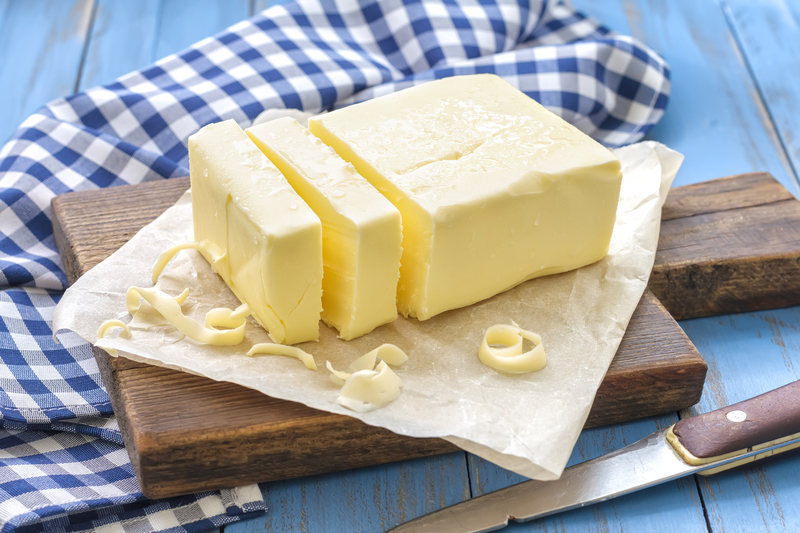
    Imagine the smell of freshly made homemade bread. Now imagine spreading your own homemade butter on a slice of steaming hot bread. Is your mouth watering yet? Mine is! One of the things about my mom that I miss the most is her homestead cooking and one of my favorites was that creamy homemade butter that melted on my tongue.

    Butter Basics

    Homemade butter does not have an oily taste like margarine. The cream and butter that comes from grass-fed cows are high in vitamin E, beta-carotene, and it can lower cholesterol. Even though butter has saturated fat, it is better for you than margarine as long as it is raw organic butter made from organic cream.

    You can make butter with just a few steps. You do not need one of those old-fashioned butter churns or a cow to milk. Although having a cow or two that eat green grass may be a good idea when homesteading, this recipe uses an electric mixer instead of a butter churn. You can even use a mason jar with cover and shake the cream instead of using a mixer. Shaking it will take more time but would be a fun thing for your kids or grandkids to do. If you don’t have cows, you can make butter from organic heavy whipping cream (butterfat content of at a minimum of 35 percent) from your local grocery store.

    Making the Butter

    The amount of cream needed depends on how much butter you want. It should be kept at room temperature for about 12 hours before mixing. About 15-20 minutes (or amount of time that water can be kept in the freezer before freezing) before mixing you need to place 2 cups of water in the freezer so you will have ice water for the recipe. You can make butter with any amount of cream and here is the typical breakdown for a pound or half a pound:

    • 1 quart of cream = 16 ounces (1 pound) butter and two cups of buttermilk.
    • 1 cup of cream = 8 ounces (1/2 pound) butter and about 1/2 cup of buttermilk.

    If this is the first time making butter, you may want to start out with the smaller amount of 1 cup of cream. Pour the cream into a mixer bowl and blend with an electric mixer at medium speed for 10 to 15 minutes. When the cream turns into curd-like lumps, keep blending until it starts to thicken and a watery/milky liquid forms at the bottom of the bowl.

    Stop the mixer and pour off the liquid into a sealable container that will hold about 1-2 cups. The buttermilk will not look like the kind you buy at the store. It is thinner but still can be used in place of water for cooking and baking.

    Suggested Article:  “Canned Corn: Whats the Trick”

    Use a stiff spatula to press the butter up against the walls of the bowl to squeeze out as much liquid as possible. Add about 1/2 cup of ice water and press up against the walls of the bowl to release the buttermilk liquid. Repeat two more times or until water loses its cloudiness.

    Continue to pour the liquid into a container and when finished, seal and refrigerate. Once all the buttermilk is collected, you can add a pinch of sea salt (per pound) to the butter unless you want to keep it unsalted. This process will give you buttermilk to cook with and keep the butter from spoiling.

    Storing the Butter

    Pack the butter you plan to use for the next week into a container with a cover and refrigerate. To store the remainder, wrap in parchment paper and then in foil or plastic wrap. You can store in the freezer for up to six months. Enjoy!

    [You May Also Like] –  DIY Underground Root Cellar

  • Easy Checklist to Winterize Your Garden

    Easy Checklist to Winterize Your Garden

    As a homesteader, you may be wondering where you’re going to get the energy for preparing your garden for winter after all the hard work of harvesting the vegetables from your garden.  Remember how happy you were when you realized that you wouldn’t need to buy any vegetables all winter long? Keep that in mind along with the fact that it will now be cooler to work outside.

    You can print out the below list to check off items as you complete them and before long you’ll be done so you can take a break for a few days. Those gardeners in warmer southern areas can ignore the items not applicable.


    Before Winter Check List

    • Harvest any remaining root plants such as potatoes and carrots after their foliage has withered and died
    • If you didn’t harvest all crops of specific vegetation such as winter squash, eggplant or cucumbers so you could collect their seeds, now is the time to pick before any frost
    • Remove and discard all dead vegetation and rotten vegetables or fruit to keep away any pests that may cling to them for the winter
    • Rake to remove small debris and to turn the soil
    • Now is the best time to do a soil test for PH levels and minerals; adding a fertilizer such as fish and seaweed is excellent for adding minerals
    • Be sure to have some covering handy for signs of the first frost and cover annuals as soon as there is a hint of frost on the way
    • Cut back dead leaves on perennials that can survive winter and rose bushes, cover with about 3 inches of mulch; fragile rose bushes need protective covering if in colder climate
    • Water shrubs and evergreens before a freeze and mulch after freeze
    • Root crops such as parsnips, arugula, or sprouting broccoli can be stored in the ground for the winter (overwintered) and depending on your USDA zone, will need the protection of heavy mulch, a thick layer of straw, tarp or row cover
    • After the first frost, cut back and dig up perennial bulbs such as gladiolus that can’t survive colder climates, dust off and store in breathable container like a cardboard box in a cool, dry place; cover beds with evergreen boughs
    • Repair raised box beds and make more boxes if needed
    • Pruning of shrubs that bloom in the summer should be done after all leaves are gone and while dormant or in early spring; however, hydrangea types such as mopheads should be pruned in June


    More Garden Tips

    • If you haven’t started a garden notebook yet, this is an excellent time to make notes on how each plant did, what problems it may have had, and if any areas didn’t grow as well as others.
    • To tell when to harvest potatoes, rub the skin and if it doesn’t scrub off quickly, it’s ready.
    • To save time and wear on your back when pruning plants, use a pole pruner to remove stems down to the base of the plant.


    Conclusion

    Winterizing your garden is the best way to ensure it will come back next spring looking as good or better than it did this year.  How much time preparing your garden for winter will take depends on how big your garden is, what type of plants you have, and if applicable, when the first frost usually comes and how cold it usually gets where you live.

    No matter where you live or what type of garden you have, we want to wish you a Happy Homestead Winterizing!

    [Food Storage] – How to build a small root cellar in your backyard <<<Watch Short Video Here>>>

  • How to Ferment Vegetables

    How to Ferment Vegetables

    Fermenting vegetables grown in your garden accomplishes two things at once. First, it enhances the nutritional value of the vegetables by preserving them at their peak. Second, it preserves the vegetables, so you can enjoy them all winter long.

    The process used for fermenting vegetables is simple. You need the right equipment and the right ingredients – and before you know it, you’ll have a pantry full of delicious, fermented vegetables for your family to eat.

    Fermentation Equipment

    The equipment you need to ferment vegetables is minimal and inexpensive. Here are the basic things you’ll need to have on hand:

    • Jars or containers to put the vegetables and pickling brine in
    • A sharp knife and cutting board for preparing the vegetables
    • Airlock tops (we like ones that are compatible with Mason jars) to keep oxygen out of the jars
    • A pickle packer (usually a wooden stick used to pack the prepared vegetables into the jar)
    • Weights to weigh down the vegetables

    You can buy these items individually or in fermentation packages.  Here is an easy, complete Fermentation Kit from Amazon you can try.

    Fermentation Ingredients

    The ingredients you need to ferment vegetables depend on the method you plan to use. However, there are only a few variations you need to know about. Here’s what you’ll need:

    1. Fresh vegetables from your garden
    2. Salt, whey, or a starter culture
    3. Water

    There are many types of salt, but some are better suited to fermentation than others. Two of our favorites are sea salt and Himalayan pink salt. Both add a nice flavor. You can also buy pickling salt although it’s not the best choice if you want a natural, minimally-processed salt.

    The water you choose for pickling can make a big difference in the final product. If you use tap water, you should boil it or run it through a reverse-osmosis filter for the best results. Well water often has a high mineral content. That can be good for some kinds of fermentation but it’s not particularly good for some fermented products like kombucha.

    How to Prepare the Vegetables

    The method you use to prepare your vegetables for fermentation depends on what you’ll be preserving. Some vegetables, such as cabbage, ferment most effectively when they are shredded. Others, like cherry tomatoes, can be fermented whole.

    It may take some trial and error to arrive at the proper preparation. You may want to start by fermenting just one type of vegetable. Later, you can mix vegetables to create pickled salads that are ready to eat out of the jar.

    The Pickling Process

    The next step is after you have prepared the vegetables is to place them in the jars, cover them with brine, and weight them so they can ferment properly.

    You want to use weights on top of the vegetables, so they stay submerged in the brine. That’s a very important step that some first-time fermenters skip.

    There’s an art to knowing when vegetables are done with fermentation. You’ll have to rely on the specific recipes you use to be sure when they’re done. They need to be kept in an anaerobic environment (air free) while they ferment.

    When they are ready, you’ll be able to remove the weights, seal the jars, and put them in cold storage. Prepared properly, fermented vegetables will keep for months.

    Wondering What to Make?

    If you’re wondering where to start, here are some suggestions for easy fermentation:

    • White or red cabbage (sauerkraut)
    • Kimchi (spicy Korean cabbage)
    • Pickled green beans
    • Pickled tomatoes
    • Fermented carrot sticks or slices

    Do you have a favorite recipe for fermented vegetables? Tell us about it in the comments!

  • 5 Gardening Budget Hacks

    5 Gardening Budget Hacks

    For people who are homesteading, managing expenses is a challenge. You want to be self-sufficient and yet some of the things that you need to do don’t happen overnight. They require an investment of both time and money.

    These things are true of gardening. It’s natural to want your garden to yield enough food for you and your family. However, you must strike a balance between pushing toward self-reliance and not blowing through your gardening budget.

    That’s why we’ve put together this list of 5 cheap gardening tricks to help you achieve self-reliance.

    #1: Pre-sprout Your Seeds

    This first trick is one we like because it saves a lot of guesswork if you have old seeds in storage. (And let’s face it, most avid gardeners do.)

    Instead of buying new seeds or risking a disappointing harvest if the old seeds don’t sprout, try pre-sprouting them in a little water. That way, you can clear out the duds and plant only those seeds that have germinated.

    Larger seeds like peas and beans can be soaked overnight and then left to sprout. Smaller ones will germinate on a damp paper towel.

    #2: Till Coffee Grounds into Your Soil

    Is your soil low in nitrogen? If so, try saving your used coffee grounds and tilling them into the soil to add nitrogen.

    One of the best things about this method is that you don’t need to compost coffee grounds before you use them. Simply collect them and till them into the soil.

    Not a coffee drinker? Go to your local coffee shop and see if they’d be willing to share. Most coffee shops simply throw away used grounds. If yours participates in a green initiative and donates them, find out how to become part of the program.

    Related Article:  The Undeniable Benefits of Coffee Grounds in Your Garden

    #3: Use Mulch

    Mulch serves three purposes in a garden:

    1. It protects the soil, holding in moisture and reducing your water use
    2. It breaks down and enriches the soil
    3. It prevents weeds from growing in your garden

    When you look at it that way, it seems clear that every gardener should use mulch.

    Keep in mind that different types of mulch serve different purposes. Plastic mulch is ideal for heating up cold soil in the Spring. Carbon-based mulches like wood chips cool down the soil and should be reserved for use later in the season.

    #4: Make Compost Tea

    Do you want an inexpensive way to fertilize your plants? Try making compost tea from manure and garden clippings.

    If you keep rabbits or other animals, simply mix some manure in a bucket with weeds from the garden and some comfrey leaves. Fill the bucket about one-third of the way, then top it off with water.

    After two weeks, you’ll have a nutrient-rich “tea” to use in your garden. Because this mixture contains manure, be careful not to get it on the leaves of plants that you’ll be eating. Pour it around the roots and make sure to wash everything thoroughly before you consume it.

    Related Articles: Do-It-Yourself Worm Casting Methods for Compost

    #5: Catch and Kill Slugs without Chemicals

    Slugs will destroy your garden if you let them. One of the best ways to get rid of them involves using metal pie plates and beer.

    Place a disposable pie plate in a depression in the ground of your garden. Pour a small amount of beer into the dish. (You may want to place plates at regular intervals if you have a large garden or a big slug problem.)

    Leave the dishes overnight. When you come out in the morning, you should find a collection of tipsy slugs in the dishes. Remove them and either drown them in soapy water or if you have chickens or ducks, feed them to the birds.

    These five tricks can help you make the most of your garden even if you have a small budget.

    Do you have a cheap gardening trick you’d like to share with us? Tell us in the comments!

    “Break-Through Organic Gardening Secret Grows You Up To 10 Times The Plants, In Half The Time” Find out more here>>>

  • Do-It-Yourself Worm Casting Methods for Compost

    Do-It-Yourself Worm Casting Methods for Compost

    If you’re a homesteader, you probably know all about composting. Composting kitchen scraps are one of the best ways to fertilize your garden without chemicals and pesticides.

    Some of the most effective composters use worms to break down food. If you have a worm composter, then you might not know that worm castings – the black waste that worms produce – is arguably the single best fertilizer known to man.

    The challenge is finding a way to harvest the worm castings – also known as black gold – without disturbing or harming your worms. You also want to make sure to preserve any eggs in the castings since those will hatch and provide you with a steady supply of worms.

    When Is It Time to Harvest?

    The first thing to cover is how to know when it’s time to harvest the castings. The best way to tell is to examine the food bedding in the vermicomposter. When most of it appears to be a rich, black soil, it’s time to harvest.

    The key is to wait until what you’ll be harvesting is mostly castings. That way, you’ll have the richest possible fertilizer to use.

    Method #1: Using Food to Move Worms

    The worms in your composter will migrate to new food sources when you provide them. One of the easiest ways to harvest their castings is to move their food source and wait until they’ve relocated.

    If you have a multi-tray worm composter, simply move the food to the tray above the one you want to harvest. You’ll have to be patient. The worms may take up to a month to relocate. Once they do, you can simply sift through the tray to find any remaining worms. Place them in the tray with the food.

    You’ll also want to be on the lookout for eggs in the soil. Worm eggs are small, round, and a yellowish color. You’ll want to place the eggs in the new food bed. That way, they’ll have a food source when they hatch.

    Method #2: Using Light to Relocate Worms

    Worms are subterranean creatures who prefer dark to light. In fact, they will naturally turn away from light and migrate to a new location when it’s present.

    For that reason, a simple way to move the worms out of the tray you want to harvest is to shine a light at one end of it. They’ll move to the other end and burrow in, leaving you free to sift through the castings, remove remaining worms and eggs, and replace the food bed.

    It’s important to note that exposure to direct light can dry out and even kill worms. An alternative method is to gently move the castings down to one end of the tray, creating a mound. The worms near the top will burrow down the bottom. Then, you can scoop castings from the top and sides.

    These first two methods are both for people who prefer not to handle their worms.

    Method #3: Hand Sorting

    The third and final method is to sort through the castings by hand, removing worms and eggs as you go. Some people don’t like this method. However, if you’re not squeamish, it’s arguably the quickest method because you won’t have to wait for the worms to move on their own.

    There are two methods you can use. The first is to empty the whole tray and sort through it, picking out worms and eggs and replacing them in the tray with a new food bed for the worms. The second is to sift a handful at a time.

    We’ve found that kids love to help with this method. Provided they’re old enough to know not to squeeze the worms, why not let them help?

    How do you harvest worm castings? Let us know in the comments!

  • 5 Simple Methods to Preserve Food

    5 Simple Methods to Preserve Food

    As a homesteader, you know that it’s important to know how to preserve food. Very few of us live in a climate where we can grow food year-round. During the colder months, true self-sufficiency requires a working knowledge of food preservation methods.

    That’s why we’ve put together a list of methods you can use to preserve food. Whether you’re looking for methods to preserve fruits and vegetables from your garden, items you’ve foraged, or animals that you’ve caught while hunting or fishing, we’ve got you covered.

    Method #1: Canning

    Canning is probably the most popular form of preserving food. It’s also one of the more expensive methods, but the initial investment can pay for itself rather quickly.

    To can food, you’ll need a canner. You’ll also need to invest in a collection of glass jars, canning rings, and lids.

    The benefit of canning food is that you can preserve it at its peak. Canning can be used to make jam, jelly, salsa, and other condiments.

    Method #2: Fermentation

    The next preservation method you may want to consider is fermentation. Fermentation involves preparing vegetables, placing them in brine, weighing them down, and allowing them time to ferment in an anaerobic environment.

    The brine may contain salt, whey, or a fermentation starter. Some popular fermented recipes include sauerkraut, kimchi, and pickled vegetables.

    Method #3: Dehydration

    One method we really like is dehydration. It’s a favorite because it can be used to dry fruit, vegetables, meat, and fish – and you don’t need any special equipment to do it.

    Of course, you can invest in a food dehydrator if you want. However, you don’t need to. Most foods can be dehydrated in a low oven. Simply marinate or season the food how you like. Then place it in a 150-degree oven for the specified time. For example, jerky takes eight to ten hours in the oven.

    Drying foods in a food dehydrator may take less time than doing it in an oven. If you think you’ll be doing a lot of dehydration, it may make sense to buy a dehydrator. This is a time-consuming process, but dehydrated foods are shelf-stable – a big plus if you have limited refrigerator and freezer space.

    Dehydrated foods can be stored in airtight bags, jars, or in the refrigerator to extend their shelf life. Some popular dehydrated foods include dried fruit, dried vegetables, and jerky.

    Method #4: Freezing

    Freezing food is a classic method of preserving it, but it has its limitations. If you’ve got a reliable source of power and a big freezer, all you’ll need is some plastic wrap and plastic bags and a permanent marker to label your food.

    There are some downsides to consider. If you lose power for an extended period, you run the risk of losing any food that you have frozen. You shouldn’t have to worry about freezer burn if your food is properly wrapped before you freeze it, but it can be time-consuming to portion out food, wrap it, label it, and freeze it.

    We like freezing for meat and fish. It can also be a great way to preserve delicate herbs from your garden. For example, we’ve made pesto with fresh basil and garlic and then frozen it in ice cube trays. That way, we have fresh pesto even in the middle of winter.

    Method #5: Root Cellaring

    In the days before refrigeration, storing hardy vegetables in a root cellar was the best way to keep them fresh over the winter.

    Not all vegetables are suited to this preservation method. Some that are include potatoes, sweet potatoes, squash, cabbages, and apples.

    If your home already has a cellar, you may be able to use it for storing produce over the winter. If not, consider digging a small cellar to ensure you have food to eat all year round.

    Do you have a favorite food preservation tip that we haven’t mentioned? Share it in the comments!

    >> This lost food has just recently been unearthed by NASA scientists. How to make NASA’s superfood at home.

  • [DIY] Simple Venison Jerky Recipe

    [DIY] Simple Venison Jerky Recipe

    When you’re stockpiling for an emergency, some foods are easier to preserve than others. Vegetables and fruits can be canned or dried.

    But what do you do to preserve meat? Freezing is effective for regular use, but it won’t help you if there’s no power. One of the best and most effective ways to preserve meat is by making jerky.

    Jerky is easy to make, healthy to eat and has a long shelf life. Making it can extend the life of venison and provide you with a healthy, protein-packed snack to get you through hard times.


    Preparing to Make Jerky

    Let’s talk first about what you need to make deer jerky. There are a few basic non-food requirements that you need to have in place.

    1. A freezer to freeze the meat before slicing it
    2. A food dehydrator or an oven with a low setting (150 degrees Fahrenheit)
    3. A very sharp chef’s knife or a meat slicer

    That’s it. Some people like to smoke their jerky, so if you have a smoker, you may want to consider that since it can add a nice depth of flavor to the finished product. However, you don’t need to smoke it. Our recipe, as you’ll see, includes a dash of liquid smoke to add a smoky finish.


    Our Favorite Deer Jerky Recipe

    Now we’re ready to share our favorite deer jerky recipe with you. We’ll walk you through it. Once you’ve made your first batch, you won’t want to go back to store-bought jerky.

    Here’s what you’ll need:

    • 1 pound of venison with the fat and skin removed
    • ½ c. soy sauce or tamari
    • 1 tablespoon Worcestershire sauce
    • 1 tablespoon steak sauce
    • 1 teaspoon liquid smoke
    • ½ teaspoon garlic powder
    • ½ teaspoon onion powder
    • ½ teaspoon sea salt
    • ½ teaspoon ground white or black pepper

    Here are the steps to follow to make the jerky.

    1. Put the venison in the freezer. Partially frozen meat is easier to slice thin than raw meat.
    2. When the venison is ready, use a very sharp knife or meat slicer to cut it into ¼-inch thick slices.
    3. In a large bowl, put the soy sauce, Worcestershire sauce, steak sauce, liquid smoke, and spices, and whisk to combine.
    4. Add the venison slices and stir to make sure all slices are coated with the marinade.
    5. Place the bowl in the refrigerator and allow it to marinate a minimum of four hours. You can leave it overnight for a stronger flavor.

    When the slices have finished marinating, it’s time to cook them. The method and time will vary depending on whether you’re using a dehydrator or your oven.

    If you’re using a dehydrator, fill the trays making sure to lay the meat down in a single layer with no overlap. The usual setting is about 155 degrees, and it should take four or five hours.

    To make jerky in an oven, lay the venison in a single layer on cookie sheets. Preheat the oven to 150 degrees Fahrenheit and put the jerky in. It will take eight to ten hours.

    In either case, you’ll know that the jerky is done when you can pick up a slice of meat and bend it without breaking it. Store the jerky in plastic bags or jars at room temperature or in the refrigerator to extend its shelf life.


    Flavor Variations

    Once you’ve made your first batch, you can experiment with new flavor combinations. Adding some fresh ginger to the marinade will give your jerky a spicy kick. If you want a little sweetness, try adding some brown sugar. Venison and apples are a classic combination, so you can try substituting ¼ cup of organic apple cider vinegar for the soy sauce.

    Store-bought jerky simply can’t compare to homemade. We hope this recipe inspires you to give it a try.

    Do you have a favorite jerky recipe or ingredient? Tell us in the comments!


    With over 1000 easy-to-prepare Paleo recipes and 10 week meal plan, you can stop stressing about your food, and start enjoying the healthy energetic body, weight loss, mental sharpness, and positive attitude you gain from eating only wholesome, natural ingredients that truly nourish.  <<<Check out the Recipes HERE>>>

  • Simple 5 Step Homemade Salsa Recipe

    Simple 5 Step Homemade Salsa Recipe

    One of our favorite things about homesteading is that it has allowed us to reconnect with food in a new way. Let’s face it, a lot of the fruits and vegetables we buy at the supermarket are grown using chemicals and harsh fertilizers. They’re harvested before they’re ready, as a result, they don’t have the rich, delicious flavors as they do when fresh.

    By contrast, home-grown produce is bursting with flavor. Once you’ve tried growing vegetables and cooking with them, you’ll never want to go back to boring supermarket produce again.

    Are you looking for ways to use the vegetables you’ve grown? Making homemade, homestead salsa is a good way to use some of the vegetables you’ve grown and create a tasty condiment for your food at the same time.

    Homestead Salsa Recipe

    Making fresh salsa is easy. All you need to do is chop the ingredients and combine them with some seasonings. It usually tastes better if you let it sit for a little while before serving it, but the salsa will be ready in just minutes.

    Of course, you also have the option of cooking and preserving salsa. This recipe is for fresh salsa, but you could just as easily preserve it, so you’ll have fresh salsa year-round.

    Here are the ingredients for our fresh salsa:

    • 10 small tomatoes (not cherry tomatoes, just small regular tomatoes from your garden)
    • 1 red onion
    • 4 sweet bell peppers
    • 3-6 spicy peppers of your choice (we like jalapeños, habaneros, and serranos)
    • 1 bunch of fresh cilantro
    • 3 cloves garlic, minced
    • ¼ c. white vinegar
    • ¼ c. brown sugar
    • 2 tablespoons lime or lemon juice
    • Salt and pepper to taste

    To prepare:

    1. Chop the vegetables. Some people like to peel and seed the tomatoes, which you can do by slicing into the skins, immersing them in boiling water for a minute or two, then shocking them in cold water. The skins should peel write off. However, we think this salsa tastes great if all you do is dice the tomatoes.
    2. Dice the red onion and bell peppers. For the hot peppers, the method you use to prepare them depends on your tolerance for heat. If you want some spice but don’t like it too hot, halve the peppers and – while wearing gloves – remove the ribs and seeds and discard them. If you like it very hot, simply chop the whole pepper and add it.
    3. Chop the cilantro leaves. If you don’t like cilantro (to some people, it tastes like soap) you can eliminate it entirely.
    4. Combine the chopped vegetables, herbs, vinegar, sugar, citrus juice, salt, and pepper in a bowl. Stir to combine the ingredients.
    5. Now, give your salsa a taste. This is the time to adjust the salsa, so the flavor will be exactly to your taste. Here are some suggestions:
    • If your salsa is too spicy, add a couple of additional tomatoes, another sweet bell pepper, or a spoon of brown sugar.
    • If your salsa isn’t spicy enough, add another hot pepper (or half – you don’t want to go overboard!)
    • If your salsa lacks acidity, add an additional tablespoon of lime or lemon juice.
    • If it lacks flavor, add a pinch of additional salt and black pepper.

    You get the idea. It may take some trial and error to get it right. The final step is to let the salsa sit overnight in the refrigerator. This final step gives the flavors a chance to blend together.

    Once you’ve mastered this basic recipe, you can experiment with other flavors. For example, you might want to add peaches for a sweeter salsa. Combining salsa with black beans and corn can make it into a hearty side dish.

    What’s your favorite salsa recipe? Tell us in the comments!

    [Picture This]

    Sh*t just hit the fan, it’s been 3 days and hunger is sweeping through town like the plague, you’re starving.  WHAT DO YOU DO?  <<<Try This Now>>>