Page 10 of 16
1 8 9 10 11 12 16
Outdoors – Page 10 – Homesteader Depot

Category: Outdoors

  • Do-It-Yourself Worm Casting Methods for Compost

    Do-It-Yourself Worm Casting Methods for Compost

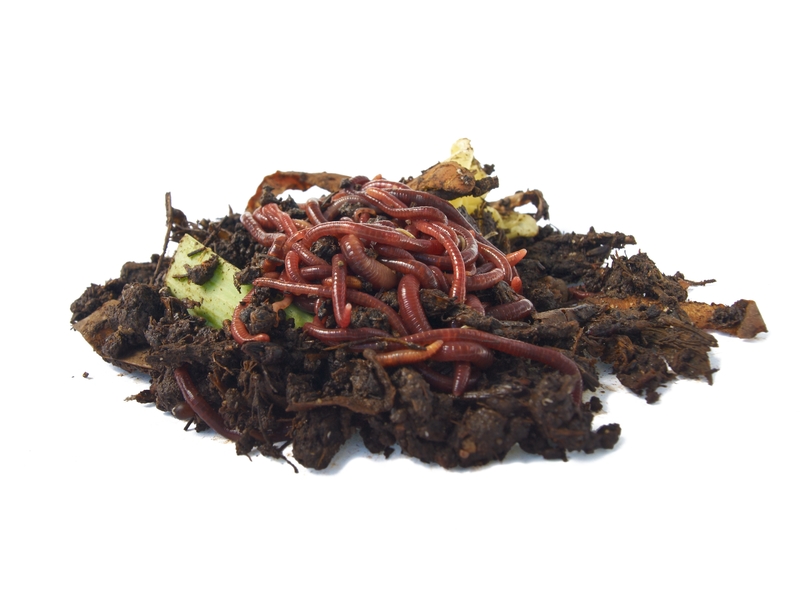
    If you’re a homesteader, you probably know all about composting. Composting kitchen scraps are one of the best ways to fertilize your garden without chemicals and pesticides.

    Some of the most effective composters use worms to break down food. If you have a worm composter, then you might not know that worm castings – the black waste that worms produce – is arguably the single best fertilizer known to man.

    The challenge is finding a way to harvest the worm castings – also known as black gold – without disturbing or harming your worms. You also want to make sure to preserve any eggs in the castings since those will hatch and provide you with a steady supply of worms.

    When Is It Time to Harvest?

    The first thing to cover is how to know when it’s time to harvest the castings. The best way to tell is to examine the food bedding in the vermicomposter. When most of it appears to be a rich, black soil, it’s time to harvest.

    The key is to wait until what you’ll be harvesting is mostly castings. That way, you’ll have the richest possible fertilizer to use.

    Method #1: Using Food to Move Worms

    The worms in your composter will migrate to new food sources when you provide them. One of the easiest ways to harvest their castings is to move their food source and wait until they’ve relocated.

    If you have a multi-tray worm composter, simply move the food to the tray above the one you want to harvest. You’ll have to be patient. The worms may take up to a month to relocate. Once they do, you can simply sift through the tray to find any remaining worms. Place them in the tray with the food.

    You’ll also want to be on the lookout for eggs in the soil. Worm eggs are small, round, and a yellowish color. You’ll want to place the eggs in the new food bed. That way, they’ll have a food source when they hatch.

    Method #2: Using Light to Relocate Worms

    Worms are subterranean creatures who prefer dark to light. In fact, they will naturally turn away from light and migrate to a new location when it’s present.

    For that reason, a simple way to move the worms out of the tray you want to harvest is to shine a light at one end of it. They’ll move to the other end and burrow in, leaving you free to sift through the castings, remove remaining worms and eggs, and replace the food bed.

    It’s important to note that exposure to direct light can dry out and even kill worms. An alternative method is to gently move the castings down to one end of the tray, creating a mound. The worms near the top will burrow down the bottom. Then, you can scoop castings from the top and sides.

    These first two methods are both for people who prefer not to handle their worms.

    Method #3: Hand Sorting

    The third and final method is to sort through the castings by hand, removing worms and eggs as you go. Some people don’t like this method. However, if you’re not squeamish, it’s arguably the quickest method because you won’t have to wait for the worms to move on their own.

    There are two methods you can use. The first is to empty the whole tray and sort through it, picking out worms and eggs and replacing them in the tray with a new food bed for the worms. The second is to sift a handful at a time.

    We’ve found that kids love to help with this method. Provided they’re old enough to know not to squeeze the worms, why not let them help?

    How do you harvest worm castings? Let us know in the comments!

  • [DIY] Simple Venison Jerky Recipe

    [DIY] Simple Venison Jerky Recipe

    When you’re stockpiling for an emergency, some foods are easier to preserve than others. Vegetables and fruits can be canned or dried.

    But what do you do to preserve meat? Freezing is effective for regular use, but it won’t help you if there’s no power. One of the best and most effective ways to preserve meat is by making jerky.

    Jerky is easy to make, healthy to eat and has a long shelf life. Making it can extend the life of venison and provide you with a healthy, protein-packed snack to get you through hard times.


    Preparing to Make Jerky

    Let’s talk first about what you need to make deer jerky. There are a few basic non-food requirements that you need to have in place.

    1. A freezer to freeze the meat before slicing it
    2. A food dehydrator or an oven with a low setting (150 degrees Fahrenheit)
    3. A very sharp chef’s knife or a meat slicer

    That’s it. Some people like to smoke their jerky, so if you have a smoker, you may want to consider that since it can add a nice depth of flavor to the finished product. However, you don’t need to smoke it. Our recipe, as you’ll see, includes a dash of liquid smoke to add a smoky finish.


    Our Favorite Deer Jerky Recipe

    Now we’re ready to share our favorite deer jerky recipe with you. We’ll walk you through it. Once you’ve made your first batch, you won’t want to go back to store-bought jerky.

    Here’s what you’ll need:

    • 1 pound of venison with the fat and skin removed
    • ½ c. soy sauce or tamari
    • 1 tablespoon Worcestershire sauce
    • 1 tablespoon steak sauce
    • 1 teaspoon liquid smoke
    • ½ teaspoon garlic powder
    • ½ teaspoon onion powder
    • ½ teaspoon sea salt
    • ½ teaspoon ground white or black pepper

    Here are the steps to follow to make the jerky.

    1. Put the venison in the freezer. Partially frozen meat is easier to slice thin than raw meat.
    2. When the venison is ready, use a very sharp knife or meat slicer to cut it into ¼-inch thick slices.
    3. In a large bowl, put the soy sauce, Worcestershire sauce, steak sauce, liquid smoke, and spices, and whisk to combine.
    4. Add the venison slices and stir to make sure all slices are coated with the marinade.
    5. Place the bowl in the refrigerator and allow it to marinate a minimum of four hours. You can leave it overnight for a stronger flavor.

    When the slices have finished marinating, it’s time to cook them. The method and time will vary depending on whether you’re using a dehydrator or your oven.

    If you’re using a dehydrator, fill the trays making sure to lay the meat down in a single layer with no overlap. The usual setting is about 155 degrees, and it should take four or five hours.

    To make jerky in an oven, lay the venison in a single layer on cookie sheets. Preheat the oven to 150 degrees Fahrenheit and put the jerky in. It will take eight to ten hours.

    In either case, you’ll know that the jerky is done when you can pick up a slice of meat and bend it without breaking it. Store the jerky in plastic bags or jars at room temperature or in the refrigerator to extend its shelf life.


    Flavor Variations

    Once you’ve made your first batch, you can experiment with new flavor combinations. Adding some fresh ginger to the marinade will give your jerky a spicy kick. If you want a little sweetness, try adding some brown sugar. Venison and apples are a classic combination, so you can try substituting ¼ cup of organic apple cider vinegar for the soy sauce.

    Store-bought jerky simply can’t compare to homemade. We hope this recipe inspires you to give it a try.

    Do you have a favorite jerky recipe or ingredient? Tell us in the comments!


    With over 1000 easy-to-prepare Paleo recipes and 10 week meal plan, you can stop stressing about your food, and start enjoying the healthy energetic body, weight loss, mental sharpness, and positive attitude you gain from eating only wholesome, natural ingredients that truly nourish.  <<<Check out the Recipes HERE>>>

  • 3 Basics for Starting Your Homestead

    3 Basics for Starting Your Homestead

    In our modern society, many of us dream of finding a way to get back to simpler times. We yearn for the days when people grew and preserved their own food and relied more on themselves and less on technology.

    If that sounds familiar, then you might want to start a homestead. Whether you already own a substantial tract of land out in the country or you’re renting a city apartment, there are things you can do right now to get things underway.


    Starting Small

    Do you live in a city or the suburbs? If so, you might not have the wherewithal to be fully self-sufficient – at least, not yet.

    That doesn’t mean that you can’t get started with homesteading in a small way. Let’s start with what you can do in a city apartment or condominium.

    1. You can install window boxes in sunny windows and grow herbs and vegetables for your kitchen.
    2. If there’s a community garden near you, see if you can rent a plot.
    3. If you have a fireplace, you can switch to wood heat during the cold winter months.
    4. You can preserve food that you grow or buy.

    Each of these things is something you can do without a lot of space. They can give you a taste of homesteading while you work toward your long-term goals.

    If you’re in the suburbs, you have more options.

    1. If your yard space permits it, you can grow a garden or even put in a greenhouse.
    2. You may be able to plant fruit trees.
    3. In some suburbs, you may be able to put in a chicken coop and raise chickens. (Check your city or town ordinances before buying!)
    4. You can install wood-burning stoves for heat.
    5. Just as you can in the city, you can preserve food.

    Growing and preserving food can help you learn essential homesteading skills even if you’re not living in the country.


    Educate Yourself about Homesteading

    There’s no question that there’s a steep learning curve for new homesteaders. That’s especially true if you are heavily reliant on mass-produced items and public services.

    That’s why one of the best things you can do to start homesteading is to learn about it. Go to your local library or bookstore and stock up on books about homesteading.


    Here are some topics to learn about as you work toward your homesteading goals:

    The more you learn about these topics, the better prepared you’ll be when the time comes to move to a homestead. Of course, you can check out our blog posts and resources for information, too!


    Make a Homesteading Plan

    The next thing you’ll need to do is make a homesteading plan. Even if you can’t afford to buy a homestead, you can still take steps to become self-sufficient.

    For example, you might decide that growing food is your top priority. If that’s the case, you can build garden beds, install window boxes, and plant trees.

    As we mentioned above, you may be able to keep chickens – some cities allow it and many suburbs do. There may be restrictions in place concerning proximity to your neighbors, so make sure to check.

    At the same time, you can be saving money or checking out country properties to make the switch to a true homestead.

    How did you get started homesteading? Do you have questions? Tell us in the comments!

    Would you like to see a garden that needs NO WATERING? >>>>SEE IT HERE

  • 5 Questions You Need to Answer When Choosing a Handgun

    5 Questions You Need to Answer When Choosing a Handgun

    Choosing your first handgun can be both exciting and overwhelming.  Just like choosing your first car, there are a number of models, sizes, and budgets available.  Not to mention new versus used, ease of maintenance and the cost of the ammunition required to use with it.

    To make the process of taking this big step a little easier, we’ve compiled a list of questions that will help you determine a course of action when making this important purchase.

    Why Are You Making This Purchase?

    Knowing why you are buying a handgun will help you decide what type.  Do you intend to keep it on hand at home strictly for home defense?  Do you plan to obtain a concealed weapon permit and carry it with you?  Are you a recreational shooter who doesn’t want to rent one at the shooting range anymore?


    [FREE eBook]

    Home Defense Hacks – 49 Ways To Keep Your Family Safe From Intruders.     Get It Here >>


    The answers to these questions will help you determine what size and caliber will work best for your needs.  Larger models can be more intimidating during a home invasion.  So much so that you may not even need it to be loaded.  Smaller models are easier to transport back and forth to the shooting ranges.

    What’s Your Budget?

    Knowing ahead of time what you can afford will have a big impact on the number of handguns are available to you.

    Do You Want a New or Used One?

    Your budget may have some impact on how you answer this question.  If you are interested in a higher price model, a used version may allow you to get just what you want without breaking the bank.

    If you do go with a used handgun, make sure you purchase it from a legitimate vendor.  Then have it checked thoroughly for damage and wear that could affect its firing performance and safety.

    One Simple Gun Shooting Hack That Will Instantly DOUBLE Your Accuracy>>>

    What Caliber and Size?

    When comparing two handguns of similar size and weight, the one designed to shoot a larger caliber will perform with more recoil.  Smaller caliber designs have less recoil.

    If you are just beginning to work on your skill, a smaller caliber will allow you to focus on improving your aim and ability.  As you progress, moving up to a larger caliber will let you continue your progress.

    Did you know:  You can receive your concealed handgun license online. <<<Check it out here>>>

    A note on gun size as it relates to the size of your hands.  In addition to caliber and how easy or difficult it makes handling the weapon, a smaller size will also be more manageable if you have a smaller hand size. Recently a friend went with her husband to the local shooting range to try out his 9mm.  After firing off several clips, she had the opportunity to test a .380.  She was amazed by the ease of use of the smaller caliber and size after fumbling with the larger and more cumbersome model her husband owned.

    If you know you want to use your handgun for personal protection, it’s a good idea to get one that is easy for you to load, fire and reload.

    How Does It Feel?

    While closely related to the size and caliber question, when it comes down to it, this is the most important question you’ll answer.  If a certain model and size feel more comfortable than others, that’s probably the one for you.

    A good way to test different models is to watch for vendor demos at your local shooting range.  Sig Sauer, for example, will often do demos several times a year.  At these events, you can test several models of different sizes and calibers to see what works best for your skill level.

    [VIDEO] 10 Out Of 10 Amateur Gun Owners Make This Simple Shooting Mistake. See It Here >>

  • Super Simple DIY Fishing Net

    Super Simple DIY Fishing Net

    Time is always scarce on a homestead so spending days on end catching 1 fish at a time is not the best use of your limited time.  How can you catch crazy amounts of fish in a short amount of time so you can get back to doing other necessary things on your homestead?

    If you use fishing and fish as a regular food source, a net is basically a mandatory piece of equipment. If you find you need a larger net than you want to spend your hard-earned cash on, you can DIY it for a fraction of the cost using some twine and nails.


    What you will need:


    • Nails
    • Hammer
    • Netting or other sturdy Twine
    • Scissors
    • Area large enough to work


    To start, decide how wide you want your net to be.  Then place two nails into a wall or beam high enough to accommodate the length of the net you want to end up with.


    Stretch a piece of your twine between the 2 nails and secure it so that the length is tightly strung with no dipping.


    Cut additional pieces of twine, each one double the length you want the final net to be.


    For example.  If you want an approximately 6’ x 6’ net, your nails will be 6’ apart and the cross piece of twine will stretch across that length.  Each subsequent piece will be cut to 12’ lengths.


    Next, attach the double lengths at even spaces across your cross string. To do this, fold the length in half, hold the center loop behind the cross string and feed the ends of the length around the cross string and through the loop, then tighten, creating 2 vertical strings hanging down the length of the net.


    Do this for each double length, spacing them evenly as you go and adjust as needed.


    The space between each tied length will determine how big the holes of the net will be.  If you want a tighter net to hold smaller fish, place them closer together.  This will also be what determines how many double lengths you need to make.


    As stated above, each double length creates 2 vertically hanging strings, or one set, when tied to the cross string. We are going to refer to each of the hanging sets as 1, 2, 3, 4 etc. and each set has a left string and a right string, so there will be 1 left, 1 right, 2 left, 2 right, etc.

    Start by taking string 1 right and 2 left and holding them together.  Make a loop around your finger with the two pieces being held together as one and feed the end through to create a knot, joining the 2 pieces below the cross piece.  Adjust as needed to balance the knot evenly between the vertical lengths to create an upside-down triangle between the knotted pieces and the cross piece.


    Continue this process with 2 left and 3 right, then 3 left and 4 right, making a line of knots across the width of your workspace until you have your first row completed.  At this point, strings 1 left and your last set’s right string will be hanging free on either end of the area and all the set will be joined to their neighbor by a knot.


    Start the second row by taking 1 left and 1 right and knotting them, then 2 left and 2 right, 3 left and 3 right, and so on.


    Continue this pattern until you get to the bottom of your twine, tie off the ends and presto!  Your very own fishing net.


    This technique can be used for any size net you may need.


    Alternatively, if you tie your double lengths to a pre-existing circular frame, you can use the same process to create a dip net, just make sure to keep alternating knot rows and tie off the bottom when you reach the depth you want.


    Happy Fishing!


    More interested in sport fishing?  Get the insider, professional fly-fishing tricks, tips, and techniques HERE.


  • Felling Trees for Dummies

    Felling Trees for Dummies

    Removing trees from your property is a great way to clear out space for other use, or to gather up firewood for the winter. If you plan to cut a tree down on your own, it’s important that you understand how difficult, and dangerous the task can be. Especially if you have never attempted to cut down a tree in the past.

    Here are a few safety tips that will help you cut down trees without putting yourself in danger.

    1. Use the Right Equipment

    Failure to use the right equipment could result in a serious accident. Be sure that you have the right safety gear on hand to keep yourself from getting badly injured. Safety is something that should be taken seriously when it comes to tree cutting. The essential safety gear you should have on hand includes:

    • A logger’s helmet to protect your head from falling branches
    • Earmuffs and a face screen that will protect your eyes and ears
    • Safety glasses to prevent dust and particles from getting in your eyes
    • Kevlar chaps, these will stop a chainsaw instantly if you accidentally drop the bar against your leg.
    1. Use Felling Wedges

    Felling wedges go inside the cut in the tree to prevent the saw you are using from getting pinched during the cut. You will need a pair of these plastic wedges and they can be purchased at any location that sells chainsaws or similar equipment.

    1. Carefully Estimate the Felling Zone

    It’s difficult to tell how tall a tree is just by looking at it. Therefore, you should estimate how tall it is by using the ax handle trick. Hold your ax handle out straight in front of you. With one eye closed, move until you see the ax top aligned with the tree top, and the bottom aligns with the base. Your feet will be around where the treetop will fall. However, this is still just an estimate. Always allow for extra room when it’s time to cut.

    1. Analyze the Tree

    Look at the tree and don’t cut it down if you notice any dead branches that are broken yet still attached to the tree.  Also, be cautious if the tree is leaning in one direction, or if there are any buildings, fences, or power lines in the felling zone.

    1. Plan & Cut the Notch

    Plan on where you will cut the notch. It will need to be on the “fall” side of the tree. Adjust your saw until it points toward the fall direction. Before you cut, lay out the notch by marking it or scoring the bark using the chainsaw. Make it at a comfortable height so that it’s easier to cut.

    You may also like: “Building a Tiny House”

    When cutting, make the top cut first, then the bottom. If you do well with the top notch, the wedge will drop freely out of the notch. If not, you can extend the cuts from the top or bottom, allowing the wedge to fall out.

    1. Use a Lookout

    When you make your felling cut, it will be much safer if you have a lookout standing several feet behind you. They can watch for falling branches and let you know when the tree begins to fall. They can also alert you when it’s time to vacate the area since you can’t keep your eye on the saw and the tree at the same time. A lookout can also let you know if something is going wrong before the tree is completely cut, such as a branch falling near you.

    Tree cutting is a job that should always be taken seriously.  Many hazards lie between the cutting process and the falling tree, be sure to take all factors into account before dropping a tree.

  • 4 Weird but Effective Ways to Avoid Deadly Bacteria

    4 Weird but Effective Ways to Avoid Deadly Bacteria

    The primary reason we need to stay clean is to maintain control over the harmful bacteria that can manifest itself in all the crevices of our body that make us smell bad and breed disease.

    The easiest way to accomplish this is to focus on the areas with the most potential for bacterial growth and go from there. What areas are those?  Just follow your nose.  It’s no coincidence that the areas that provide our embarrassing body odor are the areas we most need to target.  Just like a clogged kitchen drain or backed up sewer system, if the smell is there, the bacteria is there.

    The most common ways of battling the ongoing war of cleanliness are via large amounts of water in the form of a shower or bath.  But, what if you suffer from skin irritation issues, or you’re in the middle of a drought, are taking a 3-month journey into the wild, or just want to conserve water a little more?

    Not to worry!  Here are some carefully researched and compiled weird but wonderful ways you can clean and sanitize yourself without using excessive amounts of water.

    Smoking.  No, Really!

    Not to be confused with what you shouldn’t be doing with a pack of Camels Lights.  I’m talking about being away on an extended camping trip or living off the land, forget the waterhole, you can smoke yourself and your clothing by the fire. Smoke from firewood has antibacterial properties and should leave you feeling fresher than going without.  Yeah, you’ll smell like smoke, but that smell is better than deadly bacteria that could be on verge of damaging your body.


    Dirt Baths

    Similar to how those fancy mud and clay masks work at the local health spa.  If you have access to very fine and completely dry dirt with no extra additives like fertilizer or animal by-products, it will work wonders to absorb excess oil without over drying your skin.  Simply cover yourself in the dust, allow it to sit for a while, then scrape yourself clean and give yourself a final polish with clean fabric.  Additionally, if your hair is driving you crazy, you can create a mud “shampoo” by adding a little water, working it through your roots then letting it dry.  Afterwards, break up the caked areas and brush it out.  Your scalp will feel refreshed and ready to go.

    Use Baking Soda as A Cleanser and Dry Shampoo

    A great way to tackle the oily buildup in your hair while at the same time giving yourself a waterless body scrub is by using Baking Soda.  Sprinkle the soda onto your head and rub into the scalp.  Continue by sprinkling more soda into your hand or directly onto the other parts of your body for a clean and exfoliation that would put a loofah to shame.

    Related Article: “DIY Soap”

    If plain baking soda feels too abrasive, mix it with baby or talcum powder for a gentler cleanse. Afterwards, wipe off the excess and brush out your hair.

    Use Olive Oil to Avoid Clogged Pores and Stay Moisturized.

    If you have especially sensitive or dry skin, consider taking an olive oil sponge bath.

    Unlike standard cleansers, oils rich in vitamins and antioxidants balance the natural oils of our skin and helps dissolve the excess oil our body and face produce, which contributes to clogged pores.

    For best results, rub a small amount of it into your skin and then wrap yourself in warm, dampened towels or a robe, or a bed sheet covering your face and body for about a minute. Use the towels to wipe away the excess oil and then let yourself air dry.

    If you suffer from oily skin, try castor oil with a few drops of tea tree or peppermint oil to keep your skin from staying greasy.

    And there you have it! Four weird but effective alternatives to getting yourself soaking wet and sudsy.

  • DIY Plant Propagating

    DIY Plant Propagating

    Plant propagating is a common process among homesteaders where new plants are created using various sources. Seeds, bulbs, cuttings, and other plant parts are put together to regenerate a garden. This branch of horticulture deals with the production of new plants using what is referred to as “starter materials”. Some people look at it as a form of recycling while others place the seedlings in small containers for décor and display uses.

    How Does Plant Propagating Work?

    Plant Propagating uses totipotency, which allows the cells to regenerate all the missing parts which leads to creating an entire new organism. Totipotency in plants means that any live part separated from the main plant, when composed of live cells, can produce missing organs to create an intact plant, including roots. This means all plant organs that contain live cells such as seedlings and cuttings, may be used as propagules, or for plant propagating.

    The Diverse Types of Cuttings

    There are many types of cuttings that you can use with plant propagating. They are Softwood, Greenwood, Semi-Ripe, and Hardwood cuttings.

    Softwood cuttings come from fresh, new growth plants, usually in the spring or summer. Softwood includes plants such as butterfly bushes or dogwood trees. They tend to root really well.

    Greenwood cuttings come from young stems that are just beginning to mature. They are from the first year of the plant and cut either early to mid-summer. Greenwood plants include boxwood and gardenias.

    Semi-ripe cuttings are more mature and tougher. They are often taken midsummer to fall. The best semi-ripe plants for propagating include honeysuckle and camellia.

    Hardwood cuttings are from woody stems that have become dormant during the late fall or winter. They come from trees and shrubs such as viburnum or mock orange.

    How to Plant Propagating

    First, you will need to gather supplies such as a sharp knife, pruning shears, containers for potting, sand, perlite, vermiculite or potting mix, and rooting hormone. Then you will be ready to begin.

    The first step is to cut off a small section of a stem. You should choose a healthy plant that’s at least 3 to 6 inches in length. Make a sharp cut and try not to mash together the stems as this will make it difficult for new roots to produce

    Next, you will need to remove the lower leaves on the stem by clipping them, so that you are left with a bare stem to place into your potting mix. After that, you can dip the end of your stem in the rooting hormone. This can help your cuttings to root faster.

    Suggested Article:  “Is Your Soil Quality Good?”

    The last step is to pot up your cuttings as quickly as possible by placing it in moist potting mix. You can also use perlite, sand, or vermiculite. Keep the cuttings humid by loosely applying clear plastic or keeping it under a cloche.

    Keep in mind that there are some plants that will root faster than others. You will have to have plenty of patience with plant propagating. It usually takes around one to two months for cuttings to take root and establish well enough so they may be planted.

    Improve Root Growth: Heat Mat Warms Seeds for Improved Root Growth

    When Should I Retrieve Cuttings?

    It is best to gather cuttings early in the morning because the plant has the most moisture during this time. Keep your cuttings cool and moist until you are ready to place them in their pot. Avoid exposure to direct sunlight until then. However, there are some cuttings that will take root faster if they are kept warm and humid, therefore misting the cuttings frequently may help them grow.

    There are some cuttings that are very easy to grow, so, if this is your first plant propagating project, you may want to start with them. These plants include Geraniums, Impatiens, and Coleus.