Tag: bread

  • How to Make Sourdough Without a Recipe (Video)

    How to Make Sourdough Without a Recipe (Video)

    I’m a huge fan of home fermenting and culturing of all kinds. Yogurt, kefir, kombucha, pickled vegetables, and my personal favorite, sourdough bread.

    Sourdough is not just a distinct flavor of bread, it gets its rich, sour flavor from the leavening culture that causes it both to rise, and changes the metabolic structure of the wheat. Sourdough is actually much healthier than breads that are not naturally fermented, because the culturing process actually breaks down the antinutrients that can make wheat difficult to digest. Some people who can’t otherwise eat gluten can still eat sourdough, actually!

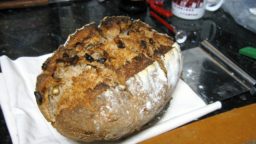
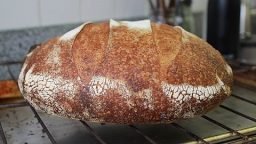
    I have made sourdough at home for a few years, but I haven’t ever put a whole lot of time into learning the techniques that would make my homebaked loaves as good as those delicious boules you can get at chic, foodie restaurants and bakeries. My loaves are usually pretty dense, and while they have the delicious flavor of sourdough, they lack the air bubbles and lightness that make professionally baked sourdough loaves so delicious. Also, without those air bubbles to help with the rise and create that light dough, I get small loaves that are gone in a flash.

    There are a lot of very specific recipes out there for sourdough, and many people even recommend measuring your ingredients on a kitchen scale to get the ratio of flour, water, and starter just right. This does make a lot of sense, of course, considering breadmaking is a very specialized science, but it actually doesn’t have to be so complicated.

    So, how can you make delicious sourdough boules right at home, without the stress and headache of measuring ingredients or seeing recipes fail you because they simply don’t work in the climate of your kitchen or with your culture?

    By feel. 

    The thing about sourdough is, not all flour, sourdough starters, or kitchen climates are created equal, and your dough simply might not turn out the way it’s supposed to following an exact recipe.

    This excellent video walks you through the process of making a sourdough loaf without measuring, and by creating a dough that looks and feels a certain way, and how to handle it so it will get those coveted air pockets.

    I don’t know about you but I can’t wait to get my hands in some dough and try this out! Check it out:

    If you enjoyed this, you might also like….

    Do You Have What You Need to Hold Down the Fort?

    Natural Healing Secrets You Need to Know…

    Effective Primal Diet Hacks…

  • How to Bake Bread in a Toaster Oven

    How to Bake Bread in a Toaster Oven

    It’s great having fresh baked bread every day, and while one of the wonderful things about homemade bread is that it contains no chemicals or preservatives, it also doesn’t stay fresh very long. Also, if you live in a warm place or somewhere with high energy costs, you might not want to heat your whole house up every day just to have fresh bread.

    The solution? Baking bread in your toaster oven. It’s totally possible, and works great!

    Here’s how:

    On the weekend, make yourself a large batch of dough. You will probably want to double or triple your regular dough recipe. Let it rise on the counter, the, if you’d like to bake on the same day, separate about a grapefruit sized amount, shape into a smaller loaf and let rise for a bit on the counter, and put the rest in a non-airtight container in the refrigerator.

    Each time you are ready to bake a new loaf, just break off another grapefruit-sized amount of dough in the morning, place on your baking pan or in a loaf pan (that you know will fit in the toaster oven) and let rise throughout the day.

    To bake, just preheat your toaster oven to 450 degrees, and bake as you would in a regular oven. It’s that simple!

    You can also use this pre-made dough for all kinds of things! Pizza, focaccia, dinner rolls, etc. Having a big batch of dough in your fridge all week long is an excellent way to ensure you have fresh, delicious, and healthy bread and baked goods for dinners and snacks throughout the week.

    If you liked this, you might also enjoy…

    Holistic Medicine Basics

    Ever Considered Taking Yoga? Read this

    The Ultimate Woodworking Course..

  • How to Make A Sourdough Starter

    How to Make A Sourdough Starter

    Sourdough starters can be purchased online or you might even have a friend or relative who’s already making them who’d be willing to share. They’re easy to pass around, and you can use just a small amount to grow as much as you want! That’s the beauty of sourdough.

    To grow your own, you don’t need anything more than flour, water, and time. Let’s begin!

    What you need: 

    • a mason jar or similar sized glass or plastic container, no metal
    • measuring cups and spoons
    • plastic wrap
    • flour (at least a pound to be safe)

    What you do: 

    1. Combine 3/4 cup of water with 3/4 cup + 2 tbs flour and stir vigorously in your container. Once bubbles are formed and you have a nice, thick, evenly combined batter, cover with plastic wrap and set on your counter. It will need to be placed somewhere that is warm, at least 70 degrees F, where it won’t be disturbed.
    2. Over the next 24 hours, bubbles should start to appear. During this period, stir the mixture occasionally to attract more yeast and air into the starter. The bubbles mean the yeast is becoming active and alive, that’s what you want!
    3. On the third day, its time to feed the yeast! Add another 3/4 cup flour and 3/4 cup water and stir vigorously, then cover and let sit once again.
    4. On the fourth day, your starter should be noticeably bubbly and have doubled in size. You will also notice that active-sourdough
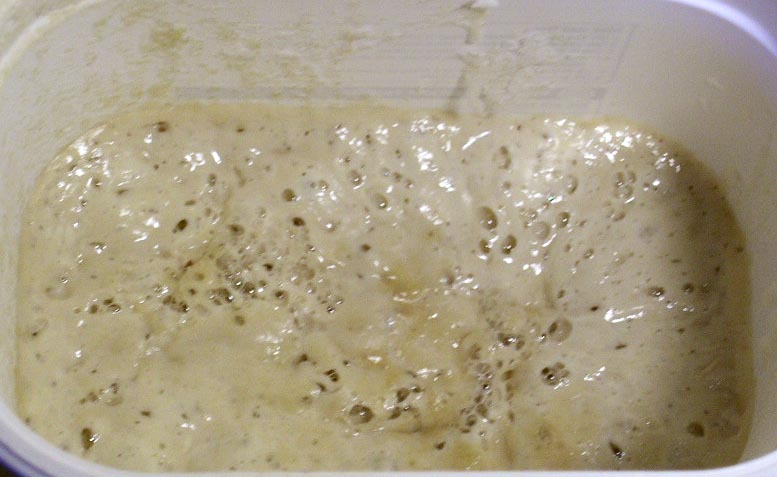
very distinct sour smell that is signature to sourdough. It is active when it is light with many big bubbles, like
      in the photo.
    5. If your starter is not this active yet-don’t worry! Just keep feeding it, it might just need another day or so. Every climate and local yeast available is going to be different.
    6. If your starter is ready-you can use it! Take about half out and use in a sourdough recipe of choice. Just make sure to add the same amount of flour and water back to your starter. Let it become active again, and either continue to reuse, or put it in the fridge to be “dormant”. Just make sure that if you do want to do this, that it is active before adding it to the fridge, and also don’t put an airtight top on it-or it might explode! You can put a sealed top on it after a few days, but let it breathe at first.

    And your done! What’s your favorite sourdough recipe?

    If you like this, you might also like:

    Advanced Gardening Course To Accelerate Your Food Production…

    Survival Medicine & Wilderness Survival…

    Survival Techniques From Long Ago, Re-purposed For The Modern Era…

  • Crock Pot Sourdough Recipe

    Crock Pot Sourdough Recipe

    Sourdough bread is delicious, and nutritious! When made with a real sourdough culture, it breaks down the anti-nutrients in the wheat that are commonly attributed to gluten intolerance and allergy. There’s also no better-tasting sourdough than when it is made fresh at home.

    A very easy way to make sourdough is right in your crock pot! If you don’t have a bread maker or don’t want to heat up your kitchen in the hot summer months, crock pot sourdough is a wonderful option. It also makes for a very easy way to rise the sourdough.

    First, you’ll need your culture. This is the most time consuming, but once you have one going, it’s a lot simpler to make loaf after loaf. This blogger seems to have originated crock pot sourdough, and also has a recipe on her website for the culture.

    Once you have a bubbly, active sourdough culture, you can follow this recipe here for delicious crock pot sourdough:

    Crock Pot Sourdough Recipe

    1 cup active culture

    3 cups flour (you can use some combination of white, white whole wheat or whole wheat if you like)

    salt

    warm water

    olive oil for greasing

    1. In a large bowl or food processor, quickly stir or pulse the salt throughout the flour. Then add the culture and mix or pulse until blended.

    2. Next add 1 cup of warm water, and stir or blend until you have a uniform dough that can be formed into a ball. You might need to add either more flour or water as needed. Should be sticky, but not too wet.

    3. Let rise overnight, either in the bowl or food processor, lightly covered, or, for a really nice, steamy rise, you can heat up your crock pot for a few minutes, then grease, and put the dough in to rise.

    4. Once the dough has at least doubled in size, it’s ready to cook. If it’s been rising outside the crock pot, dump it out onto a floured surface and reshape slightly into a loaf if needed. Then place in the greased crock. If it has been in the crock already, simply move on to the next step:

    5. Cover the crock with a dish towel or paper towel to absorb the moisture as the bread cooks. Then, cover with the crock pot’s lid. Set to low for about 1.5 hour, then check. when it’s done, it will be browned around the edges and no longer sticky and doughy on the top. It might need an extra .5 hours to achieve this.

    6. It’s hard to get a really crispy top in the crock pot, so you might want to finish it off for 2-3 minutes in the broiler-just watch it carefully so it doesn’t burn! This step is totally optional.

    7. Set on a cooling rack and once the loaf is cool enough to touch, enjoy! It’s best served fresh with warm butter and honey.

    If you liked that, you might also like:

    Advanced Gardening Course To Accelerate Your Food Production…

    Survival Medicine & Wilderness Survival…

    Survival Techniques From Long Ago, Re-purposed For The Modern Era…