Page 12 of 15
1 10 11 12 13 14 15
diy – Page 12 – Homesteader Depot

Tag: diy

  • Simple Homemade Paleo Mayonnaise (Video)

    Simple Homemade Paleo Mayonnaise (Video)

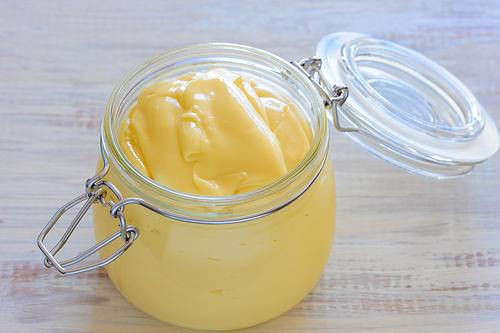
    Mayonnaise is a condiment staple that most houses stay well-stocked in. However, most store-bought mayonnaise, even the “natural” kind, is made from either unhealthy, caloric, “bad fat” oils, GMO soy ingredients, or both. Mayonnaise used to be something most homes made from scratch, and it is really quite simple to make your own, and requires ingredients you most likely already have!

    If the “paleo” part of this recipe sounds gross to you, don’t worry! “Paleo” mayonnaise is really no different than regular homemade mayonnaise. There are sometimes variations on this classic recipe, but it will taste no different than the mayonnaise you’re used to. Well, not necessarily: it might taste way better!

    Here’s a great video instructional on how to make this basic recipe. Enjoy!

    If you liked that, you might also like:

    Advanced Gardening Course To Accelerate Your Food Production…

    Survival Medicine & Wilderness Survival…

    Survival Techniques From Long Ago, Re-purposed For The Modern Era…

  • Benefits of Simple Raised Bed Gardens

    Benefits of Simple Raised Bed Gardens


    Raised bed gardens are an ideal concept for today’s lifestyle trends. Raised bed gardening transcends generations and is a viable option for various size budgets. You can enjoy this method of gardening whether you have an expansive outdoor area or a space-challenged lawn. If you’re the DIY type, you can easily find detailed instructions for building raised beds. However, if constructing beds yourself isn’t a project you have the tools or time for, a quick Internet search will reveal many raised bed garden kits and design ideas that do not require construction skills.

    Eco-friendly living and an awareness of where food comes from is something more people are paying attention to and worrying about. When you grow your vegetables, you know that they are pesticide free and a healthy option for your family. You will have fewer problems with pests such as rabbits or moles if you opt for tall raised bed gardens. It is much easier to protect your vegetables from pests in a raised bed than in a traditional type garden. Weeds are also less of a problem in an elevated garden. When they do sneak into your garden, they are easy to see and can simply be pulled out.

    The number of individual beds you have will depend on the amount of space you have available and the amount of vegetables you want to grow. Beds can be placed in a design that complements the style of home you have. Square and rectangular beds arranged in a geometric pattern or placed in neat rows would be an attractive design for a modern and contemporary home. Houses in a compact neighborhood typically have small yards. Growing a garden in a raised bed gives you the opportunity to grow an abundance of vegetables in a small space. Familiarize yourself with gardening techniques such as succession planting, companion planting and staggered planting to maximize the use of your garden space.

    [Holy Cow]  Recieve over 16,000 SIMPLE Woodworking Plans “anyone” can do. Click Here>>>

    Typically, urban living does not require that you have an extensive collection of lawn and garden equipment. In fact, there’s usually no storage space for such items when you live in an urban setting. Traditional gardens require that you have items such as a tiller, shovel, and hoe on hand to prepare and maintain your garden. Raised beds do not have to be tilled, require little weeding and can be maintained with a minimal number of small, hand-size garden tools.

    Downsizing continues to be a lifestyle change that many people choose to enjoy. It’s typically empty-nesters and retirees that want less house and lawn-related obligations and more leisure time. Moving into a senior community where small lawns are one of the positive features of the neighborhood, makes raised bed gardening an enticing idea. More leisure time means more time for pursuing enjoyable hobbies. One of those hobbies could be gardening. Raised bed gardening can help seniors stay active. It’s also an ideal way for anyone with physical limitations or health issues that restrict their activity level to enjoy growing a garden.


    If you enjoyed this, you might also like….

    Eat Like Your Ancestors…

  • DIY Liquid Hand Soap

    DIY Liquid Hand Soap

    I am all about ways to make value-added products like liquid hand soap yourself to save money and reduce exposure to harmful perfumes and toxins.

    Liquid hand soap is a really great DIY because you can re-use old hand soap pumps, or if you put them in a pretty container they make great and meaningful holiday gifts.

    The ingredients are simple and easy to adjust for scents that you prefer. Using essential oils of choice, you can mimic your favorite soap scents or create ones! Let’s get started:

    Ingredients:

    Two 5oz bars of castile soap

    Essential oils of choice

    One gallon distilled water

    Directions: 

    1. Grate up the bar soap using a box grater or the grate attachment of a food processor. The finer the better, but whatever you have will do. You can even shave off pieces if you like, this is the old-fashioned way, but it will take considerably longer.
    2. Heat up your distilled water in a large pot until it is nice and hot, doesn’t need to be boiling but definitely very hot
    3. Stir in the grated soap and stir slowly and consistently until all the soap is dissolved. If your grater was able to grate the soap very finely, it will dissolve quickly, or, if the soap was grated into larger pieces, it might take a bit longer.
    4. Once the soap is fully melted, remove from heat and set aside for 12-15 hours. You can stir it occasionally if you like, but don’t fret too much about it. It will thicken over this period of time as it cools.
    5. Finally, add your essential oils, as much or as little as you like.
    6. Pour your liquid soap into smaller containers. You can reuse old pump soap containers, or, for something very stylish and pretty for gifts, you can either make your own pump top for mason jars or use small oil bottles with metal tops, like the type you see fancy artisan olive oil in.

    If you liked this, you might also enjoy…

    Natural Healing Techniques Doctors Don’t Want You to Know…

    The Weight-Reducing Magic of Yoga…

    The Ultimate Woodworking Course..


  • Drip System Installation (Video)

    Drip System Installation (Video)

    Recently I wrote about how to conserve water, time, and energy by watering wisely, but that is under the assumption that you, like myself, don’t have a drip system.  If you have the money to invest in a drip system there is no better way to conserve water, time, and energy in watering your garden.  With a timer added to your system you can pretty much forget about your garden and it will still grow.  This video features a system that retails for about $30, in the video it irrigates a 8’x10’ bed with material to spare (the timer is not included in the price).  While not every garden setup allows for a drip system, if you live in an area prone to drought, you may want to design your garden to be compatible.


    If you liked this, you might also enjoy…

    Natural Healing Secrets Everyone Needs to Know

    Yoga: There’s a Reason Everyone’s Doing It…

    Woodworking Made Simple...

  • Horizontal Pumpkin Trellis

    Horizontal Pumpkin Trellis

    Pumpkins are not the first crop most people think of when they think of trellising, and horizontal is not the orientation most think of when they think of trellising. But having a successful garden on the cheap requires thinking outside the box. Using a trellis to grow crops like pumpkins that would sprawl and crawl all over if left to themselves will save tons of space. Likewise, orientating your trellis horizontally can also save space. That might seem counterintuitive, but if your trellis is vertical it will shade out the area behind it. Depending on your space and garden design that could make a big difference. With this design you can grow a pumpkin vine in an area as small as 4”x4”.

    • First, determine which side of your garden the sun is primarily on. For most of us in the northern hemisphere this will be on the southern side.
    • Next, determine which bed you will plant your pumpkins in. If all of your beds are uniform in dimension this won’t be a big deal.
    • Make a wooden frame that is just large enough to be placed over the bed easily.
    • Attach vertical posts to the frame at the corners. Make the two posts that are on the sunny side shorter than the posts that are on the other side. The shorter post should be about 12” above the level of the bed, and the taller post can be about 12” taller than the short posts. This doesn’t need to be exact. It can be adjusted to accommodate your available material, and if shading out is an issue you can make the taller posts even longer, but the longer they get the closer to vertical the trellis will get and the more shade it will cast.
    • Reinforce the posts with angled braces or attach them to the bed if they are close enough to add strength.
    • Connect the top of the posts with a frame as well.
    • Lay hog wire across the top frame and attach it to the frame with zip ties, or nails driven half way and then bent over. Don’t use wire that has small openings.
    • Attach hemp or cotton lines to the short side, about 6” apart and long enough to touch the soil.
    • Plant the pumpkin seeds or starts where they can climb the lines. Keep only the strongest vine. You may need to use garden tape to keep the vine on the line since pumpkins don’t climb as well as other vines.
    • When it reaches the top, train it back and forth starting at the lowest portion and going up one section at a time only after the lowest section is full.
    • Hang fruit beneath the wire, suspended from the wire with an old t-shirt. If the fruit is large the section of wire it is on may need to be vertically reinforced with a stick or two.
    This design is meant to act like a solar panel. It should maximize the amount of sun available, while taking up the least amount of space. It also helps reduce pests and rot on the fruit by keeping it off the ground.

    If you liked this, you might also enjoy…

    Learn to Heal and Treat Illnesses Naturally…

    An Ancient Secret to Slimmer Waists…

    Learn to be a Master Carpenter at Home...

  • DIY Beeswax Candles (Video)

    DIY Beeswax Candles (Video)

    Beeswax candles are a really fun indoor activity for wintertime, and a great skill for homesteading. Beeswax is one principal motivation for keeping bees, and you can use the wax to make crafts like homemade candles that will do very well at farmer’s markets or perhaps an Etsy shop. You can add essential oils or even herbs for a lovely, all-natural aroma that is far better than a toxic parafin candle with perfumes and dyes.

    But even if you don’t keep bees, you can find organic beeswax at your local health food store or online and make lovely homemade candles to sell as crafts or five as gifts (hey, the holidays are coming up!)

    This is a great tutorial video on how to make your own beeswax candles that I wanted to share, since this focus particularly on aromatherapy candles. Many people absolutely love scented candles, especially this time of year, but as I mentioned they can be toxic and harmful, not to mention expensive! This tutorial covers how to make therapeutic, great-smelling candles for yourself. Enjoy!

  • Raised Beds from Pallets

    Raised Beds from Pallets

    If you have purchased lumber to build raised beds then you know how quickly it can get expensive.  And not only the lumber, but the hardware like screws or nails to put it together.  It all adds up and it adds up fast.  But there is no need to spend your money on materials that are available for free.  Follow these tips if you want to make raised beds for next to nothing.


    Find Pallets

    This step isn’t hard, businesses like Longs, Walgreen’s, Dollar General, and more, all receive the items that they sell on pallets.  Some of these pallets are painted red or blue, but some of them are unpainted.  The unpainted ones are the ones that you want, and they are the ones that they give away.  That beings said, always ask, it would be shame to get arrested for stealing something that you could get for free down the street just because you didn’t ask first.

    Dismantle

    If you don’t have a truck then you might have to do this on site.  That will be a lot more inconvenient.  So, if you can get a friend to let you use their truck or drop the pallets at your house for you.  You could use a hammer and a pry bar to dismantle the pallets, but I find that this is a lot of work and often the wood ends up splitting because there are so many nails in a small area.  I just use a circular saw and cut off the ends where they are nailed together on both top and bottom.  This leaves only the middle still nailed together which is easy to separate with a few knocks from a hammer and you only lose an inch and a half on each side.

    Reassemble

    Now you should have a pile of flat broad boards, and a pile of scrap 2×4’s.  Depending on the size of the boards your pallets had you will probably want to make each side of your bed 3 boards tall.  Take three boards and lay them flat with long end touching long end.  Then cut a scrap 2×4 to place on each end and nail it in place.  If you were careful when you removed the nails you can reuse them.  Do this twice.  This will leave you with two sides of your square bed, these sides will be opposite eachother, simply attach them using another 3 boards on each side.


    This is only the most basic design, it can be altered to make your frames stackable, or rectangular, you can even make a keyhole bed with a little more work.  But with the basic premise here you will be able to make raised bed frames for next to nothing.

    If you liked this, you might also enjoy…

    Natural Healing Techniques Doctors Don’t Want You to Know…

    The Weight-Reducing Magic of Yoga…

    The Ultimate Woodworking Course..


  • How to Make Elderberry Syrup

    How to Make Elderberry Syrup

    Elderberries are a favorite for natural health enthusiasts, for their healing and soothing properties for colds and flus. Elderberry syrup is a popular way to consume it, and is far healthier that over-the-counter cough syrup full of chemicals, sugar, and drugs.

    They contain a high amount of vitamins A, B and C, which support the immune system and help fight off sickness. If taken before getting sick, they can help prevent an infection from spreading throughout the body, and if taken after getting sick they can help prevent the infection from spreading into the respiratory tract, making the sickness much worse.

    You can find elderberry syrup at your local health food store, but it can often be quite pricey. Making your own is a great alternative, it’s easy and far more affordable!

    What You Need:
    • ⅔ cup dried black elderberries
    • 2 Tablespoons fresh or dried ginger root
    • 1 teaspoon cinnamon
    • ½ teaspoon cloves or clove powder
    • 1 cup raw honey or maple syrup
    • mason jar or bottle
    • strainer
    Instructions:
    1. Put all the ingredients except the honey in a medium saucepan with about 3.5 cups filtered water
    2. Bring the mixture to a boil, and then reduce the heat to low and let simmer for about 45 minutes. After 45 minutes it should have reduced to about half.
    3. Remove from heat, and gently mash the elderberries
    4. Strain
    5. Let the mixture cool
    6. Once it is fully cool, and the honey and stir well
    7. Pour into a jar or bottle

    Keep your freshly made elderberry syrup in the fridge and take as needed. It can be taken daily as an immune-boosting supplement or when trying to prevent or heal sickness, although when you are sick, you will probably want to take or administer one does every 2-3 hours. A typical dose is .5-1 tbs for adults and .5-1 tsp for children.

    If you liked this, you might also enjoy…

    Natural Healing Techniques Doctors Don’t Want You to Know…

    The Weight-Reducing Magic of Yoga…

    The Ultimate Woodworking Course..