Tag: garden hacks

  • Plastic Sheeting Gardening Hack

    Plastic Sheeting Gardening Hack


    Many gardeners count down the days until the winter ends because they’re just dying (not literally, of course) to get their crops in the ground. Rather than wait until the earth warms up and the last frost is far from over, start your season early by using plastic sheeting in to create a greenhouse-like effect. Plus, if you leave the sheeting up once the weather than changed for the better, you’ll have fewer weeds to deal with. Your garden will be magnificent thanks to this quick and easy garden hack.


    It All Starts in the Autumn

    Once you harvest your crops in the fall, you can start getting things in place for your plastic sheet garden. Clear out your garden, removing the remnants of your crops. Only the soil should be left. Turn it over very well in order to remove any lingering roots or bits of plants. Get out your tiller if you need to. Then, set up your soil for next spring. This involves making seedbeds, also known as soil ridges. These ridges should be one foot wide by around six inches high. They need to run to the east and west in your yard, parallel to each other. You can arrange them so that they’re as close together or as far apart as necessary. This is up to you.


    After The Last Frost (Ideally)

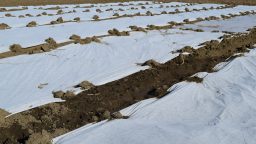
    Depending on where you live in the country, these next steps should be completed after the last frost or after what you perceive to be the last frost. (Sometimes the weather can be weird.) Purchase a roll of transparent plastic sheeting. Find one that’s 4-mil, and large enough to cover your desired area. You need it to be able to cover your entire planting area. Lay it directly on top of those soil ridges that you made in the fall. Don’t forget to anchor it down on the edges with wooden boards, stakes, or bricks. You don’t want it to fly away in a windstorm.


    Wait Until the Soil Is Warm

    Rather than waiting for the soil to warm up naturally (that is, without plastic sheeting) to plant your crops, you just have to wait until the plastic has done its job. It shouldn’t take more than a few days for the earth to warm up under the plastic. Once it has, you can start planting your crops in between the ridges. Peel back the sheet and place your seeds in the ground, following the usual planting instructions as far as how deep and how far apart to plant them. Then, place the plastic back on top of them. At this point, you may want to use wooden stakes instead of boards and bricks, as they’ll allow the plastic to move slightly as the plants grow.


    Why the Ridges Are Important

    The soil ridges are designed to hold up the plastic, giving the plants some space to grow. They also control the moisture content of the soil and trap sunlight, making the area under the plastic quite warm. It creates a greenhouse effect. This is why you can start planting much earlier than usual.


    The Rest of the Process

    As your plants begin to grow, you’ll need to check on the moisture content of the soil. If it seems like things are too damp under there, peel back the plastic for a while and let everything dry out a little. Replace the plastic once the moisture levels have gone down. Once the traditional spring-like weather has officially returned to your area, or the plants have grown too big to remain contained under the plastic, roll up the sheet and let mother nature do the rest.
    How and Why would you bury a shipping container in your backyard?  Find out the secret here>>>

  • Back to Eden Gardening Explained

    Back to Eden Gardening Explained

    Last week, we shared a video from YouTubers Deep South Homestead of their “Back to Nature” gardening method that they improvised themselves.

    They got this idea after they tried the Back to Eden gardening method with poor results. This method of gardening may have failed in their area for any number of reasons and their improvisation was clever.

    The Back to Eden gardening method is still worth a try in your area, and is a very clever and natural way of starting a garden. It’s a bit like lasagna gardening in that you are building your own soil, and start in the fall so the “ingredients” of your garden beds can break down over the winter.

    It was developed by a man named Paul Gautschi who has been using this method in his garden for over 20 years. It has grown popular after the release of a film on the method, aptly titled “Back to Eden“.  You can watch the film there for free, or, for a quicker explanation, keep reading.

    Garden Plot

    Start by choosing your space. Anywhere that has been plowed at some point or cleared out to use for gardening will do, virtually. You do need loose soil underneath, so make sure it is ready for planting in some capacity and not hard, packed soil.

    First layer

    Once you have your garden bed plotted out, it’s time for your first layer. Lay old newspaper down in an even layer all over the garden bed. If it’s at all windy where you are you’ll probably want to move on to the next step simultaneously, or have someone spray a light mist of water over the newspaper to keep it on the ground as you move on.

    Second layer

    Next, you will need lots of manure. If you have your own animals, great, if not, check with local farmers to see if they’ll let you come pick up some buckets of manure. Horse or cattle ranches will probably be particularly happy to share.

    Spread it out over your newspaper, in a nice, even, relatively thick layer.

    Third layer 

    Finally, top this with wood chips. Wood chips aren’t hard to get for free, if you look in the right places. Spread these all over your manure layer.


    Now, wait for a season. The components of your garden will break down over time, creating wonderfully nutritious soil to plant in. The wood chips will eliminate the need for excessive weeding.


    When you’re ready to plant, simply spread the woodchips back a bit and sow or transplant directly into the manure layer. The three layers of this garden will create the perfect environment for plants to grow and the nutrition they need to be healthy.


    That’s it! Have you ever tried this gardening method? Let us know!


    If you enjoyed this, you might also like….

    Can You Defend Your Family When SHTF?

    Natural Healing Secrets You Need to Know…

    Effective Primal Diet Hacks…

  • Seed Tape   

    Seed Tape  


    At $3 or more per packet, seeds can be one of the primary costs of gardening, especially if you are starting a new garden or expanding the crops you are growing.  To some extent, it is an unavoidable cost, but all too often seeds are wasted and the cost of your garden grows needlessly.  One of the most common causes for this is not properly spacing the seeds when they are planted.  Seed tape is a great way to prevent this from happening and save you a lot of money on your garden budget.  Here’s what you need and now to get started.


    Materials

    • Seeds, you really only need to make seed tape for seeds that are so small they are difficult to handle individually with your fingers.
    • 2-ply toilet paper
    • All purpose flour
    • Water

    How to Make it

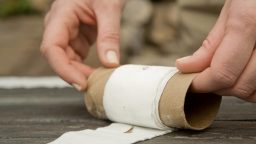
    1. Measure out a length of toilet paper to the length of your raised beds, or the shortest length if your beds are not the same size.
    2. Split the toilet paper. Separating the 2 plies from each other.  This will give you more paper to work with and make it easier on your seeds to sprout.  You don’t want to leave it intact.
    3. Spread the toilet paper out on a surface large enough to work on.
    4. Mix the flour and water together until you have a paste. This paste will be used to hold the seeds in place on the toilet paper.  It should be a little thinner than toothpaste.
    5. Spoon out a small amount, about the size of your thumbnail, of the flour paste on to the separated toilet paper. Place a dab of paste every 3 to 4 inches down the paper, about one per square on most toilet papers.  Do not place the dab directly in the center of the paper, but rather about 1/3 of the way up from the bottom.  This is to allow for the top to be folded down on top of it later when you are done.
    6. Now, place a seed, or two seeds if you are using seeds with a low germination rate, on each dab of flour paste. When you reach the end of the toilet paper, fold the top over.
    7. Carefully roll the tape back up, and then just unroll the tape in your garden bed and cover with a light layer or soil or fine compost and water in.

    In only a few minutes you can make several feet of seed tape, and at the price of seeds, and of pre-made seed tape it is well worth the time and effort.

    Natural Healing Techniques Doctors Don’t Want You to Know…

    The Weight-Reducing Magic of Yoga…

    The Ultimate Woodworking Course..