Tag: harsh weather

  • 6 Crops You Can Plant Outside in Early Spring

    6 Crops You Can Plant Outside in Early Spring

    I keep saying “spring is right around the corner” so forgive me, I’m just excited to get gardening again! As I prepare my own spring garden by starting seeds indoors, I have also been planning to start a few crops outdoors.

    I really prefer direct sowing for many reasons, while starting seeds indoors will give you that leg up to start your spring garden, and is great in many ways, direct sowing is easier, of course, and a lot of plants prefer not to be transplanted. I think it’s a really good idea to try both this year, especially if you’re a relatively new gardener, to get a feel for what’s easiest for you and which plants tolerate transplanting in your climate, and which do not.

    If you’d like to try some direct sowing this year and are eager to get started, as I certainly am, here are some crops you can start indoors while it’s still cold out.

    Radishes

    Radishes are a great crop to grow for so many reasons, and among those reasons is that you can start them early in the spring! They are cold tolerant and grow quickly, so you’ll be harvesting fresh, delicious radishes before you know it.

    You can direct sow radishes according to the seed packet instructions between 4 and 6 weeks before the last frost in your region. Make sure to choose an area with full sun, and to thin them a week or so after they’ve sprouted.

    You can also sow continuously, meaning, two weeks after your first planting, you can direct sow more seeds  in your radish patch, and every two weeks for the next six weeks, to have a longer, continuous harvest.

    Lettuce 

    Lettuce is another cold tolerant plant that you’ll probably be happy to harvest as soon as you can. What better reason to garden then to have fresh salads throughout the spring and summer, right?

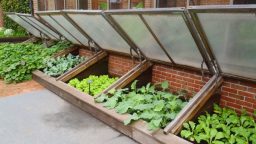
    Since the delicate leaves of lettuce are still vulnerable to frost, you will probably want to plant these under cold frames if you anticipate more frost or snow in your area. If temperatures in your cold frame are between 45 and 65 degrees, you can direct sow lettuce in well-tilled soil.

    If temperatures in your cold frame are between 45 and 65 degrees, you can direct sow lettuce in well-tilled soil (this is important). Plant either rows or broadcast your seeds in a patch, cover lightly with a very thin layer of soil, and then thin out according to the seed packet once the seedlings are over 3″ tall.


    You can sow lettuce continuously as well, if you’d like a steady harvest through the spring and summer.

    Carrots

    Carrots are not ideal for transplanting, so you’ll definitely want to direct sow them. Fortunately, they can tolerate some cold, so they’re a great choice for an early spring garden.

    Like lettuce, these also need very well-tilled soil, as the roots will need plenty of room to expand for nice, big carrots. Make sure to remove any rocks, too.

    Direct sow according to the packet instruction, leaving the recommended space around them (again, carrots need plenty of room!) around 4 weeks before the last frost in your region.

    Thin your carrot seedlings back when they’re about 1″ tall, and fertilize with well-composted compost about 5 weeks after they sprout.


    Beets 

    I don’t know about you but I’m starting to get hungry thinking about all these delicious vegetables (did I mention I’m eager to start my garden?). Beets are both delicious and can be planted early in the year.

    While beets need a soil temperature of at least 50 degrees to germinate, in a cold frame, they can surive both frost and temps as low as 32 degrees, so they’re ideal to put in that cold frame along with your lettuce if you have thawed-out soil.

    Plant them according to the packet instructions, and thin when they’re at least 4″ tall. However, when you thin back, just clip off the tops of the seedlings you’d like to remove, otherwise, you risk disturbing those you plan to let grow.

    Make sure they get plenty of water as they’re growing, beets are very thirsty plants. Keep them mulched as well; this will not only retain moisture, it will keep the soil warm in the cold months.

    You can continiously plant your beets as well, every two weeks until temperatures regularly exceed 70 degrees.

    Cabbage

    Cabbage is not only cold tolerant, it actually prefers it! This is an excellent option for an early garden, because not only will it grow, but you might miss your chance to grow cabbage if you wait too long!

    You can plant cabbage as soon as the soil is warm enough to use, or 4 weeks before the last frost.

    Kale

    Kale is another plant that, like cabbage, actually prefers the cold. It is commonly said that kale actually tastes better if it’s been through a frost! I’m not sure why this is, but many gardeners agree.

    Plant kale according to the packet instructions as soon as your soil is warm enough, and mist regularly. These take a bit longer to germinate, so just make sure to keep your soil consistently moist in this time. Once the seedlings are about 4″ tall, thin back using trimmers.

    One great thing about kale is that if you start harvesting the outer leaves, the plant will keep growing, and actually be far less bitter. It’s amazing how long a well-tended kale plant will last, so this is yet another reason why kale is an excellent option for an early spring garden.


    Well, I don’t know about you, but I can’t wait to get out there and get my hands dirty. Plant some of these crops today and you’ll be enjoying a bounty in a few months! Happy gardening.

    If you enjoyed this, you might also like….

    Can You Defend Your Family When SHTF?

    Natural Healing Secrets You Need to Know…

    Effective Primal Diet Hacks…


  • Keeping Busy in the Cold Winter

    Keeping Busy in the Cold Winter

    When the days get shorter and the temperatures get colder, you might find that you are getting a little bored in the homestead. You do not have as much sun, and if you aren’t careful, you and the rest of the family, could start to suffer from the effects of cabin fever. Fortunately, you can find plenty of great ways to stay busy through the winter and have fun. In fact, with some of these ideas, you might even be able to bring in some extra money later in the year.

    One of the things you might want to consider learning, if you do not already know how, is crocheting. Knitting might work for you as well. When you learn these skills, you can start to make blankets, hats, mittens, and more. It’s a good way to make sure you have plenty of warm items for the winter, and for Christmas gifts. You might also want to turn this hobby into a lucrative business. You can make beautiful blankets and clothing during the winter, and then sell those items the next year.

    Consider some other hobbies that you can enjoy during your downtime. You might want to learn to do more woodworking projects. You might want to learn to paint, write, or do any other number of hobbies that you have been putting off. They can be fun, and they could help you make some extra money.

    Find some fun games to play with the family, too. Make sure they are games that people play in person and not games on the phone or the television. Board games are a great option. You can have a family game night once or twice a week.

    If you enjoyed this, you might also like….

    Home Defense in the End Times…

    Natural Healing Secrets You Need to Know…

    Eat Like Your Ancestors…


  • Cold Frames; How and Why

    Cold Frames; How and Why


    Cold Frames are basically wooden boxes with no bottom and a glass top that you place on top of crops to keep them warm.  In this article, I’ll give a few tips on how to get cheap material, maximize the benefits through design, and explain why you should use cold frames if you live in a zone that has harsh winters.


    • The windows are the part of the cold frame that can make construction costly. If you were to purchase them new the cost would likely outweigh the potential gains.  You can however, get lucky if you keep your eye out at stores like Home Depot for windows that have been damaged and are being sold cheap.  If you or someone you know is remodeling their home you can get windows for free there, if you drive past a house being remodeled you can stop and ask permission to check the dumpster.  If you have a habitat for humanity restore shop in your area you might find cheap windows there as well.
    • The frame should be made to fit the window so that the window can simply sit on top of it, hinged if possible so that you can easily open it to harvest and to check on your crops.
    • Since a cold frame works by magnifying the sun’s light with the glass to increase the heat inside the box, you want to maximize the amount of sunlight that gets inside. To do this want to have your glass tilt down on the side that will be toward the sun.  For this reason, you will want to have the back side a few inches higher.  If you use a 2×8” on the back and a 2×6” on the front this should be enough of a tilt, if you need more after you have constructed it you can always mound some earth up on the back side to raise it a little.
    • With a cold frame, you will not only be able to extend your growing season for your warm weather crops, but you can also grow perineal crops all through the winter in some cases, and you will be able to begin growing and harvesting much earlier in the spring.
    • Remember that cold frames are “solar powered” and will not work in areas that are shaded during the winter.

    Gardening doesn’t have to be a seasonal activity if you have the right equipment.  As you add layers of protection to your garden you add time to your growing season and volume to your harvests.

    If you liked this, you might also enjoy…

    Become A Master Healer With This Revolutionary Course…

    Traditional Hindu Yoga for Weight Loss

    Improve Your Carpentry Skills Quickly and Easily…

  • Winterizing the Chicken Coop (Video)

    Winterizing the Chicken Coop (Video)

    We love our feathered friends, so it’s important that we make sure they have the best care through the winter! This clever Chicago couple kept getting questions as to how they cared for their backyard chickens through the notoriously brutal Chicago winters, so they made a video to show what they did. Their chicken coop looks nice and cozy! Check it out:

    If you liked this, you might also enjoy…

    Ancient Healing Secrets You Can Learn at Home…

    Yoga and Weight Loss: What You Need to Know

    How to Become a Master Woodworker..

  • How to Make a Double-Sided Draft Stop

    As winter rolls in and temperatures drop, you don’t need to freeze in your own home to keep your heating bill from climbing.  Drafts can be a major source of heat loss, even inside your home from unheated portions that are not in use.  Here is a great instructional video with simple to follow instructions on how to make a double-sided draft stop for doors.

    This is only a basic demonstration, you can substitute materials to fit what you have available, like using dried pop-corn instead of the pool noodle, or an old pair of jeans instead of new fabric.  You can even make a one-side, version with custom dimensions for a drafty widow.  Hope this helps keep you warm this winter.


    If you liked this, you might also enjoy…

    Natural Healing Techniques Doctors Don’t Want You to Know…

    The Weight-Reducing Magic of Yoga…

    The Ultimate Woodworking Course..

  • Getting the Homestead Ready for the Winter

    Getting the Homestead Ready for the Winter

    Days are getting shorter and nights are getting colder. Are you and your homestead ready for the changing season? Here are a few tips on getting ready for the winter so that you don’t get caught out in the cold.

    Preparing the Home
    The first preparation should be firewood. If you don’t already have a nice big pile of wood cut and dry, then you are going to go buy a cord of wood or have it delivered. Locate gaps and cracks that will cause drafts, fill them with caulk or foam to help insulate your home. If your home is large your fuel demands are going to be high, to help conserve your fuel close off unnecessary rooms to concentrate the heat. Give it a good cleaning and out the mouse traps because your home is about to look much more inviting than it did in the summer.
    Preparing the Garden
    As your crops finish up, prepare each bed that is done for the winter. Add compost and a thick layer of mulch to insulate the ground and provide food for the organisms that keep your soil healthy. Take some compost and soil inside where it won’t freeze if you plan on doing some indoor early spring planting.
    Preparing Animals
    Make sure that your animals have a warm place to sleep. If it snows in area, make sure that the structure will stand up to a layer of snow on the roof. If you have pigs, or chickens that are older and unproductive layers, now is a good time to start butchering them since it will save you feed costs and the meat will be easier to process in the cold weather. Make sure they have lots of straw on the ground, and consider leaving in their manure since the decomposition will give off heat.

    Winter is inevitable, and it’s not too far off. Prepare now so that you can enjoy it instead of suffering through it.

    If you liked this, you might also enjoy…

    Learn to Heal and Treat Illnesses Naturally…

    An Ancient Secret to Slimmer Waists…

    Learn to be a Master Carpenter at Home...

  • 5 Tips for Storing Food in Harsh Conditions

    5 Tips for Storing Food in Harsh Conditions


    Storing dry foods can be tricky. Ideally, you want to store your food at about 50-55 degrees Fahrenheit, with low humidity (less than 15%). Of course, that just isn’t possible for a lot of people, especially those who live in exceedingly warm or cold climates, floodplains, etc. So how can you improve your food’s longevity, even if you’re storing it in harsh conditions? Follow these tips.

    • Be selective with expiration dates – Canned goods can usually last years past their expiration dates, but it’s a good idea to choose the ones with the longest dates to be sure that your food doesn’t go bad while you’re not paying attention.
    • In humid conditions, store food higher – Your gut instinct might be to store food in the basement, but if you live in a floodplain, that can be problematic. Store food in the attic or one of the upper floors of your house to avoid flood damage and minimize humidity.
    • Invest in a vacuum sealer – if you’re bagging up dry goods, you can extend their shelf life in any conditions by sucking the oxygen out of them. A vacuum sealer is an inexpensive investment for longer lasting food.
    • Date your food inventory – Your canned goods will likely have expiration dates on them, as well some of your dry goods. If you’re doing your own canning or bagging, though, make sure to put the dates on all containers. Then always use the oldest dated foods first before moving on to newer containers.
    • Grab some Five-Gallon Buckets – If you’re worried about pests getting into your food supplies and/or you want to keep them fresher longer, invest in some five-gallon buckets with tight-fitting lids.

    With these tips, you should have no trouble extending the shelf life of all of your canned and dry foods, even in harsh conditions.

    If you like this, you might also like:

    Advanced Gardening Course To Accelerate Your Food Production…

    Survival Medicine & Wilderness Survival…

    Survival Techniques From Long Ago, Re-purposed For The Modern Era…