Page 1 of 2
1 2
meat – Homesteader Depot

Tag: meat

  • Simple Pig Weighing Hack

    Simple Pig Weighing Hack

    Did you know that it’s entirely possible to figure out how much your pig weighs without putting it on a scale? Instead, you can use a number of things that you probably have lying around your house to figure out your pigs weight. A few quick measurements and calculations are all that it takes. This is much easier than trying to hoist your pig onto a scale. We’ll cover this useful pig weighing hack and some additional information here.

    Why Do You Need To Know How Much Your Pig Weighs?

    If you’ve been trying to determine when your pig is ready to be slaughtered, or your kids want to use him or her for a 4-H project, then you need to know how much it weighs. It’s good to measure and weigh your pig on a regular basis to ensure that it’s getting enough food and growing at the proper rate. You can then place these measurements in a chart and keep track of growth rates as they compare to the amounts of food provided.

    What You Need To Get Started

    Gathering your supplies constitutes the first step to determining your pig’s weight. You’ll need a tape measure, some twine, and the most important thing – a calculator. Obviously, you also need a pig. Without one, this entire endeavor is fruitless.

    Taking the Measurements

    The best time to take these measurements is while your pig is eating. This provides a good distraction, and you won’t have to deal with attempting to measure a moving animal. You also don’t want to have to dive into the mud in order to handle this task, so don’t do it while it’s wallowing either.

    Once you’ve located your pig at the trough, pull out your tape measure or piece of twine. Whichever is easier to use. You’ll measure the twine at some point anyway, so if you have a tape measure, cut out a step and just use it.

    The very first measurement is the length. This is the total length; from the base of the pig’s tail all of the way to its ears. It’s best to go from the top, measuring along you pig’s back. Hold the tape measure flush in order to get an accurate reading.

    The next measurement is the heart girth. Wrap the tape measure around the body of your pig, parallel to its legs. This is essentially the pig’s circumference as if it were a tree or something.

    Once you have those two measurements, you’ll need to apply them to the formula. This is the heart girth number squared multiplied by the length, which is then divided by 400. Here’s an example:

    A pig has a 60” length and a 54” heart girth. Your formula is 54 X 54 X 60 = 174,960. Then that last number is divided by 400: 174,960/400 = 437.4. The pig weighs 437.4 pounds. That weight includes every part of the pig, organs and all. Once the pig is butchered, you’ll lose about 100 pounds of that weight. This means that you’ll get around 330 pounds of meat from it.

    Conclusion

    Knowing how much your pig weighs is important. We already mentioned the ways in which you can track its growth over time, noting how much you feed it in order to see the ratios form. If your kids are using your pig as their 4-H or county fair project, then that data is very important. You also need to know when the pig will be ready to be butchered. This measurement formula is actually very accurate and will come in handy. It sure beats putting your pig on a scale!

    If you find THIS PLANT in your backyard, whatever you do, DO NOT touch it>>>

  • Is Grass Fed Beef Really Better Than the Alternative?

    Is Grass Fed Beef Really Better Than the Alternative?

    As people work to become more health conscious, we are taking a closer look at the foods we eat regularly.  And, while some have chosen to avoid animal products altogether, others have instead made an effort to find healthier versions of the product they already know and love.

    Take beef, for example.  Most of us know from grocery shopping that it’s now possible to buy items like ground beef with different levels of fat in them.  And, you would think that when spending the extra money per pound on 93% lean beef that, that is hormone/additive free you’d be getting as healthy an option as possible.

    You may find it surprising then that you can do better.

    How?  By sourcing your beef from grass-fed cows instead of grain fed cows.

    But wait, isn’t grain a healthy food too? Well, yes, it is.  However, in a cow’s diet, it has more in common with a bag of potato chips than a leafy green salad.  The purpose of adding grain to a cows feed to fatten them up.  Not bulk them up with lean muscle but add fat so they weigh more and can be sold for more money.

    Grass-fed cows are much leaner, not because they are undernourished, but because they don’t build up excess fat. Beef from grass-fed cows is shown to be lower in saturated fat, calories, and total fat while being higher in vitamins and healthy fats.

    Additionally, since the cattle are allowed to graze in open fields more than those who get crowded into feedlots, there is little to no need to give them antibiotics.

    Finally, another side effect of some cheaper grain feeds it its ability to allow E. coli bacteria to breed much easier in the cows’ stomachs.

    Still not convinced?  Take a look at some more advantages grass-fed beef, and farming has:

    • Lower Omega 6-fats (These are linked to heart disease)
    • Higher Omega 3 fats (good for your brain)
    • Higher CLA levels which help reduce the risk of heart disease and cancer
    • Higher vitamin C and E levels
    • Better quality of life for cattle (Less stress)
    • Higher quality of Dairy products
    • Pastures provide reduced flooding and soil erosion versus grain fields
    • Self-fertilizing of pastures provides a more nutritious and more sustainable food source without costing extra money.
    • Reduces the use of chemical fertilizers and pesticides to produce unsustainable corn and soy feed.

    Disadvantages of Grass Fed Beef

    Like organic produce, especially when the movement was just getting off the ground, it may be difficult initially to find a local supplier.  The lack of farms producing grass-fed beef also tends to make it more expensive for now.  But, if you are in a position to take advantage of this healthy and more sustainable beef source, the advantages definitely outweigh the disadvantages.

    It Just Tastes Better!

    One last advantage to mention that anyone who’s made the switch will tell you, grass-fed beef has a much better taste to it.  Of course, the best way to find out is to try it and see.

    Where to Buy Grass Fed Beef

    If you have a locally owned butcher shop or similar, you may be able to find it there.  Whole Foods stores also carry it, but it tends to be more expensive.  Buying from Whole Foods initially would give you an opportunity to assess the differences yourself before looking too hard in your area for a supplier.

    Two resources online that provide information about where to buy grass fed beef are:

    • Eat Wild at www.eatwild.com
    • US Wellness Meats: 100% Grass-Fed Beef https://grasslandbeef.com/

    Once you’ve made the switch, its time to fire up the grill and cook up the best burger or steak you’ve ever had.

    [Bonus] This strange method will make your food last for 2 years without refrigeration.  Learn More>>>

  • Building Your Very Own Smokehouse

    Building Your Very Own Smokehouse


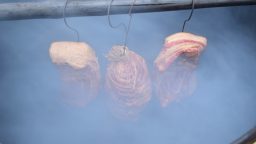
    There are a number of DIY smoker methods, ranging all sizes and prices.  If you only need to smoke small items or one medium item at a time, like a Christmas turkey, all you need is a large terracotta pot or unused metal trash can.

    But, if you need a good-sized smokehouse to help you prepare for winter on a homestead or other rural area, this design based on pallet wood should provide what you need without breaking the bank.  Its also designed so that you only need the most basic of woodworking skills to complete it.

    An important note about using pallets, most are treated with industrial chemicals. You’ll need to make sure that any pallets you use for this project are food grade wood.

    If you can get your hands on enough leftover wood from friends or other projects you’ve done, you can still use this plan; you’ll just need to adjust a little when the word “pallet” is mentioned.

    Materials List

    • 20-30 Deconstructed Food Grade Pallets or other Food Grade Wood
    • 4’ x 3’ Raw Corrugated Tin (this metal must be raw, do not use galvanized)
    • 3 Hinges
    • Aluminum Flashing
    • Aluminum Screening
    • Handle (for the door)
    • Heavy Duty Tin Foil
    • Screws – 2 1/2 inch stainless steel or other weather resistant screws
    • Screws 1 1/4 inch stainless steel or other weather resistant screws


    Select Your Materials

    Whether you are using actual pallets or sourcing your wood another way, there can be some challenges if you are working with low-cost or free materials.

    The wood you get will probably have some issues such as warping and splitting. But, if its free (especially if its free) it can be worth the hunting and sorting to keep expenses down.  Just consider that time spent as sweat equity.  If you are using pallets, you will need at least 20-30 for this plan.

    If you are using pallets, you’ll want to get your length from the middle of the panels, so the ends are trimmed off.  Doing this will help avoid splitting and remove most of the nail pieces you’ve just cut through. If you are using other wood sources, use the wood cut list below to create your pieces.


    Wood Cut List

    Make the following Cuts from 2x4s unless otherwise noted.

    1. 2 each 33”
    2. 2 each 70”
    3. 2 each 29”
    4. 2 each 6’ (Front End of Side Wall)
    5. 2 each 5’ 6” (Back End of Side Wall)
    6. 8 each 33” 2 x 2 (Used 2x2s or cut 2x4s in half lengthwise
    7. 8 each 32 ¾”
    8. 8 each 30 ½“

    Cut this from a 1×1 sized piece

    1. 2 each 5’4” (part 6)

    Cut these from Pallet Panels:

    1. 36 ¼“ pieces, enough to cover the left and right sides (part 10 and 11)
    2. 35 ¾” pieces, enough to cover the front and back (part 12 and 13)
    3. 38” pieces for the roof (part 14)
    4. 2 each 18” to 24” vent (part 15)
    5. 1 each 36” (Part 16)

    As a precaution against your wood splitting as you work, it’s a good idea to pre-drill and countersink each screw.

    Smoking your food is a great way to preserve your meat.  Check out this other method that will allow your food to last for up to 2 years.  Learn More Here>>>

    Getting Started

    Begin by putting together the 2 sides wall frames of the house that include the rack supports.

    Take one piece from the cut pieces listed above for the first side unless otherwise noted:

    #4 – 6’ Wall frame front

    #5 – 5’6” Wall back

    #6 – 4 pieces of 33”

    Make sure the bottom of your #4 and #5 pieces are squared at the bottom then attach the 33” pieces across at 24” from the bottom, 36” from the bottom, 44” from the bottom, and 52” from the bottom.

    NOTE:  Secure the cross pieces to the 6’ upright flush to the end, BUT secure the cross pieces on the 5’6” upright 1.5” in from the end.  This is to leave room for the #9 pieces later.

    Create the first side with the 6’ (front) board on the right and the 5’6” (back) board on the left.

    Create the other side with the 6’ (front) board on the left and the 5’6” (back) board on the right.

    When you’ve completed the 2 sides, you’ll have mirror image sections that resemble ladders with one side higher than the other.  The Difference in heights from front to back provides support for a slatted roof.

    The cross pieces become the rack (shelf) supports on the inside of the smokehouse.


    Making the Door Frame

    Next, you’ll need the two pieces each from #2 – 70” and #3 – 29”.  Simply connect them to make a 37” x 70” rectangle.


    Attach the 3 Sides Together

    To make the next steps easier, screw the door frame to the face of the walls for better stability. There will be a 2-inch difference at the top between the highest point of the side walls and the top of the door frame

    Related Article:  “Cooking Skills Every Homesteader Should Cultivate”

    Cut the Roof Angle

    Using a spare panel or another straight edge, draw a line from the back of the side panel to the front to create the slat line for the roof and cut off the excess.  Do this on both sides.

    Use the pieces from #1 to (33”) to span the width of the smokehouse at the front and back ends of each wall.


    Add the Rear Support Frames

    Attached both #9 pieces 5’4” to the backs of the side walls, under the roof supports.


    Adding the Paneling

    Starting with the Back, fill in your walls with paneling from the ground up, then move on to the left and right sides.


    Finishing the Door

    1. Unscrew the door from the smokehouse after the side and back paneling is in place.
    2. Add the hinges to one side
    3. Install the door frame to the house.
    4. Add paneling to the door in such a way that the door has clearance to swing open.
    5. Add the handle to the side opposite the hinges.


    Put on the Roof

    Attach paneling from the front to the back of the house, across the pieces that span the width.

    Screw on the corrugated tin.


    Building Your Smoke Rack Shelves

    Create wooden frames that fit inside your smokehouse and can slide on and off the supports constructed on the interior.

    Stretch your metal screening across and around the wooden frame to complete your “shelf.”


    In Conclusion

    With the most basic woodworking skills, scrap pallets and some determination, you could have your own smokehouse build by none other than yourself.

  • Game Meat: From Field to Freezer

    Game Meat: From Field to Freezer

    You’ve chosen your weapon, you’ve stalked your prey, you’ve made your shot, you’ve downed your first kill…Now What?


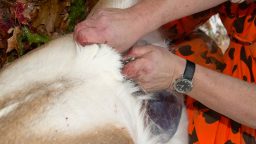
    First – Get Those Guts Out

    The faster you can remove the entrails, the better off you’ll be.  But what is fast?  Most experts will tell you if you can get it accomplished in less than 4 hours after the kill, you’ll probably be OK.


    Next – Skin the Hide

    You’ll need to remove the skin shortly after the guts so the meat can begin to cool.

    As you go, avoid puncturing the meat or cutting through the hide to let fur onto the meat as both ways can let harmful bacteria in.

    When you do get fur on the meat, you can pick it off with your fingers or burn it off with a torch to kill any bacterial contamination.

    Once the animal has been relieved of its skin, cover it with a cloth game back or clean fabric.  This cover will absorb any oozing blood and guard it against contamination.


    Cool It

    While gutting and skinning gets the cooling process started, you’ll need to continue and speed up this process to ensure the meat doesn’t spoil.

    If you are dressing your kill before you leave the area, keep a portable cooler in your vehicle so you can expedite the cooling process. If you only have ice available, try to keep it in sealed containers.  Exposure to water (ice) can compromise the texture of your meat and affect its flavor.  If you have the means, consider a clean ice alternative like ice packs or frozen water bottles.

    Have your cooler cooled and ready to go so there will be no delay in getting your meat down to optimal temps.

    Get Slicing

    Using a sharp set of tools, butcher your meat for optimal storage and to make easy use of it later.

    This process also is the time to rid the meat of unwanted items like silverskin, tendons, or large vessels that sometimes appear in the muscle tissue.  Basically, if you know you don’t want to eat it, cut it out now.


    Keep it Stored – Correctly

    If you are dealing with a big game kill, like a deer, you probably aren’t going to be able to consume all your fresh meat before it spoils.  Freezing the surplus will give you access to protein months later, but you need to make sure you are using the proper storage supplies.  Containers and storage bags specifically designed for “Freezer” use are what you want.  Anything else isn’t going to be made of a thick enough barrier to prevent freezer burn.  Ziplock and Glad both make excellent products for long-term deep freeze storage, or you can go old school with freezer paper and masking tape.  This option also makes labeling what’s inside, a breeze.

    Suggested Article:  “Your Guide For Need to Know Bullet Information”

    Ideally, you’ll want to portion your meat according to how much you and your family will eat in one sitting.  This eliminates thawing out more than you need since it’s dangerous to re-freeze meat after it’s been thawed unless you cook it first.


    Keeping it Cheap

    If you have the ability to hunt for food, you could save hundreds on grocery bills.  Whether you live in a rural area or take the time to spend a long weekend stocking up before going back to the urban jungle, being able to dress it, butcher it and store it in a timely manner will is a wonderful skill. These skills will also allow you to provide for yourself in an emergency survival situation.


    [Bonus] Simple shooting system that will double or even triple your shooting accuracy.  Watch Video>>>

  • [DIY] Simple Venison Jerky Recipe

    [DIY] Simple Venison Jerky Recipe

    When you’re stockpiling for an emergency, some foods are easier to preserve than others. Vegetables and fruits can be canned or dried.

    But what do you do to preserve meat? Freezing is effective for regular use, but it won’t help you if there’s no power. One of the best and most effective ways to preserve meat is by making jerky.

    Jerky is easy to make, healthy to eat and has a long shelf life. Making it can extend the life of venison and provide you with a healthy, protein-packed snack to get you through hard times.


    Preparing to Make Jerky

    Let’s talk first about what you need to make deer jerky. There are a few basic non-food requirements that you need to have in place.

    1. A freezer to freeze the meat before slicing it
    2. A food dehydrator or an oven with a low setting (150 degrees Fahrenheit)
    3. A very sharp chef’s knife or a meat slicer

    That’s it. Some people like to smoke their jerky, so if you have a smoker, you may want to consider that since it can add a nice depth of flavor to the finished product. However, you don’t need to smoke it. Our recipe, as you’ll see, includes a dash of liquid smoke to add a smoky finish.


    Our Favorite Deer Jerky Recipe

    Now we’re ready to share our favorite deer jerky recipe with you. We’ll walk you through it. Once you’ve made your first batch, you won’t want to go back to store-bought jerky.

    Here’s what you’ll need:

    • 1 pound of venison with the fat and skin removed
    • ½ c. soy sauce or tamari
    • 1 tablespoon Worcestershire sauce
    • 1 tablespoon steak sauce
    • 1 teaspoon liquid smoke
    • ½ teaspoon garlic powder
    • ½ teaspoon onion powder
    • ½ teaspoon sea salt
    • ½ teaspoon ground white or black pepper

    Here are the steps to follow to make the jerky.

    1. Put the venison in the freezer. Partially frozen meat is easier to slice thin than raw meat.
    2. When the venison is ready, use a very sharp knife or meat slicer to cut it into ¼-inch thick slices.
    3. In a large bowl, put the soy sauce, Worcestershire sauce, steak sauce, liquid smoke, and spices, and whisk to combine.
    4. Add the venison slices and stir to make sure all slices are coated with the marinade.
    5. Place the bowl in the refrigerator and allow it to marinate a minimum of four hours. You can leave it overnight for a stronger flavor.

    When the slices have finished marinating, it’s time to cook them. The method and time will vary depending on whether you’re using a dehydrator or your oven.

    If you’re using a dehydrator, fill the trays making sure to lay the meat down in a single layer with no overlap. The usual setting is about 155 degrees, and it should take four or five hours.

    To make jerky in an oven, lay the venison in a single layer on cookie sheets. Preheat the oven to 150 degrees Fahrenheit and put the jerky in. It will take eight to ten hours.

    In either case, you’ll know that the jerky is done when you can pick up a slice of meat and bend it without breaking it. Store the jerky in plastic bags or jars at room temperature or in the refrigerator to extend its shelf life.


    Flavor Variations

    Once you’ve made your first batch, you can experiment with new flavor combinations. Adding some fresh ginger to the marinade will give your jerky a spicy kick. If you want a little sweetness, try adding some brown sugar. Venison and apples are a classic combination, so you can try substituting ¼ cup of organic apple cider vinegar for the soy sauce.

    Store-bought jerky simply can’t compare to homemade. We hope this recipe inspires you to give it a try.

    Do you have a favorite jerky recipe or ingredient? Tell us in the comments!


    With over 1000 easy-to-prepare Paleo recipes and 10 week meal plan, you can stop stressing about your food, and start enjoying the healthy energetic body, weight loss, mental sharpness, and positive attitude you gain from eating only wholesome, natural ingredients that truly nourish.  <<<Check out the Recipes HERE>>>

  • 5 Ways Pigs Are Valuable Beyond Just Meat

    5 Ways Pigs Are Valuable Beyond Just Meat


    When you are living off the land, owning animals that can provide you with food can be extremely beneficial. You may grow plenty of crops and fill your pantry with canned vegetables, but if you aren’t getting enough protein, you won’t have the energy to tend to your farm and home.

    While there are some homesteaders who don’t want to commit to raising a large farm or a herd of cattle, there are plenty of other animals such as chickens or turkeys that can ensure you have meat and eggs throughout the year. They are also low-maintenance so that you don’t have to waste a lot of your time caring for them.

    Pigs are another option that will provide you and your family with plenty of meat. While they do require plenty of food, they aren’t as difficult to raise as you may think.

    Here are a few good reasons why you should consider adding pigs to your homestead.

    1. They Will Eat Anything

    Yes, pigs eat a lot, which can be a disadvantage, but they will eat a lot of anything. Many homesteaders make their own dairy products such as cheese or butter. If you have excess whey left over from making cheese, you can feed it to the pigs. They will also eat excess milk from dairy animals, extra eggs from chickens, or any cooked leftovers that you have lying around. That means no more food thrown out the back door and nothing goes to waste.

    1. They are Excellent Tillers

    Pigs will till any area that you place them in. Many people think that the rooting that pigs do naturally is a bad habit and it should be stopped. But it’s only a terrible thing if you have them in an area where you don’t want to disturb the soil. The tilled land where pigs once lived is a suitable place to grow vegetables. That is because along with loosening up the soil, it is also well-fertilized.


    3. They Help Eliminate Parasites 

    Pigs are a dead-end for parasites that often become an issue with other farm animals such as cattle, goats, or sheep. Since pigs have internal parasites that are different from other animals, they help clean up the land when they follow other grazing animals. If you place your pigs in a field with grazing animals such as sheep or goats, the pigs will consume the eggs and larvae of the parasites on those animals. Their bodies are capable of digesting the parasites without harm. Goat parasites will not survive inside of pigs.


    1. You Receive an Abundance of Meat

    The best thing about raising pigs is the amount of meat that you can get from them. You can add more variety to your diet and create a wide range of meals for your family all while homesteading. And the best thing about it is that you know where the meat came from. You raised the pigs humanely and know exactly what type of diet they consumed.

    Suggested Article: “5 Keys to Choosing the Perfect Livestock”

    1. Extra Income

    If you end up with more meat than you need, you can always sell the additional meat for profit. Many people will raise pigs just to sell the meat and not keep it for themselves, while others may raise additional pigs to sell. You can choose to sell the pig itself or the meat after it is butchered. Either way, you end up with a substantial profit that can help with supplies during the winter.

    If you want to have enough pork for your entire family, you should get two to three piglets in the spring. Raise them throughout the summer and then butcher them that fall. Then you can do the same the following year. Raising a pig for that period of time will usually produce around 170 to 200 pounds of meat, which should be more than enough meat to keep any homesteader happy.

  • What Is The Roadkill List?

    What Is The Roadkill List?

    Have you ever thought about eating roadkill? Now, before you start to think the idea is crazy, we aren’t talking about stalking the roadways and searching for animals that have been hit. Instead, you can get on a road kill list. This type of list is often available through park departments and highway departments, and it works very simply.

    Animals in rural areas, along the highways, and even in the suburbs tend to cross roads during their travels. This applies to all animals, but the ones that can be most problematic tend to be deer, and in some areas in the northeast, moose. They might be going from watering hole to another, or they could be foraging for food. With the sheer number of roads today, many animals are struck and injured or killed. When this happens, the animal needs to be removed from the road, as it can be a danger to others.

    The parks department or the highway department goes out and clears away the carcasses. In cases where the animal is recently dead, there tends to be a substantial amount of good meat left, so many areas allow residents to sign up to roadkill lists. The first person on the list will be notified when there is a recovered animal they can have. They will generally be the ones responsible for butchering the animal. The next time it happens, the call goes out to the next person on the list, simple as that.

    If you have been looking for a way to help supplement the meat you have in your freezer, this could be a good option. You will want to consider the options in your area regarding animal control, the department of wildlife, and highway departments to see if any of them feature a roadkill list. Even though many areas have this option, keep in mind that your area may not. It can be a good option for homesteaders always looking to find ways to supplement their food.

    If you enjoyed this, you might also like….

    Long-Term Survival for Homesteaders…

    Natural Healing Secrets You Need to Know…

    Effective Primal Diet Hacks…

  • Beef Cuts and How to Cook Them (Infographic)

    Beef Cuts and How to Cook Them (Infographic)

    I’ve often recommended on this blog finding local, farm-raised meat and dairy for the most sustainable, healthy lifestyle.

    The thing about finding local meat, however, is that you might find yourself with some cuts of meat that you’re not familiar with and not used to cooking. I don’t know about you, but when I started learning to cook, I  mostly knew how to saute ground beef and braise chicken breasts.

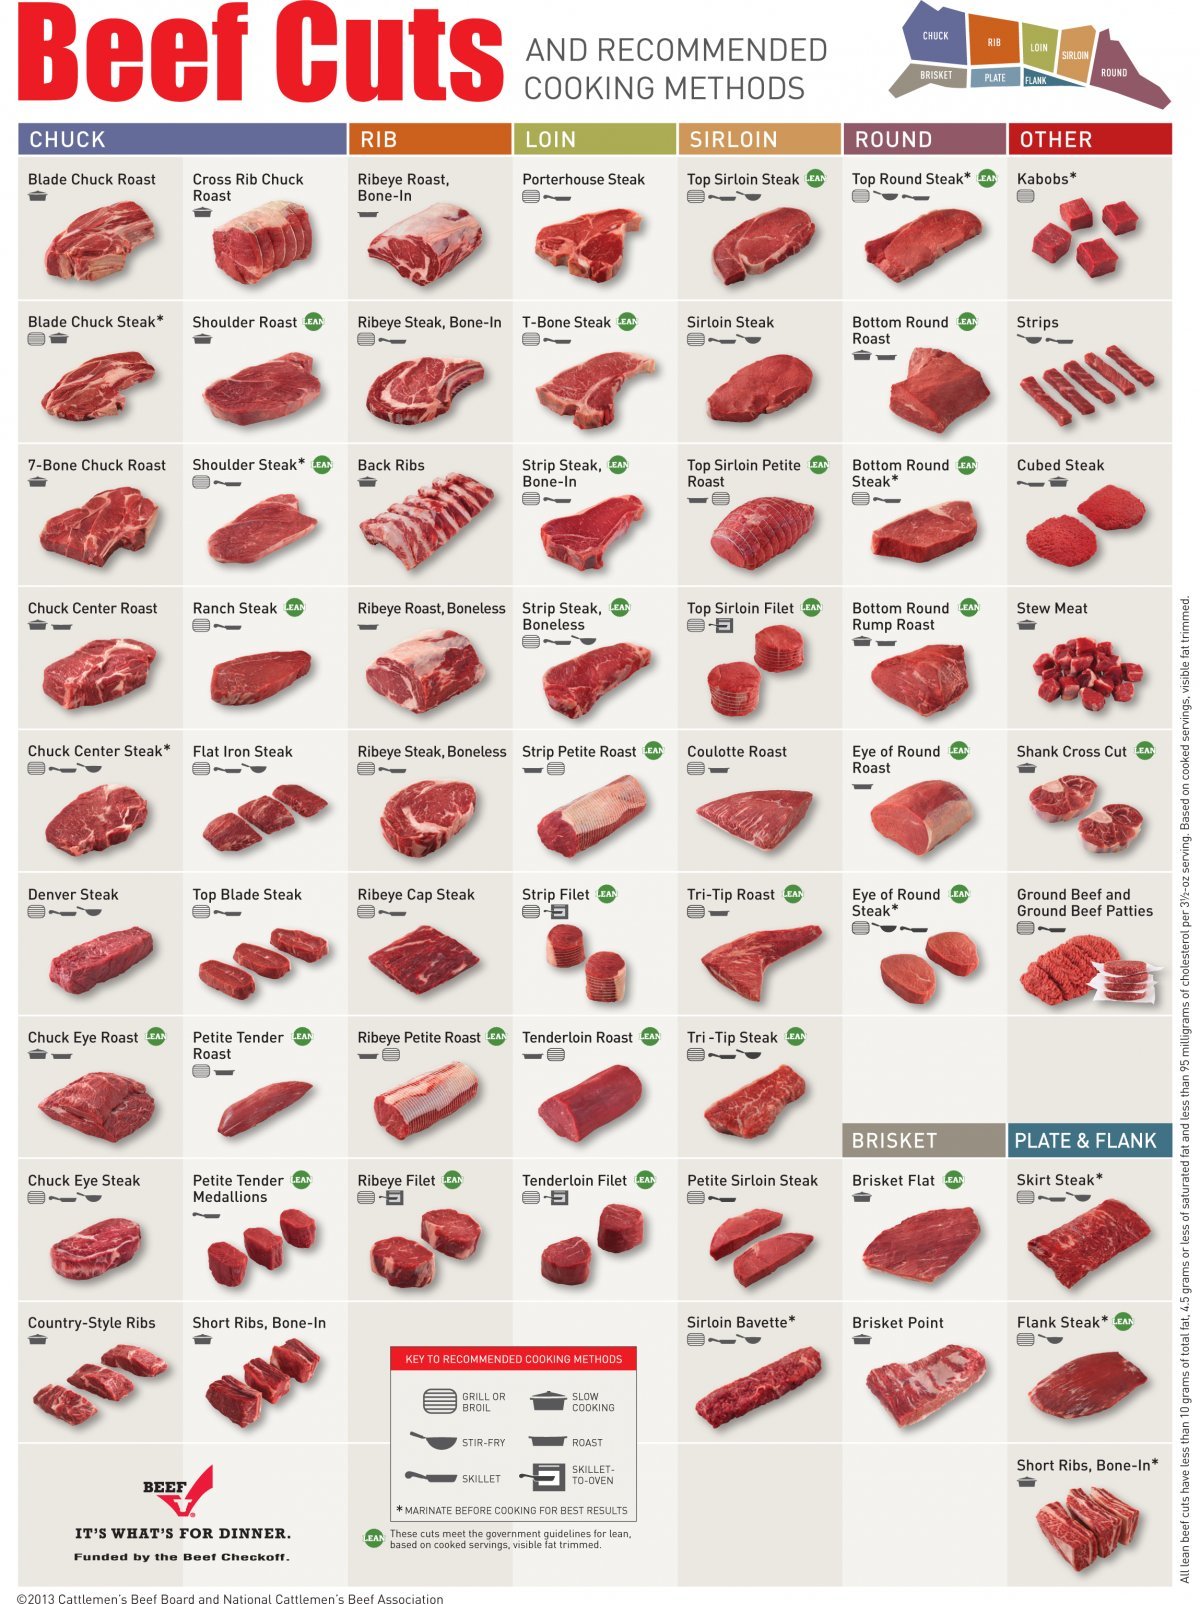
    Getting familiar with the different cuts of beef and how to prepare them can vastly broaden your culinary knowledge and abilities, as well as introduce you to some great new dishes.

    This handy infographic found on BusinessInsider.com is a chart of all the beef cuts out there, and the best cooking methods for each. Bring this along the next time you plan on buying beef from the farmer’s market!

    If you enjoyed this, you might also like….

    Long-Term Survival for Homesteaders…

    Natural Healing Secrets You Need to Know…

    Effective Primal Diet Hacks…