Page 3 of 3
1 2 3
natural remedies – Page 3 – Homesteader Depot

Tag: natural remedies

  • DIY Calamine Lotion

    DIY Calamine Lotion

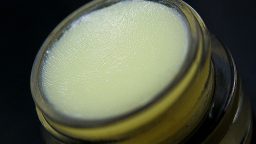
    If you’ve ever had poison ivy, poison oak, hives, or any other kind of severe skin irritation that causes itching, you’ll know just how soothing calamine lotion can be. I always thought it was something specific, but it turns out the ingredients will probably be pretty familiar to you if you have a basic natural first aid arsenal.

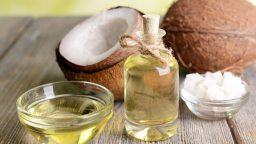
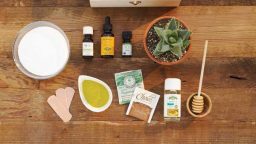
    Even if you’ve never made your own home remedy, this is still an easy remedy with simple ingredients that aren’t too hard to find if you know where to look. Kaolin or bentonite clay are normally available at a health food store, while glycerin and zinc oxide can be found at a soap making supplier, or simply online. They’re not too expensive, and they’re a great staple to have for DIY lotion, home remedies and beauty treatments.

    Essential oils can also commonly be found at a health food store, or from a local supplier. A lot of essential oil companies have network marketers, like Young Living or DoTerra, so if you know anyone who posts constantly about essential oils, odds are they’ll happily sell you some. These also make great additions to your natural health arsenal and most essential oils have a variety of uses, particular lavender and tea tree.

    Here’s what you need: 

    1/4 cup zinc oxide
    4 teaspoons pink Kaolin clay or bentonite clay
    4 teaspoons baking soda
    1/4 cup water
    1/2 teaspoon glycerin
    3-4 drops lavender, peppermint, camphor, tea tree, or other antibacterial essential oil (optional)

    Instructions

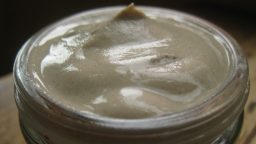
    1. Combine all the ingredients in a bowl. Make sure to be very careful not to inhale the zinc oxide; its safest to use a mask.
    2. Whisk everything together, blending until smooth.
    3. Store in the refrigerator for 1-2 weeks, or, to have on hand, blend the dry ingredients and keep together in the cupboard (out of reach of children), and when someone gets itchy skin, blend together with the water, glycerin, and essential oils to make the lotion.

    If you enjoyed this, you might also like….

    Home Defense in the End Times…

    Natural Healing Secrets You Need to Know…

    Eat Like Your Ancestors…


  • Natural Antibiotics That Are Better Than a Perscription

    Natural Antibiotics That Are Better Than a Perscription

    This time of year there are all kinds of bugs in the air, and you’re bound to get sick sooner or later. A lot of people will rush right to the doctor to get antibiotics if they suspect an infection, and antibiotics certainly are amazing miracles of modern medicine.

    But they can also be harmful to your immune system and will wreak havoc on your gut bacteria, which are necessary for a healthy body. Rather than resort to antibiotics right away, why not try some natural antibiotics first? These are some great options for natural remedies of all kind, and you’ll recognize most of them from other posts on natural remedies and healing.

    They are better than prescriptions for infections because they’re cheaper, they’re natural, whole, you can find them at your local grocery store, and they do not have the harmful side effects of anitbiotics. Stock up on some of these this winter to stay healthy and get over sickness fast!

    1. Apple cider vinegar

    Apple cider vinegar is good for almost everything. Most people don’t like the taste, and it is quite intense for sure. But this fermented superfood is amazing for killing bacteria and balancing the immune system. You can put in water, juice, or tea, or simply incorporate with your food over salad or in sauces, as you would vinegar.

    2. Raw Honey

    Raw honey is a powerful antibiotic, with natural properties that fight bacteria and illness. It also has beneficial prebiotics that regular gut flora, so even if you are taking prescription antibiotics, you could take raw honey in addition to support your digestive system.

    3. Coconut Oil 

    Coconut oil has been very popular in recent years, for good reason! It contains powerful acids that can kill bacteria and regulate the immune system and gut flora (noticing a pattern here? Gut flora health matters!). The healthy fat found in coconut oil is also great for you, and together with the natural antibiotic properties of coconut oil can help fight infection, both inside the body and externally!

    If you liked this, you might also enjoy…

    Holistic Medicine Basics

    Ever Considered Taking Yoga? Read this

    The Ultimate Woodworking Course..

  • Building a Natural First Aid Kit

    Building a Natural First Aid Kit

    On the homestead, one is subject to bumps, bruises, rashes, and other maladies and injuries. It’s very important to have a well-stocked first aid kit. But what about the homesteader who wants more natural, holistic options for home remedies, rather than simply OTC medicine that might be expensive and hard to stock up on for people who live in the country?

    Here is a simple list on how to get started restocking your first aid kit. There are so many wonderful DIY natural remedies available these days (thank you, Pinterest!) it can be almost overwhelming to know which natural remedies to stock up on. So this list will help you figure out what will work best for your needs.

    1. Take inventory

    If you already have a first aid kit or first aid items scattered around the house, gather them all together and see what you have. What have you used recently? Which items do you find particularly helpful? What items have you had since the first Bush presidency? What items are useful, but might have harmful parabens or petroleum products in them? Also, think about the herbs and plants you have on your property and in your garden that might have healing properties of their own.

    2. Reduce, reuse, and find replacements

    Throw away old, expired, and unused items. Keep what you like and see if anything needs replenishing. Items like band-aids, gauze, and medical tape are great to keep a healthy stock of, especially if you live far away from stores at which they can be purchased. If you have items you like but maybe would like to find natural alternatives, set them aside for emergencies and make a list of the injuries or issues they address and research healthy and safe alternatives. If you are a Pinterest user, make a board just for natural remedy ideas.

    3. Plan ahead

    Think about the first aid emergencies you’re most concerned about on the homestead. Issues like splinters, rashes, sunburns, cuts, scrapes, and common colds and flus are probably going to be at the top of your list. Then add to your list or Pinterest board possible natural remedies that will help with these. The simpler the better, and anything that works double-duty is great. For instance, coconut oil and aloe are great for anything skin-related, raw honey is a multi-purpose antibiotic and cold remedy, activated charcoal can help with stomach issues, skin issues and to pull out splinters, etc.

    4. Create

    Get started making some of the remedies for issues you’re already dealing with. You’d be surprised how long a jar of homemade herbal salve can last, for example. You don’t have to make everything all at once, just try to plan for some all-natural remedy ingredients that you can stock up on to make what you need when you need it.


  • Don’t Be Without These Homemade Cough Drops

    Don’t Be Without These Homemade Cough Drops

    I never tire of homemade cold remedies. I got a pretty bad cold this week and really wished I had made some of these delicious homemade cough drops. A nasty cold is particularly awful to have during cold winter months.

    I will definitely be making more of these to have on hand the next time a cold hits. It’s simple, easy, and way better than your average chemical-filled cough drops. Regular store-bought cough drops often have artificial colorings and flavorings in them. They might be able to soothe your cough but they sure won’t help prevent cancer!

    Try this simple and wholesome recipe instead. Let’s get started.

    Ingredients:

    4 TBS coconut oil

    1/2 cup honey

    1 tsp ground ginger

    3/4 cup sugar

    1/2 tsp mint extract

    Directions:

    1. Prepare a loaf pan lined with parchment paper, lightly greased with coconut oil
    2. Over low heat, melt all the ingredients together in a saucepan
    3. Stirring constantly, slowly bring the mixture to a boil, at about 250 degrees. (This is called the “hardball” stage in candy making, the point at which the mixture will harden once it has cooled
    4. Carefully pour the mixture into the parchment-lined loaf pan and let cool until you can safely handle it, about 10 minutes. You won’t want to wait much longer
    5. Cut the hardened mixture up into whatever size pieces you like
    6. Individually wrap each piece in wax paper, aluminum foil or lightly dust with cornstarch to prevent sticking
    7. Store in an airtight container at room temperature. These will keep for about a year.

    Hope this is helpful for you this cold season! Would also make great gifts for any illness-prone relatives. Enjoy!

    Also, check out these — Holistic Medicine Basics

  • Easy Poison Ivy Remedy

    Easy Poison Ivy Remedy

    Poison ivy is such a drag to get. It can debilitate you almost as much as an actual injury. Depending on where you get it on your body, it can make it difficult and even painful to move and get work done, and especially for little ones, can make life very uncomfortable. The uncontrollable itchiness makes it hard to heal, also, as resisting the urge to scratch can be very difficult.

    There are a number of good poison ivy remedies out there, but I love this one because it is super simple, very cheap to make and will last you a long time. It’s the kind of thing you can make a big batch of and leave in your medicine cabinet for years, always ready to use.

    It is a remedy that is best made ahead of time, but there’s also a quick shortcut if you need it on the spot, which I’ll include at the bottom. Let’s begin:

    Ingredients: 

    1 quart raw organic apple cider vinegar (you probably won’t use all of this)

    1-2 bunches fresh organic sage

    1-2 bunches fresh organic plantain herb

    1 quart mason jar with lid

    *A quick note on plantain: this herb (not to be confused with plantain fruit) is most commonly found growing in your yard rather than in your herb garden or grocery store, so to ensure you do have “organic”, pick some that you know has not been sprayed with herbicides or pesticides. If you can’t find any plantain, it can easily be omitted or replaced with an equal amount of sage if desired. 

    Directions: 

    1. Wash and dry your herbs, the chop roughly. You want to make sure every leaf is cut at least once, but it doesn’t have to be diced. You can also put them in a blender with a little apple cider vinegar to make sure the essential oils in the herbs are properly released.
    2. Stuff your herbs into the mason jar.
    3. Cover the herbs with the apple cider vinegar, making sure there are no air bubbles in between the leaves. You can ensure this by pressing down on the herbs with a wooden spoon, releasing any air bubbles (here’s the cheat if you need this ready faster: heat up your apple cider vinegar and then steep the herbs in the hot vinegar as you would tea, then proceed to step 5)
    4. Cover and store in a cool, dark place for 2-3 weeks.
    5. After your waiting period (or when the mixture has cooled, if you are doing the quick version), strain out the herbs and return to the jar, or a smaller jar if needed, for storage.
    6. Dab the mixture gently onto the infected area as needed, using a cotton ball or soft cotton cloth. This will sting a bit when applied, but it is incredibly effective!

    If you liked this, you might also enjoy…

    Become A Master Healer With This Revolutionary Course…

    Traditional Hindu Yoga for Weight Loss

    Improve Your Carpentry Skills Quickly and Easily..


  • Honey-Infused Garlic

    Honey-Infused Garlic

    There are so many great natural cold and flu remedies we’ve covered lately, but this is another great one that is very simple to make, and includes only two ingredients that you probably already have on hand: garlic and raw honey. And maybe I’m weird, but I think this combination is totally delicious!

    Both garlic and honey boast incredible health and immune-boosting benefits, and taken individually are great to add to your healthcare regimen.

    Garlic, especially when consumed raw, can help maintain healthy blood pressure and circulation, heart health, and kill fungus and bacteria.

    Raw honey is honey that has not been cooked, maintaining the original metabolic structure and nutrient content of the honey. It can help maintain balanced gut flora, has loads of healthy enzymes, nutrients, and pre-biotics, and also kills fungus and germs.

    So both these great natural remedies, when they combine forces, make for a powerful, germ-busting and immune-boosting cold and flu remedy! Not to mention, possibly the most appealing thing about this remedy, that while raw garlic is great for your health it is also very difficult to consume raw, so the honey adds sweetness to the flavor, making it far more bearable!

    Here’s how you make it:

    Ingredients: 

    raw honey

    1 head of garlic

    a small jar (about 4-5 oz)

    Recipe: 

    1. Break apart the individual cloves of garlic and crush each one with the flat side of a large knife. Completely peel each clove, then let sit for about 15 minutes.
    2. Place the cloves in your jar.
    3. Cover the garlic cloves with raw honey. As honey moves slowly, be patient and make sure every gap is filled between the cloves, you might have some air pockets, so just stir gently and pour more honey in until you have it full.
    4. Cover with the jar’s lid, and let sit on your counter for 3-5 days
    5. Refrigerate.

    And that’s it! Keep the jar in your refrigerator and, whenever you feel a cold or sickness coming on, simply eat one of the cloves. Enjoy!

    If you liked this, you might also enjoy…

    Natural Healing Techniques Doctors Don’t Want You to Know…

    The Weight-Reducing Magic of Yoga…

    The Ultimate Woodworking Course..


  • DIY Vapor Rub Recipe

    DIY Vapor Rub Recipe

    Cold and flu season are no fun, especially if you are experiencing bad congestion that makes it difficult to sleep, breathe and go about your daily business. Vick’s is the classic remedy for terrible congestion, but it’s actually petrolium-based, which is pretty much as bad as it sounds. Who wants to add carcongens to an over-the-counter cold remedy?

    This natrual and homemade alternative is not only much safer and healtier, it also smells even better and is more effecive. Also, if you make the initial purchase of these basic ingredients, the essential oils will probably last for years of many recipes. A little bit of this healing rub goes a long way, too!

    Here’s how you make it:

    Ingredients: 

    1/2 cup olive, coconut or almond oil

    2 tablespoons beeswax (pellets are easiest to measure and use)

    20 drops eucalyptus essential oil

    20 drops peppermint essential oil

    30 drops camphor essential oil

    Small jar with lid (an old baby food container or something similar works really well)


    How to Make It: 

    1. Fill a shallow, small skillet with about half an inch of water and place on the stove.
    2. Measure out your oil and beeswax into your jar. Put the lid aside for now
    3. Place the jar in the skillet and put your stove to low
    4. Keep an eye on it as the water heats up; the beeswax will begin to melt
    5. Once the oil-beeswax mixture is totally melted, carefully remove the jar from the skillet
    6. Add all of your essential oils to the jar and blend, using a popsickle stick or some other disposable utensile, as beeswax can be very hard to clean off regular metal spoons or forks
    7. Place the lid on the container and set the jar aside to cool
    8. Once it has cooled, it’s ready to use!

    How to Use:

    You can keep your jar of vapor rub in the cabinet just as you would any other balm or ointment. It will last virtually indefinitately. When you are sick, apply a modest amount to chest, back and feet. It can cause a bit of a hot/cold sensation though, so you might want to try just a little bit at first to see how much you can handle and then apply more accordingly.

    If you liked this, you might also enjoy…

    Natural Healing Techniques Doctors Don’t Want You to Know…

    The Weight-Reducing Magic of Yoga…

    The Ultimate Woodworking Course..

  • Natural Relief for Insect Bites

    Natural Relief for Insect Bites

    Insect bites or stings can be a very unpleasant experience. It is crazy how much pain and discomfort a tiny creature like a wasp or hornet can cause! Even minuscule mosquitoes can completely ruin a good night’s sleep with just a few bites that will drive you crazy with itchiness.

    Fortunately, good old mother nature has several very effective remedies for reducing the pain, swelling and itching of standard insect bites. These will help you with most insect bites, however, make sure to keep an eye out for signs of allergy in the case of wasps or bees, it’s always good to keep Benadryl on hand too just in case.

    1. Vinegar

    Vinegar is a wonderful neutralizer for insect stings. If you make a simple compress soaked in vinegar and apply moderate pressure to the sting, it will relieve any pain and greatly reduce itching. Make sure to leave it on there for a good while, re-wetting with vinegar if needed.

    2. Baking Soda

    Baking soda has long been used to draw out the irritant in insect bites. Just apply it directly to the sting, cover with a rag or towel to keep it all concentrated on the problem area, and leave on for about twenty minutes, or as you’re able to.

    3. Activated Charcoal

    Activated charcoal works much like baking soda, to draw out the irritant and neutralize the sting site. It can be a bit easier to apply, too, you can just mix a little up with some coconut oil and smear on the wound site. Just be careful to avoid contact with your clothes-activated charcoal will get over everything!

    4. Aloe

    Aloe is wonderful for soothing itching. You can use a fresh aloe leaf or store-bought aloe gel (the less ingredients, the better, food-grade pure aloe vera gel is very reasonably priced and can be found at many health food stores or online). Aloe is a great follow-up treatment to the above remedies, it will help with the second and third day itching and discomfort from an insect sting and has a lovely, cooling sensation.

    Do you have any tried-and-true remedies for insect stings?

    If you like this, you might also like:

    >> Advanced Gardening Course To Accelerate Your Food Production

    >> Survival Medicine & Wilderness Survival

    >> Survival Techniques From Long Ago, Re-purposed For The Modern Era