Page 1 of 2
1 2
pests – Homesteader Depot

Tag: pests

  • How to Avoid a Skunk Problem Before It Happens

    How to Avoid a Skunk Problem Before It Happens

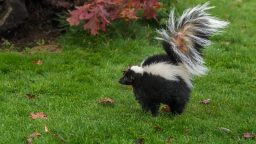
    You’ll smell your neighborhood skunk before you see it. No matter how hard they try not to, these critters give off a pungent odor. Although skunks do just want to be left alone, they can cause a number of issues around your home, particularly if you have pets that spend time outdoors. The last thing that you want is for your beloved dog or outdoor cat to get sprayed by a skunk. Plus, the closer that it gets to winter, the more likely a skunk is to look for a fairly warm place where they can hide out once the temperatures fall. Skunks are likely to end up in your basement or inside of your foundation if you aren’t careful! Here’s what you can do to ward off these invaders.

    Put Motion Sensor Lights Around Your Property

    Skunks don’t like light. They are nocturnal creatures, so the best way to deter them is to make them think that it’s daytime. If you can, set up motion sensor lights all around your home and throughout your property. There are some that use only solar power, so you won’t have to worry about hardwiring them to your grid, although standard electricity-using ones work just as well. No matter which kind you’ve chosen, place them in dark corners and wherever the skunks tend to roam on your property in order to scare them off.

    Harvest All of Your Fruits and Vegetables

    Your garden appeals to skunks. They’re consistently in search of things to eat, which makes your plants resemble a meal. Before you winterize your garden for the year, go through and pick all of the fruits and vegetables that are still out there. If you leave anything behind, the skunks will find it and then stick around, hoping for more.

    Enclose Your Trash Cans and Compost Bins

    Like other outdoor critters, skunks will eat your trash. This isn’t as nice as it sounds, because the last thing that you need is a skunk hanging out where you and your children deposit your bags of garbage. In order to keep skunks away, place your trash cans in an enclosed area, like inside of a porch or in a fenced-in overhang near the garage. Make sure that each can closes securely as well. In addition, do what you need to in order to close off your compost bins as well, because skunks will get in there and eat the decaying food waste.

    Eliminate Hiding Places

    Skunks hide during the day. They prefer to live in isolated, dark places, such as piles of firewood, the foundation of your home, under porches, and more. In order to prevent them from ending up on your property, make sure that they can’t get into any of these locations. Seal off the underside of your porch, make sure that your firewood isn’t a hospitably hiding place, and most importantly, walk around your home look for potential openings, and then seal them off as well. Skunks won’t stick around if they have no place to live.

    Keep Predators Around

    Skunks will spray when they feel threatened by a dog, but the mere presence of one may be enough to keep them at bay. After all, skunks don’t want to have to deal with a predatory encounter. They’ll steer clear of your yard when they hear your pooch barking in the distance. As long as you follow all of the other advice here, you’ll never have to worry about a skunk surprising your dog, because there won’t be any reason for them to stick around and make themselves at home.

    Controversial Video Exposes Crisis About to Explode…WATCH THIS>>>

  • 4 Ways to Solve Your Ant Problems

    4 Ways to Solve Your Ant Problems

    Ants are complicated. On the one hand, you want some of them in your garden, because they go after other insects. They protect their territory unless you’re an aphid. They’ll help aphids, which can be bad because those insects have the power to wipe out an entire garden. One of the other hand, you really don’t want them to harm your plants. Whole colonies will set up shop near the root systems of your plants, harming them in the process. Thankfully, you can get rid of ants in your garden using a number of different methods, none of which require harmful insecticides.

    Get Some Nematodes

    Nematodes are tiny microscopic worms. They sound like the opposite of what you want to put in your garden in order to deal with an ant infestation, but they really will do the trick. Nematodes like to eat ants. They’ll seek out those creatures and kill as many as them as they can. In the meantime, ants, who don’t want to have to deal with any predators at all, will up and move their colony to a new location in order to get away from the nematodes. Your ant problem will be solved.

    Sprinkle Diatomaceous Earth Around Your Plants

    Diatomaceous earth is a fine powder made up of the exoskeletons of sea creatures. It works well in gardens to get rid of insects, slugs, flies, and other pests. There are several ways in which they do this. The diatomaceous earth will either dry out the insects and kill them in that manner, or the insects will move elsewhere because they don’t like to walk to land on it. (Although it looks powdery, it’s actually crunchy and crumbly under their little feet.) Even better, diatomaceous earth won’t harm your garden – just the insects that are on it.

    Use Boiling Water

    This is the simplest method of them all. A cup or two of boiling water will kill ants. You first need to follow them to see where their nests are and then find the entrances to those nests. Once you have them located, pour the water into every entrance. There are usually more than one. The water will kill the ants, but it may take some time and repeated attempts at killing them. After all, the ants who are outside of the nest at the time of application won’t die, but they will go back there eventually. You’ll have to get them then.

    Mix a Little Boric Acid and Sugar Together

    If you really want to get rid of your ants, then you’ll need to bring out the “big guns.” This involves the use of boric acid and sugar. The sugar appeals to the ants because they enjoy eating things that are sweet. The boric acid mixed into it (combine the two until they form a paste and then apply it to the entrance of the ant nest) will kill any ants who eat it. Eventually, it will take them all out. Just be carefully when handling the boric acid.

    Combine Dish Soap with Olive Oil and Water

    You’d be surprised at just how effective this technique is. You’ll need a quart of water, a half teaspoon of liquid dish soap, and one and a half teaspoons of olive oil (although canola oil will work.) Mix everything together and place it in a spray bottle. Spray it on the ants and then pour some of the mixtures into their nest. The mixture harms the ant’s exoskeleton, killing them fairly quickly through suffocation. You won’t have to watch them die to know that it worked.

    This Odd Little Power Saving Trick WILL Change Our Lives>>>

  • 5 Great Uses for Cheesecloth in Your Garden

    5 Great Uses for Cheesecloth in Your Garden

    Cheesecloth is a very useful material. While it has its obvious uses in the kitchen, including cheese making and filtering various products, this fabric can also be used in your garden. One of the reasons why you can use it outdoors is the fact that it’s such a natural material that it can be composted. On top of this, you can use it more than once, turning your small investment into something that will stick around for a while. Here are some additional uses for cheesecloth – and all of them take place outdoors in your garden.

    Protect Your Plans

    Your young plants need protection from the elements. This means that they need to be covered, especially when they’re still in the seedling stage. If you don’t have the space to start your seeds indoors and need to place them outside (as long as your climate allows for it, of course), then you can create a small covered “house” for your plants. Leave them in the large planter, place some stakes in the four corners, and then drape your cheesecloth over it. The cheesecloth will protect those seedlings, while still allowing plenty of air, light, and water in.

    Scare Away Pests

    Did you know that you can keep pests out of your garden with cheesecloth? This is another great use for this material. All that you need is a pair of scissors, some small stakes, and a liquid that will keep squirrels, rabbits, raccoons, and more at bay. Ammonia is a great example. You want to use something that won’t harm your plants. Just slice the cheesecloth into strips, dip them in the liquid, and then tie them to the stakes. Plant the stakes near the crops that you want to protect.  Check out: 5 Tricks for Keeping Animals Out of Your Garden

    Create Plant Food from Compost

    Cheesecloth can even help you create plant food from compost. How? All that you need is to grab a scoopful of compost from your bin. Place it in a square of cheesecloth and fold up the corners. Then, tie them closed with a piece of string. It’s like you’re making a tea bag – and that’s exactly what this is. Place your cheesecloth bag, with the compost in it, of course, into a watering can full of water. Let it steep for around half an hour, and then remove the bag. Pour the water, which is now mixed with nutrient-rich plant food, onto your plants. Voila! All-natural fertilizer.  Check out: Benefits of Compost Tea

    Tie Your Plants to Stakes

    If you have plants that waver in the wind, either because they’re too tall to support themselves or too young to stay up properly, you can use strips of cheesecloth to tie them into place. Some plants, especially those with thin, young stems, can droop over, causing damage. Thankfully, tying these plants to a support system, like a series of stakes or even a trellis, can give them the support that they need in order to remain healthy. Just make sure to not tie them to the stakes too tightly, as that can damage them as well.

    Start Your Seeds

    You can make a sprouter for beans or sprouts out of a simple canning jar and a piece of cheesecloth. Soak your bean seeds or sprouts overnight and then place them into the bottom of a canning jar. Take your canning jar and remove the metal lid, leaving behind only the band. Cut a small square of cheesecloth and fit it over the top of the jar, securing it into place with the band. Leave the jar in a sunny area, and keep removing and then adding more water every day, until you see the sprouts emerge.

    Check out this WEIRD fabric that has recently replaced paper towels in Americans kitchens>>>

  • 3 Tips to Outsmart Backyard Critters

    3 Tips to Outsmart Backyard Critters

    No matter where you live, you’re probably familiar with backyard critters. These squirrels, skunks, raccoons, and more tend to invade yards in both the city and the country. There’s nothing worse than having to defend your yard from these invasive pests, especially when you catch them trying to eat the crops growing in your garden. Thankfully, there are a few different ways to outsmart them!

    Stop Attracting Them

    Outdoor critters want three things: shelter, food, and water. If you have even one of these three things in your yard, you’ll attract some unwanted pests. The shelter could be anything from a doghouse to a backyard deck. Even the shade and protection from something like a hot tub can provide a good hiding space for a raccoon or squirrel. The food comes from your garden, in the form of the crops that you grow. Other sources include trash cans full of kitchen scraps and even compost bins. Finally, if you have birdfeeder or a pet dish full of water, you’ll no doubt see some wild critters drinking from them. The best way to keep from attracting these animals is by limiting their access to these things. Bar off any covered sections of your yard, fence in your garden, and don’t leave your pet’s water dishes outside, unless your pet is present.

    Scare Them Off

    If those methods don’t work, or are unfeasible for one reason or another, you need to scare them off. Since these backyard animals tend to be afraid of humans, this is fairly easy to do. You could set out aluminum pie tins filled with ammonia. This works great if you have raccoons living under your front or back porch. Don’t block off any of the exit routes, since that will trap the animals in and cause an entirely different problem should they expire under there. You need to be humane and give them a chance to escape. However, a small tin with some ammonia in it will annoy the animals, and they’ll leave on their own. The chemical in ammonia irritates their respiratory system.

    Learn about the Tree EVERY homesteader should have in their backyard>>>

    Another method involves placing a radio outside. Since many squirrels, raccoons, and skunks, (not to mention other pests) are afraid of humans; this works quite well. Set the radio to a talk station at a fairly low volume. It should loud enough to scare off the animals, but not so loud that it irritates your neighbors. Leave the radio running as much as you can, especially at night.

    Bright lights make up the third method of disturbing these critters. They want dark, quiet spaces to hide out in, particularly when they’re giving birth to their offspring. Shining spotlights, setting up motion detector lights, or just leaving outdoor lights on in the areas where they tend to hide will deter them from setting up a habitat in your yard.

    Tailor Your Methods to the Animal

    Finally, once you determine which animals have been frequenting your yard, you can completely outsmart them. Some of them, raccoons, for example, have sensitive paws. Sprinkling some dried pepper flakes over your rock borders or fences will keep them at bay. They’ll go elsewhere permanently once their paws begin to sting. Squirrels, on the other hand, like fruit trees and birdfeeders. If it bothers you that you’re constantly chasing them away, think about whether you really want those things in your yard. You could always get rid of the tree or empty the feeder and place it in storage. Other critters, like skunks and moles, like to tunnel under the ground. Setting up your landscaping to block off their access will work well.

    As you can see, there are numerous ways to prevent wild critters from taking over your yard, it may take a little bit of thought but you can definitely outsmart them.

    Are you sick of spending a fortune to hire someone to build things for you?  Even if you don’t have a large workshop or expensive tools you can easily do it yourself.  Get over 16,000 step by step plans and build anything you need HERE>>>

  • Animal Trapping for Dummies

    Animal Trapping for Dummies

    There are two main ways to get rid of those unwanted critters that are terrorizing your garden. You can either use a number of methods to repel them, or you can trap them. There are plenty of humane traps out there that will do the job nicely without harming the animal. These traps are a good solution if you have one or two animals that have been bothering you. Before you get started, check out this short guide to animal trapping. Everything will go much more smoothly once you understand the basics.

    Some Basic Rules to Follow

    When it comes to trapping live animals, there are some basic rules that you need to follow. Putting these in place will prevent injuries, both to you and the animal. Are you ready? Here they are:

    • Always call the experts once you’ve trapped a wild animal. Your local wildlife official or someone at a pest removal company will know the best way to deal with it.
    • Make sure that you hide any signs to humans. This means handling the traps as little as you possibly can to the point of wearing gloves when you carry it. If the trap smells like human, animals won’t go near it.
    • Ensure that the trap is the right size and shape for the animal that you’re attempting to capture.
    • Anchor the trap to the ground. Otherwise, the animal might be able to roll the entire thing over and pop the door open.
    • When baiting the trap, arrange a trail of tasty treats leading up to it. Place the last of these treats inside of the trap.
    • After you use the trap, clean it well with bleach. Wear gloves while doing this. Animal saliva can contain rabies, so even if you aren’t bitten, you still might get infected.
    • Check your traps every single day. The less time an animal suffers within one, the better off everything will be.
    • If you’re using live traps, put a piece of plywood under it. Otherwise, the animal might try to claw their way free, tearing up your grass in the process.

    Baiting the Trap

    Now that you know how to set up your trap, it’s time to learn the best types of bait to use. These depend on the animal that you’re trying to catch. Here’s a comprehensive break down:

    If you’re trying to catch squirrels and chipmunks, then go with something that they love: nuts and seeds. You can use whole nuts, rolled oats, piles of birdseed, and even spoonfuls of peanut butter. Also, only use metal traps when trying to catch these critters. They’ll chew right through wooden ones.

    Raccoons and opossums like cat food.  They’ll also eat marshmallows, corn, and sardines. Those tasty treats will draw them in. You really need to anchor your traps well when you’re trying to catch them since they’ll roll them over and try to escape.

    Speaking of sardines, skunks like them quite a bit. They like anything fishy, really, so use seafood flavored pet foods, bits of fish scraps, and even canned tuna as bait. You’ll need to cover the trap with a tarp, as skunks like dark places.

    Another common pest animal is the woodchuck. These creatures love things commonly found in gardens: apples, lettuce, beans, and carrots are some of their favorites. If you can find the entrance to their burrows, place the trap right near it. Otherwise, putting the trap near your garden will work well. You should only trap woodchucks in the summertime. They reproduce in the spring and hibernate in the fall.

    Not sure where to buy one of these affordable traps?  Check them out here>>>

    New Powerful Laundry Magnets — NEVER Buy Laundry Detergent Again>>>

  • The Good and Bad of Snakes on the Homestead

    The Good and Bad of Snakes on the Homestead

    How do you feel about snakes? Many people have a fear of snakes, and for some people, it goes beyond just a healthy respect for the creatures and turns into full-blown hysterical fear. So, what should you do if you happen to see snakes on the farm or around your homestead? Are they good or are they bad? As you will find with most things in life, there are good and bad elements to them, but in most cases, they tend to provide some benefits to the homesteader.

    The Pros and Cons

    If you see a nonvenomous snake on your property, it doesn’t mean you need to pick up and move! Many types of snakes tend to eat rodents, and some will also eat other snakes. Certain species may also eat birds and eggs, which means you will want to make sure your chickens are fully protected. Since most of the snakes have a diet of rodents, they can help to keep your stores and your crops safe from those pesky little critters.

    If you do not know much about snakes, it is a good idea to look up the species commonly found in your area, and learn to identify them. When you see a snake, and are not sure of the species, do not approach it. Take a picture and ask someone what type it is. You will find that the nonvenomous snakes tend to be more of a boon than a problem, and you might just want to let them be.

    Of course, if you have venomous snakes, such as water moccasins and rattlesnakes, that are on your property, you need to take steps to have them removed. You do not want them to injure or kill your livestock, or you! The other snakes though, the non-venomous variety, can be a bonus. So long as they aren’t inside your home, you should not have any problems. Give them their space, and they will give you yours. Always be careful.

    If you enjoyed this, you might also like….

    Do You Have What You Need to Hold Down the Fort?

    Natural Healing Secrets You Need to Know…

    Effective Primal Diet Hacks…


  • Tips and Tricks for Starting Seeds

    Tips and Tricks for Starting Seeds

    Winter is on its last legs and it’s time to get ready for this year’s garden! If you’re in a zone with a shorter growing season or just want to stagger your crops for a richer harvest, check out these easy seed starting tricks. We already mentioned the first two in a post on frugal ways to start seeds, so check that post out for a more detailed description of how to do them:

    • Cut and fold paper tubes to use as a biodegradable seedling planter. Use the tubes from toilet paper, paper towels, or wrapping paper.
    • Start your seeds in compostable food waste such as egg shells or citrus rinds. Keep in mind the acidity of the soil when choosing one of these no-waste methods.
    • Save on seeds and grow new plants from cuttings. This works with basil, celery, onions, beets, and many more.
    • Place coffee filters in your seed trays and planters before filling with soil. This helps to keep soil from falling through holes in the vessel and makes removing the root ball for transplanting a breeze!
    • Test the germination rate and viability of saved seeds by sprouting them on a wet paper towel. Larger seeds can be soaked overnight, rinsed, and drained. Plant those that sprout immediately!
    • Save popsicle sticks to label seedlings. Unless you want a mystery garden, use these handy little markers!
    • Use spices as a natural antifungal to prevent damping off disease.  Cinnamon, turmeric, clove, and mustard applied at sowing and after every other watering will help your seedlings survive!
    • Give your seedlings a nitrogen boost with old coffee or tea. For acid-loving plants, you can water your plants almost every time with leftover coffee or tea. For other plants, just give them a drink once a month.
    • Thin your seedlings! So many people neglect to do this because it seems counterproductive to kill extra seedlings. Still, plant spacing is extremely important and your plants will be healthier with less competition from crowded neighbors. If you hate waste, simply rinse thinned seedlings and add them to a salad!


    Most of us still have several more weeks before we can get in our gardens for a dirt therapy session. Start seeds indoors to get your gardening fix and get a head start on the season!

  • Beer for the Garden

    Beer for the Garden

    Beer isn’t just great for the gardener after a hard day’s work, it’s also great for the health of your garden.  One way to put this beverage to work for you is to use it to attract and to kill slugs that can damage your crops and even spread disease.  Here’s how to use household items and little extra beer to keep your garden healthy and productive.


    • You will need a small tin, like a tuna can or a cat food container, a large plastic bottle, and some beer.
    1. Empty and clean the tin. You don’t want to try to get rid of slugs only to bring in the neighborhood stray cats.
    2. Cut the top off of a plastic bottle that has a diameter larger than the tin. This will be used to cover the tin to keep water out, so it needs to be able to fit over the tin completely.
    3. Cut 4 “mouse holes” in the bottle top, one on each side. This is to allow the slugs to get in while it is covering the tin.
    4. Place the tin in the ground near crops that have been affected by slugs or where you have seen their trails. You want the top the tin close to the ground so that the slugs don’t have to work too hard to get to their beer.  But, if you notice that you are catching other critters, especially ground beetles that eat slugs, then you are going to want to raise the tin up a little to reduce this risk.
    5. Fill the tin with beer, almost to the top.
    6. Place the bottle over the tin to keep rain from diluting your beer to the point that it does not attract slugs.
    7. Change the beer in the trap and the location of the trap every few days to keep the slugs guessing.

    Don’t waste all the beer on the slugs, gardening can be hard work, save some for yourself.

    If you liked this, you might also enjoy…

    Holistic Medicine Basics

    Ever Considered Taking Yoga? Read this

    The Ultimate Woodworking Course..