Page 1 of 2
1 2
seasonal gardening – Homesteader Depot

Tag: seasonal gardening

  • 5 Steps to Growing Watermelon (Video)

    5 Steps to Growing Watermelon (Video)

    I know it’s only April, but I’m already thinking about summer! And what better way than to prep for summer now than to plant some watermelon?

    It’s finally getting warm enough to plant these heat-loving, delicious melons, and this great, five step video will help you figure out if you can manage it in your garden.

    Enjoy, and happy gardening!

    If you enjoyed this, you might also like….

    Long-Term Survival for Homesteaders…

    Natural Healing Secrets You Need to Know…

    Effective Primal Diet Hacks…

  • Why You Should Keep a Homesteading Journal

    Why You Should Keep a Homesteading Journal

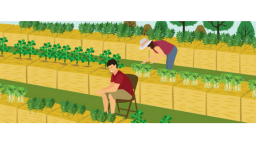
    As you embark on your homesteading journey, whether that is buying several acres of land and starting a full-fledged farm, or simply growing herbs on your windowsill and trying a few simple home ferments, it is incredibly beneficial to keep a journal.  Heres a few tips on why and how to journal.

    Why? 

    Journals are, literally, records of events. So as you begin gardening, raising animals, trying home cultures, and generally doing more things simpler, greener, and for yourself, you’ll want to keep track of your efforts, method, and progress.

    First of all, it’s fun! You can look back in a few months and remember how far you’ve come.

    But more importantly, it can be extremely helpful. As you work with inexact sciences like gardening or fermenting, you’ll probably want to remember what worked, and what didn’t. If you battled a serious bout of pests, it might be very helpful next year to look back and pinpoint the precise timing so you can take precautionary measures this year, for example. Or if you are selling eggs, keeping track of your chicken production and income can help calculate the cost and whether or not is productive for you.

    How to journal?

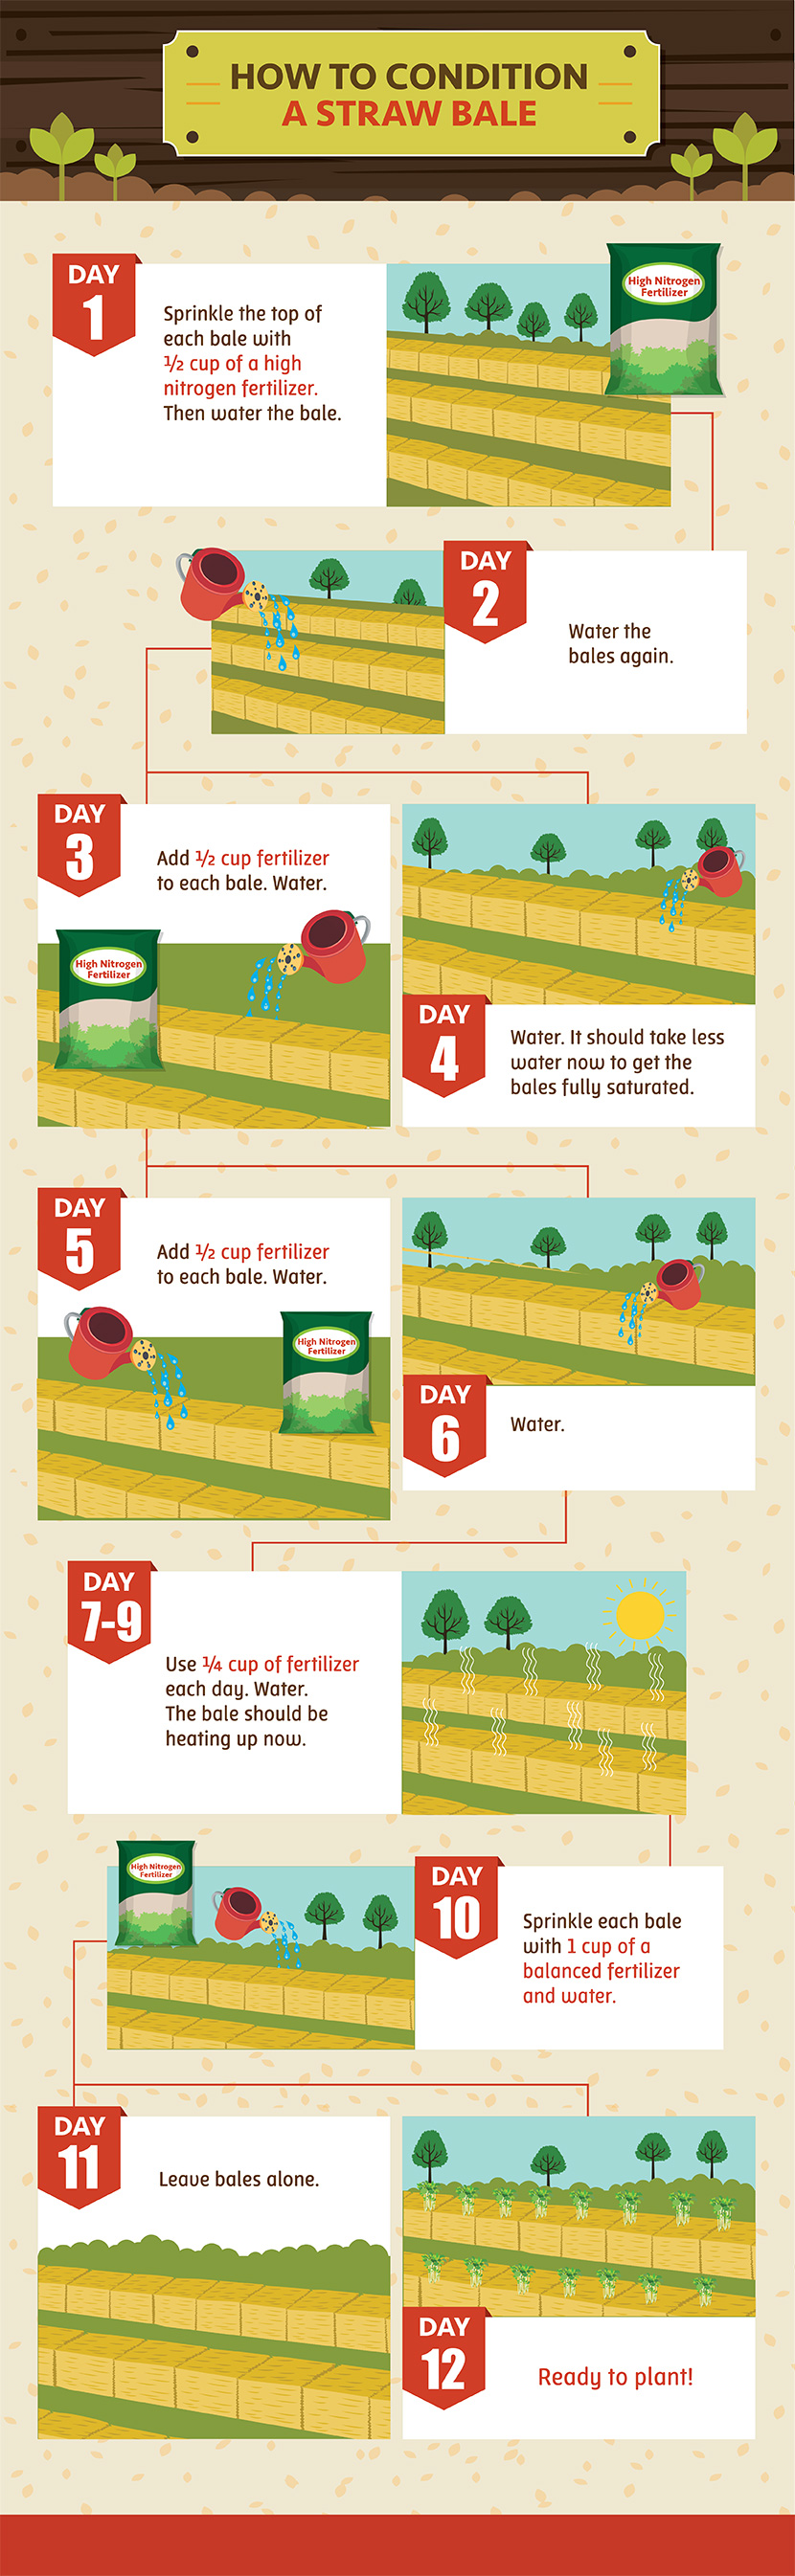
    The great thing is, there’s no exact science for homestead journaling!  You can find tons of great, free resources on the internet for worksheets, charts, and recordkeeping for gardening and homesteading, if you like that sort of thing, or you can simply keep a diary and record your day-to-day events.  What works for some folks may not work for you and vice versa, this is about you and recording what was successful for you.

    Bullet journals are very popular these days, and the simple method for a sort of DIY journal might be ideal for tracking planting records, daily tasks, and achievements, etc. The sky is the limit!

    However you choose to record your journey, you’ll learn as you go what’s helpful to record and track. The important part is to do it! This is how homesteaders and farmers learned and grew back in the day, so it’s just as beneficial today as always.

    If you enjoyed this, you might also like….

    Long-Term Survival for Homesteaders…

    Natural Healing Secrets You Need to Know…

    Effective Primal Diet Hacks…

  • Seed Starter Chart By Temperature (Infographic)

    Seed Starter Chart By Temperature (Infographic)

    It’s been officially spring for a few weeks now, but depending on where you live in the country, you could be already wearing your summer clothes, or still shoveling your driveway.

    Temperature is a far better indication of official spring weather than the calendar, and I thought these handy infographics from Cultivatorcorner.com were a great resource to determine what you can plant and when. If you’re already ordering seeds and planning out your garden, this is a great quick-glance guide for when you can get them started.

    Enjoy, and happy planting!

    If you enjoyed this, you might also like….

    How to Lock Down Your Homestead…

    The Ultimate Guide to Natural Health…

    Effective Primal Diet Hacks…

  • Straw Bale Gardening (Inforgraphic)

    Straw Bale Gardening (Inforgraphic)

    Straw bale gardening has gotten very popular in recent years. It is a great option for smaller container gardens, and takes away a lot of the demand for buying and/or building soil.

    The idea is simple, you take a straw bale, condition it over a season so it begins to decompose and form a perfectly shaped container garden, full of fresh nutrients, and you plant directly in it for a very low-maintenance, weed-free garden bed.

    If you have a hard time getting soil, creating compost regularly, or weeding, straw bale gardening might be a great option for you, and especially if you happen to have a lot of straw bales lying around your homestead or can get them for a good price in your local area.

    It’s great to start in the fall and plant in in the spring, because straw is put into bales in the fall so you can begin the conditioning process then. One advantage to straw bale gardens is also how much easier they are to plant in come springtime verses cold ground, so if you’re struggling to get your garden started this year because of hard, frozen ground, maybe next year you’ll have a much easier time with a few conditioned straw bale gardens.

    This great infographic from Fix.com breaks down every aspect of conditioning and planting in a straw bale garden in an incredibly through and detailed format. It should be able to give you a good idea as to whether or not straw bale gardening might be right for you. Enjoy!

    If you enjoyed this, you might also like….

    Do You Have What You Need to Hold Down the Fort?

    Natural Healing Secrets You Need to Know…

    Effective Primal Diet Hacks…

  • Getting the Garden Ready for Spring Now   

    Getting the Garden Ready for Spring Now  

    Just because you don’t have a garden, or if yours is covered in snow and not producing, doesn’t mean there is nothing you can do now to get ready for next season.  Getting ready now will help you start early and thereby increase the length of your growing season and with it, the amount of food you are able to produce next year.  Here are a few things you can do now to be ready early for next spring.

    • Start shopping now for deals on spring crop seeds. The longer you wait, the more uniformity you will see in rising costs for spring crops.
    • Prepare the area that you are going to grow in. If you don’t have a garden now you can cover the area in cardboard before putting your raised bed frame and dirt on top.  This will be much easier this time of year than when the grass is growing.  If you have a garden already you can mulch it heavily to keep the soil as warm as possible and add organic matter.
    • Building a starter box will allow you to start spring crops earlier indoors where it is warmer.
    • Budget now for items that you will use during next growing season, items like bird net, stakes, irrigation supplies, material to build cold protection. Purchasing these items in the winter will help spread out the cost of gardening, making it easier to budget for.

    Getting done whatever you can now, even if it is small well help save time and energy later.  For most of us, those are the two most limiting factors in gardening, so anything you can do to get more of them in the growing season is a big head start.

    If you liked this, you might also enjoy…

    What Are the Signs of the End Times?

    Learn Natural Healing Secrets From the Masters

    Preparing for the Bubble to Burst 

  • Hot Beds

    Hot Beds


    With winter closing in I’ve recently been talking a lot about getting your crops covered up to extend your growing season.  But in some of the colder zones retaining what little heat is in your garden might not be enough, or you might not have the resources available to build a greenhouse or hoop house.  So instead of concentrating on insulating the heat in, you might want to focus on increasing the amount of heat in your soil to begin with.  This is usually referred to as a “hot bed”.  Here are some tips on how to increase heat in your soil and extend your growing season.


    Frames

    Hot beds are just that, beds, not rows, so this isn’t going to work without frames of some sort to contain your material.  So first off, you will need to construct frames for your beds.  These frames will need to deeper than your normal raised bed frames.  Preferably 2 feet or higher.

    Manure

    The key ingredient to any hot bed is manure.  The animal source is not as important as the age of the manure.  Unlike manure that would be added as a top dressing, the manure you want for your hot bed needs to be as fresh as you can get it.  Preferably less than one month old.

    Fill it Up

    You will want to spread out your manure in your hot bed frame.  The depth of the manure is the primary determination of the heat it will give off.  So if you are in a colder zone, or have less insulation you are going to want manure as deep as 18 inches, less if you are in a warmer zone or have multiple layers of cover.  Then press down the manure to get rid of air pockets that will make the heat less evenly distributed.

    Add Soil

    Next, add the soil that you will be growing in.  You want this to be able to accommodate the whole root structure since you don’t want your plants to have to have their roots in manure that is going to be over 100 degrees.

    Soak

    Water your bed thoroughly, add urine if you feel comfortable doing so.  This will help to activate the bacteria that will break down the manure, this is the source of heat.


    All that is left is to plant it out.  Remember, you will still want to select seasonal crops since they are more suited to shorter days.  If your bed is getting too cold, try adding more water, if your bed is dry the bacteria will not be thriving and this is what you need to produce heat.  Don’t let dropping temperatures put an end to your gardening season, fight back with hot beds.

    If you enjoyed this, you might also like….

    Last Resort Home Defense and More…

    Natural Healing Secrets You Need to Know…

    The Healthy Primal Diet Everyone Should Try…

  • Extending Your Growing Season

    Extending Your Growing Season

    Recently I posted a video demonstrating how to build a PVC hoop house that will help extend your growing season.  In this article, I’ll give a few more tips about extending your season and maximizing the benefits to your hoop house.


    Seasonal Crops

    While your hoop house will protect your crops from extreme temperature change, temperatures will still drop even inside.  But more importantly the days will be shortening and not all crops can handle the decrease in sunlight.  Leafy greens, carrots, and green onions are examples of crops that cope well with shortening days.

    Layers

    For those that live in a higher zone, one layer of cover will be plenty, but if you live in a colder zone or are expecting unusually low temperatures you might want to add another layer of protection without your hoop house such as low tunnel or a cold frame.

    Vent

    Alternately, in warmer weather, your hoop house could actually produce temperatures that are too high for cold crops if you do not vent it.  Simply lifting the plastic on opposite ends of the hoop house should do the trick.

    Avoid Containers

    The less mass an object has the quicker it will lose temperature.  If you are in a cold zone, crops in containers can freeze even under a hoop house while soil in beds or rows remains above freezing.

    Water Carefully

    With shorter days comes less evaporation, which will mean that your plants require less water.  Water you plants only when the soil surface has dried out and when you are not expecting temperatures to drop below freezing.


    Decreased production is unavoidable as winter closes in.  But that doesn’t mean that your garden has to shut down.  Depending on your zone, you may be able to continue growing food year round with a hoop house and these simple tips.

    If you liked this, you might also enjoy…

    Learn to Heal and Treat Illnesses Naturally…

    An Ancient Secret to Slimmer Waists…

    Learn to be a Master Carpenter at Home...

  • Winter Composting Tips

    Winter Composting Tips

    A compost pile that has done fine all year long can freeze solid on you in the winter.  This could leave you having to buy soil or compost in the spring when you are planting again.  To avoid this, keep these tips in mind this winter for your compost pile.


    Build it Big

    A large compost pile will remain hotter than a small pile.  There will be more food in it for composting organisms and the outer portion will insulate the center.  When temperatures drop, worms and other organisms will simply migrate to the center of the pile until it warms up again, rather than dying off leaving your pile in stasis.

    Put it in the Sun

    Place your winter compost pile where it can receive the most sunlight.

    Cover It

    Cover your compost pile with plastic.  This will allow you to control the moisture level and insulate it from the cold.  If possible, use black plastic since it will absorb the most sunlight and heat up more.

    Add hot Material

    Make sure to keep feeding your composters with the material that heats up your pile.  Grass clippings will probably not be on the menu for them in the winter but coffee grounds are a favorite of composters.

    Don’t Turn

    Turning your compost pile in cold weather will allow all the heat to escape the warm center which could be fatal to your composters.  When you adding more food for them, like coffee grounds, instead of turning the pile make a hole in it with a long stick.  The handle of a shovel should work, jab it into the center of your pile and wiggle it around until you have a hole that you can pour your grounds into.  Then fill the hole back up with you done.


    Don’t think that because the days are too short to grow vegetables this time of year that you have nothing to do in the garden.  Staying on your compost in the winter will give you the ability to get your garden going quicker and with better results in the spring time.


    If you liked this, you might also enjoy…

    Learn to Heal and Treat Illnesses Naturally…

    An Ancient Secret to Slimmer Waists…

    Learn to be a Master Carpenter at Home...

    Edit