Tag: spring

  • Opening Day-Georgia Spring Turkey Hunting (Video)

    Opening Day-Georgia Spring Turkey Hunting (Video)

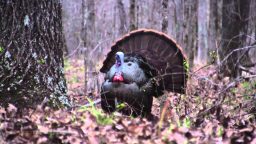
    Think all the good hunting is in the fall and winter? No way! Spring is prime turkey season, and they’re a great animal to go for. Big and juicy, as well as fun to hunt, you’re sure to get hooked in no time.

    In this video, YouTube “Turkeyologists” walk you through their opening day of turkey season in Georgia, with some excellent, high-def footage of the hunt. I thoroughly enjoyed this video and can’t wait to give turkey hunting a try this season. Enjoy!

    If you enjoyed this, you might also like….

    Do You Have What You Need to Hold Down the Fort?

    Natural Healing Secrets You Need to Know…

    Effective Primal Diet Hacks…

  • Spring Equinoxes Explained (Video)

    Spring Equinoxes Explained (Video)

    Today is the first day of spring! Hopefully, you’ve got lots of warm weather and sunlight in your area so you can get your spring garden started.

    Spring equinox is a great day to start planting, because there’s only going to be more daylight from this day forward.

    But what is an equinox, exactly? I thought it would be cool to learn a little bit about what makes an equinox and equinox, and where it lies in the seasonal rhythms of our planet.

    Understanding both the cycles of light and seasons on earth as well as the way planetary changes can influence us is always great for homesteaders to be aware of! After all, our seasons and growing patterns have been dictated by the skies for centuries.

    Check out this nice little video from National Geographic on Spring Equinoxes to learn what is happening to our planet today!

    If you enjoyed this, you might also like….

    Can You Defend Your Family When SHTF?

    Natural Healing Secrets You Need to Know…

    Effective Primal Diet Hacks…

  • How to Make Your Own Seed Tape

    How to Make Your Own Seed Tape

    Continuing in the theme of spring from our last few posts, let’s talk about seed tape today, and how easy it is to make your own!

    Seed tape is a great way to easily plant your first spring crops, because you can guarantee proper placement and spreading of the seeds, as well as greatly reduce your time spent planting.

    Not to mention, the tape itself helps germination, by keeping the seeds protected and moist.

    Here is a very simple tutorial for how to make your own seed tape, that will certainly save you time and money. It only takes a few basic supplies, that are usually easy to find at any grocery store. Let’s get started so you can get planting!

    What you need: 

    • White party streamers
    • Measuring tape
    • Thin-tipped marker
    • Seeds you plan on planting
    • 1 tbs cornstarch
    • 1 cup water
    • 1 small paintbrush

    Directions

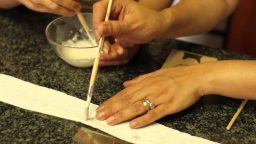
    1. In a small saucepan, combine the cornstarch with one cup of water, and mix well.
    2. Cook mixture over medium heat, stirring constantly, until it becomes thick and gel-like.
    3. Once it has a gel-like consistency, remove from heat and let cool to room temperature.
    4. As your cornstarch “glue” is cooling, cut your streamers into the length you’d like your rows to be.
    5. Using your marker and ruler, and referring to the seed packets, mark the points on the streamer you’d like to put your seeds. So, for example, if you are planting kale seeds that need to be 2″ apart from each other, make a hash mark on every 2″ on your streamer.
    6. One the glue is cooled, using your paintbrush, dab some on the streamer at each hashmark, and stick the seed to this, completing with another dab of glue if needed. Repeat until you’ve completed the whole length of the streamer.
    7. When you’re finished, paint a thin strip of glue along one side of the streamer, so you can roll it in on itself, making a long tube to plant.
    8. Once the glue has dried completely, it’s ready to be rolled up and stored or planted.

    That’s it! Happy planting 🙂

    If you enjoyed this, you might also like….

    Do You Have What You Need to Hold Down the Fort?

    Natural Healing Secrets You Need to Know…

    Effective Primal Diet Hacks…

  • 6 Crops You Can Plant Outside in Early Spring

    6 Crops You Can Plant Outside in Early Spring

    I keep saying “spring is right around the corner” so forgive me, I’m just excited to get gardening again! As I prepare my own spring garden by starting seeds indoors, I have also been planning to start a few crops outdoors.

    I really prefer direct sowing for many reasons, while starting seeds indoors will give you that leg up to start your spring garden, and is great in many ways, direct sowing is easier, of course, and a lot of plants prefer not to be transplanted. I think it’s a really good idea to try both this year, especially if you’re a relatively new gardener, to get a feel for what’s easiest for you and which plants tolerate transplanting in your climate, and which do not.

    If you’d like to try some direct sowing this year and are eager to get started, as I certainly am, here are some crops you can start indoors while it’s still cold out.

    Radishes

    Radishes are a great crop to grow for so many reasons, and among those reasons is that you can start them early in the spring! They are cold tolerant and grow quickly, so you’ll be harvesting fresh, delicious radishes before you know it.

    You can direct sow radishes according to the seed packet instructions between 4 and 6 weeks before the last frost in your region. Make sure to choose an area with full sun, and to thin them a week or so after they’ve sprouted.

    You can also sow continuously, meaning, two weeks after your first planting, you can direct sow more seeds  in your radish patch, and every two weeks for the next six weeks, to have a longer, continuous harvest.

    Lettuce 

    Lettuce is another cold tolerant plant that you’ll probably be happy to harvest as soon as you can. What better reason to garden then to have fresh salads throughout the spring and summer, right?

    Since the delicate leaves of lettuce are still vulnerable to frost, you will probably want to plant these under cold frames if you anticipate more frost or snow in your area. If temperatures in your cold frame are between 45 and 65 degrees, you can direct sow lettuce in well-tilled soil.

    If temperatures in your cold frame are between 45 and 65 degrees, you can direct sow lettuce in well-tilled soil (this is important). Plant either rows or broadcast your seeds in a patch, cover lightly with a very thin layer of soil, and then thin out according to the seed packet once the seedlings are over 3″ tall.


    You can sow lettuce continuously as well, if you’d like a steady harvest through the spring and summer.

    Carrots

    Carrots are not ideal for transplanting, so you’ll definitely want to direct sow them. Fortunately, they can tolerate some cold, so they’re a great choice for an early spring garden.

    Like lettuce, these also need very well-tilled soil, as the roots will need plenty of room to expand for nice, big carrots. Make sure to remove any rocks, too.

    Direct sow according to the packet instruction, leaving the recommended space around them (again, carrots need plenty of room!) around 4 weeks before the last frost in your region.

    Thin your carrot seedlings back when they’re about 1″ tall, and fertilize with well-composted compost about 5 weeks after they sprout.


    Beets 

    I don’t know about you but I’m starting to get hungry thinking about all these delicious vegetables (did I mention I’m eager to start my garden?). Beets are both delicious and can be planted early in the year.

    While beets need a soil temperature of at least 50 degrees to germinate, in a cold frame, they can surive both frost and temps as low as 32 degrees, so they’re ideal to put in that cold frame along with your lettuce if you have thawed-out soil.

    Plant them according to the packet instructions, and thin when they’re at least 4″ tall. However, when you thin back, just clip off the tops of the seedlings you’d like to remove, otherwise, you risk disturbing those you plan to let grow.

    Make sure they get plenty of water as they’re growing, beets are very thirsty plants. Keep them mulched as well; this will not only retain moisture, it will keep the soil warm in the cold months.

    You can continiously plant your beets as well, every two weeks until temperatures regularly exceed 70 degrees.

    Cabbage

    Cabbage is not only cold tolerant, it actually prefers it! This is an excellent option for an early garden, because not only will it grow, but you might miss your chance to grow cabbage if you wait too long!

    You can plant cabbage as soon as the soil is warm enough to use, or 4 weeks before the last frost.

    Kale

    Kale is another plant that, like cabbage, actually prefers the cold. It is commonly said that kale actually tastes better if it’s been through a frost! I’m not sure why this is, but many gardeners agree.

    Plant kale according to the packet instructions as soon as your soil is warm enough, and mist regularly. These take a bit longer to germinate, so just make sure to keep your soil consistently moist in this time. Once the seedlings are about 4″ tall, thin back using trimmers.

    One great thing about kale is that if you start harvesting the outer leaves, the plant will keep growing, and actually be far less bitter. It’s amazing how long a well-tended kale plant will last, so this is yet another reason why kale is an excellent option for an early spring garden.


    Well, I don’t know about you, but I can’t wait to get out there and get my hands dirty. Plant some of these crops today and you’ll be enjoying a bounty in a few months! Happy gardening.

    If you enjoyed this, you might also like….
    Can You Defend Your Family When SHTF?

    Natural Healing Secrets You Need to Know…

    Effective Primal Diet Hacks…


  • Tips and Tricks for Starting Seeds

    Tips and Tricks for Starting Seeds

    Winter is on its last legs and it’s time to get ready for this year’s garden! If you’re in a zone with a shorter growing season or just want to stagger your crops for a richer harvest, check out these easy seed starting tricks. We already mentioned the first two in a post on frugal ways to start seeds, so check that post out for a more detailed description of how to do them:

    • Cut and fold paper tubes to use as a biodegradable seedling planter. Use the tubes from toilet paper, paper towels, or wrapping paper.
    • Start your seeds in compostable food waste such as egg shells or citrus rinds. Keep in mind the acidity of the soil when choosing one of these no-waste methods.
    • Save on seeds and grow new plants from cuttings. This works with basil, celery, onions, beets, and many more.
    • Place coffee filters in your seed trays and planters before filling with soil. This helps to keep soil from falling through holes in the vessel and makes removing the root ball for transplanting a breeze!
    • Test the germination rate and viability of saved seeds by sprouting them on a wet paper towel. Larger seeds can be soaked overnight, rinsed, and drained. Plant those that sprout immediately!
    • Save popsicle sticks to label seedlings. Unless you want a mystery garden, use these handy little markers!
    • Use spices as a natural antifungal to prevent damping off disease.  Cinnamon, turmeric, clove, and mustard applied at sowing and after every other watering will help your seedlings survive!
    • Give your seedlings a nitrogen boost with old coffee or tea. For acid-loving plants, you can water your plants almost every time with leftover coffee or tea. For other plants, just give them a drink once a month.
    • Thin your seedlings! So many people neglect to do this because it seems counterproductive to kill extra seedlings. Still, plant spacing is extremely important and your plants will be healthier with less competition from crowded neighbors. If you hate waste, simply rinse thinned seedlings and add them to a salad!


    Most of us still have several more weeks before we can get in our gardens for a dirt therapy session. Start seeds indoors to get your gardening fix and get a head start on the season!

  • Getting the Garden Ready for Spring Now   

    Getting the Garden Ready for Spring Now  

    Just because you don’t have a garden, or if yours is covered in snow and not producing, doesn’t mean there is nothing you can do now to get ready for next season.  Getting ready now will help you start early and thereby increase the length of your growing season and with it, the amount of food you are able to produce next year.  Here are a few things you can do now to be ready early for next spring.

    • Start shopping now for deals on spring crop seeds. The longer you wait, the more uniformity you will see in rising costs for spring crops.
    • Prepare the area that you are going to grow in. If you don’t have a garden now you can cover the area in cardboard before putting your raised bed frame and dirt on top.  This will be much easier this time of year than when the grass is growing.  If you have a garden already you can mulch it heavily to keep the soil as warm as possible and add organic matter.
    • Building a starter box will allow you to start spring crops earlier indoors where it is warmer.
    • Budget now for items that you will use during next growing season, items like bird net, stakes, irrigation supplies, material to build cold protection. Purchasing these items in the winter will help spread out the cost of gardening, making it easier to budget for.

    Getting done whatever you can now, even if it is small well help save time and energy later.  For most of us, those are the two most limiting factors in gardening, so anything you can do to get more of them in the growing season is a big head start.

    If you liked this, you might also enjoy…

    What Are the Signs of the End Times?

    Learn Natural Healing Secrets From the Masters

    Preparing for the Bubble to Burst