Tag: survival food

  • Protecting Your Plants from Frost and Freeze

    Protecting Your Plants from Frost and Freeze

    Cold temperatures are not good for the plants in your garden. Many of them need air temperatures that are above 32 degrees Fahrenheit in order to survive unprotected. While others, such as pine trees and evergreen bushes, might be fine, you’ll have to take some steps to ensure that everything else in your garden (except for your annuals, of course) will survive the winter.

    Types of Plants

    The first step involves determining which types of plants that you have. This way, you’ll know whether you need to protect them or just let them go. For example, if you have annuals, then they won’t survive the winter. These plants will last for one growing season. Many of them will leave some seeds behind at the end of their life cycles, so they might reappear next year. It all depends on the plant. There are also tropical plants. While many of them will grow in a number of different climates as long as the weather is hot and humid, they won’t last through the first frost. The cold weather is more than they can bear, so they’ll die.

    In addition to this, there are perennials. There are two main types of them: root-hardy perennials and full hardy perennials. The first type of these plants has leaves and branches that seem to die in the winter, although their roots are still good. The roots will enter a dormant state and won’t come out of it until the temperatures improve. The other type of perennials – the full hardy ones – go dormant as well. Trees, various plants, and even some types of shrubs fall into this category. These plants will also stay dormant until the weather warms up, although they’ll spring back to life much more quickly.

    How to Stockpile for Free: By Growing Your Own Groceries>>>

    Protecting Your Plants

    Now that you understand the plants that are in your garden, the next step involves protecting them from the cold temperatures. It all starts with keeping an eye on the weather. As soon as fall hits and the mercury in your thermometer starts to slide downwards, you should move as many of your warm weather-loving and tropical plants indoors as you can. This means that plants like geraniums and petunias should be moved inside. It helps if you already have them housed in small pots in your yard. You’ll also need to dig up any bulbs that won’t survive the winter. For example, dahlia bulbs need to be kept warm and then replanted in the spring.

    Next, you need to take the necessary steps to protect the perennials that you can’t move into your home. The night before the first cold snap, give them plenty of water. You want to really soak the ground, as this gives their roots something to insulate them from the cold. Once this is done, get some old bedsheets and wrap them around the roots of the plants. Burlap works just as well. (Just make sure to never use plastic.) This will provide some additional insulation for the roots of the plants. You want to remove them as soon as the temperatures rise above freezing.

    Ideally, all of your plants will survive the freezing temperatures that are a major part of winter. However, you need to be prepared to replace some that won’t make it. Sometimes things are out of your control. In addition, if you purchase plants for your garden that are designed for your climate, then you’ll have fewer issues. These plants can either survive the frost and freezing weather, or their seeds will. Either way, you’ll have fewer headaches in the spring when you take a look at your garden.

    [Food Stockpile] Another “food system”? It’s better than a food system, it’s a complete food strategy>>>

     

  • 9 Practical Emergency Foods And How to Store Them

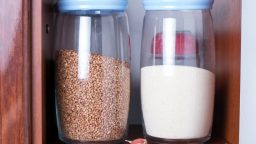
    9 Practical Emergency Foods And How to Store Them


    Long term food storage is a good idea in many, many circumstances.  There are several basic food types that you should consider stocking up on that will last for years if needed.


    Beans

    Dried beans of every variety are super cheap and even easier to store.  Store them in a dark, dry and cool place for best results.


    Coffee and Tea

    Most of us consider ourselves in an emergency situation if we run out of coffee.  So, try to imagine going through an actual emergency without it…OH…THE HORROR!!!

    Just make sure you keep it in the right forms so it can last the longest.  Whole bean coffee stored in an air-tight container will last the longest.  This means you will also want to invest in a manual coffee grinder, in case the power goes out.  Of course, if all else fails, stick the beans you want to grind into a paper or plastic bag and start hammering.

    Tea is usually sold in sealed containers, so they store nicely until opened.  Then keep them in a cool, dark and dry place to avoid them becoming stale before you have the chance to brew them up.


    Fats

    The human body requires a certain level of fat intake to function properly.  We also use it to cook and bake, making it a staple of any person’s pantry.

    Butter, lard, olive oil, coconut oil and more can be stored for extended periods of time.  Butter can also be frozen if you have some in surplus.

    Additionally, coconut oil can also be used as a moisturizer and for a whole bunch of other functions including:

    • Body Moisturizer
    • Cuticle Softener
    • Face and Eye night cream
    • Facial Cleanser
    • Hair Conditioner
    • Lice Treatments
    • Shaving Cream
    • And soooooo much more.

    Store your all your non-animal fat sources at room temperature and away from heat and excessive light. Butter can also be stored at room temperature for easy spreading.

    Honey

    Honey never goes bad and is one of nature’s miracle foods.  Store honey out of direct sunlight.  Sometimes older honey may crystallize or harden.  If this happens, you just need to place the container its stored in, into hot water until it “melts” back into its thick syrup-like consistency.


    Oatmeal

    Oatmeal is inexpensive and can be used a number of ways including ground up to use as a flour substitute. Just keep it in a dry place.


    Rice

    When it comes to really long-term storage, white rice is the best option.  While not as nutritionally packed as brown rice, it contains less oil so it won’t become rancid.  Rice is a good item to have to make meals stretch a little further and then when paired with other foods, can add a variety of flavor and texture to your meal planning. Keep rice in an airtight container for freshness and to keep out the bugs.

    Suggested Article: 5 Simple Methods to Preserve Food


    Salt

    Salt can be used as a seasoning and a way to preserve food.  It’s also difficult to come by if the stores run out and it can’t exactly be grown in your garden. To keep salt safely stored and prevent its clumping together into one giant mass, store it in a sealed container, in a dry area.


    Sugar

    Essential for canning and baking, sugar is another one of those products that is hard to get if the stores run out.  Make sure it is stored in an airtight container to keep out pests, and placed in a cool, dry place.


    Wheat Berries

    Contrary to many other long-term storage food lists, flour isn’t the most idea.  While it can last for many months or even a year if stored perfectly, it can go rancid before you use it all, plus it can attract pests.

    Alternatively, wheat berries and other types of grain can be stored for several years.  Then, you can either grind them into flour or soak them to use as hot cereal. Two types to consider are hard white wheat and spelt. They should be stored in a cool, dry location.

    The Medicine Chest — how to deal with a disaster using alternative medicine. Check it out here>>>

  • Game Meat: From Field to Freezer

    Game Meat: From Field to Freezer

    You’ve chosen your weapon, you’ve stalked your prey, you’ve made your shot, you’ve downed your first kill…Now What?


    First – Get Those Guts Out

    The faster you can remove the entrails, the better off you’ll be.  But what is fast?  Most experts will tell you if you can get it accomplished in less than 4 hours after the kill, you’ll probably be OK.


    Next – Skin the Hide

    You’ll need to remove the skin shortly after the guts so the meat can begin to cool.

    As you go, avoid puncturing the meat or cutting through the hide to let fur onto the meat as both ways can let harmful bacteria in.

    When you do get fur on the meat, you can pick it off with your fingers or burn it off with a torch to kill any bacterial contamination.

    Once the animal has been relieved of its skin, cover it with a cloth game back or clean fabric.  This cover will absorb any oozing blood and guard it against contamination.


    Cool It

    While gutting and skinning gets the cooling process started, you’ll need to continue and speed up this process to ensure the meat doesn’t spoil.

    If you are dressing your kill before you leave the area, keep a portable cooler in your vehicle so you can expedite the cooling process. If you only have ice available, try to keep it in sealed containers.  Exposure to water (ice) can compromise the texture of your meat and affect its flavor.  If you have the means, consider a clean ice alternative like ice packs or frozen water bottles.

    Have your cooler cooled and ready to go so there will be no delay in getting your meat down to optimal temps.

    Get Slicing

    Using a sharp set of tools, butcher your meat for optimal storage and to make easy use of it later.

    This process also is the time to rid the meat of unwanted items like silverskin, tendons, or large vessels that sometimes appear in the muscle tissue.  Basically, if you know you don’t want to eat it, cut it out now.


    Keep it Stored – Correctly

    If you are dealing with a big game kill, like a deer, you probably aren’t going to be able to consume all your fresh meat before it spoils.  Freezing the surplus will give you access to protein months later, but you need to make sure you are using the proper storage supplies.  Containers and storage bags specifically designed for “Freezer” use are what you want.  Anything else isn’t going to be made of a thick enough barrier to prevent freezer burn.  Ziplock and Glad both make excellent products for long-term deep freeze storage, or you can go old school with freezer paper and masking tape.  This option also makes labeling what’s inside, a breeze.

    Suggested Article:  “Your Guide For Need to Know Bullet Information”

    Ideally, you’ll want to portion your meat according to how much you and your family will eat in one sitting.  This eliminates thawing out more than you need since it’s dangerous to re-freeze meat after it’s been thawed unless you cook it first.


    Keeping it Cheap

    If you have the ability to hunt for food, you could save hundreds on grocery bills.  Whether you live in a rural area or take the time to spend a long weekend stocking up before going back to the urban jungle, being able to dress it, butcher it and store it in a timely manner will is a wonderful skill. These skills will also allow you to provide for yourself in an emergency survival situation.


    [Bonus] Simple shooting system that will double or even triple your shooting accuracy.  Watch Video>>>

  • How to Secure Food When Your Garden Fails

    How to Secure Food When Your Garden Fails

    Gardening is the first place to start if you’d like to be more food-independent on your homestead, and for good reason! There’s nothing quite as satisfying, healthy, and cost-effective as growing your own food. But, sometimes crops fail, or your garden doesn’t produce as much as you want.

    It’s always important to have a plan B, especially when it comes to food, as well as supplementary and alternative options for food. If your homestead is for the purpose of being totally self-sustainable or prepared for when SHTF, you’ll need to make sure you have multiple sources of food beyond your garden.

    Here are some options for food sources to plan on when your garden fails:

    Learn to forage

    Know what grows wild on your homestead and in your area, where to find it, and when it grows. Keep careful record of this, either in a notebook or with pictures (physical records are probably best as you never know when electronics won’t be reliable, but there’s a good chance it will correlate with a situation in which you’ll need extra food!). You’d be surprised how many edible foods there are out there, and even before you you’re in need you might greatly benefit from learning what you can forage!

    Store food

    As with so many topics on this blog, we will always recommend learning to can, ferment, and dry your food to preserve it for the long-term. Invest in a root cellar if you can, and when your garden is fruitful, preserve everything you can. Always try to have  more food than you need!

    Raise animals

    Raising animals should really go hand-in-hand with gardening if you want to be food independent on your homestead. It’s also a great way to have an alternate food source if your crops fail, since the same conditions that might cause a small harvest from your garden might not necessarily affect your animals. Plus, they reproduce on their own, no replanting needed! (Although you’ll probably need to learn a bit about birthing livestock if you want to rely on this).

    Learn to hunt

    Like foraging, it’s very important to know what sources of food are available in your area, and hunting is crucial. Equip yourself with some weapons and learn to hunt now, so you’ll be prepared when you need it as a reliable source of food. Invest in a deep freezer so you can store whatever you get. This is nearly 100% free meat, so it’s an excellent way to stock up.

    If you enjoyed this, you might also like….

    Can You Defend Your Family When SHTF?

    Natural Healing Secrets You Need to Know…

    Effective Primal Diet Hacks…

  • How (and Why) to Render Tallow

    How (and Why) to Render Tallow

    Tallow used to be commonplace a few hundred years ago, before it was replaced with mass-produced cooking oils like canola, corn and soy. What it is is rendered animal fat, (it’s normally called tallow for beef fat and lard for pig fat, but the same principles apply for each) and it can be used in many ways.

    Why Render Tallow

    The reason this is ideal for a homesteader is it’s always ideal to use every part of a butchered animal, and tallow gives you a great way to use up all the fat. But it’s not just useful-its super healthy and nutritious. Tallow is rich in Vitamin K, which is essential for bone health, cognitive function and heart health, Conjugated linoelic acid which regulates the immune system and maintains a healthy heart, and has also been suggested to contribute to weight loss, and omega-3 fatty acids, which can help with heart health, eye health, a healthy pregnancy, cognitive function, balancing mood and lowering cholesterol, to name just a few.

    How to Use

    Tallow can be used for frying and cooking, in place of butter or cooking oil, as an ingredient in lotion or cosmetics, and even to condition leather or as a lubricant for certain farm equipment. Probably one of the most efficient uses for tallow is for making pemmican, an incredible, super-nutritious survival food that can last for years.

    How to make: 

    To make tallow, you will probably want to start by looking up a recipe specifically for the animal who’s fat you are rendering, just to get an idea of specifics about that fat in particular, but for the most part the process is going to be the same.

    • First, you will want to start with frozen or refrigerated fat. This is how it should be stored before you render it. When you’re ready to make it, cut it up into small pieces or pulse in a food processor until it is broken up.
    • Then, you’ll want to put on very low heat over a stove. The key is not to burn it. A stove thermometer is handy here, keep it between 200-250 degrees. Stir pretty much constantly to prevent burning.
    • Once it is all melted, you need to strain it out. A metal mesh strainer will probably work well, or a colander lined with cheesecloth or a coffee filter. The liquid will be very hot, so as you strain it, make sure it is into something like an old coffee cup or sturdy heat-proof jar.
    • Once it is cool, it will be ready to store. It can keep at room temperature for up to a month, or in the refrigerator for a few months. It will keep in the freezer for up to a year. And that’s it! Enjoy your fresh, healthy, useful tallow.

    Have you ever rendered tallow? 

    If you like this, you might also like:

    Survival Techniques From Long Ago, Re-purposed For The Modern Era…

    Advanced Gardening Course To Accelerate Your Food Production…

    Survival Medicine & Wilderness Survival…

  • 5 Survival Foods That Virtually Last Forever

    5 Survival Foods That Virtually Last Forever

    When stocking up a survival stash, it’s important to maximize your space with items that will last the longest. Below is a list of items that will virtually last forever…

    1.Dried Beans

    Dried beans are probably one of the most common items to stock up on and for good reason. When kept away from moisture and light, they can last for decades. Vacuum sealing is a great option for storing beans, as they keep best in an absence of oxygen.

    2. Vinegar

    Due to its high acidity, vinegar will last essentially forever. Vinegar is a great item to stock up on for any long-term survival situation because it can be used as a disinfectant and all-purpose food preservative for other food items that might not last so long on their own.

    Learn How To SUPERCHARGE your garden or farm…

    3. Salt

    Like vinegar, salt is also a food preservative with many practical applications that will keep indefinitely. Not to mention, it’s always going to be your first choice for making bland survival food tastier. All you need is to protect it from moisture, of course (because we all know plenty of salt doesn’t pour when it rains!)

    Related Article: 9 Practical Emergency Foods and How to Store Them

    4. Honey

    Honey lasts so long, it has been found in ancient Egyptian tombs. Unless it gets exposed to moisture, it will pretty much last forever. Just keep it stored in an airtight container. And amazingly, while it may crystallize or change color, it will remain edible for possibly hundreds of years.

    5. Rice

    Rice is quite possibly the ultimate survival food. Like honey, rice has also been found in Egyptian tombs. Most varieties (other than brown rice, which is more perishable due to its high-fat content) will last indefinitely, especially when stored in a cool, dry place.

    If you liked that, you might also like:

    Click Here To Get The Best Survival Medical Course…

    Check Out These Mind Blowing Survival Skills…