Page 22 of 81
1 20 21 22 23 24 81
Ethan Archer – Page 22 – Homesteader Depot

Author: Ethan Archer

  • 5 Ways to Use Vinegar for Your Chickens

    5 Ways to Use Vinegar for Your Chickens

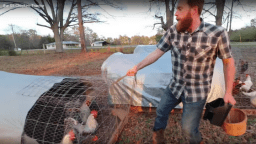
    Vinegar has so many uses around the home in general, it should be no surprise to you that there are a lot of ways to use it around your chicken coop! Both distilled white vinegar and apple cider vinegar are wonderful to keep your chicken coop clean, your chickens healthy, and keep you happy!

    Here are a few of the many ways you can use vinegar for your chickens:
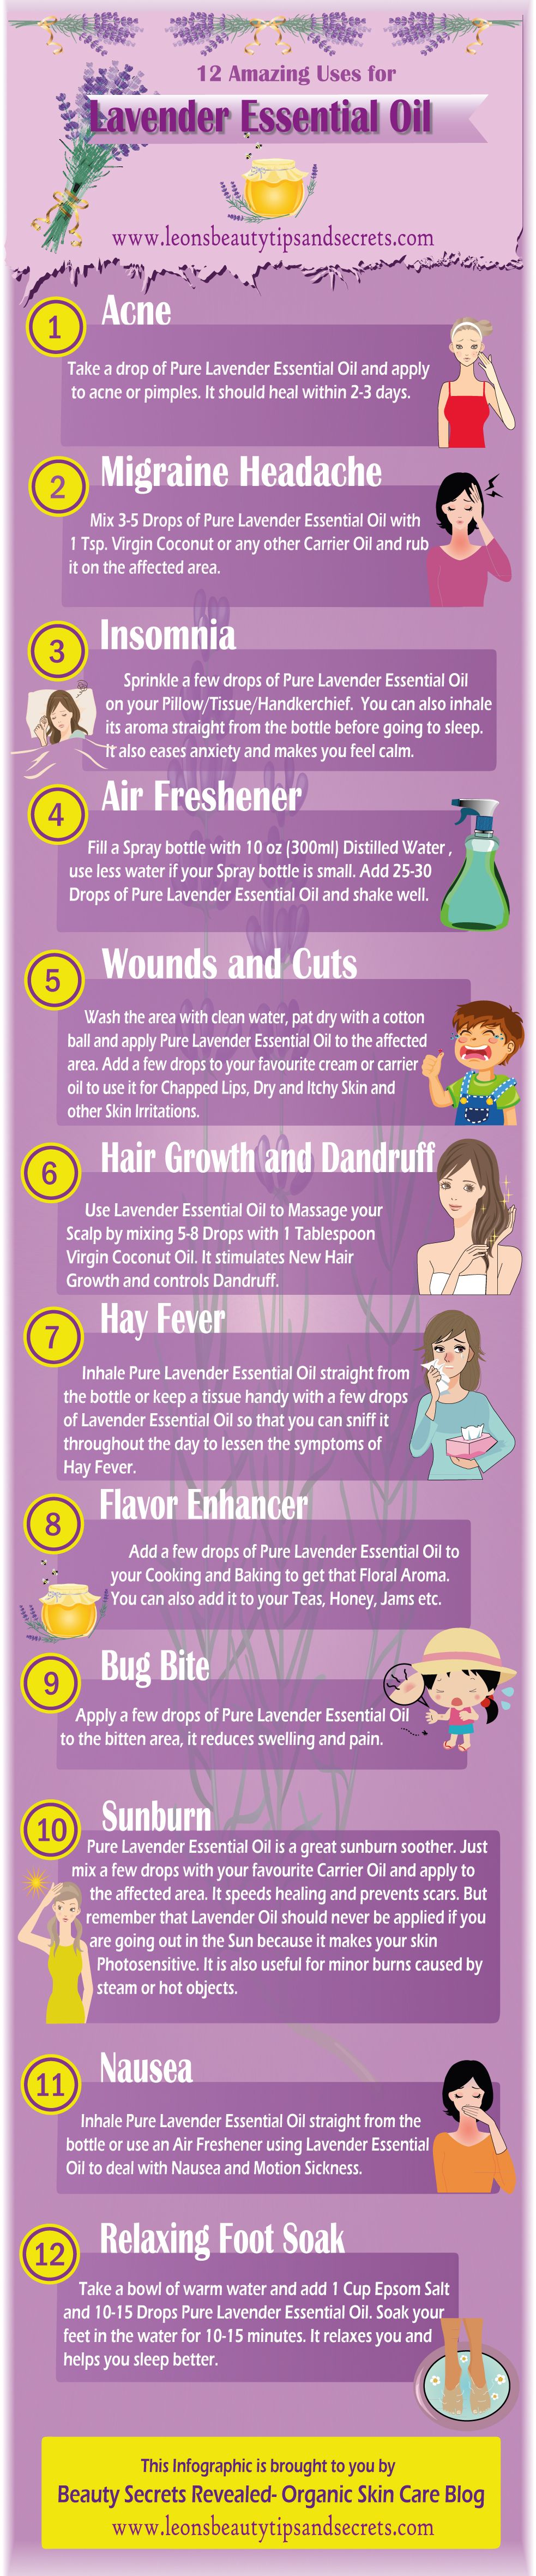
    1. Added to water

    Chickens are subject to parasites and digestive issues as much as any other creature, and adding a bit of vinegar to their water can help keep them healthy and happy. If you happen to see your chicken has very runny droppings, it’s time to add some vinegar to their water. I would recommend a tablespoon for each gallon of water.

    2. Chicken baths

    Chickens are pretty good about giving themselves dust baths, so you will want to make sure they have a clean place to do this every day. However, it can also help them, especially with mites and parasites, to give them a simple bath in warm soapy water from time to time, and give them a rinse in water with a bit of vinegar. This will both condition their feathers, kill any unwanted critters or fungal growths, and help to gently cleanse off any dead skin on their feet.

    3. Clean eggs

    While seeing bits of dirt or chicken droppings on your eggs are how you know they’re truly farm fresh, no one really wants to bring chicken poop into their kitchen! Giving your eggs a quick dunk in water with a bit of vinegar will clean them and also brighten the egg shells.

    4. Remove tough grime

    We’ve all experienced that bit of chicken poop in the coop that just doesn’t want to budge. A spray bottle with vinegar will not only remove tough stains, it will also help repel critters and fungal growth in your coop, so use this for regular coop cleanings.

    5. Easy peeling for hard-boiled eggs

    I recently discovered this, and, as a big fan of hard-boiled eggs, it’s made my life much easier! You may have heard that adding a dash of baking soda to the water when you hard boil eggs can make them easier to peel, but I’m not really sure why, since it is vinegar that dissolves calcium. Add a dash of vinegar instead and those pesky egg shells will practically peel themselves off.

    If you enjoyed this, you might also like….

    Defend the Homestead When Times Get Tough…

    The Ultimate Guide to Natural Remedies…

    What You Need to Know Before Going Paleo…

  • The $5 Chicken Tractor (Video)

    The $5 Chicken Tractor (Video)

    Popular homesteading vlogger Justin Rhodes has been on a tour of American homesteads this month, and through his travels, he found this impressive $5 chicken tractor made by his friend, Ryan from Wholesome Roots.

    I love seeing great, innovative, and frugal ideas for homesteading in general, but it seems people seem to get particularly innovative when it comes to housing and accommodating chickens! Just this week we shared our frugal chicken nest ideas, and I’ve actually found a few more since posting it.

    This is a very clever little system for moving chickens around the homestead, which is a great way to ensure they’re doing their part, and also getting fresh ground to scratch and fertilize every day. Chickens like grains, but they really thrive on bugs and grass. There are lots of options for tractors, chicken runs, and mobile coops out there, but if you can’t afford a fancy system, you’ll love this clever and simple tractor.

    Check it out, and be sure to follow Rhode’s homestead tour, it has been really fun and cool to see so many homesteads across the country!

    If you enjoyed this, you might also like….

    Are We In The End Times?

    Complete Health Transformation Without Drugs or Surgery…

    Having Trouble Sticking With Paleo?

  • Simplest Bulletproof Coffee Recipe

    Simplest Bulletproof Coffee Recipe

    You may have heard of bulletproof coffee, which is gaining massive popularity among foodies everywhere. It is an aspect of the bulletproof diet, a book and diet plan designed by a man named Dave Asprey, that focuses on lots of good fat, moderate protein, and low carbohydrates.

    Healthy fats are making a huge comeback, after decades of “low-fat”  being considered healthy, nutritionists have changed their tune on saturated fats, which they now say make up an important part of a healthy diet.

    And bulletproof coffee is a great way to make sure you’re getting healthy fats, and make your morning coffee smooth and delicious without unhealthy creamers.

    It’s very simple to make, and you’re sure to get hooked!

    The purist version requires a special kind of coffee, and a special kind of oil called MCT oil, but any coconut oil will do, as they count as MCT oil. Organic coffee is always much better for you than non-organic, since conventional coffee crops are usually heavily sprayed with pesticides. Organic coconut oil is preferable as well. And, you will definitely want to use butter from grass fed cows. Pasteurized dairy is a much healthier source of fat, as grass is what cows are meant to eat. It also ensures they are much healthier, meaning higher-quality butter.

    And now, without further ado, here’s the recipe:

    Ingredients: 

    • Organic coffee of choice
    • Grass-fed butter
    • Coconut oil or other MCT oil

    Directions: 

    1. Brew your coffee as you normally would.
    2. When you have a fresh cup of coffee, when it is still very hot, add 1/2 tbs each of coconut oil and butter.
    3. Put the coffee with oil and butter in your blender, and blend on high for a few minutes, until it is nicely frothy.
    4. Pour back into your mug, and enjoy!

    Now, keep in mind, this will have about 400 calories in a single cup, which is a lot, so if you’re counting calories, make sure to keep track of that. I usually find that with a few hard boiled eggs, this makes a very satisfying breakfast that gives me energy throughout the day!

    If you enjoyed this, you might also like….

    Do You Have What You Need to Hold Down the Fort?

    Natural Healing Secrets You Need to Know…

    Effective Primal Diet Hacks…

  • How to Train Horses (Infographic)

    How to Train Horses (Infographic)

    I came across this infographic from Thoroughbredstallionbestminister.com on Pinterest recently and I thought it was really cool. I’m not a huge horse expert, but my ideal homestead would most definitely include horses. There’s a reason they were such a huge part of Western Civilization for centuries, and why, despite much faster modes of travel we have today, many people still choose to keep them around.

    First of all, they’re always reliable for work and transport. Sure, tractors and cars are much more efficient…or are they? When the grid goes down, how reliable will your fossil-fuel reliant vehicles be? Or maybe you’re going for a greener model on your homestead, and can sacrifice speed for something much more sustainable?

    In the West, we don’t eat horses, the way we do other farm animals, but they still are a great addition to any farm or homestead. Their manure is excellent for the soil, they can be pastured and help you keep grass and weeds down, and of course, you can ride them! They don’t need anything but food and water to be “fueled”.

    Now, I definitely wouldn’t recommend relying on this infographic alone to train a horse, but I found it really interesting and motivating to learn more about horses and what it takes to raise them from birth. Because, naturally, if you want a really sustainable farm animal, you’ve got to breed it right?

    Check it out, and let me know if you’d like to read more about homesteading and horses or other pack animals.

    If you enjoyed this, you might also like….

    Can You Defend Your Family When SHTF?

    Natural Healing Secrets You Need to Know…

    Effective Primal Diet Hacks…

  • How to Grow Alfalfa Sprouts

    How to Grow Alfalfa Sprouts

    Spring will soon be upon us, and you might be eager to get your garden started. If you’re impatient to have fresh greens again, you might want to try sprouting as you wait for the seeds in your garden to germinate.

    Sprouting seeds is a great way to get quick, delicious nutrients you can throw in sandwiches and salads, and they only take a few days to grow right on your countertop. This is also a great option for folks who don’t have room to garden!

    Fresh sprouts are not only delicious and easy, they’re actually really good for you too. They contain a bunch of wonderful nutrients, vitamins, and minerals, including:

    protein and dietary fiber, as well as vitamin K, folate, pantothenic acid, niacin, thiamin, vitamin C, vitamin A, and riboflavin. In terms of minerals, sprouts contain manganese, copper, zinc, magnesium, iron, and calcium.

    • protein
    • dietary fiber
    • vitamin K, C, and A
    • folate
    • pantothenic acid
    • niacin
    • thiamin
    • riboflavin
    • manganese
    • copper
    • zinc
    • magnesium
    • iron
    • calcium

    These are a great way to get fresh, live, essential nutrients that’s both affordable, fresh, and fun to do. Here’s how:

    What you need: 

    1. Organic alfalfa seeds, meant for sprouting
    2. Mason jar
    3. Clean, plastic or wire mesh
    4. Mason jar lid
    5. Sturdy bowl

    Directions: 

    1. First, rinse 2 tbs of your seeds thoroughly under clean, cold water. (Save the rest of them for the next time you want to sprout seeds!)
    2. Put the seeds in your mason jar, and cover with a few cups of water.
    3. Leave overnight.
    4. Drain the seeds in the morning, cover with the mesh and lid, shake the jar thoroughly, and tip over into your bowl, so that excess moisture can drain out.
    5. Do this daily until you have sprouts that are your desired size. This will typically be a few days. There’s no exact size that is perfect, although if they get too big they will start to mold or rot, but you can “harvest” and eat them pretty much from when they sprout little green shoots on.
    6. Once they are sprouted to your liking, cover with the mason jar lid, and keep in the refrigerator.

    Pictured above is seeds that have been sprouted three days; this is a pretty good example of a desirable “length” of the sprouts.

    Once they’re in the fridge, eat them within 3-5 days, and enjoy!

    If you enjoyed this, you might also like….

    Do You Have What You Need to Hold Down the Fort?

    Natural Healing Secrets You Need to Know…

    Effective Primal Diet Hacks…

  • 12 Amazing Uses for Lavender Essential Oil (Infographic)

    12 Amazing Uses for Lavender Essential Oil (Infographic)


    I’ve written before about how awesome lavender essential oil is, and how many uses it has. Apparently, the folks over at Leonsbeautytipsandsecrets.com agree with me, and have this great infographic to show for it!

    As I’ve said before, if you’re going to buy only one essential oil, lavender is a really great choice. It is both versatile, safe to use around babies and small children, smells amazing, and is incredibly effective. Lavender has been used for centuries for many cleaning and medicinal uses, and essential oil is such a concentrated form of it, it’s super efficient, as one or two drops will usually get the job done (and who really has constant access to fresh bunches of rosemary?)

    Enjoy this handy and detailed infographic of all the wonderful uses for lavender essential oil.

    If you enjoyed this, you might also like….

    Can You Defend Your Family When SHTF?

    Natural Healing Secrets You Need to Know…

    Effective Primal Diet Hacks…

  • How to Store Food in Vacuum Packed Canning Jars (Video)

    How to Store Food in Vacuum Packed Canning Jars (Video)

    I’ve had a vacuum sealer for years that has an attachment on it for canning. I never thought much of it, and figured it required a bunch of fancy additional equipment to use. However, it recently just clicked that I can use it for vacuum canning! And it doesn’t take much at all, just a lid for my jars, and I’ve got plenty of canning jars already.

    So, I wanted to learn how to use it. This video is a great tutorial on how and why to use your canning attachment to your vacuum sealer. She explains how long the food will keep, where to find the accessories you’ll need for vacuum canning, how hers works, and gives a demonstration of the whole process. She also demonstrates how to re-open the can once it’s been sealed.

    To me, if you already have a vacuum sealer with a hose attachment, and aren’t already set up for canning (or even if you are), this seems like a really quick, easy, and mess-free way to preserve food through canning. Enjoy!

    If you enjoyed this, you might also like….

    Can You Defend Your Family When SHTF?

    Natural Healing Secrets You Need to Know…

    Effective Primal Diet Hacks…

  • How to Make Probiotic Cream Soda

    How to Make Probiotic Cream Soda

    I don’t know about you, but I absolutely love a good, old-fashioned cream soda. It’s such a great treat, and hard to find a really well-brewed one these days.

    Earlier this week we wrote about a ginger bug which is the base for many kinds of probiotic sodas, and cream soda is one of the delicious, healthy, probiotic sodas you can make using ginger bug as a result!

    The really great thing about probiotic cream soda is that since you are fermenting it with a culture, the little bacteria in the culture actually eat the sugar, changing its metabolic structure, so it’s actually nothing like store-bought sodas that are full of sugar or high-fructose corn syrup. While it does still contain sugar, it’s a much healthier form.

    So, here is how you make it!

    Ingredients: 

    • 2 quarts filtered water
    • 3 cups white sugar
    • 3 tbs vanilla extract
    • 1 cup active ginger bug

    Directions: 

    1. When you are sure your ginger bug is active, meaning bubbly and fizzy, make this recipe right away.
    2. First boil your water, then remove from heat and stir in 2 cups of sugar. Once it is cooled a bit, so that it’s still warm to the touch but not at all hot, stir in the other cup of sugar until it dissolves.
    3. Then, pour the water into a half-gallon jar and stir in the vanilla, and finally, the ginger bug.
    4. Cover with the lid, and let sit on your counter for several days. Check daily for signs of fermenting, and stir.
    5. When it is bubbly and smells slightly sour and sweet, it’s time for the secondary ferment, which will make it bubbily. You can either keep in the same container and simply tighten the lid, and check every day until the lid no longer indents when you press it, or you can pour into specialized flip-top bottles for fermenting.
    6. Be very careful at this point, because the jar or bottle could explode if fermented too long! You might want to keep in a bucket, if you can, just to be safe. But all you need to do is to crack the lid or bottle top slightly to hear for a “hiss”, then you’re probably good.
    7. Put in the refrigerator to keep and to stop the carbonation process, and enjoy!

    If you enjoyed this, you might also like….

    Are We In The End Times?

    Complete Health Transformation Without Drugs or Surgery…

    Having Trouble Sticking With Paleo?