Page 75 of 81
1 73 74 75 76 77 81
Ethan Archer – Page 75 – Homesteader Depot

Author: Ethan Archer

  • Coffee Grounds For Your Garden

    Coffee Grounds For Your Garden

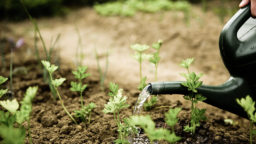
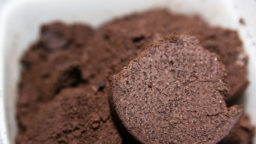
    Coffee grounds are a common cheap and easy form of organic material to add to your compost pile or garden. Here are a few tips for how, and why, to use them in your garden.

    Coffee and pH

    Despite what you might have heard, coffee grounds in your garden will have little to no effect of your soil pH and will not harm plants even when applied directly as a top dressing in generous amounts.  The acid that is in the coffee you drink is there because it is water-soluble, meaning that is has been removed from the coffee grounds by the water that was used to brew your coffee.  The spent grounds themselves will have a near-neutral pH of 6.5 to 6.8.

    This Backyard Miracle Farm Will Change Our World Forever>>>

    Nutrients in Coffee

    That being said, there is quite a bit in coffee grounds that will have an effect on the soil in your garden.  Coffee grounds have an average NPK of 2.1, 0.3, 0.3.  And the Phosphorus and Potassium are plants available right away, while the Nitrogen will not be available until broken down by micro-organisms and worms that will be attracted to the garden by the grounds.  There is also Magnesium, Copper, Calcium, Manganese, Iron, and Zinc in coffee grounds.  All of which provide food for your plants and for soil life that contributes to the health of your garden. For those that still can’t get over the fear of applying coffee grounds directly to your garden soil, there is always the compost pile.

    Compost

    Coffee grounds will heat up a compost pile quickly which can help keep the necessary organisms alive as we head into the fall and winter months.  And worms love coffee grounds.  Like chickens, worms have gizzards and have no teeth to break down their food.  The coarse texture of the grounds and their small size are great for this.

    Availability

    But perhaps the best thing about coffee grounds is that they are available in most places, and in bulk, for free.  Coffee shops are just going to throw them away, and often times they have separate trash cans that only contain coffee grounds and coffee filters (which are also great in the garden or compost pile).  So even if you don’t drink coffee yourself, stop by a coffee shop today and get your garden a boost.

    Advanced Gardening Course To Accelerate Your Food Production…


  • Chickens vs. Rabbits

    Chickens vs. Rabbits

    When most people think of small scale backyard animal husbandry, they tend to think exclusively of chickens.  And while chickens are not without their own advantages, they are certainly not the only small animal that even a new backyard farmer can raise, one such animal is the rabbit.

    There are many benefits to having either chicken or rabbit. Both animals produce sustenance, and can provide the backyard farmer with plenty of nutrient rich manure for the garden, as well as have their feeding needs reduced by keeping them in a mobile pen.  Not every backyard farmer has the same resources available to them and what might work for one might not be right for the other, so here are some considerations:

    Gestation Periods

    Rabbits generally gestate for about 30 days.  This is around a week longer than chickens take to hatch.  However; a doe rabbit can get pregnant as early as the next day after birthing a litter of 12, while a mother hen will take considerable time off from reproducing eggs in order to care for her new chicks.  This is important to consider when thinking of your animals as a direct food source.  You can’t eat the same animal twice, so when resources and space are tight it is a great advantage to have animals that can reproduce new “future meals” for you quickly.

    Once hatched, most chickens will take about 6 months to reach sexual maturity for hens, and maximum size for roosters.  Compare this to 3 1/2 to 4 months for rabbits and once again you have your next meal coming much quicker with rabbits than with chickens.

    Food Provision

    But just how big is that next meal going to be?  Rabbits average in weight from 1 to 4 pounds, while chickens can weigh can anywhere from 2 to 9 pounds.  That being said, the larger chickens are those that have been breed for their meat and for their eggs, but they have lost most of their brooding instincts and therefore the hens will often not incubate the eggs they lay even if they are fertilized, and will show less interest in raising and caring for chicks.  So while your initial chicken dinner might be larger than your rabbit alternative, it won’t do you too much good down the road when you are all out of chickens.

    Care

    As mentioned, both rabbits and chickens can be fed scraps from the garden or even from the household vegetable scraps, and both can be given mobile pens to move around the homestead. However, while you can in certain environments let chickens go free range, this can be harder for rabbits. Rabbits also need to be watched carefully, as they can get very sick if their enclosures aren’t clean enough. Of course, if you live somewhere with a cold winter, it’s the same for chickens.


    Whether or not chickens or rabbits are preferable for your homestead will depend on what you’re looking for and what you have available for them, and these are some of the factors you can consider. If you can’t decide, hey-you can always get both!

    If you like this, you might also like:

    Advanced Gardening Course To Accelerate Your Food Production…

    Survival Medicine & Wilderness Survival…

    Survival Techniques From Long Ago, Re-purposed For The Modern Era…

  • Making Your Own Sprouted Flour

    Making Your Own Sprouted Flour

    You may have heard that sprouted flour is healthier than regular flour, and this is definitely true. When wheat is allowed to sprout before it is ground into flour, it breaks down the antinutrients that are the plant’s natural defense system, which can be difficult for us to digest. This is one possible reason for so many people having gluten and wheat allergies in recent years.

    Before modern industrial harvesters and mills, wheat used to be cut and lay to dry in the field, allowing the wheat berries as they’re called to naturally sprout before grinding.

    Sprouted wheat flour can be quite pricey-but, with the right equipment, it’s very easy to make at home!

    What you need:

    • Wheat berries: you can usually find these in the bulk section of your health food store. You’ll definitely want organic, and if you can’t find them locally you can usually find them online.
    • A flour mill-you can buy a hand-powered mill, a special attachment for your Cuisinart, or an electric mill. You can also use a coffee grinder or a high-powered blender, but you’ll probably have to experiment to see how these work for you before trying to grind several pounds of flour at once.
    • A dehydrator-the sprouted berries will need the be thoroughly dehydrated before being ground into flour, so a dehydrator will accomplish this best, although if you can set your oven low enough this also might work.

    What to do: 

    1. Sprout the wheat: once you have your equipment and have bought some wheat berries, you will probably want to make a small batch first to see how it goes. But either way the process will be the same: take the amount of what you will want to sprout, and fill mason jars about halfway with the berries. The soak in water for 24 hours, covered. Then, drain the water, and cover with plastic or metal mesh if you can, and tilt upside down with the bottom resting on a towel. This will keep the excess moisture draining. If you can’t do this, regularly strain out what water  you can to avoid molding. It is sprouted when the wheat berries have cracked open and you can see green underneath, or a small tail is sprouting from them. They can be eaten fresh like this, or dehydrated to make the flour:
    2. Dehydrate the sprouted berries: check the manual of your dehydrator to see how long you should dry the berries for and at what temperature, but it will probably be at about 115 F for 12-24 hours. Check after about 8 to see if they’re dry, and then every few hours after that. You want them to be as dry as possible.
    3. Grind the flour: follow the directions for whatever mill or grinder you have, or, if you’re experimenting with a blender or coffee grinder, just start with a small amount to see how well they can be ground. The consistency of the flour is up to you, but you will probably want it to be very fine.
    4. Enjoy! Once you have the amount of flour you would like to use, you can use it as you would regular whole wheat flour. It’s probably best to keep the rest of your sprouted berries in a sealed container in the refrigerator, and grind the flour fresh each time you’d like to use it.

    If you like this, you might also like:

    Advanced Gardening Course To Accelerate Your Food Production…

    Survival Medicine & Wilderness Survival…

    Survival Techniques From Long Ago, Re-purposed For The Modern Era…

  • Health Benefits of Turmeric

    Health Benefits of Turmeric

    Turmeric is totally incredible. If you don’t already have it in your natural healing arsenal, you totally need it. It’s a staple in Indian cooking, and its bright yellow pigment is even used as a natural dye, and has been for centuries.

    You can buy it in different forms, if you’re lucky you can find it fresh in the produce section, usually at a health food store. Health food stores will often have turmeric supplements too or even fancy mixtures, but those can be pricey. If you have no idea how to use turmeric or need a quick remedy these can be great for sure, but you really don’t need anything more than a few ounces of powdered turmeric powder, which can be found in the spice section.

    Uses for turmeric: 

    • in health tonics
    • for topical healing
    • as a cooking spice
    • in face masks
    • in hair masks

    Health benefits:

    • Natural anti-inflammatory
    • Natural anti-biotic
    • Natural antiseptic
    • Natural analgesic
    • Speeds up wound healing
    • Strengthens ligaments
    • Eases coughs
    • Improves digestion
    • Purifies blood
    • Reduces symptoms of asthma
    • Reduces symptoms of arthritis
    • Prevents gas and bloating
    • Heals stomach ulcers
    • Reduces the effects of skin conditions (psoriasis, eczema)
    • Helps prevent cancer
    • Prevents progression of Alzheimers
    • Aids if fat metabolism and weight management
    • Reduces side effects of chemotherapy

    The simplest way to take turmeric is of course to just use it in your cooking as much as you can. You can season simple homemade bread and rolls with it, throw it into stir-fries, use it in a rub for meat, etc. But depending on the severity of what you are treating, you might want more than that or you simply might not like turmeric in your cooking.

    A cheap and easy way to make your own turmeric supplements is to buy veggie capsuels so you can make your own turmeric supplement. They can be found online or at health food stores, as well as simple contraptions to easily fill them. You can also fill them  by hand but it can be relative time-consuming.

    One very simple and ultra-effective way to take turmeric-if you can stand this-is in a health tonic. Take one cup of water and stir in 1 tbs of apple cider vinegar. Then stir in a tsp of raw honey, a tsp of cinnamon and a tsp of turmeric. If you are getting a cold or flu, this will work as a super-charged natural antibiotic, or if you need to take turmeric for any other ailment it will put the natural healing power of raw honey, apple cider vinegar and turmeric right to work.

    Do you take turmeric for your health? How do you take it?

    If you like this, you might also like:

    Advanced Gardening Course To Accelerate Your Food Production…

    Survival Medicine & Wilderness Survival…

    Survival Techniques From Long Ago, Re-purposed For The Modern Era…

  • 2 Common Water Sources for Homesteads

    2 Common Water Sources for Homesteads

    You simply cannot survive without water. And while you might very well be able to purchase land for a homestead that has county or agricultural water, you might also want to consider self-reliant options for water. You also might not be able to buy land that is already irrigated and on the water grid, and either way, considering grids can always fail and if you’re homesteading, you are most likely intending to be as off-grid and self-reliant as possible, so alternative sources of water are always ideal. Here are a few of the most common methods for getting and keeping water on a homestead.

    Wells

    Wells are ideal, but they can also be expensive and are dependent on a few factors, like the water table on your property and the kind of ground you have. Wells are an invaluable resource though, so they’re definitely worth considering. If you are shopping for land, a property that already has a well is an excellent criteria to take into account when shopping around. If you already have land, you’ll want to research will drilling a bit first and compare different services if you can so you get the best deal and the most knowledgeable and experienced well drillers. Here’s a great video from a prepping vlogger on everything you need to know about drilling a well. 

    Rain Catchment 

    Harvesting rain water is a very cheap and easy way to collect water, but how reliable it is will of course depend on your location and how often it rains, as well as the means with which you have to collect, store and treat the water. For a simple off-grid homestead, or even if you have county water and simply want to harvest some rain water for your gardening and bathing needs, there are a few different cheap set-ups for very basic water catchment systems. One of the most common is building a sloped roof with a covered gutter that feeds into a large drum or container. There are also containers specifically designed for water catchment that have thick plastic mesh on top to keep out wildlife and filter out debris. Drinking catchment water can be a bit more complicated-you’ll have to filter or treat it, but there are low-budget options for this as well.

    What are some methods of storing weather that you’ve considered for your homestead?

    If you like this, you might also like:

    Advanced Gardening Course To Accelerate Your Food Production…

    Survival Medicine & Wilderness Survival…

    Survival Techniques From Long Ago, Re-purposed For The Modern Era…

  • How to Make A Sourdough Starter

    How to Make A Sourdough Starter

    Sourdough starters can be purchased online or you might even have a friend or relative who’s already making them who’d be willing to share. They’re easy to pass around, and you can use just a small amount to grow as much as you want! That’s the beauty of sourdough.

    To grow your own, you don’t need anything more than flour, water, and time. Let’s begin!

    What you need: 

    • a mason jar or similar sized glass or plastic container, no metal
    • measuring cups and spoons
    • plastic wrap
    • flour (at least a pound to be safe)

    What you do: 

    1. Combine 3/4 cup of water with 3/4 cup + 2 tbs flour and stir vigorously in your container. Once bubbles are formed and you have a nice, thick, evenly combined batter, cover with plastic wrap and set on your counter. It will need to be placed somewhere that is warm, at least 70 degrees F, where it won’t be disturbed.
    2. Over the next 24 hours, bubbles should start to appear. During this period, stir the mixture occasionally to attract more yeast and air into the starter. The bubbles mean the yeast is becoming active and alive, that’s what you want!
    3. On the third day, its time to feed the yeast! Add another 3/4 cup flour and 3/4 cup water and stir vigorously, then cover and let sit once again.
    4. On the fourth day, your starter should be noticeably bubbly and have doubled in size. You will also notice that active-sourdough
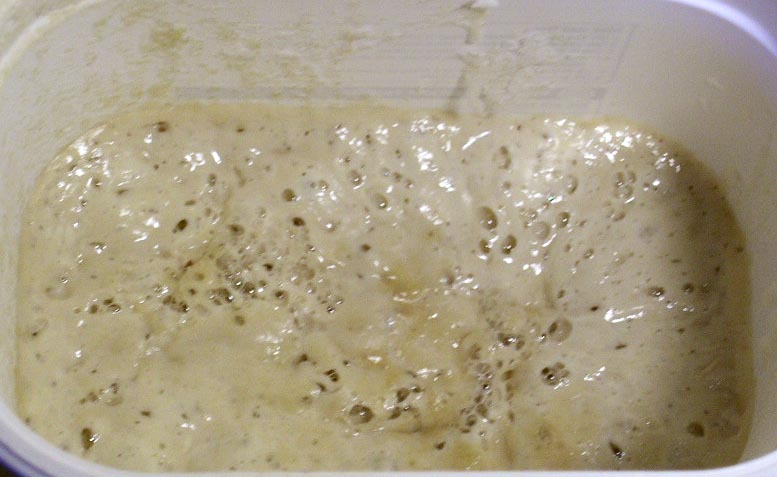
very distinct sour smell that is signature to sourdough. It is active when it is light with many big bubbles, like
      in the photo.
    5. If your starter is not this active yet-don’t worry! Just keep feeding it, it might just need another day or so. Every climate and local yeast available is going to be different.
    6. If your starter is ready-you can use it! Take about half out and use in a sourdough recipe of choice. Just make sure to add the same amount of flour and water back to your starter. Let it become active again, and either continue to reuse, or put it in the fridge to be “dormant”. Just make sure that if you do want to do this, that it is active before adding it to the fridge, and also don’t put an airtight top on it-or it might explode! You can put a sealed top on it after a few days, but let it breathe at first.

    And your done! What’s your favorite sourdough recipe?

    If you like this, you might also like:

    Advanced Gardening Course To Accelerate Your Food Production…

    Survival Medicine & Wilderness Survival…

    Survival Techniques From Long Ago, Re-purposed For The Modern Era…

  • 5 Tips for Storing Food in Harsh Conditions

    5 Tips for Storing Food in Harsh Conditions


    Storing dry foods can be tricky. Ideally, you want to store your food at about 50-55 degrees Fahrenheit, with low humidity (less than 15%). Of course, that just isn’t possible for a lot of people, especially those who live in exceedingly warm or cold climates, floodplains, etc. So how can you improve your food’s longevity, even if you’re storing it in harsh conditions? Follow these tips.

    • Be selective with expiration dates – Canned goods can usually last years past their expiration dates, but it’s a good idea to choose the ones with the longest dates to be sure that your food doesn’t go bad while you’re not paying attention.
    • In humid conditions, store food higher – Your gut instinct might be to store food in the basement, but if you live in a floodplain, that can be problematic. Store food in the attic or one of the upper floors of your house to avoid flood damage and minimize humidity.
    • Invest in a vacuum sealer – if you’re bagging up dry goods, you can extend their shelf life in any conditions by sucking the oxygen out of them. A vacuum sealer is an inexpensive investment for longer lasting food.
    • Date your food inventory – Your canned goods will likely have expiration dates on them, as well some of your dry goods. If you’re doing your own canning or bagging, though, make sure to put the dates on all containers. Then always use the oldest dated foods first before moving on to newer containers.
    • Grab some Five-Gallon Buckets – If you’re worried about pests getting into your food supplies and/or you want to keep them fresher longer, invest in some five-gallon buckets with tight-fitting lids.

    With these tips, you should have no trouble extending the shelf life of all of your canned and dry foods, even in harsh conditions.

    If you like this, you might also like:

    Advanced Gardening Course To Accelerate Your Food Production…

    Survival Medicine & Wilderness Survival…

    Survival Techniques From Long Ago, Re-purposed For The Modern Era…


  • Is it too late to start my garden?

    Is it too late to start my garden?

    Summer isn’t going to last forever, so should you just wait until next year to start your garden?  No.

    While your potential for late planting will depending on the zone you are living in, there is still time to get plants in the ground for almost everyone even without season extension tools like a green house or low tunnel.  Leafy greens and root crops like carrots and radishes easily tolerate the declining amount of sunlight and cooling temperatures this time of year in most places.

    Late-Season Start

    Find out what the first frost date is for your zone, and check out the packages of what seeds you have available for crops that can be harvested prior to your first frost date, if planted soon.  If that’s a little too much math for you, or if you don’t have seeds currently and are unsure what seeds you should purchase for late summer early fall here is a link to a free online planting calculator…

    Planning Ahead 
    Don’t be discouraged if your favorite crops didn’t make the list for late planting.  There will always be next year, but that’s no reason to wait.  A functional and productive garden takes more than seeds in the ground, and there is plenty that can be done any time of year to get you ready to grow what you are more excited about.

    You could starting building raised bed frames.  This doesn’t require spending tons of money at your local big box home improvement store on lumber.  Untreated wood (you will always want to use untreated wood in constructing raised beds so as not to contaminate your soil and food with harmful chemicals) can be easily be obtained in most areas in the form of used pallets.  Make sure you ask first so you don’t get the cops called on you for stealing, and make sure you are taking the unpainted pallets, the blue or red pallets the ones that the business is going to want to keep most of the time and the ones that you want to avoid because of contaminates in the wood.

    Winter Compost

    And every garden needs compost.  You can always start a compost pile. Things don’t break down as fast in the winter, but you can keep things reasonable warm in your pile by doing simple things like placing it in an area that receives sunlight and covering it with black plastic. If you don’t have a garden already, don’t wait, break the inertia and get started today so that next spring you can have a much more productive growing season.

    If you like this, you might also like:

    Advanced Gardening Course To Accelerate Your Food Production…

    Survival Medicine & Wilderness Survival…

    Survival Techniques From Long Ago, Re-purposed For The Modern Era…