Page 77 of 81
1 75 76 77 78 79 81
Ethan Archer – Page 77 – Homesteader Depot

Author: Ethan Archer

  • Benefits of Compost Tea

    Benefits of Compost Tea

    When it comes to a thriving, healthy garden, one of the quintessential components is a good fertilizer, and homemade compost is one the best things you can make. Using kitchen scraps, garden cuttings and locally sourced organic waste like grass clippings, manure, coffee grounds, egg shells, etc., you can-and should-make your own compost pile for a consistent supply of amazing plant superfood.

    There are many different options for how to build a compost pile and what to build it with, so if you’re not already composting, you’ll want to start there.

    But if you do already have a successful compost pile, compost tea is a fantastic way to use it to give your plants optimum nutrition, minerals, and beneficial microbes.

    Compost tea is exactly what it sounds like-except it’s for plants to drink up, not humans! There are many different methods of brewing it, but it is essentially soaking some finished compost in water for a period of time, and then using the mixture to water your plants.

    Advanced Gardening Course To Accelerate Your Food Production…

    Obviously, you can just dig your compost into the soil, so why go to the extra effort of brewing a tea? Well, the way plants drink in nutrients is through water, the nutrients bond to water molecules and are absorbed into the roots of the plants, so it just makes it more readily available to them. Also, for certain issues like fungus or blight on the leaves of the plant, there might be benefit in certain cases to being able to spray the compost mixture right onto the plant directly (although you’ll only want to do this if you know it is specifically recommended, compost tea can burn the foliage of some plants).

    To make compost tea, there are a lot of different options. Some people prefer to aerate it, with a water tank like the kind used in fish tanks, and others choose to simply let the tea mixture sit and stir once a day. But the basic principle is the same: you take a bucket or large drum, depending on your needs, and place some ready compost in it. You can make a sort-of tea bag, with something like a pillowcase, or just put it in there loose. After about a week or whenever you’d like to use it, you can either strain out the loose compost or simply pour over your plants.

    Compost tea is an excellent way to get amazing nutrients and minerals to your plants, and way cheaper than Miracle Gro! Believe me, your plants will thank you-try some today!

    [More]  Organic Gardening Secrets – Grows Up To 10 Times The Plants. Learn More Here

    Enjoy a quick video from Steve about Compost Teas and their amazing benefits for your garden…

  • How to Get Started Knitting

    How to Get Started Knitting

    It’s only the middle of August, but apparently snow is already accumulating above some US states-can you believe it? It’s already time to start thinking about getting out that winter gear. Or, if you want to learn a new skill-making it!

    Knitting is a wonderful skill to have, and it’s never too late to learn. It’s actually has some surprisingly health benefits, like improving cognitive function, memory, coordination and relieving stress. Not to mention you get scarves, hats, and or any of the many other things you can knit right at home! It’s a great way to give an original gift for the holidays that’s functional too, and wonderful alternative to cheap made-in-China goods.

    To get started knitting, you only need two things: yarn and knitting needles. That’s it! Nothing else fancy required.

    For needles, there are three kinds: plastic, metal and bamboo. Plastic and metal are usually very affordable, so you might want to start with a pair of those to see if you take to knitting before investing in the nicer bamboo needles. There are many different sizes of knitting needles, for different sized yarn and also desired tightness of the stitch, but size 8 is the most standard size. Packages of yarn will typically have recommendations for the size knitting needle to use with them, so check before buying.

    Yarn is what you’ll want to pick out next, and with all the beautiful colors available, this is definitely the fun part! To start out, you’ll probably want to buy two or three different colors, so you have a few options and, once you’ve got the hang of the stitch, you can practice changing the yarn. All yarn is either natural fiber or synthetic. Synthetic is very affordable, but also won’t breathe very well when worn. But this is a good choice to start out with, just to get the hang of knitting, and for many projects it can be ideal.

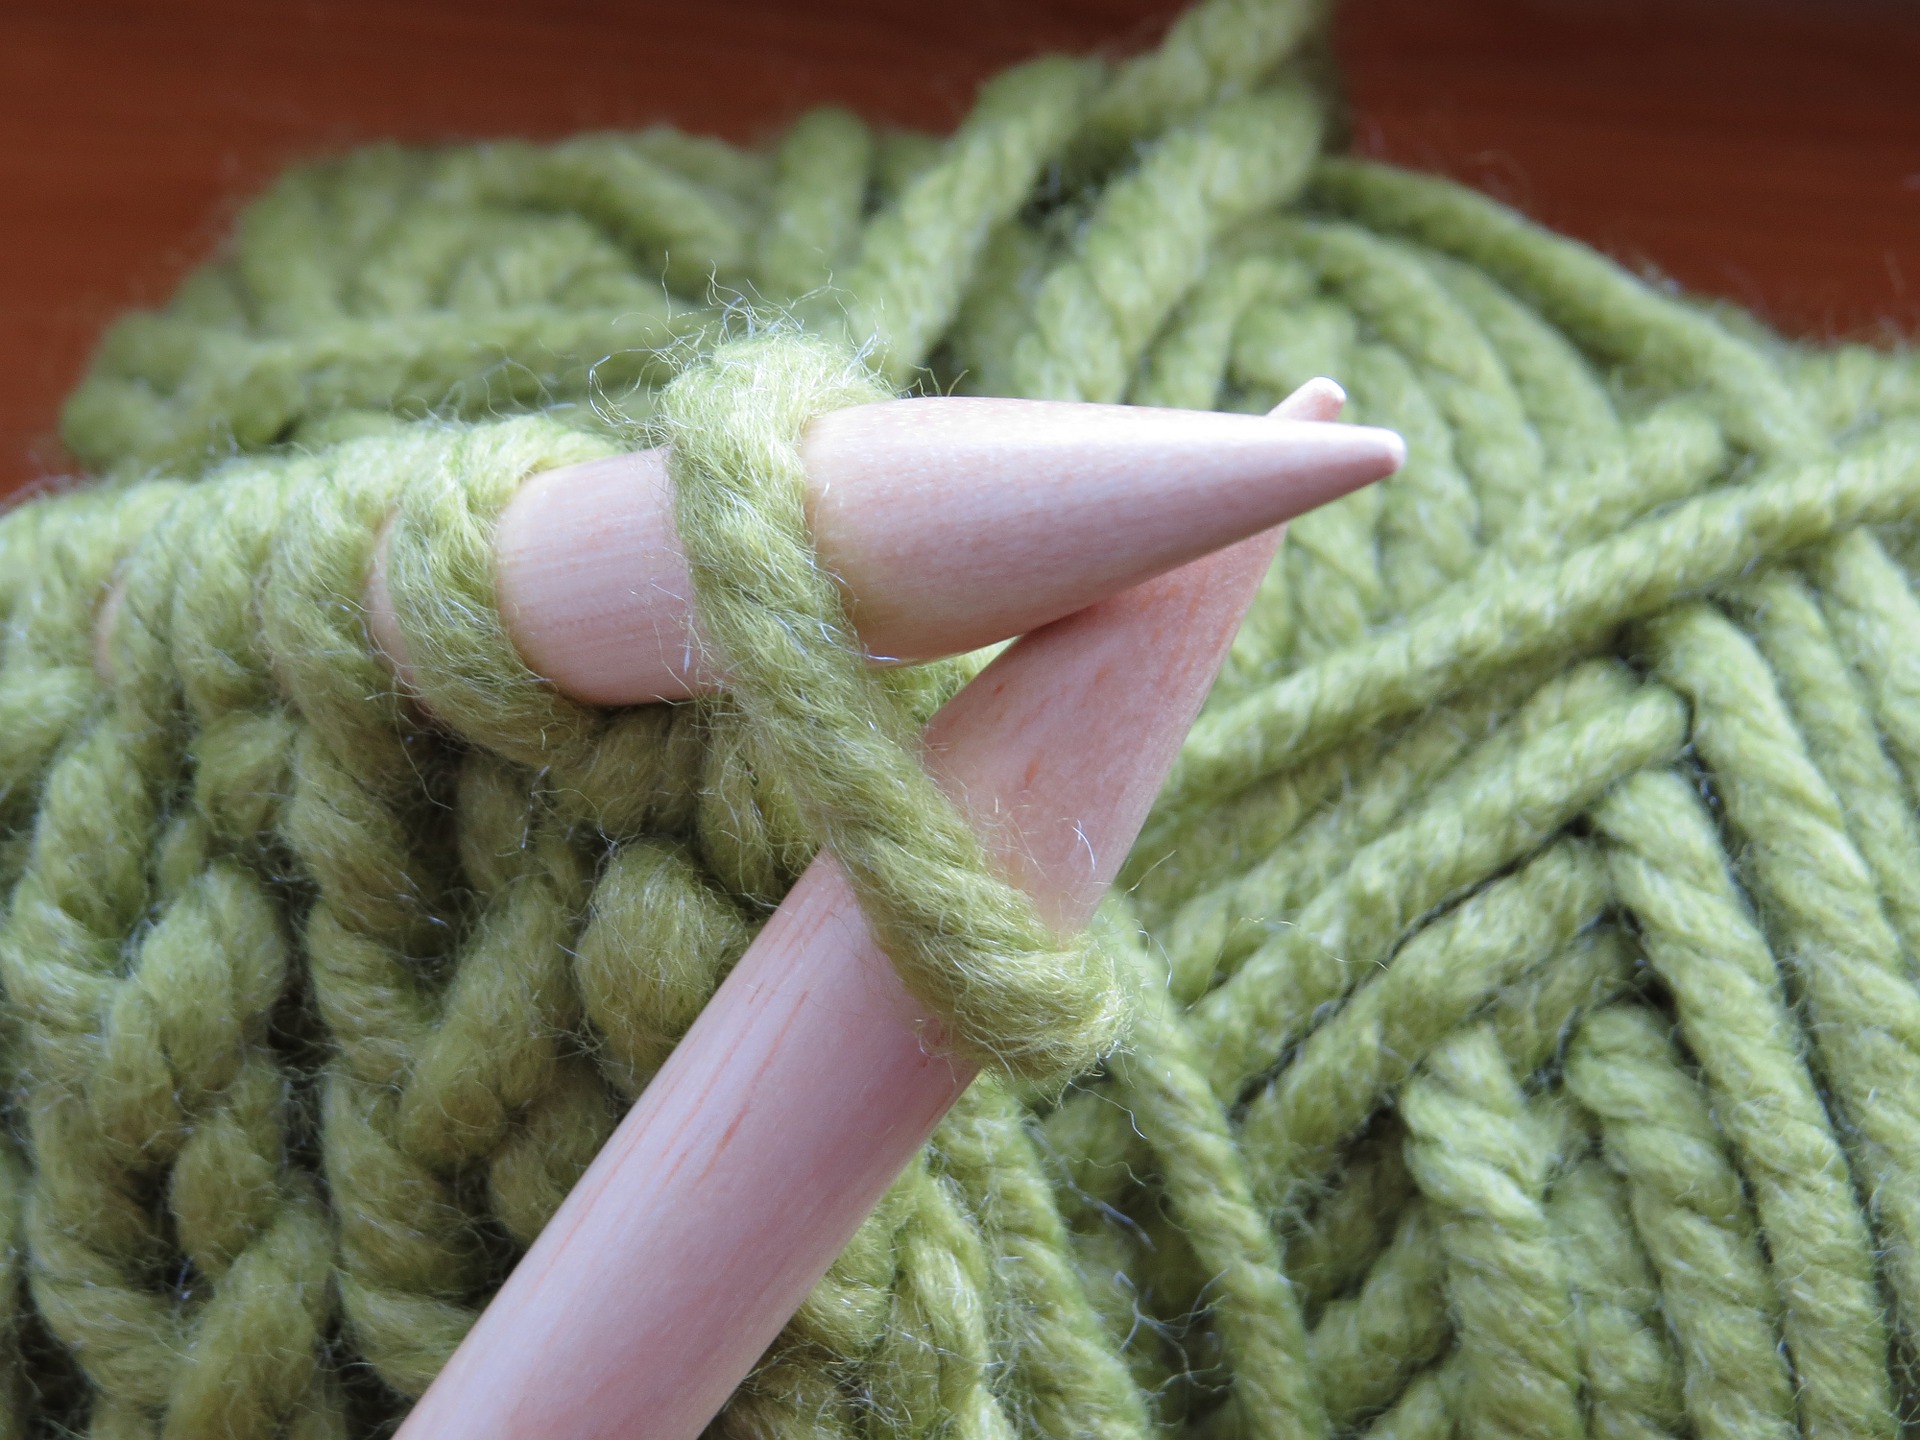
    Next, you’ll need to learn the basic stitch. knit-637092_1920

    And if you have an internet connection, well, then the wide wonderful world of free knitting tutorials, patters and guides is at your fingertips. This is a great beginner video on the basic stitch.

    This step can be the hardest-once you get the hang of it it’s very fun-and even addictive!

    A simple scarf is a very easy and fun first project, and useful too! Make one for each member of your family for the coming winter months, and maybe even some for extended family for gifts! You’ll find you can knit in your sleep in no time this way, with lots of practice of the basic stitch, and then you can move on to more complicated projects like hats, booties for babies, etc.

    Happy knitting!

    If you like this, you might also like:

    Advanced Gardening Course To Accelerate Your Food Production…

    Survival Medicine & Wilderness Survival…

    Survival Techniques From Long Ago, Re-purposed For The Modern Era…

  • The Health Benefits of Himalayan Salt Lamps

    The Health Benefits of Himalayan Salt Lamps

    Himalayan salt lamps have been increasing in popularity lately, and for good reason. The pretty pink chucks of salt fitted with lamps on the inside make lovely additions to any decor, but they also provide amazing health benefits. They are called the “vitamins of the air”.

    The way they work is by emitting negative ions, which cancel out harmful positive ions. Positive ions are created by electronic devices and radiation from electronic fields such as WiFi or cellphone networks. Positive ions can exacerbate issues such as allergies, insomnia and stress.

    Himalayan sea salt is the purest sea salt on earth. It contains all the elements that naturally occur in our bodies. The way the ion process works is that the salt, like all salt, naturally attracts water. When the heat from the light bulb causes the salt to warm up, the water begins to evaporate, being diffused into the air. The negative ions get released this way, and they bond with the positive ions. You know those cheesy animations in Febreeze commercials that show the happy little Fabreeze bubbles capturing and eliminating ugly odors? That’s how the negative ions bust up the nasty, harmful positive ions that mess with our sleep patterns and other bodily systems.

    The health benefits are many, including:

    • Increasing blood flow and circulation
    • Boosting serotonin levels
    • Reducing symptoms of asthma
    • Improved lung capacity
    • Improved mood
    • Reduced stress
    • Reduced symptoms of allergies
    • Better sleep
    • Increased energy levels
    • Reduced headaches

    Not all salt lamps are created equal though, so when you’re shopping for one, make sure it is pure, food-grade Himalayan salt. There are cheaper imitations on the market right now, and you simply won’t get the health benefits from anything less than the good stuff.

    Himalayan salt is also great on food and a much healthier alternative to standard table salt. Full of minerals and nutrients, it’s also totally delicious! They even make Himalayan salt licks for horses and dogs.

    Do you have a Himalayan salt lamp or use Himalayan salt on your homestead?

    If you like this, you might also like:

    Advanced Gardening Course To Accelerate Your Food Production…

    Survival Medicine & Wilderness Survival…

    Survival Techniques From Long Ago, Re-purposed For The Modern Era…


  • Homemade Dog Food

    Homemade Dog Food

    Our dogs are our best friends, and they deserve homemade meals too!

    Unfortunately, a lot of store-bought dog foods have a lot of preservatives and additives that you might not be so thrilled for your canine companion to be consuming. And high-dollar dog food, with real food ingredients, can be really pricey.

    So a great alternative is to just make your own at home!

    First, you’ll want to determine what the best nutrition is for your dog. Not every dog is going to have the same nutritional needs, but in general, dogs need protein, like from meat, fish, dairy and eggs, fat, like from meat or oil, carbohydrates, calcium and fatty acids. Grains are not always good for dogs, you might want to opt for sweet potato and vegetables as a carbohydrate source.

    A good starting place is to talk to your vet. The two of you can discuss what ingredients would be best for your dog, and if he has special health or nutritional needs that should be met and how to do that.

    >>>Brain Training for Dogs (Unlock That Hidden Intelligence

    Next, pick a recipe that fits your dog’s specific needs. There are a lot of homemade dog food recipes on the internet, so odds are you will find something that suits you.

    A really great basic recipe consists of sweet potatoes, frozen peas and carrots, and chicken breast, at a 1:1:2 ratio. Cook all the ingredients in a slow cooker on low for 8 hours and then stir, let cool, and distribute into bags to freeze. You can pull out a bag every few days, thaw, and bam! Easy, healthy, delicious and nutritious homemade food for your dog.

    While this probably isn’t ideal for daily meals, making sure your dog gets regular helpings of raw meat is also crucial. Once or twice a week, throw your dog some raw ground beef. Occasional organ meats are also incredibly beneficial, but should not exceed 15%. Also, bones are great for their health, but try to get them from a butcher, not the pre-packaged ones that are full of artificial flavoring and preservatives.

    Our dogs are members of our family, and they deserve healthy, whole, real food ingredients too. Consider making your own dog food today!

    If you like this, you might also like:

    Advanced Gardening Course To Accelerate Your Food Production…

    Survival Medicine & Wilderness Survival…

  • 3 Tips for Growing Potatoes

    3 Tips for Growing Potatoes

    Potatoes are one of the best staple foods for almost any diet. They’re full of fiber, complex carbohydrates, and nutrients that can enhance anyone’s health. Better yet, potatoes are actually pretty easy to grow in your garden, making them even more attractive to homesteaders everywhere. Here are a few tips and tricks to help you grow better potatoes in your garden.

    Pick a Sunny Spot

    No matter what kind of potatoes you’re growing, always pick a spot that gets full sun. You should also ensure that the soil is light, loose, and slightly acidic (ideally with a PH of 5.0-7.0), but you really can grow potatoes in almost any kind of soil, so you don’t have to worry about this too much.

    Rotate Your Potato Crops

    Potatoes can be fairly hard on soil, so don’t grow them in the same place in your garden every year. Instead, rotate them each year and make sure that you don’t repeat the same area more than once every three to four years.

    Start Sprouting Before You Plant

    You should plant your potatoes early in the spring, as soon as the soil is workable, and then you can harvest them once the ground temperature reaches about 45 degrees Fahrenheit. Before you plant them, though, go ahead and cut your seed potatoes and place them inside the house in a place where they can get some sun. Do this about two to three weeks before you plant them, and they’ll start to sprout. This will help them grow stronger and larger when you plant them.

    Potatoes are a hearty crop, but you do want to make sure that they don’t experience a hard freeze without protection. And you should keep their soil weeded and protected from insects and pests. Follow these tips, and you’ll be on your way to a great crop of potatoes this year.

    Sources:
    http://blog.seedsavers.org/blog/tips-for-growing-potatoes
    http://www.rodalesorganiclife.com/garden/7-ways-grow-potatoes
    http://www.unwins.co.uk/potato-growing-guide-ggid9.html


    If you like this, you might also like:

    Advanced Gardening Course To Accelerate Your Food Production…

    Survival Medicine & Wilderness Survival…

    Survival Techniques From Long Ago, Re-purposed For The Modern Era…

  • The Ultimate Guide to Chicken Coops (Infograph)

    The Ultimate Guide to Chicken Coops (Infograph)

    Raising chickens is awesome, but you definitely need to have everything they will need to thrive. In most cases, this will include a properly constructed and well-equipped chicken coop. Even free-range chickens will need somewhere to roost at night. There are many options out there for homemade chicken coops, and this will probably be the best option for most people as you can customize it to your flock size, climate, and budget needs.

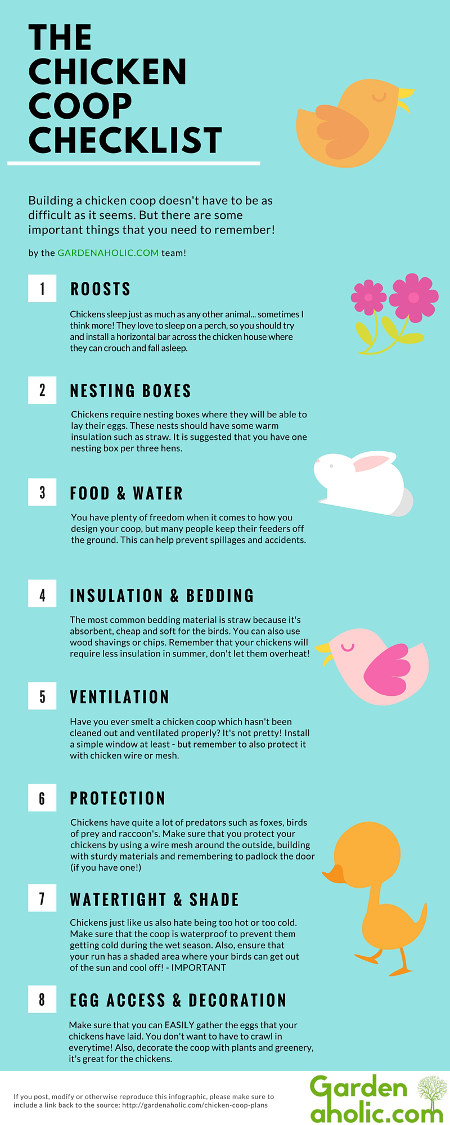
    There are a few crucial components to a chicken coop, which this great infograph from Gardenaholic.com put together. They also have a great article on how to raise backyard chickens if you’re interested in more information.

    The basics that this infograph covers are appropriate roosts for the chickens, as they like to perch to roost, or sleep, a horizontal bar set up in the coop is a great option. They will also need nesting boxes-they like to burrow into small, safe places to lay their eggs. Food and water is of course crucial as well, you’ll need a sturdy, easy-to-access container for both food and water that can’t be accessed by potential predators.

    Speaking of predators, securing the coop from predators such as foxes, coyotes, birds of prey, raccoons and other animals who look at live chickens as a delicious meal. They will also need lots of fresh air so good ventilation in the coop is key.  They are also very vulnerable to too much rain or heat, so they’ll need plenty of overhang for shade and water protection. A dust bath is also great to add to your coop so your chickens can clean off-which is really fun and cute to watch, by the way.

    Overall, this is a great little guide to what you’ll need to consider for your chicken coop. You can also look at Pinterest and YouTube to see what other people have done for their ideas-this is great to get an idea of what works in real-life scenarios for a chicken coop.

    Your coop doesn’t have to be fancy-it just needs what the chicken will need to be comfortable, safe and happy. Happy chickens means more eggs-so that will make you happy too!

    chicken-coop-diy-budget-checklist

    If you enjoyed that, you may also like:

    Advanced Gardening Course To Accelerate Your Food Production…

    Survival Medicine & Wilderness Survival…

    Survival Techniques From Long Ago, Re-purposed For The Modern Era…

  • 3 Tips for Prepping When You’re Broke

    3 Tips for Prepping When You’re Broke

    Whether you’re prepping in case of a disaster, you’re preparing to be an off-grid homesteader, or anything in between, you know that prepping and learning survival skills can take up a lot of time and money. That really doesn’t have to be the case, though. In fact, there are a number of ways that you can be prepared, even when you can barely pay your bills.

    Focus on Learning New Survival Skills

    First of all, being prepared isn’t just about buying cool equipment that will help you put up a tent anywhere or stay warm outside on the harshest winter night. It’s also about being mentally and physically prepared. It doesn’t cost anything to work on your situational awareness skills, to practice tying better knots, or to start composting in your yard.

    Shop Second-Hand for Gear

    You might be surprised at the quality of the gear you can find on eBay or Craigslist. More often than not, people buy camping and survival gear and they never use it or only use it once. Then they sell it at a steep discount, where broke preppers like you can get a great deal.

    Start Couponing at the Grocery Store

    Want to stockpile food without spending your whole grocery budget and then some? Start collecting coupons. You can usually save a lot of money and buy enough canned and dry goods to eat now and stockpile more for later. You can also use coupons to save on a lot of other items you can find at the store. Sometimes those buy-one-get-one deals can really come in handy.

    These are just three of the best ways to continue prepping, even when you don’t have any extra money. Can you think of other ways to get creative, be frugal, and continue to prepare your home for disaster or off-grid living?

    Sources:
    http://hubpages.com/politics/Doomstay-Prepping-When-Youre-Poor
    http://www.theorganicprepper.ca/what-to-eat-when-youre-broke-08112013
    http://modernsurvivalblog.com/preps/how-to-be-prepared-when-youre-dead-broke/

    If you like this, you might also like:

    Advanced Gardening Course To Accelerate Your Food Production…

    Survival Medicine & Wilderness Survival…

    Survival Techniques From Long Ago, Re-purposed For The Modern Era…

  • Tips for Saving Seeds

    Seed storage seems like it should be simple, but it’s actually more involved than you might think. After all, you don’t want your seeds to germinate while they’re in storage. With proper storage, though, a good collection of heirloom seeds could help you grow a full garden, complete with all of the fruits and vegetables for your cooking needs.

    Put Them in the Fridge and Leave Them There

    First of all, seeds do best when they’re stored in cooler temperatures. 40 degrees – the temperature of most refrigerators – is perfect for keeping seeds fresh and avoiding early germination, mold, and other problems. After you put your seeds in the fridge, though, don’t take them out and move them around a lot. Fluctuating temperatures are bad for seeds, as are freezing temperatures, so keep them away from the freezer.

    Keep Them in the Dark

    Whether or not you choose to keep your seeds in the refrigerator, you should never store them in a fully lit room. Seeds respond to light, so keep them in opaque bags or containers, and store them in a cool, dark place.

    Keep Them Dry

    Moisture can lead to mold and/or germination, so you want to make sure that they stay dry. Keeping them in a mason jar is a good idea, and Mylar bags work really well for this, as well. You can then place these in a paper bag or other opaque container to keep light out. You may even want to store them with some kind of desiccant or oxygen absorber to further dry them out.

    And, if you’re using your seeds in your garden each year, go ahead and rotate them, using the oldest ones first. This is a good way to ensure that you get better crops and that none of your seeds spoil while you’re storing them.

    Sources:
    http://www.backdoorsurvival.com/8-tips-for-storing-seeds-for-the-long-term/
    http://www.rodalesorganiclife.com/garden/10-tips-storing-your-saved-seeds

    If you like this, you might also like:

    Advanced Gardening Course To Accelerate Your Food Production…

    Survival Medicine & Wilderness Survival…

    Survival Techniques From Long Ago, Re-purposed For The Modern Era…