Page 11 of 16
1 9 10 11 12 13 16
Outdoors – Page 11 – Homesteader Depot

Category: Outdoors

  • 3 Effective Sheep Shearing Techniques

    3 Effective Sheep Shearing Techniques

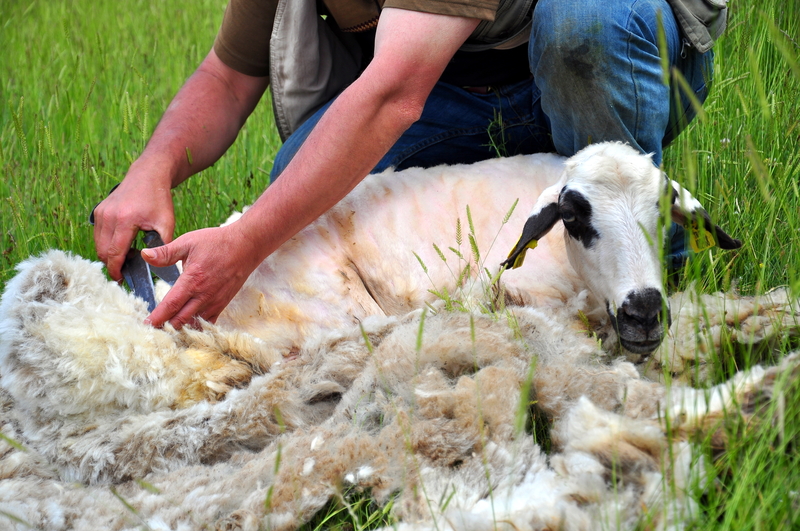
    Despite some claims from animal rights groups, shearing is necessary to maintain the health and comfort of your sheep.

    There are 2 main reasons you need to have your sheep sheared once a year.

    • If the sheep’s thick wooly coats are not removed before the summer months, they can become very uncomfortable. Additionally, the amount of dirt that can amass and become matted to their bodies could develop into a health risk.
    • The wool from certain breeds is a valuable commodity and a good source of annual income. When raised correctly with a proper diet, a single sheep can grow up to 10 pounds of wool.

    Whether or not you are keeping them as a source of income or food, your sheep will need you to get them ready for the summer months to maintain a happy and healthy lifestyle on the farm, ranch, or homestead.

    Note: To make this process go a lot faster, take a look at these awesome shears I found on Amazon at a 65% discount right now <PanelTech Sheep Shears>

    There are a number of techniques out there, and like a person’s handwriting, each individual will develop a style of their own as they practice and get better.  Go get started, here are some basic steps, and tips to follow.

    Starting Position

    Some experts say start by laying the sheep on one side, others recommend starting on their backs with their feet in the air. Depending on the size of the sheep, you can decide what will work best for you.

    Shearing the Brisket

    No matter the technique or starting position you use, most experts say to start shearing on the brisket, or belly area.  If you are planning to sell your wool, the belly area is often too dirty to sell, so starting there will allow you to tackle the worst areas around the belly and crotch areas and get rid of them before you move on to the more valuable areas.

    When you start shearing, make sure your blows (strokes) are long and confident.

    Move down the belly area, around the crotch and the tail.  Separate the wool removed from these areas and discard.

    Start on One Side and Work Toward the Middle

    The removal of the brisket wool will leave a nice starting place to move onto the sides.

    To continue, start on the back leg, shear around it, and then shear up to the shoulder in a long clean blow. Trim the head and neck then work your way back down and around.

    Repeat this on the other side then finish with the back.

    When finished the ultimate goal is to have a single layer of wool that can be rolled or folded up for transport.

    Tips for Maneuvering Your Sheep

    To get your sheep into the positions needed to access each area, you can apply the following techniques.

    To control the head

    Place your thumb in the sheep’s mouth behind the incisor and wrapping your fingers under its chin.

    Take a firm but gentle hold of one of the ears and use to guide the head and body.

    To hold in place while shearing

    Rest the sheep’s body against your legs or between your knees.

    Lay the sheep on its side and straddle with your legs.

    Keep in mind, the calmer and more comfortable the sheep is, the less they will want to wriggle out of your control to get away.  This is especially important for larger sheep breeds to ensure a successful shearing experience.

    Sheep shearing is not an easy task, but the rewards are worth the effort, both for you and your sheep.  Professional shearers make it look easy but remember, they’ve had years and years of experience.  Like most things worth doing, practice makes perfect.

    Bonus: Want to take your identity off the grid?  <<<Click Here and Become INVISIBLE>>>

  • Can Rabbits Contribute to a Homestead?

    Can Rabbits Contribute to a Homestead?

    Not just for pets, including rabbits on a homestead can be a great way to contribute to your food supplies, both as a food source and a natural fertilizer for your garden.  If you’re into fiber arts or want some extra money, angora rabbits give an additional benefit just by growing their fur.

    Rabbits for Manure

    A single rabbit can produce approximately a pound of dry manure each week.  That’s roughly 50 pounds a year. This high-quality soil conditioner is usually low in weed seeds thanks to the prepared foods typically used to feed them.  It also contains an excellent nutrient content that beats cows, horses and goats both when used fresh and when dried.

    The application can be done a few ways depending on what you need it for.  If you are feeding ornamental plants, top-dress them with fresh manure.  For produce gardens, mix it with your compost pile and let sit for at least 3 weeks before spreading on the garden areas.

    Need worms for your compost pile?  Start a worm farm under the rabbit hutch using red wigglers.  This will assist with odor control in the hutch, and provide you with a great source of worm castings, compost worms, and the manure.

    NOTE:  If your wigglers freeze to death during the winter, just replace them come spring. Learn more here: “Worm Farming”

    Rabbits for Meat

    Once you’ve gotten your “herd” started, rabbits are a really good way to add to your food sources with very little extra money.  We all know the old cliché “breeds like rabbits” and it’s true.  A well cared for trio will provide low-fat, low cholesterol, high-quality meat for years to come.

    Related Article:  “Simple Guide to Raising Meat Rabbits”

    Although some breeders consider some rabbit breeds too little to butcher, like the Mini Rex, any rabbit can provide meat when you need it.  If food is going to be your primary goal for adding rabbits to your property, some breeds developed especially to be a meat source include the Californian, the New Zealand and the Giant Chinchilla.

    Rabbits for Fiber

    Although not great for eating, angora wool rabbits will provide fertilizer and a little extra money for your trouble.  If you know someone into fiber art, this resource is amazing for fiber artists. It is excellent for spinning and weaving or can be sold raw.

    Of course, with added benefits comes added responsibility.  Angoras need regular grooming to keep them in immaculate condition, sometimes up to once a day.  Wool collections can be done quarterly by shearing.

    If fiber production sounds like a great idea, here are some breeds that will work.

    English Angora

    A smaller type of angora, English rabbits require more maintenance than other angoras.  But, at an average of 5-7 lbs., you can have a few more in the same space and still receive a good production of wool.

    French Angora

    A little larger at 7.5 to 9.5 lbs. the French rabbit’s wool is a litter rougher than the English but needs less maintenance.

    Giant Angora

    True to its name, the Giant Angora Rabbit averages about 10.5 lbs.  Giants are white with red eyes.

    Some Final Info that Could Become Veeery Helpful…

    To keep your rabbits healthy and reduce the possibility of stomach and tooth issues, avoid sweet foods like fruits and carrots and focus on grasses, and non-sweet veggies.  Sugary foods can lead to an imbalance of bacteria in their tummies and make them sick.

    And, finally, an important word on reproduction.  Rabbits are able to conceive again less than an hour after giving birth!  (Yikes!)

    So, if you’re long-term plans are to start slowly, keep a firm eye on the male at all times!  If they aren’t already, separate them and keep them separate before, during and immediately after the birthing.

    More Info:  “Comprehensive Guide Covering Everything You Need to Know About Raising Rabbits”

  • DIY Animal Shelter

    DIY Animal Shelter

    Many structures you see on larger farms will often rival a designer house in style and amenities. However, if design awards are not what you are looking for but only to keep your friends protected from the elements, this basic structure will do.  A simplified shelter with basic material will satisfy all of these requirements.

    What You’ll Need

    • 3 Posts = Eight-Foot (8’) Long Pressure Treated Four-Inch by Four-Inch (4”X4”)
    • 3 Posts = Ten-Foot (10’) Long Pressure Treated Four-Inch by Four-Inch (4”X4”)
    • 6 Roof Boards = Eight-Foot (8’) Long Pressure-Treated Two-inch by Six-inch (2”X6”)
    • 17 Roof Joists = Ten-Foot (10’) Long Pressure-Treated Two-inch by Six-inch (2”X6”)
    • 34 Joist Connectors
    • Framing Nails
    • 34 Metal Hurricane Straps
    • 160SF of Roofing Materials
    • Roofing Hardware
    • Siding (optional)
    • Basic Tool Kit
    • Circular Saw

    Laying Out the Grid

    To begin, plan the location of your shelter by laying out a 2 by 3 grid with the point 8’ apart.  This will be where the poles are positioned.  When you are finished you will have an 8’ x 16’ area with 2 rows of 3 posts each

    Dig the Post Holes

    The post holes should be a minimum of 2’ deep and 1’ wide. If you live in a consistent freeze thaw cycle area, increase your minimum depth to 4’.

    Set Your Posts

    Set your 4” x 4” posts into place, all the 8’ long post in one row of three and all the 10’ long posts in the other row of three.

    The 10’ posts will form the front of the barn, so make sure you place them on the side you plan to be the front.

    Pour enough pre mixed cement to fill the hole at least 1’ (12”).

    Wait at least 2 days for the fill to set.  Check the manufacturer’s directions for precise mixing and setting instructions.


    Once set, backfill the rest of the hole with the loose dirt removed when dug.

    Compress the dirt as you fill in the space, checking regularly to make sure your post remains square and straight.  You can use your string line to gauge if it’s straight.  Once each pole is backfilled they will probably be slightly different heights due to differences in the hole depths and settling.  Determine the height of the shortest pole in each row and trim the top of the other 2 to make each row even.  Remember, you want an angled roof, so keep the front row at least 1-2 feet higher than the back.

    Roof Support Beams

    Attach your six 8’ long 2”x6” boards around the top of the structure, connecting the posts and forming a large rectangle at the top.

    Roof Joists

    For this simplified angled roof, traditional trusses are not needed.  Use your roof joists to join the front and back sides of the structure across the top.  You can buy connectors to make this job easier and more secure.  Starting at one end of the stall, attach the roof joists 12” or 1’ apart from each other, with the 2 ends flush with the roof boards.  Connect the joists and roof boards with hurricane straps for added strength against high winds.

    Roofing Material

    Finish your roof with the roofing material of your choice.  Follow the manufacturer’s instructions for installation and additional accessories or tools needed for the process.

    Siding

    For basic siding that can be used as a wind break, use additional 8’ long 2x6s placed horizontally around at least 3 sides of the stall.  Start the bottom on the ground or a few inches above it.  Create “stripes” around the barn by spacing each level an inch or two above the previous one until you reach the top

    Once you have the basic plans down, you can easily utilize them for additional structures on your land for extra storage or workspace.

    Try this:  DIY Home Energy System

  • 3 Keys to Choosing the Perfect Livestock

    3 Keys to Choosing the Perfect Livestock

    A farm or homestead without livestock seems unusual, to say the least.  Whether you see yourself with a flock of cheerful chickens, a herd of graceful goats or a few calming cows, livestock are a valuable food source that should be planned for carefully, then cared for consistently.

    Are You Ready to Be Available Every Minute of Every Day?

    Are you prepared to be “on-call” for your animals 24 hours a day, 7 days a week, 365 days a year? When you enter the world of livestock, a few things to be aware of are:

    • Newborns usually come in the middle of the night.
    • Orphaned or abandoned babies will need you to feed them around the clock.
    • Escaped animals and flattened fencing will need attending to immediately, even in 110o F heat.

    Just like having kids, keeping livestock can tie you down in ways you can’t even imagine.  And, they won’t eventually grow up and learn how to take care of themselves like kids will.

    Basic Ownership Preparation and Considerations

    Before you add animals to your homestead, evaluate your situation and skills to see if you have what you need to support the new lives coming in. The following points will help you in your evaluation.

    Research, research, research-Knowledge is power!  Educate yourself on each of your options before you make any purchases.

    Talk to the Local Vet-Find out what animals the veterinarians in your area are qualified to treat.  This info alone can go a long way in helping you decide what livestock to get.

    Similar Article: “Are You Ready for Livestock?”

    Look for a Soul Mate-If you have a loud and abrupt personality, and so does your livestock, you could easily run into more issues than you want to deal with. Assess yourself and research compatible animals. In the same breath, many species require brute strength to safely interact with them, make sure you don’t take on more than you can handle.

    Enjoy the Animals-You must honestly take pleasure working with the kind of livestock you choose.

    Have Their New Home Ready and Waiting-Make sure you have ample land, structures, and resources before you finally bring them home.

    So, What Are Your Options?

    Here is some basic info on the most common livestock homesteaders consider when adding to their property.

    Beef Cattle

    Beef cattle are low maintenance and don’t need complex facilities. Most people are able to handle cattle with minimum issues and local vets can usually treat them. If you decide to go the milk cattle route, you will need to make sure you have the proper equipment to handle the milking process and storage.

    Goats

    According to a publication by Florida A&M University, 70% percent of the world population eats goat regularly. If that’s not to your fancy, dairy products like goat milk and cheese are another good protein source. Additionally, known to eat just about anything, you can picket them or corral them in a different area each day and never have to mow your lawn again.

    Rabbits

    Whether for meat, fiber, or just to have as a pet, rabbits can bring a lot to a homestead.  Just don’t go too far too fast.  Proceed carefully and know your limits.  And, keep the males away from the females unless you want your “herd” to expand exponentially.

    Related Article: “Beginners Guide to Buying Rabbits”

    So, whether you go small, medium, or large, make sure you are thoroughly prepared to take on the challenges adding livestock to your way of life can produce.

    Chickens

    Chickens need very little besides food, water, a safe place to sleep, and a few hours from you each week to gather eggs and clean the roosts.  For that relatively little amount of effort, you will be rewarded with fresh eggs and roast chicken on Sundays (or Mondays, or Tuesdays….)

    If chickens are your choice, I suggest taking a look at this guide to building the perfect chicken coops to protect your new friends and future food source <<<Click Here>>>

    Pigs

    Pigs are one of the easiest animals for your homestead because they will eat literally anything, they will be your living compost.  No need to throw away and waste anything edible, your pigs will take care of that.

    They are also great at killing parasites that may harm you other livestock, they have different internal parasites that can digest other animal parasites.  Let them graze with your other animals to help clean up the pasture and keep everyone healthy.

    The obvious reason would be the delicious meat such as ham, sausage, and bacon.

    In conclusion, livestock is a great source for food if a self-sustaining homestead is what you are looking for.  Even though it may take some time, research and hard work, the end result will be worth it.

    Here are some other food options for your “Survival Farm”


  • 3 Creative Ways to Fish Without a Pole

    3 Creative Ways to Fish Without a Pole

    Fishing can be many things, from a food source to recreation, a type of meditation for some but to others a popular competitive sport.  Often a rite of passage full of tradition that is passed down from generation to generation.  Most of us are at least familiar with the concept of fishing, usually with a rod and reel, or if out on the high seas, with a really big net!

    But, are there other ways to get the job done, especially if you are looking to feed your family inexpensively?  You bet!

    Here are 3 ways to catch fish in any situation if you take the time to gather or bring the right supplies.

    Bucket Fishing

    This method has often been used by fishermen on Lake Bruin in Louisiana.  When catfish begin spawning, the locals use a technique they refer to as “bucket fishing.”

    To try it, you’ll need a lidded bucket and some strong line long enough to reach the fish.  Cut a semicircular hole in the lid of the bucket and add enough weight to sink it while still being able to pull it up when it’s full of water (and hopefully fish).  Depending on the size of the bucket you are using, it’s a good idea to tackle this type of fishing with a buddy.

    When you are ready, sink the buckets into the water deep enough to reach the fish.  During spawning, catfish enter the bucket to spawn and become trapped as the bucket is lifted up rapidly enough to keep them in.

    Once brought to the surface, either tie off the bucket to the side of the boat and transfer the fish one by one to a live well or stringer or lift the bucket fish, water and all into the boat and move on.  This technique has proven to be highly effective.

    Funny Video:  “This is not the bucket fishing I’m talking about”

    Bow and Arrow or Spear Fishing

    In a survival situation, this can be particularly effective if you have the skills and not a lot of supplies.  With a decent knife, you can create your own spear, smoothing it and sharpening the end then hardening the tip over the coals of a fire.

    Related Article:  “DIY Bow and Arrow”

    Once your spear or bow and arrows are created and ready, attach a line, if available, and go “hunting” under the surface of the nearest viable water source.  If you are fishing in a lake, an attached line will most likely be needed unless you are able to stay in very shallow water and have the fish come to you.

    Gap Netting

    Even with the barest of supplies you can build a net and use this method to get your next meal. All you need is a ball of twine and a knife or something sharp for cutting the twine. This method will work best in a shallow river or stream, but a natural viaduct between 2 larger bodies of water, like 2 lakes, will work if needed.

    If you already have a net, fantastic!  Here is what to do with it.

    Find an environment where water currents flow through a narrow area, like some rocks or fallen tree limbs, or a narrow crossing from one side to the other.  To create an area, fill in the space from either side with rocks or other debris.

    Learn More: Click here for MORE life-saving survival tips

    Position your net on the side of the gap that faces the current and secure it into place.  Run a stick through the top of the net to keep it from collapsing.  If possible, prop the stick upon the rocks you’ve used to create the gap.

    Now, you can encourage fish to swim in the direction of your net by beating the water or tossing rocks systematically further out and then closer to direct them toward you.

    After you’ve got through a systematic routine to herd the fish, stop and check your net.  Repeat the herding steps until you’ve caught something.

    Although some may feel these 3 methods aren’t very sporting, when you are fishing to feed yourself and your family and not merely as a form of recreation, that’s not what matters.  What matters is staying alive and healthy.


  • Homemade Suet Cakes for Chickens

    Homemade Suet Cakes for Chickens

    Suet cakes are a great treat for your chickens, especially as the summer heat creeps in and they have a hard time sticking to their normal activities.

    Chickens love to peck and scratch, it’s truly what they live for. If you have chickens in a coop who can’t freely forage this way, they might end up getting bored and unhappy. And bored and unhappy chickens means less eggs and less delicious meat! It is vital not just for the animal’s quality of life but also for the “services” they provide you to keep them occupied and entertained.

    Homemade suet cakes are a great way to do this! The tightly packed little cakes full of delicious treats (well, treats to a chicken) will keep them happily busy pecking away to get them.

    This recipe is a very easy and healthy way to provide your chickens with this diversion. It contains coconut oil, which is a great source of fat for your chickens, as well as naturally antifungal and antibacterial, which is super crucial for keeping their digestive systems, feathers, and feet clean and healthy.

    A note: this is just a treat for your chickens, and shouldn’t be used as a replacement for their regular feed or time spent outdoors if you’re able to let them roam at all. It’s just a fun way to supplement their regular diet and daily activities.

    Do Laundry With NO DETERGENT…Heres How>>>

    Ingredients and supplies 

    • coconut oil
    • mix of grains (pre-mixed chicken feed, or any combination of grain or seed your chickens enjoy)
    • Muffin tin
    • Room in your freezer for the muffin tin

    Directions 

    1. In a saucepan over low heat, melt your oil. How much you need will depend on the volume of the grain you use, but you can start with about 2-3 cups.
    2. Once the oil is liquid, stir in your grains.
    3. You will want to completely coat the grains with oil, so that there’s hardly any oil pooling around them. However, you don’t want there to be any dryness in the mixture. Try to think of the oil hardening; you’ll want a ratio that will allow for the oil to hold all the grains in place and form a cake.
    4. Spoon your mixture into the muffin tins. Flatten with a rubber spatula at the top.
    5. Freeze for about an hour, then remove.
    6. Tip your muffin pan upside down to remove the cakes. At this point, you can give one to your chickens and put the rest in a ziplock bag to keep in the freezer.

    In the summer heat, your bored chickens will love this healthy, fun, and not to mention cold, treat!

  • Essential Items for Your Emergency Survival Kit (Infographic)

    Essential Items for Your Emergency Survival Kit (Infographic)

    Whether you’re a survivalist, prepper, homesteader, or simply someone who wants to create a culture of self-reliance in your home, you need to be prepared for emergencies.

    It can be overwhelming thinking about everything you might need to survive long-term, but it’s always prudent to simply start with the basics. Every family should have a basic emergency survival kit, and this infographic from SHTFPreparedness.com is a great guide for how to build this kit and what you should have in it.

    These simple items are essential for any kind of emergency, and even if you’re not set up with enough food and water to survive a total zombie apocalypse, having this stuff on hand will greatly impact your odds of survival if there is a disaster or emergency in your area.

    If you enjoyed this, you might also like….

    Is Your Home Secure?

    Natural Healing Solutions…

    Why Everyone is Switching to the Primal Diet…

  • Make Money on Your Homestead

    Make Money on Your Homestead

    You love the idea of living simply and living on a homestead. However, you probably also love the idea of having some extra money coming into the household. Fortunately, you can combine these two loves and find some interesting ways to make money from your homestead, and it is easier than you might imagine. Here are just some of the different ways that you can start using your activities on the homestead to earn more to supplement your life.

    Grow and Sell Excess Food

    If you are already growing a nice garden, and perhaps some fruit trees to provide for you and your family, consider taking some of the excess items that you make and selling them at a farmer’s market. It is something you are already doing, and you do not want the food to go to waste, so why not make some money from it?

    Make and Sell Handmade Goods

    Consider some of the goods you are making for you and your family already. It could be something such as blankets and quilts, homemade soap, or even homemade artwork. No matter what you are making, there is a good chance that there will be a market for it online and offline.

    Sell Honey

    Another option is to start raising bees and collecting honey. People love to buy natural honey, and it is another good item if you have a farmer’s market in your area.

    Teach Homesteading

    Many people are interested in the homesteading lifestyle, and they want to try it out first. You can teach them the ins and outs of homesteading by having them come to your property to learn. In fact, you can essentially charge them to help with your chores and work on the homestead!

    Keep in mind that these are just a few of the different ways that you can start to earn from your homestead. Think about the things you do on your property that you can now start to monetize.

    How to Make Money From YourLivestock

    What type of livestock do you have on your homestead? You probably have some great animals that are working to provide well for you and your family. However, have you ever stopped to think that you might be able to get even more out of the animals? In some cases, your livestock will make money, providing you with some extra income. Let’s check out a few of the ways that your animals could make money for you.

    Selling Excess Eggs

    If you have some chickens, they are going to keep laying eggs each day in most cases. This means you will have more eggs than you know what to do with. Consider selling or bartering with the excess eggs. For example, if you have some neighbors who make soap or honey, trade the eggs for what you need.

    Selling Wool

    If you have sheep, you can only use so much wool, too. You can always sell some of the excess wool, or you can use it to make products that you can sell.

    A Petting Zoo

    Here’s an idea you might want to consider. If you have some animals such as goats, sheep, pigs, and the like, you may want to set up a petting zoo. For a few dollars, parents and their kids can come out to the farm and see the animals up close and learn more about life as a homesteader. The animals can be a real draw, especially when there are babies. Pony rides and horse rides are yet another option.

    These are just a few of the different ways that you can make money from your livestock. Consider the animals that you have and just how you might be able to profit from them, and then reinvest that money back into the homestead. There are tons of options.

    [Video] – What Really Happens When You Bury a Shipping Container?