Page 9 of 16
1 7 8 9 10 11 16
Outdoors – Page 9 – Homesteader Depot

Category: Outdoors

  • 5 Things to Consider When Building an Aquaponic System

    5 Things to Consider When Building an Aquaponic System


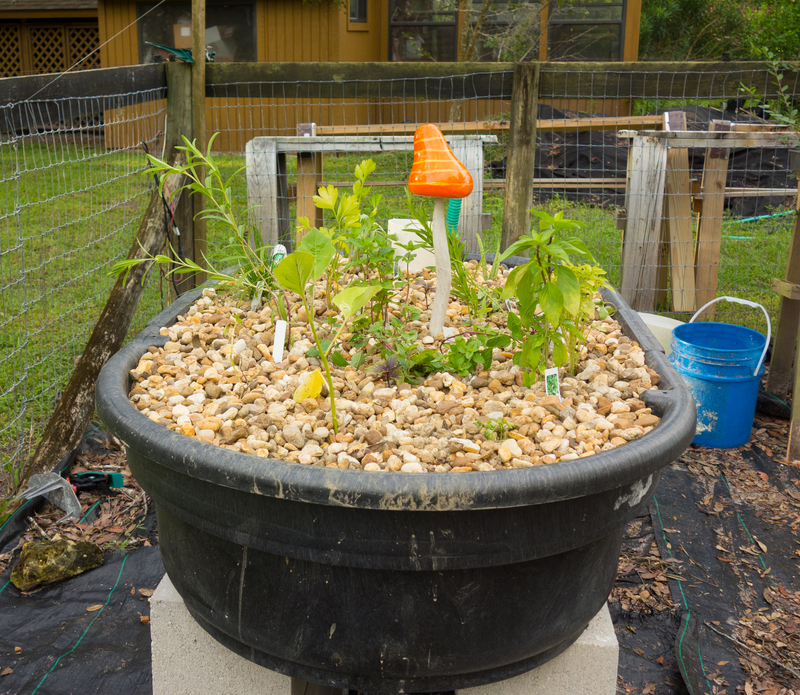
    Setting up an aquaponic system, although quite an easy task, requires some basic knowledge of aquaponics. If you have decided to install such a system in your house, then you probably know what this is and how it could help you. However, there may still be things which can interest or help you. Below you will find 5 essential things which you should know in order to obtain spectacular results.

    1. Location
    The place where you put your aquaponic system is highly important for the way in which the plants and the fish will develop. In order to obtain great results, you should make sure that the temperature from the room is not too high, nor too low, that there is enough light for the plants to prepare their food and that no wind or extreme weather conditions will reach them. Also, make sure that no harming chemical substances can get inside the water as this means death for both your fish and your plants.

    2. Oxygenizing the water
    The happier your fish are, the better your system will work! This is why you need to oxygenize the water on a daily basis and make sure your fish have all the “comfort” they need.

    Related Article: “Advantages of Aquaponic Farming”

    3. Choosing your fish accordingly
    The aquaponic system works well with almost all types of fish. Yet, there are states in which you are not allowed to grow whatever type of fish you want, so you will want to see what types of fish you are allowed to have before starting your aquaponic system as you do not want any problems with the law.

    4. Placing the pots
    In order to make the harvest much easier, you should place the pots or the entire system at your waist level. This way you will not have to bend over, making the daily care routine a much easier activity.

    5. Adding additives
    There are cases in which your fish may not provide all the nutrients needed for your plants. If the quantity is lower than what the plants need, then you will have to supply them with the respective substances. In most cases, you will need to add iron, calcium carbonate or potassium carbonate.

    Aquaponics is an easy activity which will provide you with the necessary vegetables and fish in a short amount of time. Just follow the tips mentioned above and you will have great success in your attempt to grow organic food in your home. 

  • Advantages of Aquaponic Farming

    Advantages of Aquaponic Farming

    Aquaponics is a new way of approaching farming. Unlike traditional agriculture where you needed plants to grow vegetables, with aquaponics you need water and fish in order to have healthy food on your table each and every day. Basically, aquaponics relies on the interdependence between fish and plants: the fish produces bio-nutrients for the plants, while the plants clean the water, creating a perfect environment for the fish to grow and develop. It is a blend of aquaculture and hydroponics that has plenty of advantages. If you need some reasons to get your own aquaponic system started, then here are some of the advantages you will get once you assemble it.

    First of all, you will have fresh organic food on your table each and every day, regardless of the hour when you decide to cook your meals. You simply take your tomato, cucumber of your basil from the aquaponic “field” and use it for your meals. It is as easy as it sounds.

    The second best thing about it is that you not only grow vegetables, but you also have plenty of fish. Whether you want them for cooking tasty meals or simply for your décor, they are a great addition to your home! They also have a practical purpose, as you will never have to use chemical fertilizers on your plants, thus obtaining real organic food.

    If you ask how difficult is this system to put in practice, the answer is extremely simple. Not only will you be able to assemble it all by yourself, without the help of your family or neighbors, but you can also put it wherever you want. If you move from one house to another, then you simply disassemble the system and take it with you! What can be easier than that?

    Another great advantage of the hydroponic farming is that it offers you financial independence and control over your money. You know exactly how much you need to spend on your food and you will no longer depend on the market for your veggies’ supplies.

    Related Article: “5 Things to Consider When Building an Aquaponic System”

    Last, but not least, it involves no dirty hands and clothes, no bending and digging, no land and little maintenance time, so it will be like your veggies and fish grow all by themselves! Quite an easy to put in practice system, suitable for all types of people, even for busy and impatient ones!

    There are plenty advantages that the aquaponic system can offer you! Your health and your comfort will be improved, while your savings will considerably grow with the constant use of the aquaponic type of farming! If this is what you want, then why not give it a try? 

    [Boost Your Plants Growth] Step by Step how to build your own Aquaponics System <<<Access Here>>>

  • Harvesting Your Own Maple in Just a Few Simple Steps

    Harvesting Your Own Maple in Just a Few Simple Steps

    Tapping maple trees for sap may seem like a daunting task. However, it really is not hard to do. In fact, this outside activity can be fun as the days get warmer in anticipation of springtime.

    But what if you are not sure which trees are maple? Or which maple trees are the best to tap? Be assured that being self-sufficient doesn’t mean you need to be a pro at tapping. Why not start out with tapping just a few trees? You could join in with neighbors or homesteading friends to see if it is something you want to do every year.

    The time of year to do the tapping depends on when the temperature warms up over 32 degrees in the day but still freezes at night, generally from February through late March or early April. With the following tips, you’ll be serving homemade pancakes with maple syrup in a matter of a few weeks.

    Preparing to Tap

    The tools needed are a hammer, a bucket with a cover (or buy a maple pail at the local home improvement store), a drill of some sort, 5/16 or 7/16 drill bit, and a few spiles (or taps). To cook the sap, having two crockpots (a large and a medium size) works best but you can also use large and medium-size pots. You need a colander, some coffee filters, jars for the syrup, and something like a giant pitcher to store the sap.

    Finding the Best Maples

    If you didn’t get the chance last fall to mark the trees you want to tap, identifying the right type of maple trees by other means is possible with a few tips from us. The best kind of sap to tap comes from the sugar (aka hard, black, or rock) maple and you can tell a sugar maple by the type of branches they have. Their branches are what is called “opposite” as opposed to “alternate” branching. Opposite means the branches shoot out from the stem directly across from each other in opposite directions in a uniform manner, whereas alternate branching means that the branches shoot out from the stem alternating without being directly across from each other. If there are any leaves left on the tree or on the ground to examine, sugar maples are usually big with a smooth outline of the leaf, not real jagged or tooth-like. Don’t worry if you get the wrong kind of maple; you will still get some sap.

    Tapping

    Look for older large size sugar maples so you can put two or three taps in one tree. You should drill the hole for the spiles on the south side of the tree about at chest height at a slightly upward angle so when you hang the bucket, it won’t slide off the spile. Pound the spile into the hole with the hammer and place the bucket with the cover on it to keep pieces of wood or leaves from getting blown into the sap. To get the sap to start flowing, you may need to blow your hot breath into the spile. Once it starts, you should check the buckets every day and remove sap to store in the fridge until you have enough to start cooking a batch in a large crockpot.

    Making Maple Syrup

    You should cook the sap within seven days of harvesting it. The best way to prepare sap is in a large crockpot. To strain the sap, place a colander with several coffee filters spread out and flattened to pour the sap through into the crockpot. Fill the crockpot almost full with sap. Bring it to a simmer on high setting and then turn down to low until it has reduced down to half, which will take about eight hours or overnight. If you have more sap to cook, pour the melted amount into another smaller crockpot. Keep on warm until it gets darker and the consistency of syrup. Keep filling the large crockpot with more until you are finished with the season’s amount.

    Conclusion

    Now, that wasn’t so hard, was it? You may have surprised everyone with more than you expected. If so, you can always have pancakes for breakfast, lunch, and dinner, plus give some away as gifts!

    [Discover] The ONLY battery reconditioning resource that lets you easily bring nearly any type of dead battery back to life…<<<Learn How Here>>>

  • Easy Checklist to Winterize Your Garden

    Easy Checklist to Winterize Your Garden

    As a homesteader, you may be wondering where you’re going to get the energy for preparing your garden for winter after all the hard work of harvesting the vegetables from your garden.  Remember how happy you were when you realized that you wouldn’t need to buy any vegetables all winter long? Keep that in mind along with the fact that it will now be cooler to work outside.

    You can print out the below list to check off items as you complete them and before long you’ll be done so you can take a break for a few days. Those gardeners in warmer southern areas can ignore the items not applicable.


    Before Winter Check List

    • Harvest any remaining root plants such as potatoes and carrots after their foliage has withered and died
    • If you didn’t harvest all crops of specific vegetation such as winter squash, eggplant or cucumbers so you could collect their seeds, now is the time to pick before any frost
    • Remove and discard all dead vegetation and rotten vegetables or fruit to keep away any pests that may cling to them for the winter
    • Rake to remove small debris and to turn the soil
    • Now is the best time to do a soil test for PH levels and minerals; adding a fertilizer such as fish and seaweed is excellent for adding minerals
    • Be sure to have some covering handy for signs of the first frost and cover annuals as soon as there is a hint of frost on the way
    • Cut back dead leaves on perennials that can survive winter and rose bushes, cover with about 3 inches of mulch; fragile rose bushes need protective covering if in colder climate
    • Water shrubs and evergreens before a freeze and mulch after freeze
    • Root crops such as parsnips, arugula, or sprouting broccoli can be stored in the ground for the winter (overwintered) and depending on your USDA zone, will need the protection of heavy mulch, a thick layer of straw, tarp or row cover
    • After the first frost, cut back and dig up perennial bulbs such as gladiolus that can’t survive colder climates, dust off and store in breathable container like a cardboard box in a cool, dry place; cover beds with evergreen boughs
    • Repair raised box beds and make more boxes if needed
    • Pruning of shrubs that bloom in the summer should be done after all leaves are gone and while dormant or in early spring; however, hydrangea types such as mopheads should be pruned in June


    More Garden Tips

    • If you haven’t started a garden notebook yet, this is an excellent time to make notes on how each plant did, what problems it may have had, and if any areas didn’t grow as well as others.
    • To tell when to harvest potatoes, rub the skin and if it doesn’t scrub off quickly, it’s ready.
    • To save time and wear on your back when pruning plants, use a pole pruner to remove stems down to the base of the plant.


    Conclusion

    Winterizing your garden is the best way to ensure it will come back next spring looking as good or better than it did this year.  How much time preparing your garden for winter will take depends on how big your garden is, what type of plants you have, and if applicable, when the first frost usually comes and how cold it usually gets where you live.

    No matter where you live or what type of garden you have, we want to wish you a Happy Homestead Winterizing!

    [Food Storage] – How to build a small root cellar in your backyard <<<Watch Short Video Here>>>

  • Your Guide For Need to Know Bullet Information

    Your Guide For Need to Know Bullet Information

    When it comes to bullets, there is a LOT of information out there.  Basic knowledge can be very useful when determining what type of firearm you may want to try out or eventually purchase.

    Ammunition itself can be extremely intimidating to the novice.  Selecting the right ammo for personal defense or hunting is a very important decision that can affect performance and safety. In this article, we’ll discuss some basic terms and then go into more detail on common ammo types.

    First, let’s take a quick look at the most common types of weapons used by civilians for sport, home or personal defense.

    Revolver – Named for its revolving cylinder that is usually made up of 6 chambers designed to hold one cartridge each.  For the newbie, these are the types used in classic westerns.  Think “6-shooter.”

    Pistol – This is the most common handgun used today by pros and amateurs alike.  It’s a hand-operated weapon like the revolver but distinguishes itself primarily by using “clips” of ammo that can be changed out during use to expedite firing.

    Rifle – The general term for any shoulder firearm that discharges its ammo through a barrel at least 16 inches in length or more.

    Basic Terms You’ve Probably Heard

    Full Metal Jacket (FMJ) – The most common type of bullet.  Made up of a softcore metal encased by a harder metal.

    Hollow Point (HP) – Designed to expand on impact.

    Open Tip (OTM) – Similar appearance to hollow points but the openings are too small to expand in the same manner.

    Ballistic Tip – A hollow point covered with plastic to copy the profile of a Full Metal Jacket.

    Bird Shot and Buck Shot – Shotgun rounds that consist of small pellets within in each shell.


    Bullet Size & Caliber

    For firearms, “caliber” refers to the diameter of the inside of the barrel (also the diameter of the bullet used). Some common bullets include:

    .22LR – The most common caliber in terms of units sold.

    .25 ACP – Slightly larger than the .22 and slightly more powerful.

    .380 ACP – One of the more popular caliber, the .380 has a low recoil making it easier to handle if you are just starting out.

    9mm – Probably the most popular, it’s the same size as the bullet used in the .380 and the .38 Special. The difference lies in the amount of gunpowder used in each.

    .38 Special – Most often used in revolvers. More recoil than the .380, especially when used in lighter weight revolvers.

    7.62x39mm – A Soviet rifle round used in the AK-47. Moderate recoil.

    .223 / 5.56x45mm – These 2 (.223 and the 5.56 Remington) are almost equal in dimensions.

    5.56 has higher pressures.  The .223 rounds can be fired in a 5.56 rifle, but the 5.56 rounds cannot be used in a .223 rifle.  Each cartridge has light recoil.

    .308 / 7.62x51mm – these both also have almost the same dimension but are not able to swap rifle use.  Popular for hunting.

    12 Gauge – The most popular shotgun round, recoil varies based on the round.  Shotgun ammunition is the most versatile with birdshot and buckshot.

    Some Final Notes on Selecting Your Ammo

    When you get to the point where you are ready to select ammunition for whatever purpose you’ve obtained a firearm, it’s important to find out:

    • The ballistics of the cartridge you’ve chosen
    • Whether or not it’s appropriate for the job you need it to do (e., hunting, personal defense, target practice)
    • How prone it is to going through objects or living tissue

    That last one especially is crucial for safety and liability reason.

  • Treating Your Homestead Wounds the EASY Way

    Treating Your Homestead Wounds the EASY Way

    As the name suggests, an open wound is an injury that has resulted in an opening in the skin. Minor versions are commonplace and can be treated at home with over the counter first aid products. Fundamental wound care is a useful skill to have in any situation.  Keeping a First Aid Kit handy can go a long way to ensuring they don’t develop complications.

    In this post, we’re going to take a quick look at the different types of open wounds that can happen as well as basic instructions on how to care for them.

    TYPES

    There are four different types of open wounds.  Knowing their classification can be very helpful in an emergency situation.  Often when calling 911, the operator will ask you the nature of the injury.  The ability to accurately describe the different types of open wounds will help EMT’s prepare for what they will be dealing with on arrival.

    Abrasion

    Probably the most common, an abrasion is essentially a scrape.  Most of us probably had scraped knees (and elbows, and ankles, etc.) more than once growing up. If you were one of us, you probably remember there isn’t a lot of bleeding.

    Avulsion

    This type is probably the least common since they usually happen as a result of violent incidents such as explosions, gunshots, or severe traffic accidents.  Avulsions involve a partial or complete tearing away of the skin as well as the tissue underneath. They bleed heavily. These injuries should definitely be treated by a professional.

    Laceration

    Deep cuts or tearing of the skin are referred to as lacerations.  They usually involve sharp tools, knives or broken glass.  Shallow versions will have mild to moderate bleeding, while deep cuts can bleed much more quickly and at a faster rate, especially if an artery is severe in the process.

    Puncture

    Just like in a tire, punctures are small holes through the skin into the underlying tissue.  They can be a result of nails, needles, or any other thin sharp objects.

    Punctures may not bleed excessively.  You should determine if the wound is deep enough to damage any internal tissue or organs.  If it is, or you’re not sure, seek medical help immediately.

    TREATMENT

    For minor wounds, such as shallow scrapes, cuts, and tiny punctures, home treatment is usually standard. The primary concern is generally to make sure its cleaned thoroughly to get rid of all dirt and other debris.

    To control bleeding, just apply light pressure until it stops. Smaller scrapes can be covered with an antibiotic ointment and finished with an adhesive bandage.  If the area of the scrape is more extensive, an antibiotic ointment can still be used.  After application, a sterile dressing created from gauze, and medical tape can protect the whole area.

    Any pain management can be accomplished by taking over the counter non-aspirin products like acetaminophen or ibuprofen.

    Just avoid aspirin since it is also a blood thinner that can make bleeding more challenging to keep under control.

    If bruising or swelling also occurs, treat with an ice pack.

    When to see a doctor (If Possible)

    If any of the following can be answered with a “Yes” about the wound in question, seek medical care instead of trying to address it yourself.

    • Is the open wound deeper than 1/2 inch?
    • Does the bleeding continue despite applying direct pressure?
    • Has the bleeding lasted longer than 20 minutes?
    • Is the bleeding a result of a severe accident?

    If any of the above applies to your situation, or if you aren’t sure, its best to let a professional assess and treat the injuries to help avoid any complications in the future.

  • 5 Gardening Budget Hacks

    5 Gardening Budget Hacks

    For people who are homesteading, managing expenses is a challenge. You want to be self-sufficient and yet some of the things that you need to do don’t happen overnight. They require an investment of both time and money.

    These things are true of gardening. It’s natural to want your garden to yield enough food for you and your family. However, you must strike a balance between pushing toward self-reliance and not blowing through your gardening budget.

    That’s why we’ve put together this list of 5 cheap gardening tricks to help you achieve self-reliance.

    #1: Pre-sprout Your Seeds

    This first trick is one we like because it saves a lot of guesswork if you have old seeds in storage. (And let’s face it, most avid gardeners do.)

    Instead of buying new seeds or risking a disappointing harvest if the old seeds don’t sprout, try pre-sprouting them in a little water. That way, you can clear out the duds and plant only those seeds that have germinated.

    Larger seeds like peas and beans can be soaked overnight and then left to sprout. Smaller ones will germinate on a damp paper towel.

    #2: Till Coffee Grounds into Your Soil

    Is your soil low in nitrogen? If so, try saving your used coffee grounds and tilling them into the soil to add nitrogen.

    One of the best things about this method is that you don’t need to compost coffee grounds before you use them. Simply collect them and till them into the soil.

    Not a coffee drinker? Go to your local coffee shop and see if they’d be willing to share. Most coffee shops simply throw away used grounds. If yours participates in a green initiative and donates them, find out how to become part of the program.

    Related Article:  The Undeniable Benefits of Coffee Grounds in Your Garden

    #3: Use Mulch

    Mulch serves three purposes in a garden:

    1. It protects the soil, holding in moisture and reducing your water use
    2. It breaks down and enriches the soil
    3. It prevents weeds from growing in your garden

    When you look at it that way, it seems clear that every gardener should use mulch.

    Keep in mind that different types of mulch serve different purposes. Plastic mulch is ideal for heating up cold soil in the Spring. Carbon-based mulches like wood chips cool down the soil and should be reserved for use later in the season.

    #4: Make Compost Tea

    Do you want an inexpensive way to fertilize your plants? Try making compost tea from manure and garden clippings.

    If you keep rabbits or other animals, simply mix some manure in a bucket with weeds from the garden and some comfrey leaves. Fill the bucket about one-third of the way, then top it off with water.

    After two weeks, you’ll have a nutrient-rich “tea” to use in your garden. Because this mixture contains manure, be careful not to get it on the leaves of plants that you’ll be eating. Pour it around the roots and make sure to wash everything thoroughly before you consume it.

    Related Articles: Do-It-Yourself Worm Casting Methods for Compost

    #5: Catch and Kill Slugs without Chemicals

    Slugs will destroy your garden if you let them. One of the best ways to get rid of them involves using metal pie plates and beer.

    Place a disposable pie plate in a depression in the ground of your garden. Pour a small amount of beer into the dish. (You may want to place plates at regular intervals if you have a large garden or a big slug problem.)

    Leave the dishes overnight. When you come out in the morning, you should find a collection of tipsy slugs in the dishes. Remove them and either drown them in soapy water or if you have chickens or ducks, feed them to the birds.

    These five tricks can help you make the most of your garden even if you have a small budget.

    Do you have a cheap gardening trick you’d like to share with us? Tell us in the comments!

    “Break-Through Organic Gardening Secret Grows You Up To 10 Times The Plants, In Half The Time” Find out more here>>>

  • The Best States for Homesteading

    The Best States for Homesteading

    If you’re interested in homesteading – and we assume you are or you wouldn’t be here – you might be wondering where to start your homestead.

    It’s a good question. After all, some states are better suited to homesteading than others. You might already live in a state with a lot of homesteaders – or perhaps you live in a city and you want some advice about where to shop for a homesteading property.

    We’re here to help. There’s no one-size-fits-all answer, but we’ll run down our top picks and explain why we like them.

    Oregon

    Our first pick is Oregon, located in the Pacific Northwest. We chose it because it’s one of the most naturally abundant places in the country.

    Oregon and its neighbor, Washington, offer an embarrassment of riches for homesteaders. Berries and other natural edibles grow wild. The oceans and rivers are teeming with fish.

    For hunters and fishers, Oregon offers deer, bear, rabbits, salmon, and a host of other wildlife. People who want to live off the land would do well to consider this area for their homesteads.

    Virginia

    If you dream of owning a farm, you need to choose a place with rich, nutrient-dense soil, a temperate climate, and plenty of precipitation. Our next pick fits all those requirements. We’re talking about the state of Virginia.

    Suggested Article: “The Reality of Homesteading: What No One Tells You”

    Virginia is considered a Southern state but it’s not as hot as states further to the South. The generous annual rainfall ensures that you won’t have to worry much about irrigation. The soil is rich and capable of sustaining a wide variety of plants.

    One thing we love about Virginia is that you don’t need a ton of space to have a sustainable homestead. If you choose the right plants and use your land wisely, you can grow all the food you need even if you can’t afford a massive spread.

    Arizona and New Mexico

    You might not think that the desert is a good place to have a homestead, but don’t rule it out. One of the benefits of homesteading in the Southwest is that land there is both inexpensive and abundant.

    While the prices are unbeatable here, it is essential to keep in mind that growing plants and raising livestock in the desert is a challenge. You’ll need to work with the land and not against it if you want to be successful.

    Of course, the desert is a surprisingly bountiful place when you know what to look for. Desert-dwelling natives hunted native animals and found ways to prepare and preserve the foreboding-looking plants that grew in the desert.

    Montana

    Some people who are interested in homesteading find the idea appealing because they can change their view from city skyscrapers and suburban strip malls to views of mountains, prairies, and trees.

    There’s a reason they call Montana “Big Sky Country.” The wide-open landscapes are ideal for raising livestock and farming. The views are incomparable.

    Quick Tip:  “Why You Should Keep a Homesteading Journal”

    The weather in Montana can be harsh in the winter, but if you’re looking for a location that’s rural and has the breathtaking views you desire, you might want to consider it. And if Montana doesn’t appeal to you, Colorado is another option that fits the same criteria.

    Alaska

    When it comes to homesteading in the United States, Alaska seems like the final frontier. It’s certainly the most remote location on our list, and one of the most beautiful.

    Homesteading in Alaska has its challenges. The state is far to the North and has a cool climate. It doesn’t get much sun during the winter months and that can make solar power an unreliable source of energy.

    However, for homesteaders who don’t mind a challenge, Alaska has a lot to offer. It’s an especially good choice if you want to get away from the burdens of civilization.

    Are you homesteading in a state that didn’t make our list? Sing its praises in the comments!

    [Self Reliance Video] Solar expert Stan reveals his SOLAR INDUSTRY SECRET <<<Watch Here>>>