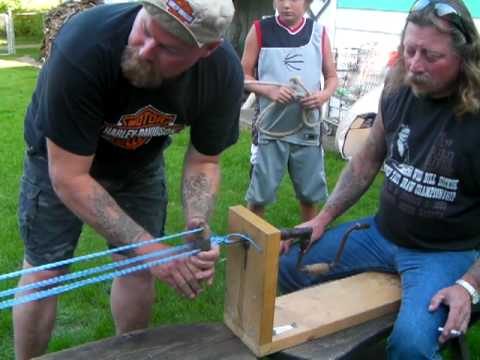
Blog

  • Does Tap Water Kill Garden Bacteria?   

    Does Tap Water Kill Garden Bacteria?  


    Some people believe that the chemicals used in treating tap water, namely chlorine, will kill or harm the bacteria in their garden soil.  Since bacteria are the base of the food web in your garden it’s important to keep them healthy and happy.  Because of this some gardeners have resorted to filtering their water with costly filtrations systems, or letting it sit out for hours or even days in watering cans to allow the chlorine to evaporate.  But is any of this necessary?  In this video we are shown the painstakingly scientific evaluation of this hypothesis.  The experiment takes place in Alberta Canada, and other areas will have slightly different treatment levels in their water, but the results are not likely to be drastically different from the ones shown in the video.  Hope this helps.

    If you liked this, you might also enjoy…

    Become A Master Healer With This Revolutionary Course…

    Traditional Hindu Yoga for Weight Loss

    Improve Your Carpentry Skills Quickly and Easily…


  • A Simple DIY Cold and Flu Tonic

    A Simple DIY Cold and Flu Tonic

    I know I’ve been sharing a lot of DIY natural cold and flu remedies lately, but I seriously don’t think anyone can ever have too many in their natural health arsenal.

    Also, a lot of the remedies I’ve been sharing are make-ahead or big batch remedies, and sometimes busy people just need a quick fix for when they feel a cold or flu coming on.

    This has been my go-to for years as I usually have these ingredients in my cupboard, they’re super healthy and all boast immune-boosting properties, and you can make it in about five minutes, and even a few different ways.

    The main ingredients are: 

    • Raw honey
    • Apple cider vinegar
    • Ground ginger
    • Turmeric powder
    • Ground cinnamon

    Options for preparing 

    You can make this with any or all of the ingredients listed; they’re all good for you individually, so it doesn’t have to be perfectly adherent to the recipe to work. This is my favorite method of preparing:

    1. Brew your favorite herbal tea. I like Hawaiian mamake tea, which isn’t very common, but if you can find it it’s also great for warding off or curing illness. Some echanacea tea or lemon tea would be ideal, or you can just use hot water. Keep in mind the flavors of what you want to blend in, for instance peppermint tea might be pretty gross with apple cider vinegar, so maybe just mix in the honey and ginger if that’s what you are brewing with.
    2. When your tea or hot water are ready, stir in the ingredients one by one, making sure the honey and spices are dissolved. You can use however much you prefer to taste, but a basic guide for measurements would be 1 tbs of the honey and apple cider vinegar each, and a 1/2 tsp of each of the spices.

    An even quicker alternative:

    1. Mix together two parts drinking water and one part apple cider vinegar. I like to use a shot glass to just take it all down in one or two sips.
    2. Blend in the honey and spices. This will need more through stirring than the tea version, although you can use warm water as well.

    You could play around with this recipe to see what works for you, you could use fruit or citrus juice for example. It is probably advisable if you have a sensitive stomach to eat not long after taking this remedy, as while it is beneficial to take on an empty stomach, it might upset your stomach a bit if you don’t eat within twenty minutes. Whatever you do, you’re sure to notice the amazing benefits of these healing products!

    If you liked this, you might also enjoy…

    The Ultimate Natural Healing Course…

    Anaerobic Weight Loss Fitness…

    Woodworking Skills for Everyone..


  • How to Make Fermented Chicken Feed

    How to Make Fermented Chicken Feed

    Us humans love fermented food. It’s not just kombucha and sauerkraut for hippies, most of us eat fermented food in the form of beer, wine, cheese, yogurt, vinegar, pickles and sourdough and levain-style artisan breads, which are all fermented when traditionally made.

    I’m a big fan of fermentation because not only are most fermented foods delicious, they’re also packed with beneficial bacteria that can heal your gut and improve overall health tremendously.

    So when I first heard about fermented chicken feed, I was instantly intrigued. If you’re rolling your eyes, I understand, it definitely sounds like a pretty hippie thing to do. But plenty of happy chicken owners report that their chickens go crazy for fermented feed and lay more eggs when they’re fed it regularly!

    It’s also very simple to make.Here’s how you do it it:


    1. Starting with the feed you already give your chickens on a daily basis, take the amount of feed you normally give to your chickens in one day, and put it in a jar with a lid (a quart or half-gallon mason jar will probably be perfect)
    2. Cover with filtered water so that the feed is completely submerged, with at least an inch of water covering it
    3. Put the lid on and let sit for three days (at this point, you could start a new batch on the second day, and again on the third day, and so on as you use the first day’s batch up, so that you have a new one every day to use. But you also might want to try out just one batch at first so that you can make sure your chickens will like it before using up that much chicken feed!)
    4. After three days, drain, and feed to your chickens!

    I hope your chickens enjoy this and repay you with lots of eggs. Enjoy!

    If you liked this, you might also enjoy…

    Become A Master Healer With This Revolutionary Course…

    Traditional Hindu Yoga for Weight Loss

    Improve Your Carpentry Skills Quickly and Easily..


  • Indoor Microgreens

    Indoor Microgreens

    With things getting colder and colder outside this time of year it’s getting harder and harder to produce much food in the garden.  For those that don’t have a greenhouse, or that live in an area where even a layer of protection or two from the cold is not enough, you might want to consider growing microgreens inside near your windows.  Microgreens are not special plants that stop growing after they get only a few inches, they are just normal plants that are harvested early, shortly after sprouting.


    Why Grow Microgreens

    • Microgreens can be grown inside during the cold season
    • Microgreens are nutrient dense
    • Microgreens are incredibly easy to grow

    How to Grow Microgreens

    • First, select plants that work well for the process. Radishes, beans, salad greens, and chia are commonly used for microgreens.
    • Get any shallow wide container. You don’t need, or want a lot of depth since the plants will be harvest while they are still young, but you do want enough space to grow a lot of seeds since each one will not amount to much food.  If possible, select a container that will allow for bottom watering to keep from bending over the young shoots and getting them dirty.
    • Normal potting soil is all you need, but if you have extra perlite available, you can use only perlite for cleaner harvests.
    • Sprinkle seeds over the soil densely, you want much more than you would normally sow since they do not require any room to grow to maturity and since each one will not provide much food.
    • In most cases you do not need to cover the seeds, except for some seeds like chia which like a thin covering like a moist paper towel.
    • When they are a few inches tall you can harvest them. You can cut them with scissors or you can pull them out with the roots still attached and rinse off the dirt.

    Microgreens can be added to green juice, salads, or sandwiches.  They are as dense in taste as they are in nutrients.  Because of the amount of seeds necessary, I would suggest buying them in bulk food from your local health food store and not in seed packets since the cost will be too high.  Good luck!

    If you liked this, you might also enjoy…

    Natural Healing Techniques for Regular People…

    Ever Wanted to Try Yoga?

    Learn Basic Carpentry at Home…


  • When to Harvest Vegetables and Herbs

    When to Harvest Vegetables and Herbs

    Time is a key factor in determining when to harvest vegetables. You want to be sure to harvest them when they are on the verge of maturity. The time of day is also a factor in assuring that you harvest vegetables appropriately.
    It’s helpful to keep the seed packet or plant identification marker for each item you plant in your garden. This is where you will find information regarding the estimated time to maturity. If you keep a garden journal, you can write that information in your journal. There are also plenty of charts available on line that list the average time for specific plants to reach maturity. Even with that information available, soil conditions and weather conditions can affect the exact amount of days it takes your vegetables to reach the harvesting stage. Therefore, consistent attention to your garden is the best way to determine when a vegetable is ready to be harvested.

    It’s important that you harvest vegetables based on their individuality. For example, not all beans should be picked at the same length. Pole beans are ready for harvest when they are approximately five inches long. On the other hand, yard long beans or Asian beans should be at least 15 inches long before they are picked. You can’t base your harvesting time solely on appearance. Peppers are ready to be harvested when they are full size, even though they’re still green. If you leave them on the vine until they turn red, they will lose some of their crispness. Hot peppers left on the vine will continue to get hotter. It’s generally best to harvest vegetables when they are young and tender. It’s also essential that you handle these tender vegetables carefully to avoid bruising them. Don’t leave the vegetables you pick sitting outside in the hot sun. Take them indoors immediately after harvesting them.

    It’s best to harvest vegetables in the early morning hours, just after sunrise. This is when your vegetables will have the highest water content. If harvesting in the morning doesn’t fit into your schedule, your next best option is early evening. Once harvest time arrives, you should check your garden daily. You might be amazed at how fast tomatoes ripen and squash grow. If you’re pinched for time and are struggling to keep up with your rapidly maturing vegetables, you can delay harvesting the root vegetables you planted such as onions, potatoes and carrots.

    Herbs should be harvested after the morning dew dries and before the afternoon sun heats up the day. Herbs should be harvested before they flower. Herbs are less prolific after they bloom. You can begin harvesting herbs early in the season. You can harvest between 50% and 70% of the plant at one time. Typically, annual herbs can be harvested until frost.

    Once you’ve invested time and effort into growing a garden, you want to be diligent with your harvesting routine. Picking the vegetables at precisely the right time is the best way to enjoy their flavor and freshness.

    If you liked this, you might also enjoy…

    Naturopathic Medicine at Home…

    Always Wanted to Try Yoga? Read this…

    Easy Carpentry Courses for the Average Person...

  • A Vegetable Growing Cheat Sheet

    A Vegetable Growing Cheat Sheet

    I love a good, detailed infographic, especially when it comes to gardening. A lot of the gardening infographics that show up on my feed on Pinterest are pretty simple, so I was stoked when I found this one from Anglianhome.co.uk recently.

    It’s an all-purpose cheat sheet for vegetable growing, from what’s best for plot vs. patio (or potted) vegetable gardens, where to plant, when to plant, and a handy companion planting guide as well. I think the companion planting guide section is my favorite, with handy color coding. It can be overwhelming trying to decide what to plant with what, and I love visual aids like this that can make planning out next year’s garden simpler.

    The most impressive part of the infographic however, has got to be the chart in the middle that has, in one handy chart, all the info you will need for planting, from spacing, sunlight, whether to direct sow, and what season to plant and harvest. This can also help to plan a garden, so you can coordinate companion plants and early spring starts.

    ee80d4941d31d520b09b03e11e5951b3

    If you enjoyed this, you might also like….

    Eat Like Your Ancestors Did…

    Home Defense in the End Times…

    Natural Healing Secrets You Need to Know…

  • Tips to get Free Wood Chips

    Tips to get Free Wood Chips

    In case you hadn’t noticed from other articles I love wood chips.  I’m not alone on this, gardeners and homesteaders with much more experience that I have swear by the power of wood chips.  Whether it’s just for mulch, to add to the compost, for soil transformation, or even to build your own soil from scratch, you will be hard-pressed to find a better resource than wood chips.  But those who have bought wood chips, by the truckload, but especially by the bag full, know that wood chips can be costly.  On the other hand, those of us who have done a little digging and searching know that wood chips can come in great quantities for absolutely nothing.  Here are some tips you can use to get your hands on this valuable resource without spending a dime.


    Local Government

    If your city or county operates the landfill in your area it is likely that they have a green waste area, and often in this area there will be a huge pile of wood chips.  Sometimes you can just pull up and take it, sometimes you need permission or even a free permit.  If the landfill is privately run in your area you may be able to get free wood chips from your local government through the parks department, or the transportation department.

    Electric Company

    The electric company in your area has to trim and remove trees near power lines regularly.  This is going to result in a lot of wood chips.  They might even have to pay to dump these wood chips if someone doesn’t take them off their hands first.

    Local Arborists

    Look in your yellow pages for tree trimming companies in your area.  Give them a call and let them know that you would love some free wood chips.  They might let you come and pick them up from the base yard, or they might even drop them off at your home for free to save themselves from having to drive them out of their way to dispose of them.


    If you have been paying for your wood chips, you don’t have to continue to waste your money, and if you have been going without them to save money, your garden doesn’t need to continue to suffer.  With these tips you should be able to locate some free wood chips in your area, though you might have to wait for a permit or get your name on a list for drop off, you will still be on your way to having a cheaper, more bountiful garden.

    Natural Healing Techniques Doctors Don’t Want You to Know…

    The Weight-Reducing Magic of Yoga…

    The Ultimate Woodworking Course..

  • How to Make a Holiday Wreath (Video)

    How to Make a Holiday Wreath (Video)

    A holiday wreath is a really easy way to dress up your house for the holidays without spending hours hanging lights that you’ll just take down in a few weeks anyway. And for homesteaders, why not make some wreaths out of found seasonal foliage on your property?

    Even if you don’t homestead, this easy, homemade wreath is a great alternative to artificial or expensive seasonal wreaths at Walmart.

    I think my favorite thing about this homemade wreath is that you can customize it to use whatever foliage and decorations you have, you could integrate Christmas tree ornaments, tinsel, even lights if you wanted to get really creative! Holiday decorations with a personal, homemade touch are so much simpler and classic and in my opinion, more festive! Have you ever made your own holiday decorations or wreaths? Share below!

    If you liked this, you might also enjoy…

    Become a Master Healer at Home

    Anaerobic Weight Loss Fitness…

    The Ultimate Woodworking Course..