Page 3 of 10
1 2 3 4 5 10
food – Page 3 – Homesteader Depot

Tag: food

  • Benefits of Protein in Your Pantry

    Benefits of Protein in Your Pantry


    Protein powder is usually known as the substance that bodybuilders use to bulk up. It’s more than that, however! There are protein powders out there that go into shakes, can be mixed with water and drank on their own, and that serve as meal supplements.

    Having supplemental protein powder can prove very necessary for those bad years when livestock doesn’t produce or you’ve come up empty-handed while hunting.  Your body needs a source of protein and when you can’t get it from meat, a supplemental powder is a great option.  It’s definitely something to consider in your emergency pantry.

    In fact, there are so many different types of protein powder that you might find yourself overwhelmed with options. We’ll help with that here.

    What Exactly Is Protein Powder?

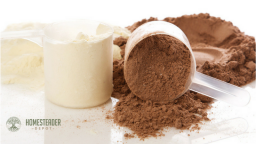
    Protein powder is exactly what it sounds like – it’s a supplemental powder that contains protein and a number of other vitamins and minerals. There are versions with more protein than others (these are what bodybuilders use to bulk up) and some that are very well-rounded. If you’re looking for a good type to keep in your preparedness pantry, choose the well-rounded versions. They’ll serve your needs better and act as a meal replacement.

    Types of Protein Powder

    We’ve already covered one type of protein powder – the one used by bodybuilders. However, the types that serve as meal replacements come in a variety of types and flavors. Some use coconut to provide the protein, while others have some animal by-products in them. Make sure to read the labels carefully if you’re a vegetarian or vegan to avoid ending up with the wrong kind. On top of this, there are a number of different flavors, from strawberry to chocolate. In fact, some types are available in more than one flavor, making the decision even tougher. What it comes down to is finding the meal replacement kind in a flavor that you enjoy.

    How Long Will It Last?

    Protein powder is just that, a powder so that it will have quite a long shelf life. The standard types expire within four to five years, and, like with most canned and jarred items, if they are stored properly, they’ll last even longer than that. As long as the container isn’t opened, you can probably get a few extra years of storage time. However, if it’s opened, make sure to use it up as soon as possible. You don’t want to risk contaminating anything!

    Is Protein Powder Good For Kids?

    The answer here is yes. Protein powder is indeed good for children. There are even kid’s versions available on the market. Compare it to baby formula, only formulated differently and tastier. It contains the same number of nutritious elements as the adult versions; only it is made for children’s needs. In short, if you have kids in your house, you should have some protein powder for them store with your other emergency goods.

    Can I Do Anything Else With Protein Powder?

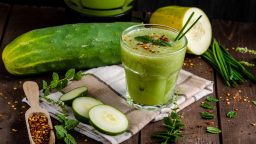
    While the most popular method of using protein powder is by mixing it with water and drinking it, you can always use it in a smoothie. In fact, if you mix some of your canned fruit in with the protein powder and maybe some powdered milk and water, you have the makings of a quite tasty drink. You’ll need some variety in your diet – you can’t keep eating and drinking the same things all of the time – and this is a great way to expanding things.

    Protein powder is a useful vitamin and mineral supplement that can provide some of the things that your average diet is lacking. Make sure to keep some containers of it in your emergency pantry alongside your other goods. You might want to pull it out when you tire of eating the same old things all of the time. The benefits are worth it, especially if you chose a tasty flavor.

    [Discover] The ONLY battery reconditioning resource that lets you easily bring nearly any type of dead battery back to life…<<<Learn How Here>>>

  • 5 Things to Consider When Building an Aquaponic System

    5 Things to Consider When Building an Aquaponic System


    Setting up an aquaponic system, although quite an easy task, requires some basic knowledge of aquaponics. If you have decided to install such a system in your house, then you probably know what this is and how it could help you. However, there may still be things which can interest or help you. Below you will find 5 essential things which you should know in order to obtain spectacular results.

    1. Location
    The place where you put your aquaponic system is highly important for the way in which the plants and the fish will develop. In order to obtain great results, you should make sure that the temperature from the room is not too high, nor too low, that there is enough light for the plants to prepare their food and that no wind or extreme weather conditions will reach them. Also, make sure that no harming chemical substances can get inside the water as this means death for both your fish and your plants.

    2. Oxygenizing the water
    The happier your fish are, the better your system will work! This is why you need to oxygenize the water on a daily basis and make sure your fish have all the “comfort” they need.

    Related Article: “Advantages of Aquaponic Farming”

    3. Choosing your fish accordingly
    The aquaponic system works well with almost all types of fish. Yet, there are states in which you are not allowed to grow whatever type of fish you want, so you will want to see what types of fish you are allowed to have before starting your aquaponic system as you do not want any problems with the law.

    4. Placing the pots
    In order to make the harvest much easier, you should place the pots or the entire system at your waist level. This way you will not have to bend over, making the daily care routine a much easier activity.

    5. Adding additives
    There are cases in which your fish may not provide all the nutrients needed for your plants. If the quantity is lower than what the plants need, then you will have to supply them with the respective substances. In most cases, you will need to add iron, calcium carbonate or potassium carbonate.

    Aquaponics is an easy activity which will provide you with the necessary vegetables and fish in a short amount of time. Just follow the tips mentioned above and you will have great success in your attempt to grow organic food in your home. 

  • Advantages of Aquaponic Farming

    Advantages of Aquaponic Farming

    Aquaponics is a new way of approaching farming. Unlike traditional agriculture where you needed plants to grow vegetables, with aquaponics you need water and fish in order to have healthy food on your table each and every day. Basically, aquaponics relies on the interdependence between fish and plants: the fish produces bio-nutrients for the plants, while the plants clean the water, creating a perfect environment for the fish to grow and develop. It is a blend of aquaculture and hydroponics that has plenty of advantages. If you need some reasons to get your own aquaponic system started, then here are some of the advantages you will get once you assemble it.

    First of all, you will have fresh organic food on your table each and every day, regardless of the hour when you decide to cook your meals. You simply take your tomato, cucumber of your basil from the aquaponic “field” and use it for your meals. It is as easy as it sounds.

    The second best thing about it is that you not only grow vegetables, but you also have plenty of fish. Whether you want them for cooking tasty meals or simply for your décor, they are a great addition to your home! They also have a practical purpose, as you will never have to use chemical fertilizers on your plants, thus obtaining real organic food.

    If you ask how difficult is this system to put in practice, the answer is extremely simple. Not only will you be able to assemble it all by yourself, without the help of your family or neighbors, but you can also put it wherever you want. If you move from one house to another, then you simply disassemble the system and take it with you! What can be easier than that?

    Another great advantage of the hydroponic farming is that it offers you financial independence and control over your money. You know exactly how much you need to spend on your food and you will no longer depend on the market for your veggies’ supplies.

    Related Article: “5 Things to Consider When Building an Aquaponic System”

    Last, but not least, it involves no dirty hands and clothes, no bending and digging, no land and little maintenance time, so it will be like your veggies and fish grow all by themselves! Quite an easy to put in practice system, suitable for all types of people, even for busy and impatient ones!

    There are plenty advantages that the aquaponic system can offer you! Your health and your comfort will be improved, while your savings will considerably grow with the constant use of the aquaponic type of farming! If this is what you want, then why not give it a try? 

    [Boost Your Plants Growth] Step by Step how to build your own Aquaponics System <<<Access Here>>>

  • 7 Interesting Ways to Use Excess Cucumbers

    7 Interesting Ways to Use Excess Cucumbers

    Congratulations on producing a successful homesteading garden this year! Now all you need to do is find ways to use your excess cucumbers. You’ve come to the right place. There is nothing as refreshing and crispy as a cucumber straight out of the garden. Even better are cucumbers in a salad or other yummy cold recipe made just for hot summer days and nights. We can suggest seven ways to use those lovely crunchy cucumbers. There are three recipes and four are for non-food uses that will surprise you.


    Food Uses


    1. Cucumber Tomato Salad

    This salad could be the centerpiece of an enormous veggie tray all from your garden. It is a straightforward recipe that can be made to serve with a meal or as a snack.

    Ingredients are three cucumbers, three diced tomatoes or a cup of cherry tomatoes, half (or more) of a sweet onion cut in small slices, a teaspoon of dill, and your favorite dressing. I like to use the cucumber dressing below. Just mix them all up and chill for an hour and serve.


    2. Cucumber Yogurt Dressing

    This dressing is so creamy and smooth that it melts in your mouth. It’s very healthy, especially if you make your own yogurt. It only has about two grams of fat per tablespoon. It is simple to make by just adding the ingredients into a blender and run it until smooth.


    Quick Trick: THIS grows 10 times more plants in half the time


    Ingredients are 1 cup of cucumbers, seeded, peeled and chopped; 3 tablespoons of plain or vanilla low-fat yogurt; 2 tablespoons of olive oil, 1 teaspoon of apple cider vinegar, ¼ teaspoon of dill, along with salt and pepper to taste. Let all blend for a few minutes and then test it for taste. Chill and enjoy!


    3. Strawberry & Cucumber Smoothie

    Just the sound of this drink sends a cool smoothness through me that makes me feel like I’m doing something special for my body because there’s lots of potassium and Vitamin B in this smoothie that will give you a spurt of energy. What makes it so good is the sweet strawberry taste.

    Ingredients are 1-1/2 cups of frozen or fresh strawberries, 1 large cucumber, with seeds removed and chopped, 1 cup of almond milk (cold), 1-1/2 tablespoons of honey, and a teaspoon of lemon juice. Blend on high, add more milk if desired,


    Non-food Uses


    4. Control Garden Pests

    Cucumbers are one of the most fascinating vegetables. Did you know they can get rid of garden pests? All you need to do is put 4-5 slices in a few small open containers and place them around your garden. They will repel all sorts of insects. You just need to replace them when they dry out.


    5. Breath Freshener

    Forget using mints to freshen your breath. Place a slice of cucumber on the roof of your mouth and hold for about 30 seconds. The chemicals in the cucumber will kill bacteria and bad breath.


    Suggested Article: “How to Use Extra Cucumbers”


    6. Hangover Relief

    This non-food use is one you will probably wish you knew about on New Year’s Eve. If you eat half a cucumber before going to bed after drinking, it will help relieve a hangover because they are high in nutrients and electrolytes.


    7. Mirror Defogger

    If you want to defog your mirror, rub a cucumber slice over the mirror before getting in the shower, and when you get out, the mirror will be clear of fog and your bathroom will have a fresh smell.


    [Holy Cow]  NEVER Use Laundry Detergent Again!!!  Discover How You Can Get Your Clothes Cleaned Without A Single Drop of Toxic Laundry Detergent…Don’t believe me? <<<See for yourself here>>>

  • Canned Corn: What’s the Trick?

    Canned Corn: What’s the Trick?

    A fond childhood memory is sitting on the back porch with my brother as we pulled husks off the bushels of corn on the cob. Somehow, we would always end up falling to the floor in a pile of husks with corn silk stuck in our hair laughing our heads off. You’d think our mom would have been upset, but all she could do is laugh with us.

    Since then I have assumed my mother’s role, canned many a cob of corn, and want to share with you how to process ‘doing it yourself’ canning corn. If you have never canned corn before, it may seem like a lot of work, but it’s the raw pack method, which is easier than other ways. If you follow these easy steps, you will accomplish some of the most significant things about homesteading—being self-reliant, saving money, and feeding your family the best kind of food.

    Gather Equipment and Ingredients

    1. Pressure Cooker – necessary to kill bacteria like botulism that can kill you if not cooked at 240 degrees in a pressure cooker since using stovetop doesn’t get hot enough.
    2. Mason canning jars with lids and rings to match
    3. Kernel stripper or sharp knife
    4. Jar lifter, tongs, and canning funnel
    5. Large pot of water at boiling temperature
    6. Shallow pan or cookie sheet
    7. Towels and hot pads
    8. Labels for jars and a thin tip marker
    9. Canning salt for flavor – the amount is optional
    10. A bushel of freshly picked corn on the cob – follow directions on the pressure cooker for exact amounts for the quantity desired.

    [Video] This strange method will make your food last for 2 years without refrigeration…Try it Here>>>

    Preparation

    • To begin you can either shuck the husks or just bend back each husk and use it to hold the cob as I slice off the kernels.
    • Remove the silk with a kitchen brush and rinse corn cobs in cold water.
    • Cut the kernels off each cob with a cookie sheet placed underneath to catch the kernels.
    • Slide the kernels from the cookie sheet into a large bowl.
    • Sterilize the jars, lids, and rings in the pot of hot water, remove right before filling.
    • Using the funnel, fill each jar with corn up to an inch from the top.
    • Add salt if desired – but no more than ½ tsp. for each pint or 1 tsp. for each quart.
    • Fill each jar with hot water up to an inch from the top.
    • Giggle the jars to remove any bubbles.
    • Wipe the edge of each jar making sure they are not cracked, place lids on, and tighten rings securely.

    Cooking

    • Using jar lifter, place jars in a pressure canner/cooker according to the user manual (if at high elevation, check instructions for the proper setting).
    • Close lid and cook pints for 55 minutes or quarts for 1 hour and 25 minutes.
    • Once done, turn off the cooker and wait for the pressure gauge to return to zero before opening.
    • Remove jars with the lifter placing on a towel to drain out of the way.
    • Let jars cool and check lids to make sure they are sealed. If the covers pop when touched, they are sealed.
    • Write the contents and date on labels with a marker and apply to jars.
    • Place jars in a cool, dry place until you are ready to

    Conclusion

    You can use the corn for all kinds of recipes from salads to enchiladas, and you will love how much better it tastes than the store-bought can or frozen versions. By the way, do not throw away the corn husks or cobs—use for composting. If you have children that can help with shucking the husks, let them have fun with it and send us some pictures.

    [Discover] The ONLY battery reconditioning resource that lets you easily bring nearly any type of dead battery back to life…<<<Learn How Here>>>

  • How to Make Delicious Homemade Butter

    How to Make Delicious Homemade Butter


    Imagine the smell of freshly made homemade bread. Now imagine spreading your own homemade butter on a slice of steaming hot bread. Is your mouth watering yet? Mine is! One of the things about my mom that I miss the most is her homestead cooking and one of my favorites was that creamy homemade butter that melted on my tongue.

    Butter Basics

    Homemade butter does not have an oily taste like margarine. The cream and butter that comes from grass-fed cows are high in vitamin E, beta-carotene, and it can lower cholesterol. Even though butter has saturated fat, it is better for you than margarine as long as it is raw organic butter made from organic cream.

    You can make butter with just a few steps. You do not need one of those old-fashioned butter churns or a cow to milk. Although having a cow or two that eat green grass may be a good idea when homesteading, this recipe uses an electric mixer instead of a butter churn. You can even use a mason jar with cover and shake the cream instead of using a mixer. Shaking it will take more time but would be a fun thing for your kids or grandkids to do. If you don’t have cows, you can make butter from organic heavy whipping cream (butterfat content of at a minimum of 35 percent) from your local grocery store.

    Making the Butter

    The amount of cream needed depends on how much butter you want. It should be kept at room temperature for about 12 hours before mixing. About 15-20 minutes (or amount of time that water can be kept in the freezer before freezing) before mixing you need to place 2 cups of water in the freezer so you will have ice water for the recipe. You can make butter with any amount of cream and here is the typical breakdown for a pound or half a pound:

    • 1 quart of cream = 16 ounces (1 pound) butter and two cups of buttermilk.
    • 1 cup of cream = 8 ounces (1/2 pound) butter and about 1/2 cup of buttermilk.

    If this is the first time making butter, you may want to start out with the smaller amount of 1 cup of cream. Pour the cream into a mixer bowl and blend with an electric mixer at medium speed for 10 to 15 minutes. When the cream turns into curd-like lumps, keep blending until it starts to thicken and a watery/milky liquid forms at the bottom of the bowl.

    Stop the mixer and pour off the liquid into a sealable container that will hold about 1-2 cups. The buttermilk will not look like the kind you buy at the store. It is thinner but still can be used in place of water for cooking and baking.

    Suggested Article:  “Canned Corn: Whats the Trick”

    Use a stiff spatula to press the butter up against the walls of the bowl to squeeze out as much liquid as possible. Add about 1/2 cup of ice water and press up against the walls of the bowl to release the buttermilk liquid. Repeat two more times or until water loses its cloudiness.

    Continue to pour the liquid into a container and when finished, seal and refrigerate. Once all the buttermilk is collected, you can add a pinch of sea salt (per pound) to the butter unless you want to keep it unsalted. This process will give you buttermilk to cook with and keep the butter from spoiling.

    Storing the Butter

    Pack the butter you plan to use for the next week into a container with a cover and refrigerate. To store the remainder, wrap in parchment paper and then in foil or plastic wrap. You can store in the freezer for up to six months. Enjoy!

    [You May Also Like] –  DIY Underground Root Cellar

  • How to Ferment Vegetables

    How to Ferment Vegetables

    Fermenting vegetables grown in your garden accomplishes two things at once. First, it enhances the nutritional value of the vegetables by preserving them at their peak. Second, it preserves the vegetables, so you can enjoy them all winter long.

    The process used for fermenting vegetables is simple. You need the right equipment and the right ingredients – and before you know it, you’ll have a pantry full of delicious, fermented vegetables for your family to eat.

    Fermentation Equipment

    The equipment you need to ferment vegetables is minimal and inexpensive. Here are the basic things you’ll need to have on hand:

    • Jars or containers to put the vegetables and pickling brine in
    • A sharp knife and cutting board for preparing the vegetables
    • Airlock tops (we like ones that are compatible with Mason jars) to keep oxygen out of the jars
    • A pickle packer (usually a wooden stick used to pack the prepared vegetables into the jar)
    • Weights to weigh down the vegetables

    You can buy these items individually or in fermentation packages.  Here is an easy, complete Fermentation Kit from Amazon you can try.

    Fermentation Ingredients

    The ingredients you need to ferment vegetables depend on the method you plan to use. However, there are only a few variations you need to know about. Here’s what you’ll need:

    1. Fresh vegetables from your garden
    2. Salt, whey, or a starter culture
    3. Water

    There are many types of salt, but some are better suited to fermentation than others. Two of our favorites are sea salt and Himalayan pink salt. Both add a nice flavor. You can also buy pickling salt although it’s not the best choice if you want a natural, minimally-processed salt.

    The water you choose for pickling can make a big difference in the final product. If you use tap water, you should boil it or run it through a reverse-osmosis filter for the best results. Well water often has a high mineral content. That can be good for some kinds of fermentation but it’s not particularly good for some fermented products like kombucha.

    How to Prepare the Vegetables

    The method you use to prepare your vegetables for fermentation depends on what you’ll be preserving. Some vegetables, such as cabbage, ferment most effectively when they are shredded. Others, like cherry tomatoes, can be fermented whole.

    It may take some trial and error to arrive at the proper preparation. You may want to start by fermenting just one type of vegetable. Later, you can mix vegetables to create pickled salads that are ready to eat out of the jar.

    The Pickling Process

    The next step is after you have prepared the vegetables is to place them in the jars, cover them with brine, and weight them so they can ferment properly.

    You want to use weights on top of the vegetables, so they stay submerged in the brine. That’s a very important step that some first-time fermenters skip.

    There’s an art to knowing when vegetables are done with fermentation. You’ll have to rely on the specific recipes you use to be sure when they’re done. They need to be kept in an anaerobic environment (air free) while they ferment.

    When they are ready, you’ll be able to remove the weights, seal the jars, and put them in cold storage. Prepared properly, fermented vegetables will keep for months.

    Wondering What to Make?

    If you’re wondering where to start, here are some suggestions for easy fermentation:

    • White or red cabbage (sauerkraut)
    • Kimchi (spicy Korean cabbage)
    • Pickled green beans
    • Pickled tomatoes
    • Fermented carrot sticks or slices

    Do you have a favorite recipe for fermented vegetables? Tell us about it in the comments!

  • Do-It-Yourself Worm Casting Methods for Compost

    Do-It-Yourself Worm Casting Methods for Compost

    If you’re a homesteader, you probably know all about composting. Composting kitchen scraps are one of the best ways to fertilize your garden without chemicals and pesticides.

    Some of the most effective composters use worms to break down food. If you have a worm composter, then you might not know that worm castings – the black waste that worms produce – is arguably the single best fertilizer known to man.

    The challenge is finding a way to harvest the worm castings – also known as black gold – without disturbing or harming your worms. You also want to make sure to preserve any eggs in the castings since those will hatch and provide you with a steady supply of worms.

    When Is It Time to Harvest?

    The first thing to cover is how to know when it’s time to harvest the castings. The best way to tell is to examine the food bedding in the vermicomposter. When most of it appears to be a rich, black soil, it’s time to harvest.

    The key is to wait until what you’ll be harvesting is mostly castings. That way, you’ll have the richest possible fertilizer to use.

    Method #1: Using Food to Move Worms

    The worms in your composter will migrate to new food sources when you provide them. One of the easiest ways to harvest their castings is to move their food source and wait until they’ve relocated.

    If you have a multi-tray worm composter, simply move the food to the tray above the one you want to harvest. You’ll have to be patient. The worms may take up to a month to relocate. Once they do, you can simply sift through the tray to find any remaining worms. Place them in the tray with the food.

    You’ll also want to be on the lookout for eggs in the soil. Worm eggs are small, round, and a yellowish color. You’ll want to place the eggs in the new food bed. That way, they’ll have a food source when they hatch.

    Method #2: Using Light to Relocate Worms

    Worms are subterranean creatures who prefer dark to light. In fact, they will naturally turn away from light and migrate to a new location when it’s present.

    For that reason, a simple way to move the worms out of the tray you want to harvest is to shine a light at one end of it. They’ll move to the other end and burrow in, leaving you free to sift through the castings, remove remaining worms and eggs, and replace the food bed.

    It’s important to note that exposure to direct light can dry out and even kill worms. An alternative method is to gently move the castings down to one end of the tray, creating a mound. The worms near the top will burrow down the bottom. Then, you can scoop castings from the top and sides.

    These first two methods are both for people who prefer not to handle their worms.

    Method #3: Hand Sorting

    The third and final method is to sort through the castings by hand, removing worms and eggs as you go. Some people don’t like this method. However, if you’re not squeamish, it’s arguably the quickest method because you won’t have to wait for the worms to move on their own.

    There are two methods you can use. The first is to empty the whole tray and sort through it, picking out worms and eggs and replacing them in the tray with a new food bed for the worms. The second is to sift a handful at a time.

    We’ve found that kids love to help with this method. Provided they’re old enough to know not to squeeze the worms, why not let them help?

    How do you harvest worm castings? Let us know in the comments!