Page 6 of 10
1 4 5 6 7 8 10
food – Page 6 – Homesteader Depot

Tag: food

  • The Ultimate Guide to Health Diets

    The Ultimate Guide to Health Diets

    It can be overwhelming trying to eat healthier these days. It seems like every day there’s new information about the health benefits of a certain food, while the current fad diet preaches the elimination of that diet.

    If you browse healthy recipes on Pinterest, there’s lots of confusing terms applied to different recipes that might make finding the right recipe for your needs difficult.

    If you are wanting to try a new cleansing diet, eat healthier, or simply understand what all these diet buzzwords mean, this simple guide is for you. Since this is a site about homesteading and we focus a lot on natural health and whole foods, this isn’t a list of fad weight-loss diets, but rather, the different kind of detoxing, whole/real food diets that not only help with weight loss, but balance and reset your body overall. These different diets achieve that in different ways, but they’re all holistic in nature.

    Before you try any radical diet, make sure to talk to your physician or naturopath. Not everyone is the same, and while low-carb or high-protein might work great for someone else, it might not be healthy for you, especially if you have any challenging conditions. This guide is purely meant to decipher the different health diets out there, so that you can learn more about them and start the process of finding one that’s right for your needs.

    Let’s begin.

    Paleo

    The paleo, or primal, diet, has taken the health and fitness world by storm over the last few years. Paleo adherents report significant weight loss, as well as reduced health problems such as eczema, inflammation, and allergies.

    The diet is based on the idea that our early ancestors ate only meat and planets, and this is the majority of what’s allowed. The banned foods include white sugar, dairy, grains, and legumes, and fruit is limited. The diet emphasizes meat, vegetables, and nuts.

    Whole 30

    Very similar to paleo, the Whole 30 diet begins with 30 days of totally clean eating. No sugar, grains, or dairy, for 30 days, with a strong emphasis of simple foods rather than substitutions for grain or dairy that are becoming very popular these days. After you complete the 30 days, there are different stages of reintroducing certain foods back into your diet, keeping some of the rules permanently.

    GAPS 

    The “gut and psychology syndrome” diet is a highly-specified diet that aims at curing the gut. The knowledge of gut health has exploded in recent years, and this diet is based on the relationship between gut health and psychological struggles that has been discovered. It is often used for children with autism or other developmental disorders, or people with severe depression. Like Whole 30, it includes several stages of cleansing, at which different foods are either banned or reintroduced, and is often specified for the condition of the person beginning the diet.

    GAPS has a strong emphasis of fermented foods, which we’re big fans of here, as well as vegetable and bone broth. If you’re interested in GAPS, you’ll probably want to do your own research into it as it can be very complex, but is an excellent option for a wholly cleansing diet that can target many specific health issues.

    Grain-free

    You’ll notice a common thread with the three previously mentioned diets, and that is to eat grain-free. While grains aren’t inherently unhealthy, the way they’re grown and processed in the post-industrial world, as well as the levels many Westerners eat grains and the effect that can have on the body, can cause a lot of issues. This is one of the reasons we see such overwhelming numbers of people who are gluten intolerant.

    Grains have in their outer husks certain toxic acids that act as the grain’s natural self-defense system, but, when not properly processed, this can wreak havoc on the digestive system and overall bodily health.

    Simply eliminating grains from your diet might produce many amazing results, as you’ll be removing this harmful acid from your system.

    Weston A. Price Foundation Diet

    The Weston A. Price Foundation has been one of the leaders in nutritional research and information in the last few decades. Through the research of Dr. Price and his associates, the foundation emphases a few key components to a healthy diet. They focus heavily on good, healthy fats, lots of fermented foods, raw milk and dairy from pastured animals, as well as meat from pastured animals. The WAPF also has a very important perspective on grains.

    As mentioned above, grains contain certain toxins in their husk that make them difficult to digest. However, Dr. Price found that when grains are soaked, soured, or sprouted, these antinutrients are broken down, making them far easier to digest. So while this style of eating doesn’t eliminate grains, it has a specific protocol for how to prepare them.

    Keto

    Keto is growing in popularity, and is not always in the natural health category of diets as it’s quite popular among weightlifters and other fitness buffs, and many people will partake in a keto diet while still consuming highly-processed foods.

    However, since the focus of the diet is essentially a kind of liver cleanse, I’m still including it here because it can have amazing health impacts on those who find it’s right for them. The principle of the keto diet is to eat largely fat and very little carbohydrates. It’s very similar to, and often synonymous with, a low-fat high-carb diet. The idea is that if you consume enough healthy fats, and deprive your body of carbohydrates, the body will enter a stage of ketosis and will very efficiently burn fat. For this reason it is very popular as a weight loss solution, however, it is not meant to be continued long-term.

    Other mentions

    These are the diets that are most popular among those seeking a healthier lifestyle as of late, however, it’s important to mention a few diets that have been around for decades. A simple vegetarian diet has been a popular solution to the quest for a healthier lifestyle for years, and is chosen for both health reasons as well as moral reasons. In the same vein is vegan; while vegetarians do not eat meat, vegans eat no animal byproducts.

    There is also the raw diet, often synonymous with raw vegan, although there are people out there who eat raw meat as well, strangely enough. And of course, in the same vein as gluten-free, many people, mostly for health reasons, choose to go dairy-free. There are also high carb diets, in which most of the time its adherents will eat a large amount of fruits and vegetables and downplay fat and protein.


    Nutrition is a complex topic and there is so much conflicting information out there about what’s healthiest. It’s important to keep in mind that not everyone’s  body is the same, by any means, so choose a diet that’s best for you and makes you feel healthiest. At the end of the day, eating whole, non-processed foods, and lots of fruits and vegetables seems to always win out as the best way to eat. Whatever style of eating you choose, natural is always better!

    If you enjoyed this, you might also like….
    Do You Have What You Need to Hold Down the Fort?

    Natural Healing Secrets You Need to Know…

    Effective Primal Diet Hacks…

  • How to Make Pickles at Home

    How to Make Pickles at Home

    Pickles are one of the most classic and widely recognized forms of brine preservation. While the term “pickled” can apply to various forms of preserving various kinds of vegetables, what most of us think of when we think of “pickles” is the classic, brine-preserved cucumber that has become a staple of delis and diners across America. It most famously made its way into the American diet through Jewish delis in New York City, and, like any classic food, it can be made easily at home.

    While the formula is simple, however, there can be a bit of trial and error involved, and anyone who’s successfully made pickles can probably attest to this. There have probably been hoards of gray-haired European grandmothers throughout the ages who have perfected the art of delicious, crunchy, perfectly-pickled cucumbers, but for those who didn’t grow up learning at their Bubbie’s knee, it take a bit of practice.

    Fortunately, we can still learn from the masters, even if they’re not in our own family. Sandor Ellix Katz, author of Wild Fermentation: The Flavor, Nutrition, and Craft of Live-Culture Foods is not only an expert in the field of home fermentation, he also grew up in a Jewish community in Brooklyn, so he knows a good pickle when he, well, makes one.

    One of the most common mistakes made by first-time pickle makers is by only using a brine. This will result in mushy, soft pickles. What Katz discovered the hard way is that by adding fresh grape leaves, you can naturally preserve the crunchiness of the cucumber, as it absorbs the brine and takes on the delicious, salty sweetness that can only be acheived through pickling.

    To find fresh grape leaves is another story, however, and you might have some trouble, depending on where you live. Of course, if you grow grapes, you won’t even be worrying about this, but if you don’t, you can see if any homestead neighbors do. You can also check or ask at Middle Eastern restaurants or markets, or simply order dried ones online, which are a good substitute. You can also use black tea leaves. While grape leaves are the classic, black tea will perform the same function.

    This Odd Therapy Will Revolutionize Your Well-Being…

    The other crucial component is your equipment. We’ve included Katz’ suggestions, but there’s still room for improvisation. The important thing is to have a cyllindrical container and some way of weighing down the pickles so they remain submerged in the brine. See what you can come up with!

    So without further ado, here is Sandor Ellix Katz’ recipe for classic kosher deli pickles!

    Ingredients 

    Yields 1 gallon 

    • Approximately 4 lbs cucumbers, pickling variety preferable
    • 3/4 cup salt (kosher or sea salt is best)
    • Dill, either fresh and flowering, or the dried leaves and/or seeds (whatever you can find)
    • Several cloves of garlic
    • Grape leaves (these help the pickles retain their crunchiness)
    • Black peppercorns

    Equipment

    • Ceramic fermentation crock, or food-grade bucket, both cylindrical
    • Fermenting weight or large plate that fits inside the bucket
    • Either: 1-gallon bottle filled with water OR a large rock that has been boiled
    • Clean cheesecloth or dish towel for covering

    Directions 

    1. Rinse the cucumbers carefully, to avoid bruising. If you are using cucumbers that haven’t been picked fresh that day, soak them for a few hours in chilled water.
    2. Bring half a gallon of water to a boil on the stove, then remove from heat and stir in the salt, making sure it dissolves completely. This creates the 5% brine solution.
    3. Let the brine mixture cool until you can leave your finger in it for at least 10 seconds without it burning.
    4. As you are waiting for the brine to cool, clean your crock or bucket thoroughly using hot water and non-antibacterial soap, as well as your weight or plate.
    5. Peel and crush your garlic cloves, and place those along with the dill, peppercorns, and grape leaves at the bottom of your crock or bucket.
    6. Next, place your cucumbers in the crock or bucket, and then follow with the brine.
    7. Place your weight or plate on top, and weigh that down with the jug filled with water or the boiled rock. If the brine doesn’t cover the plate or weight, add more brine with the ratio of 1 tbs salt to each additional cup of water.
    8. Cover your crock or bucket with the cheesecloth or dish towel. This will keep dust, bugs, and any other small debris out of the pickels.
    9. Store in a cool, dark place.
    10. Check daily. Scum may start to appear on the surface, so remove this.
    11. After a few days, taste your pickles to see if they’re ready. This part is largely up to your own taste, once they taste good to you, they’re done! There’s no rule here; as long as they’re fermenting well and you like the taste, you can remove them when you please.
    12. You can let them continue to sit for one to four weeks, taking some out to enjoy as you go. At some point they will become fully sour, at which point you’ll want to move them to the fridge to slow the fermentation process.
    13. To safely move them to the fridge, transfer to a jar if you don’t have room for your whole crock or bucket in the fridge, but DO NOT COVER for a few days, leaving the cheesecloth, dish towel, or a paper towel secured with a rubber band on the jar. After a few days, you can cover with the jar lid.
    14. These will keep for a long time in the fridge, so you’ll probably eat them all up before they ever go bad! Such is the beauty of fermented foods.

    Enjoy!

    The ONLY Reason You’re Failing the Paleo Diet...

  • How to Make Sourdough Without a Recipe (Video)

    How to Make Sourdough Without a Recipe (Video)

    I’m a huge fan of home fermenting and culturing of all kinds. Yogurt, kefir, kombucha, pickled vegetables, and my personal favorite, sourdough bread.

    Sourdough is not just a distinct flavor of bread, it gets its rich, sour flavor from the leavening culture that causes it both to rise, and changes the metabolic structure of the wheat. Sourdough is actually much healthier than breads that are not naturally fermented, because the culturing process actually breaks down the antinutrients that can make wheat difficult to digest. Some people who can’t otherwise eat gluten can still eat sourdough, actually!

    I have made sourdough at home for a few years, but I haven’t ever put a whole lot of time into learning the techniques that would make my homebaked loaves as good as those delicious boules you can get at chic, foodie restaurants and bakeries. My loaves are usually pretty dense, and while they have the delicious flavor of sourdough, they lack the air bubbles and lightness that make professionally baked sourdough loaves so delicious. Also, without those air bubbles to help with the rise and create that light dough, I get small loaves that are gone in a flash.

    There are a lot of very specific recipes out there for sourdough, and many people even recommend measuring your ingredients on a kitchen scale to get the ratio of flour, water, and starter just right. This does make a lot of sense, of course, considering breadmaking is a very specialized science, but it actually doesn’t have to be so complicated.

    So, how can you make delicious sourdough boules right at home, without the stress and headache of measuring ingredients or seeing recipes fail you because they simply don’t work in the climate of your kitchen or with your culture?

    By feel. 

    The thing about sourdough is, not all flour, sourdough starters, or kitchen climates are created equal, and your dough simply might not turn out the way it’s supposed to following an exact recipe.

    This excellent video walks you through the process of making a sourdough loaf without measuring, and by creating a dough that looks and feels a certain way, and how to handle it so it will get those coveted air pockets.

    I don’t know about you but I can’t wait to get my hands in some dough and try this out! Check it out:

    If you enjoyed this, you might also like….
    Do You Have What You Need to Hold Down the Fort?

    Natural Healing Secrets You Need to Know…

    Effective Primal Diet Hacks…

  • Dandelion Pesto Recipe

    Dandelion Pesto Recipe

    Dandelion is a wonderful plant, that the majority of Americans just think of as a weed. If you’re not already foraging your yard’s dandelion for natural remedies or food, you definitely should be.

    Dandelion grows virtually everywhere, and I can almost guarantee it’s growing somewhere near you, either in your backyard, local park, or any field or meadow nearby. It was a staple of Depression-era cooking, and it’s tasty, nutritious leaves can be prepared in a number of ways.

    You can easily eat them raw, but if you’d like to enjoy them in a very delicious way, try this amazing and tasty dandelion pesto. You can make a fancy, gourmet pasta dish out of foraged leaves, how cool is that?

    To harvest dandelion leaves, be sure to use a knife. The tough, stubborn roots can make it hard to harvest the whole plant, so you’ll want to dig in with a paring knife to uproot it properly.

    After harvesting, make sure to wash extremely thoroughly. Dandelion can retain a lot of dirt, so you’ll want to rinse it all under cold water, then soak it all in water with a dash of vinegar.

    After about 20 minutes of soaking, vigorously shake the dandelion leaves all around the water, then pour out the water, rinse, and fill your bowl with water again, shake the leaves out one more time, and rinse again. This should do it, but inspect the leaves as you prepare your pesto, just to be safe.

    Ingredients

    • 1/2 pine nuts
    • 3 garlic cloves
    • 2 bunches freshly harvested dandelion leaves.
    • 1 Tbs lemon juice
    • 1/2 cup olive oil
    • 1/2 tsp salt
    • 1/2 tsp black pepper
    • 1/4 cup Parmesan cheese
    • salt to taste

    Instructions

    1. Roughly chop your freshly washed dandelion leaves, so that they equal a loosely packed 2 cups.
    2. Roughly chop your garlic.
    3. Place the garlic, dandelion leaves, pine nuts, lemon juice, olive oil, salt, and pepper in a blender or food processor.
    4. Blend or pulse until smooth. You might need to stop and scrape down the sides with a rubber spatula a few times.
    5. Stir in the parmesan cheese until evenly incorporated.
    6. Serve fresh or refrigerate and eat within 3 days.

    Bon appetit!

    If you enjoyed this, you might also like….

    Do You Have What You Need to Hold Down the Fort?

    Natural Healing Secrets You Need to Know…

    Effective Primal Diet Hacks…

  • How To Make Caramelized Onions in a Slow Cooker

    How To Make Caramelized Onions in a Slow Cooker

    I don’t know about you, but I love caramelized onions. What I don’t love is spending half an hour in front of my stove, stirring the onions and waiting for them to get to just the right degree of caramelized.

    Caramelized onions are a delicious addition to a wide variety of dishes, from soups to salads to pork chops and beyond. They can make a very simple, dressed-down seem like it’s straight out of a fancy French restaurant. Of course, the fancy part of it is probably due to the careful process of making caramelized onions, which many home cooks won’t feel they have the time for.

    This is why I was very thrilled recently to find this hack for making caramelized onions in a slow cook cooker.

    Not only does is this process a simple, hands-off way to make caramelized onions that doesn’t require constant stirring at the stove, but it can help you make a large batch of caramelized onions to keep in your fridge or freezer for many dishes to come. Not only can you add a lovely bit of gourmet class to each meal, you can do it with very little effort on your part!

    This is a great option for processing onions you find on sale, or a large harvest if you’re lucky enough to grow onions on your homestead.

    Here’s how:

    Ingredients

    1 large bag onions

    1/4 cup butter (1/2 stick typically)

    2 tsb salt

    4 tbs brown sugar

    Directions

    1. Slice your onions into thin rings, as best you can. They don’t have to be perfect.
    2. Place them in the slow cooker and cut the butter up into a few cubes, scattering them around the onions. Throw in the salt and brown sugar and give a good stir.
    3. Put your slow cooker on low.
    4. In about an hour, stir the onions again.
    5. Check the onions every now and then for about 8 hours, stirring when you can.
    6. Once they are brown and golden, you’ve got yourself easy caramelized onions! Let cool to room temperature and pack into bags and jars to refrigerate or freeze.

    How easy was that? I’m getting hungry just thinking of the delicious smell this will fill your kitchen with. Enjoy!

    If you enjoyed this, you might also like….

    Do You Have What You Need to Hold Down the Fort?

    Natural Healing Secrets You Need to Know…

    Effective Primal Diet Hacks…

  • Soaking and Sprouting Times for Seeds (Infographic)

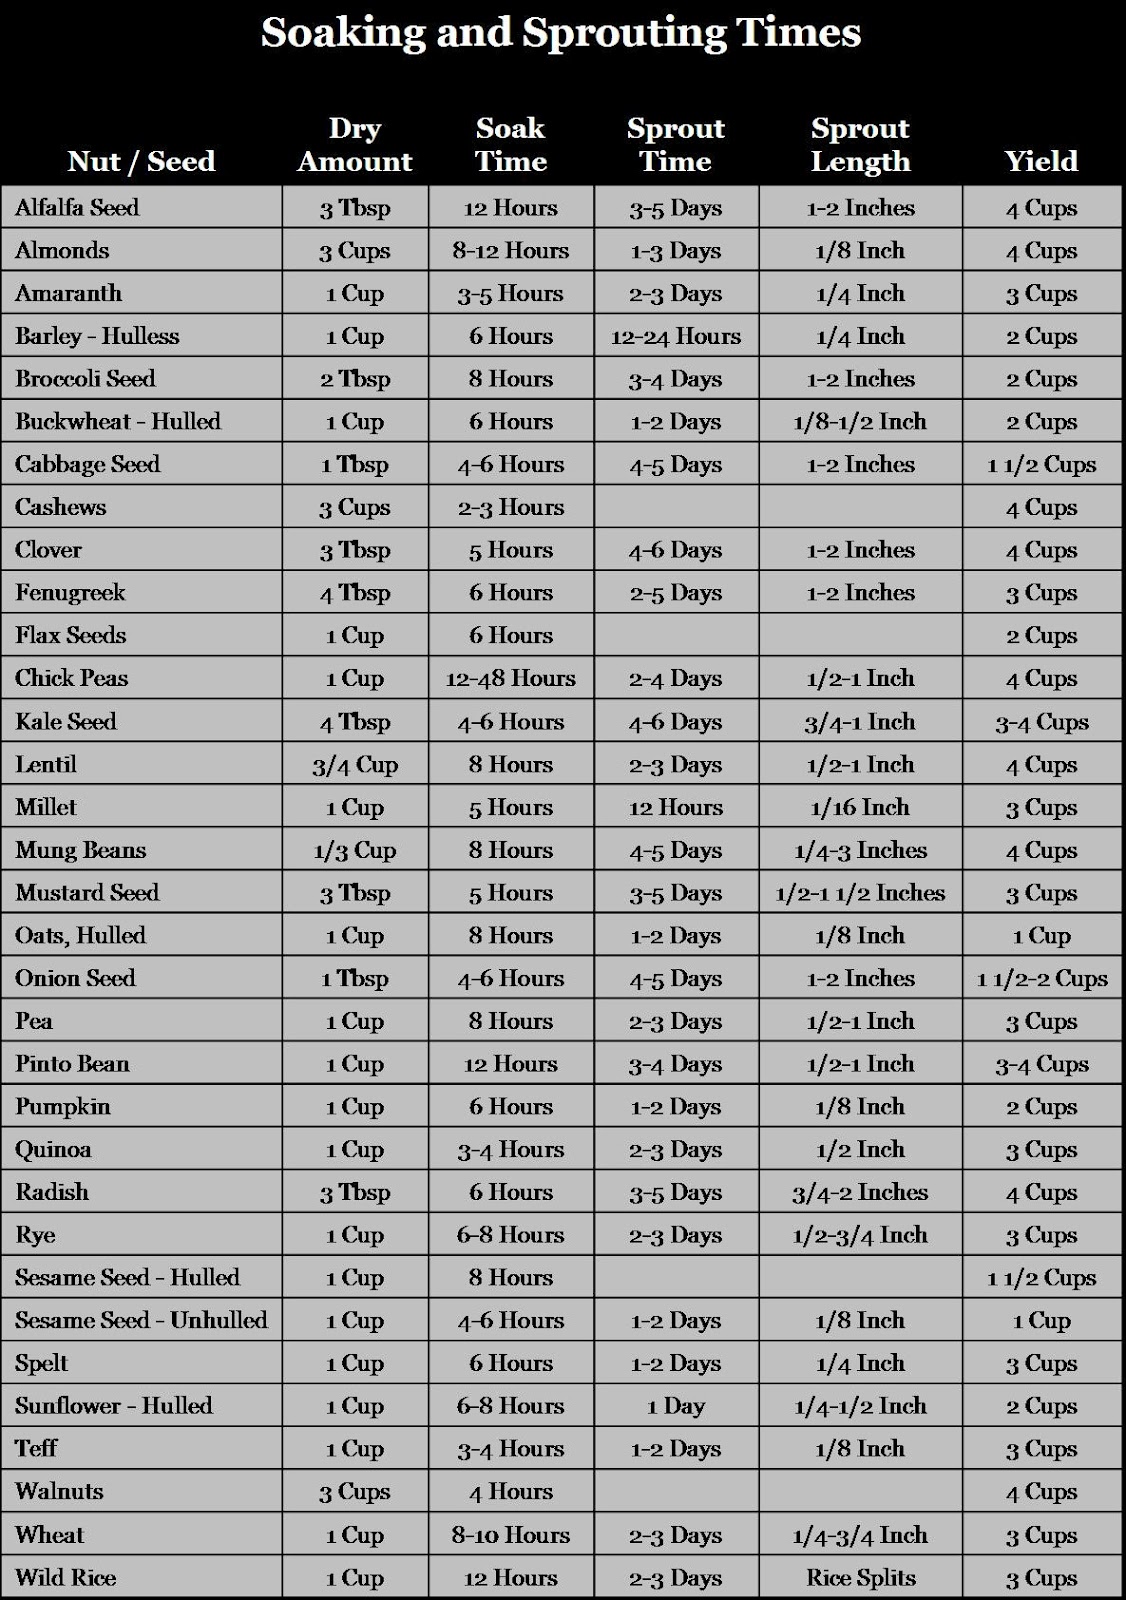
    Soaking and Sprouting Times for Seeds (Infographic)

    I shared an article last week on sprouting alfalfa, and I did mention that you can use many other kinds of seeds and beans as well, using this method.

    It is definitely true that the basic principle of soaking, draining, and sprouting applies to many seeds and beans, they vary, sometimes quite drastically, in ideal soaking time and the amount of days it takes for them to sprout.

    Here is a great resource from nourishsystem.com for any aspiring sprouters out there. This is a chart that lists many of the popular sprouting seeds, grains, nuts, and beans, and all the information you’ll need to sprout them.

    What is particularly helpful about this chart, that I haven’t seen in other similar infographics, is that it includes the dry amount of seeds you’ll need, and what that will yield in sprouted greens. This is a great resource, so you can measure out exactly what you’d like to use and anticipate how long it will last you once sprouted. I’m definitely keeping this up on my fridge for future sprouting.

    If you enjoyed this, you might also like….

    Can You Defend Your Family When SHTF?

    Natural Healing Secrets You Need to Know…

    Effective Primal Diet Hacks…

  • Delicious Beef Liver Pate Recipe

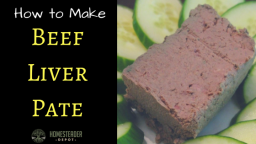
    Delicious Beef Liver Pate Recipe

    I recently shared a post on the health benefits of liver, and I did promise I’d post a liver pate recipe.

    Liver pate is a great way to eat liver, it’s super delicious and actually very good for you, at least in moderation, as while it includes lots of healthy fats, it’s still pretty caloric.

    It is a classic example of fattening-but-healthy French food, and liver pate from France has gained a worldwide reputation for its decadent flavor.

    And it’s really not too hard to make at home! I chose a very basic recipe that calls for ingredients you already have, nothing too fancy. It calls for beef liver, but you can use chicken if you like, just skip soaking it in meat. While many recipes you may come across call for cognac, this calls for a simple American bourbon, which I figured most people probably already have at home, but you can of course use the classic cognac as well.

    So, get your wine and crackers ready, and let’s get started!

    Ingredients: 

    • 2 lbs beef liver
    • 3 cups whole milk
    • 2 tablespoons olive oil
    • 3/4 cup butter
    • 1 onion, minced
    • 1 tbs thyme
    • 1/2 cup bourbon
    • 1/2 cup heavy cream
    • 1/2 cup coconut oil
    • salt & pepper

    Directions: 

    1. The night before you’d like to prepare the pate, (which should be two nights before you’d like to eat the pate, as after initial preparation it will have to set overnight in the fridge) soak the beef liver in the milk in the fridge, covered in milk.
    2. In the morning, drain the milk and discard.
    3. Rinse the liver with cool liver, and gently dry with paper towels.
    4. Preheat a skillet or grill, and then rub the liver with oil and sprinkle with salt and pepper.
    5. Place the liver on the grill or in the hot skillet, and cook for about five minutes or so on each side, until it is nice and charred but still slightly pink on the inside.
    6. In a saucepan, melt the butter over low heat.
    7. When melted, add the onions and thyme, and cook until softened.
    8. When softened, add the bourbon carefully. It might ignite for a moment, so proceed onto this step at your own risk! It will most likely die down in a moment.
    9. Cook for a few minutes after reducing the heat slightly.
    10. Roughly chop the cooked liver, then add to a food processor with the butter mixture, as well as the rest of the ingredients.
    11. Puree until smooth.
    12. Pack the pate into jars and cover. Let sit in the fridge overnight.

    The pate will keep for up to four days in the fridge, so I usually just put most of it in the freezer in small ramekins and take one out at a time to enjoy in small portions.

    If you enjoyed this, you might also like….

    Do You Have What You Need to Hold Down the Fort?

    Natural Healing Secrets You Need to Know…

    Effective Primal Diet Hacks…

  • The Simplest Way to Peel Garlic. Period. (Video)

    The Simplest Way to Peel Garlic. Period. (Video)

    Garlic is a homestead kitchen staple, but let’s face it; it’s more than a little tedious to fidget with the papery skin of each individual clove.

    Sure, you could smash your garlic with a knife or a mallet and make a big mess. If you have half an hour or more to spare, you could soften the skins in hot water. If you need to peel enough garlic to season food for an army, or make a hefty portion of a natural remedy like honey-infused garlic, you can shake them into oblivion between two bowls, but that’s more trouble than you really need to go through. And let’s not even get started with the weird, artificial flavor of pre-processed garlic available in the store.

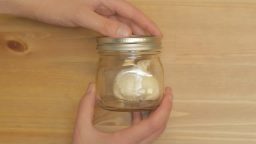
    So what’s the homestead cook to do? I shared a video about the bowl method last year, but this video shows an even easier, ridiculously simple kitchen hack for the home chef in a hurry who won’t settle for less than fresh, pungent garlic. It’s as easy as tossing the head of garlic into a jar, closing it, and shaking the living daylights out of it for less than half a minute. After 20 seconds, tip the jar to pour out your fresh peeled garlic cloves.

    Wasn’t that easy?


    If you enjoyed this, you might also like….
    Are We In The End Times?

    Complete Health Transformation Without Drugs or Surgery…

    Having Trouble Sticking With Paleo?