Page 2 of 2
1 2
homemade – Page 2 – Homesteader Depot

Tag: homemade

  • Frugal DIY Nesting Box Ideas

    Frugal DIY Nesting Box Ideas

    If you want your chickens to provide you with lots of wonderful, nutritious, farm-fresh eggs, they’re going to need some cozy nests to get the job done!

    You don’t need to spend an arm and a leg to trick your coop out with some nice, comfortable nesting boxes for your lovely egg-laying ladies.

    Here are some frugal nesting box ideas for you that can all be purchased cheaply, recycled, or even scavenged for, if you’re lucky!

    Dishpans

    Dishpans, the kind you can grab at Walmart or the Dollar Tree for very cheap, are great for nesting boxes, if you cut a shallow entry point for the chickens on one end, and stack them where they can easily access them. Simply fill with bedding, find a quiet, private place for them to go, and let your hens enjoy.

    Related Article: 5 Mistakes First-Time Chicken Farmers Make

    Bookshelves

    If you have any old bookshelves lying around, the little nooks would be perfect for some comfortable chicken privacy. Also, if you feel more confident that you could easily make a bookshelf than some fancy laying boxes, just use the same idea! Chickens like to “roost”, fly up into trees, so they’ll like something they can perch on and fly up and down from to lay their eggs.
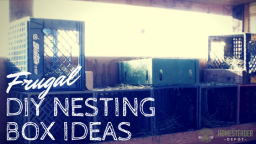
    Milk crates

    Milk crates are one of the best kind of containers there are, especially for homesteaders! And you can probably find them for free, from friendly restaurants or businesses who discard them after deliveries. These are also great because they have holes all around, so they’re breathable and will dispose of some of the chicken droppings for you, without putting the eggs at risk. Fill with bedding and tuck away (maybe on your bookshelf?).

    Litter boxes

    If you’ve only got a few hens and some old litter boxes lying around or can find them cheaply or for free, they’re perfect for nesting boxes. They enclose the hen and are already designed for easy cleaning and bedding changes.

    NEVER Buy Laundry Detergent AgainLearn How>>>

  • DIY Tooth Whitening Recipe

    DIY Tooth Whitening Recipe

    We’ve shared a lot of DIY health and personal hygiene products on this blog, and for good reason. There are so many products out there that are full of chemicals and toxins, that can be easily made at home for a fraction of the cost. This whitening tooth powder is packed with beneficial ingredients you’ll want to try.


    Ingredients:

    • 4 tablespoons bentonite clay. This is a natural, mineral-rich powder that gently cleans your teeth. It also detoxifies your mouth to freshen breath and fight gum disease
    • 2 teaspoons baking soda. Baking soda is a very mild abrasive that polishes the teeth and removes stains.
    • 1½ teaspoons finely ground sea salt. This ingredient is loaded with trace minerals that help to strengthen and rebuild your teeth. Salt is also a natural antiseptic which keeps the bacteria in your mouth in check.
    • 1 ½ teaspoons unrefined stevia powder. For anyone nervous about ditching conventional toothpaste, or just picky children, stevia helps to sweeten the powder.
    • Up to 3 teaspoons flavoring of your choice. Ground cloves, cinnamon, or mint are excellent choices that also act as astringents for gum health.
    • 1 teaspoon activated charcoal. Ironically, this jet black special ingredient is what really does the work in whitening your teeth. Activated charcoal (carbon) particles bind to the tannins from coffee, tea, wine, and certain foods to lift stains away. Charcoal also helps to balance the mouth’s pH levels which aids in remineralization.


    Add all ingredients to a clean glass jar with a tight-fitting lid. Attach the lid and shake thoroughly to evenly mix.

    To use, simply wet your toothbrush, dip it in the powder, and brush and rinse as you would with toothpaste. 

    This recipe is incredibly easy to make and use in place of conventional toothpaste made with questionable chemicals. Whip up a batch today to complete your DIY health and wellness toolkit.

    If you liked this, you might also enjoy…

    What Are the Signs of the End Times?

    Learn Natural Healing Secrets From the Masters

    Preparing for the Bubble to Burst 

  • Make Your Own Powdered Laundry Detergent

    Make Your Own Powdered Laundry Detergent

    Are you tired of buying overpriced laundry detergent that has too much scent? As a homesteader, you should be making your own laundry detergent. You will find that with a few simple ingredients, you can create laundry detergent that works just as well as what you buy, and it will save you quite a bit of money in the end.

    Choose a bar soap that you like, and look for the powdered form. You should be able to find it in the grocery store or online. Then, take four cups of the shaved or powdered soap and combine it with two cups of borax and two cups of washing soda. Mix it and store it in an airtight container. You could also add two cups of baking soda to the mix if you would like. You will only need to use two tablespoons for a load of laundry.

    You might be wondering what to do about scent. Even though the detergent in the store might be over-scented, that doesn’t mean you don’t want any scent at all. A simple tip you can use is to add a couple of drops of essential oil into the laundry while you add the detergent. You can increase or decrease the amount you add based on how your first load turns out. This way, you will get just the amount of scent that you want.

    The simple recipe found here is for powdered laundry detergent. While it is possible to make liquid detergent as well, these seem to work better because they require less storage space for more detergent.

    As you can see, it’s easier than you probably thought to create your own laundry detergent. With a small expenditure at the outset, you could make a large amount of detergent that could last the entire year.

    If you liked this, you might also enjoy…

    Become A Master Healer With This Revolutionary Course…

    Traditional Hindu Yoga for Weight Loss

    Improve Your Carpentry Skills Quickly and Easily..


  • Don’t Be Without These Homemade Cough Drops

    Don’t Be Without These Homemade Cough Drops

    I never tire of homemade cold remedies. I got a pretty bad cold this week and really wished I had made some of these delicious homemade cough drops. A nasty cold is particularly awful to have during cold winter months.

    I will definitely be making more of these to have on hand the next time a cold hits. It’s simple, easy, and way better than your average chemical-filled cough drops. Regular store-bought cough drops often have artificial colorings and flavorings in them. They might be able to soothe your cough but they sure won’t help prevent cancer!

    Try this simple and wholesome recipe instead. Let’s get started.

    Ingredients:

    4 TBS coconut oil

    1/2 cup honey

    1 tsp ground ginger

    3/4 cup sugar

    1/2 tsp mint extract

    Directions:

    1. Prepare a loaf pan lined with parchment paper, lightly greased with coconut oil
    2. Over low heat, melt all the ingredients together in a saucepan
    3. Stirring constantly, slowly bring the mixture to a boil, at about 250 degrees. (This is called the “hardball” stage in candy making, the point at which the mixture will harden once it has cooled
    4. Carefully pour the mixture into the parchment-lined loaf pan and let cool until you can safely handle it, about 10 minutes. You won’t want to wait much longer
    5. Cut the hardened mixture up into whatever size pieces you like
    6. Individually wrap each piece in wax paper, aluminum foil or lightly dust with cornstarch to prevent sticking
    7. Store in an airtight container at room temperature. These will keep for about a year.

    Hope this is helpful for you this cold season! Would also make great gifts for any illness-prone relatives. Enjoy!

    Also, check out these — Holistic Medicine Basics

  • How to Make Yogurt

    How to Make Yogurt

    Yogurt has increased in popularity in recent years, and for good reason. It’s a wonderful source of healthy fat and protein as well as millions of beneficial probiotic bacteria. It’s also delicious!

    Did you know you can make your own easily at home? Yogurt is nothing more than cultured milk, and, like sourdough, all you need is a starter to get going-which is actually just about 1/4 of a cup of yogurt!

    There are many different methods for making yogurt, and this is simply one of them. You can make it in a specially-designed yogurt maker, in a crock pot, even in an oven or a crock. You’ll have to figure out what works best for you, but this will give you a good idea of the process and what you might need to start your own yogurt making process!

    (Note: this recipe is for regular pasteurized milk, not raw. We’ll have to do a recipe on raw milk yogurt in the future)

    What you need: 

    To make yogurt, you only need a few things:

    • Quart mason jar
    • Candy thermometer
    • Sauce pan
    • A quart of organic milk (not ultra-pasteurized)
    • 1/4 cup yogurt starter (yogurt with “live active cultures” on the package, only use plain with no added ingredients)

    Instructions: 

    1. Bring 6 cups of milk to 160-175 degrees F on the stove. Watch closely-it gets hot very quickly.
    2. Allow the milk to cool to 110 degrees. Check frequently-you don’t want it to get too cold, it has to be right at 110.
    3. Skim off any layer that has formed once the milk is cooled to 110, and pour into the mason jar. Add your starter and mix thoroughly.
    4. Put a lid on the jar and keep at this temperature. This is the trial-and-error part, and you’ll have to figure out the best way to do this for you. You can wrap the jar in towels and put in an insulated grocery bag or cooler, or even the oven (turned off) with the light on. You can also just place the jar in a crock pot filled with an inch or so of water if you can set the temperature to 110.
    5. Check it 12 hours later to see if it has turned into yogurt. Check carefully to retain the heat if you need to let it sit for another 12 hours.
    6. To get a thicker yogurt, you might want to strain it through cheesecloth in a bowl in the fridge overnight. Either way, store in the refrigerator and use within 2-3 weeks. Enjoy!

    If you like this, you might also like:

    Advanced Gardening Course To Accelerate Your Food Production…

    Survival Medicine & Wilderness Survival…

    Survival Techniques From Long Ago, Re-purposed For The Modern Era…

  • Homemade Dog Food

    Homemade Dog Food

    Our dogs are our best friends, and they deserve homemade meals too!

    Unfortunately, a lot of store-bought dog foods have a lot of preservatives and additives that you might not be so thrilled for your canine companion to be consuming. And high-dollar dog food, with real food ingredients, can be really pricey.

    So a great alternative is to just make your own at home!

    First, you’ll want to determine what the best nutrition is for your dog. Not every dog is going to have the same nutritional needs, but in general, dogs need protein, like from meat, fish, dairy and eggs, fat, like from meat or oil, carbohydrates, calcium and fatty acids. Grains are not always good for dogs, you might want to opt for sweet potato and vegetables as a carbohydrate source.

    A good starting place is to talk to your vet. The two of you can discuss what ingredients would be best for your dog, and if he has special health or nutritional needs that should be met and how to do that.

    >>>Brain Training for Dogs (Unlock That Hidden Intelligence

    Next, pick a recipe that fits your dog’s specific needs. There are a lot of homemade dog food recipes on the internet, so odds are you will find something that suits you.

    A really great basic recipe consists of sweet potatoes, frozen peas and carrots, and chicken breast, at a 1:1:2 ratio. Cook all the ingredients in a slow cooker on low for 8 hours and then stir, let cool, and distribute into bags to freeze. You can pull out a bag every few days, thaw, and bam! Easy, healthy, delicious and nutritious homemade food for your dog.

    While this probably isn’t ideal for daily meals, making sure your dog gets regular helpings of raw meat is also crucial. Once or twice a week, throw your dog some raw ground beef. Occasional organ meats are also incredibly beneficial, but should not exceed 15%. Also, bones are great for their health, but try to get them from a butcher, not the pre-packaged ones that are full of artificial flavoring and preservatives.

    Our dogs are members of our family, and they deserve healthy, whole, real food ingredients too. Consider making your own dog food today!

    If you like this, you might also like:

    Advanced Gardening Course To Accelerate Your Food Production…

    Survival Medicine & Wilderness Survival…