Page 2 of 3
1 2 3
winter – Page 2 – Homesteader Depot

Tag: winter

  • First Snow of Winter on the Homestead (Video)

    First Snow of Winter on the Homestead (Video)

    All across the country, temperatures are dropping and snow is beginning to fall. Winter is officially almost here!

    Of course, for many homesteaders across the country this means a big change of pace. “Off the Grid with Doug and Stacey” is a really cute channel that documents their off-grid adventures in their tiny log cabin homestead. A few weeks ago they published a video of the sights on their first snow day of the year. It’s fun to see their authentic, simple, small homestead get covered with it’s first layer of 2016 winter snow. Enjoy!

    If you enjoyed this, you might also like….

    Home Defense in the End Times…

    Natural Healing Secrets You Need to Know…

    Eat Like Your Ancestors…

  • Growing Vegetables and Herbs Indoors

    Growing Vegetables and Herbs Indoors

    When the weather gets too cold for you to grow vegetables outdoors, you might want to be adventurous and try growing a few select vegetables and herbs indoors. If you live in an apartment, condominium or townhome without any outdoor space to grow a garden, you can grow some vegetables, herbs and even tropical fruit indoors if you create the proper growing environment.

    Sufficient light, either natural light from a door or windows or a grow light, is essential for an indoor vegetable garden to thrive naturally. There are some LED grow lights available on amazon.com that also make for a cost effective alternative (if you don’t have access to sutable light).

    Other than eight or more hours of light, the only thing you need to grow vegetables and herbs indoors is a good potting soil mix and containers with sufficient drainage. You’ll want to be selective when buying seeds or plants for your indoor garden. Carrots and radishes grow well indoors, but it is the round varieties that you want to plant in your indoor garden. Beans are another good choice for an indoor garden. Varieties such as dwarf French green beans and dwarf runner beans are good choices. Beans do well and look attractive when placed at the window of a sunroom. Cherry peppers and banana peppers can do well in a warm, sunny room. Pepper plants should be planted in a 3 to 5 gallon container. Garlic, green onions and ginger are easy and inexpensive plants to include in your indoor garden. Tomatoes can be grown indoors but they won’t produce as well as plants that are grown outdoors.

    If you have a sunny room, an enclosed heated porch or a sunroom that stays warm throughout the year, you might want to try growing something tropical. A dwarf lemon, orange or lime tree could thrive in this type of environment. Hanging baskets add beauty to your indoor decor. A basket filled with strawberries would be a conversation starter when people visit and a convenient source of fresh fruit.

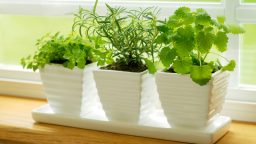
    Herbs grow well on a sunny windowsill, on a kitchen counter or in any well-lit area. You can find containers designed specifically for creating an herb garden. A collection of individual containers placed around the house or grouped together as a decorative display would be an aromatic and attractive addition to your home. If you plan to plant several herbs in one container, you’ll want to group together herbs that require similar growing conditions. Rosemary, sage, thyme and oregano need a lot of sunlight and prefer relatively dry soil. Basil, cilantro and parsley are examples of herbs that can be grouped together because of their preference for moist soil. If you want to grow mint indoors, it is best to plant it in an elongated planter. Mints need space to spread out in order to thrive.

    Growing vegetables indoors is an interesting hobby to pursue. Don’t be afraid to experiment with different vegetables and herbs. You can start with plants that are almost foolproof such as lettuce, onions, garlic, ginger and basil and expand your indoor garden as your experience and confidence level increases.

    If you want to take your garden to the next level…

    Watch this video on self replishing food production.
    It is a great resource if you are ready to start growing more of your own food.
    Garden smarter, not harder.


    If you liked this, you might also enjoy…
    Learn to Heal and Treat Illnesses Naturally…
    An Ancient Secret to Slimmer Waists…
    Learn to be a Master Carpenter at Home..

  • Calculating Your Wood for the Winter

    Calculating Your Wood for the Winter

    Many homesteaders prefer to utilize wood stoves to help offset the cost of other power sources. It can help them to limit their dependence on the electric company, and if they have solar panels as well, it could eliminate the need entirely. However, if you are going to use wood for heating and even for cooking, you need to make sure you have enough to last the entire winter.

    Think about how often you will be using the woodstove or the fireplace. If you will only be using it during the night, you will need to have less wood on hand than if you use it around the clock to keep the place warm. Also, are you using it to heat your entire house, or are you only using it to heat part of the house, or one of the outbuildings, for example.

    Understanding how much wood you will go through in a typical day will give you a better idea of how much you need. Generally, you will be buying wood in what is called “cords”. A cord of wood measures 4’ high and 4’ wide, while being 8’ long. You do not typically have to buy a full cord of wood though. You can also buy half a cord or even a third of a cord. Make sure you have a place on your property where you can keep the wood out of the weather so it remains nice and dry.

    You will likely have people in your area that sell firewood. If not, you may want to cut down some trees on your own property. When you are buying, it’s always better to have a bit more than you think you need, just so you don’t run the risk of having no wood part-way through the winter. After all, you can always keep the extra wood for the following winter.

    If you liked this, you might also enjoy…

    Holistic Medicine Basics

    Ever Considered Taking Yoga? Read this

    The Ultimate Woodworking Course..


  • Winterizing the Chicken Coop (Video)

    Winterizing the Chicken Coop (Video)

    We love our feathered friends, so it’s important that we make sure they have the best care through the winter! This clever Chicago couple kept getting questions as to how they cared for their backyard chickens through the notoriously brutal Chicago winters, so they made a video to show what they did. Their chicken coop looks nice and cozy! Check it out:

    If you liked this, you might also enjoy…

    Ancient Healing Secrets You Can Learn at Home…

    Yoga and Weight Loss: What You Need to Know

    How to Become a Master Woodworker..

  • Winter Composting Tips

    Winter Composting Tips

    A compost pile that has done fine all year long can freeze solid on you in the winter.  This could leave you having to buy soil or compost in the spring when you are planting again.  To avoid this, keep these tips in mind this winter for your compost pile.


    Build it Big

    A large compost pile will remain hotter than a small pile.  There will be more food in it for composting organisms and the outer portion will insulate the center.  When temperatures drop, worms and other organisms will simply migrate to the center of the pile until it warms up again, rather than dying off leaving your pile in stasis.

    Put it in the Sun

    Place your winter compost pile where it can receive the most sunlight.

    Cover It

    Cover your compost pile with plastic.  This will allow you to control the moisture level and insulate it from the cold.  If possible, use black plastic since it will absorb the most sunlight and heat up more.

    Add hot Material

    Make sure to keep feeding your composters with the material that heats up your pile.  Grass clippings will probably not be on the menu for them in the winter but coffee grounds are a favorite of composters.

    Don’t Turn

    Turning your compost pile in cold weather will allow all the heat to escape the warm center which could be fatal to your composters.  When you adding more food for them, like coffee grounds, instead of turning the pile make a hole in it with a long stick.  The handle of a shovel should work, jab it into the center of your pile and wiggle it around until you have a hole that you can pour your grounds into.  Then fill the hole back up with you done.


    Don’t think that because the days are too short to grow vegetables this time of year that you have nothing to do in the garden.  Staying on your compost in the winter will give you the ability to get your garden going quicker and with better results in the spring time.


    If you liked this, you might also enjoy…

    Learn to Heal and Treat Illnesses Naturally…

    An Ancient Secret to Slimmer Waists…

    Learn to be a Master Carpenter at Home...

    Edit

  • DIY Vapor Rub Recipe

    DIY Vapor Rub Recipe

    Cold and flu season are no fun, especially if you are experiencing bad congestion that makes it difficult to sleep, breathe and go about your daily business. Vick’s is the classic remedy for terrible congestion, but it’s actually petrolium-based, which is pretty much as bad as it sounds. Who wants to add carcongens to an over-the-counter cold remedy?

    This natrual and homemade alternative is not only much safer and healtier, it also smells even better and is more effecive. Also, if you make the initial purchase of these basic ingredients, the essential oils will probably last for years of many recipes. A little bit of this healing rub goes a long way, too!

    Here’s how you make it:

    Ingredients: 

    1/2 cup olive, coconut or almond oil

    2 tablespoons beeswax (pellets are easiest to measure and use)

    20 drops eucalyptus essential oil

    20 drops peppermint essential oil

    30 drops camphor essential oil

    Small jar with lid (an old baby food container or something similar works really well)


    How to Make It: 

    1. Fill a shallow, small skillet with about half an inch of water and place on the stove.
    2. Measure out your oil and beeswax into your jar. Put the lid aside for now
    3. Place the jar in the skillet and put your stove to low
    4. Keep an eye on it as the water heats up; the beeswax will begin to melt
    5. Once the oil-beeswax mixture is totally melted, carefully remove the jar from the skillet
    6. Add all of your essential oils to the jar and blend, using a popsickle stick or some other disposable utensile, as beeswax can be very hard to clean off regular metal spoons or forks
    7. Place the lid on the container and set the jar aside to cool
    8. Once it has cooled, it’s ready to use!

    How to Use:

    You can keep your jar of vapor rub in the cabinet just as you would any other balm or ointment. It will last virtually indefinitately. When you are sick, apply a modest amount to chest, back and feet. It can cause a bit of a hot/cold sensation though, so you might want to try just a little bit at first to see how much you can handle and then apply more accordingly.

    If you liked this, you might also enjoy…

    Natural Healing Techniques Doctors Don’t Want You to Know…

    The Weight-Reducing Magic of Yoga…

    The Ultimate Woodworking Course..

  • How to Make a Double-Sided Draft Stop

    As winter rolls in and temperatures drop, you don’t need to freeze in your own home to keep your heating bill from climbing.  Drafts can be a major source of heat loss, even inside your home from unheated portions that are not in use.  Here is a great instructional video with simple to follow instructions on how to make a double-sided draft stop for doors.

    This is only a basic demonstration, you can substitute materials to fit what you have available, like using dried pop-corn instead of the pool noodle, or an old pair of jeans instead of new fabric.  You can even make a one-side, version with custom dimensions for a drafty widow.  Hope this helps keep you warm this winter.


    If you liked this, you might also enjoy…

    Natural Healing Techniques Doctors Don’t Want You to Know…

    The Weight-Reducing Magic of Yoga…

    The Ultimate Woodworking Course..

  • Winterizing Small Engines

    Winterizing Small Engines

    Tools aren’t cheap, but preventative maintenance is.  Don’t overlook properly winterizing your small engines this year.  If you do, it could mean having to spend hundreds of dollars on repairs next spring.  Instead, follow these easy steps to take care of your tools.


    Clean Them

    Spray off your mower or trimmer with a pressure washer and soapy water.  If you don’t have a pressure washer just use a hose, or what you have available, and a scrub brush.  Make sure you remove all debris.  Spray WD-40 into any tight areas, or areas that you notice any rust.

    Change Oil

    Old oil that is allowed to sit all winter can turn into a corrosive type of sludge that can cause serious damage to your engines.  Perform an oil change according to the owner’s manual for your tool.

    Remove Gas

    Drain the fuel from the tank.  Then start and run the machine until it dies to make sure to remove any excess fuel that is still in the lines and carburetor.  Try to restart it just in case.

    Change Sparkplug

    After the engine has cooled, remove the spark plug.  Prior to installing the new spark plug, pour about a tablespoon of engine oil into the cylinder, then pull the starter cord slowly to turn the engine over a few times allowing the oil to move over the cylinder and pistons.  Then replace the spark plug with a new one and reconnect.

    Make a list

    Now your small engine is safe for storage, but there still might be plenty of work to do prior to using it again next spring.  Now is the time to look over your machines and make a list of any other work that needs to be done that you can take care of during your down time this winter.


    You’ve spent a lot of money on your tools, don’t neglect them now.  If you do, you will might be kicking yourself in the spring!

    If you liked this, you might also enjoy…

    Natural Healing Techniques Doctors Don’t Want You to Know…

    The Weight-Reducing Magic of Yoga…

    The Ultimate Woodworking Course..