Page 79 of 81
1 77 78 79 80 81
Ethan Archer – Page 79 – Homesteader Depot

Author: Ethan Archer

  • Five Ways to Preserve Herbs

    Five Ways to Preserve Herbs

    As summer winds down, you may have a garden brimming with herbs just dying to be harvested. One of the biggest downsides of herb gardens is how much work it can be to process all the herbs! A pretty good problem to have, if you ask me. Here are five great ways to make the most of a bulk herb harvest and keep your herbs through the winter, for many months of delicious cooking.

    Freezing 

    This is quite possible the easiest and quickest method of preserving herbs. Simply toss your herbs in a Ziploc bag, squeeze the air out, and stick right in the freezer. You can pull them out whenever you need some and, other than the additional moisture content, they can be used just as you would dried herbs. This might be the best option for space as they can be flattened in the bags and stacked pretty easily in a freezer.

    Freezing in oil 

    This is the best way to preserve herbs if you want to just grab a small amount to toss in a pasta sauce or other dish. Stick small portions of the herbs in each section of an ice tray, then cover with oil and freeze. Once they are frozen you can pop out the cubes and put them in a Ziploc bag for long-term storage in the freezer.

    Drying

    The most classic way to dry herbs, this can be done either in a dehydrator, a very low oven with the door cracked, or hung on a string. If you have a particularly dry cellar or pantry, you can even just put them in a paper bag for a few weeks. Once dried, they can easily be removed from the stem or stalk and put in airtight jars.

    Preserving in salt or sugar

    In an airtight jar with salt or sugar, herbs will keep sometimes for up to two years and flavor the medium you’re preserving them in. The salt or sugar will absorb the flavor of the herb can be used as you regularly would. This might be nice for homemade bath salts or body scrubs too, with herbs like lavender or lemon balm.
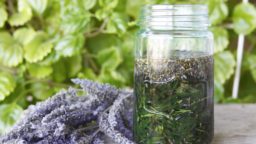
    Preserving in oil 

    This is a very delicious way to preserve herbs! The herbs must be completely free of moisture, and are packed in jars, often with garlic as well, and covered with oil. You can use one of those fancy oil bottles as well. Let sit for a few weeks and then just use as regular oil. Also a lovely option for gifts.

    I hope this list has given you some ideas for maximizing your herb harvest this year-at the very least, I bet it’s made you hungry! Happy cooking!

    If you like this, you might also like:

    Advanced Gardening Course To Accelerate Your Food Production…

    Survival Medicine & Wilderness Survival…

    Survival Techniques From Long Ago, Re-purposed For The Modern Era…

  • Monsanto or Organics: Who Should You Trust? (Infographic)

    The notorious ago-giant Monsanto has been genetically modifying foods, dominating the agricultural industry and putting small farmers out of business with ridiculous lawsuits over their crops being cross-pollinated with Monsanto GM seeds for decades. But they have a a frighteningly massive influence over the media and government (the USDA is a revolving door of Monsanto employees going in and out, but that’s another post), so if you are someone you know is a skeptic, here is a very informative infographic on who we should trust with our food source, originally published on Care2.com.

    dont-trust-monsanto

    *Superfund is a United States federal government program designed to fund the cleanup of sites contaminated with hazardous substances and pollutants. It was established by the Comprehensive Environmental Response, Compensation, and Liability Act of 1980 (CERCLA).

    If you like this, you might also like:

    Advanced Gardening Course To Accelerate Your Food Production…

    Survival Medicine & Wilderness Survival…

    Survival Techniques From Long Ago, Re-purposed For The Modern Era…


  • Crock Pot Sourdough Recipe

    Crock Pot Sourdough Recipe

    Sourdough bread is delicious, and nutritious! When made with a real sourdough culture, it breaks down the anti-nutrients in the wheat that are commonly attributed to gluten intolerance and allergy. There’s also no better-tasting sourdough than when it is made fresh at home.

    A very easy way to make sourdough is right in your crock pot! If you don’t have a bread maker or don’t want to heat up your kitchen in the hot summer months, crock pot sourdough is a wonderful option. It also makes for a very easy way to rise the sourdough.

    First, you’ll need your culture. This is the most time consuming, but once you have one going, it’s a lot simpler to make loaf after loaf. This blogger seems to have originated crock pot sourdough, and also has a recipe on her website for the culture.

    Once you have a bubbly, active sourdough culture, you can follow this recipe here for delicious crock pot sourdough:

    Crock Pot Sourdough Recipe

    1 cup active culture

    3 cups flour (you can use some combination of white, white whole wheat or whole wheat if you like)

    salt

    warm water

    olive oil for greasing

    1. In a large bowl or food processor, quickly stir or pulse the salt throughout the flour. Then add the culture and mix or pulse until blended.

    2. Next add 1 cup of warm water, and stir or blend until you have a uniform dough that can be formed into a ball. You might need to add either more flour or water as needed. Should be sticky, but not too wet.

    3. Let rise overnight, either in the bowl or food processor, lightly covered, or, for a really nice, steamy rise, you can heat up your crock pot for a few minutes, then grease, and put the dough in to rise.

    4. Once the dough has at least doubled in size, it’s ready to cook. If it’s been rising outside the crock pot, dump it out onto a floured surface and reshape slightly into a loaf if needed. Then place in the greased crock. If it has been in the crock already, simply move on to the next step:

    5. Cover the crock with a dish towel or paper towel to absorb the moisture as the bread cooks. Then, cover with the crock pot’s lid. Set to low for about 1.5 hour, then check. when it’s done, it will be browned around the edges and no longer sticky and doughy on the top. It might need an extra .5 hours to achieve this.

    6. It’s hard to get a really crispy top in the crock pot, so you might want to finish it off for 2-3 minutes in the broiler-just watch it carefully so it doesn’t burn! This step is totally optional.

    7. Set on a cooling rack and once the loaf is cool enough to touch, enjoy! It’s best served fresh with warm butter and honey.

    If you liked that, you might also like:

    Advanced Gardening Course To Accelerate Your Food Production…

    Survival Medicine & Wilderness Survival…

    Survival Techniques From Long Ago, Re-purposed For The Modern Era…

  • Preparing the Homestead for Winter

    Preparing the Homestead for Winter

    I know, I know, it’s not even labor day yet, but it’s never too early to think about preparing the homestead for winter. The key to a safe winter is planning, preparation and foresight. If you’d like to homestead one day or get more off-grid eventually, here are a few basic tips for winter prep you can start considering now, for this year or the next. Even if you’re not a homesteader at all, these are useful tips for disaster preparedness through the winter.

    Collecting Firewood

    This is probably what comes to mind first when you think of preparing for winter, and it is of course vital. Fireplaces and wood stoves can be lifesaving, and even if you have gas stoves, you may want to consider a wood-burning backup for heating and cooking, in case gas lines get shut down or roads get blocked and you can’t drive to purchase more propane.

    You can purchase truckloads of firewood, sometimes find people selling it or giving it away on websites like Craigslist or other local listings, and of course cut your own. The most important factor is dryness: storing the wood while dry and keeping it dry.

    Storing Food

    As summer wanes away, take advantage of your garden harvest and also whatever harvest is going on in your community and start preserving food. Canning, drying, fermenting and packing in oil are all great options for refrigeration-free food storage in your cellar. Also if you are a hunter or know some, you’ll want to start preserving meat too. Meat can also be canned, made into jerky, and you can also render tallow too.

    Even if you are happy with your emergency supply of canned goods, preserving fresh produce through the winter is a very good idea for nutritional reasons. Throughout the winter, finding fresh, local produce can be very difficult, so preserves offer a nice alternative to irradiated Ecuadorian produce.

    Make repairs 

    Before the weather gets cold is the ideal time to check your house for any repairs that might need to be done before winter. You wouldn’t want to find out in the middle of a winter storm that you’ve got a leak in your roof or poor insulation on one of your windows. Get your regular maintenance done on your vehicles, too.

    Other ways to prepare for winter are to make sure you’ve got flashlights and/or oil lamps with spare batteries and/or oil, plenty of winter clothes and blankets for your family, and-something often overlooked-a way to dry clothes indoors. With the right considerations and foresight, you can have a very safe and prepared homestead winter.

    If you liked that, you might also like:

    Advanced Gardening Course To Accelerate Your Food Production…

    Survival Medicine & Wilderness Survival…

    Survival Techniques From Long Ago, Re-purposed For The Modern Era…

  • Easiest Herbs to Grow for Tea

    Easiest Herbs to Grow for Tea

    Herbal tea can be very calming, invigorating and of course, healing. These days, however, a lot of major herbal tea brands that have become staples in homes and health food stores unfortunately have added ingredients like natural flavors and soy lecithin. The good news is, there’s several easy and delicious options for homemade herbal tea!

    Mint

    Mint is the most obvious and a lovely option for tea. Tea made with mint leaves can help with upset stomachs and other digestive issues, and it is also very calming and refreshing. It grows best in well-drained soil and shade, and it crawls so it’s a great ground cover. It also repels bests so it’s perfect around your garden beds.

    Lemon Balm

    Lemon balm makes for a delicious tea with a lovely flavor, and it’s very medicinal too. Perfect for treating colds, it is a wonderful natural sedative for restless children or patients. It’s an easy and low-maintenance herb, that can get very big very quickly, so it’s perfect for tea as you’ll want to cut it back often.

    Dandelion

    Dandelion tea, either from the roots, leaves or flowers, is wonderfully medicinal and also quite flavorful. The root even can be used to make caffeine-free, liver-supporting coffee. Odds are you already have dandelion growing in your lawn or pasture, but it can be easily grown in gardens as well.

    Chamomile 

    Chamomile is a classic herb tea that’s a lovely bedtime treat. It is wonderfully medicinal, benefiting chest colds, inflammation, eczema and allergic reactions. Best grown outdoors in the ground, it can be a lovely option for mass planting and the pretty little flowers are a great landscaping choice as well.

    These are just a few options for herbal tea-there’s many more out there! Home-grown and home-brewed tea is the best you’ll get, for taste and for health, so consider some of these wonderful tea herbs today!

    If you liked that, you might also like:

    Advanced Gardening Course To Accelerate Your Food Production…

    Survival Medicine & Wilderness Survival…

    Survival Techniques From Long Ago, Re-purposed For The Modern Era…

  • How to Propagate and Use Comfrey

    How to Propagate and Use Comfrey

    Free medicine doesn’t just come from the government (kidding!).

    The wonder plant comfrey is one of the easiest herbs to grow and among other amazing benefits it has been known to speed healing in bruises and broken bones.

    One hardly needs a green thumb to take advantage of this plant’s healing properties.  Comfrey is most commonly grown from root divisions.  These can be purchased online from your favorite gardening website, or even on Amazon. But even easier, they can easily be taken out of ground from any mature comfrey plant that you have access to without doing the slightest damage to the existing parent plant.

    If making your own cuttings, simply dig up the entire parent plant, and cut off the existing leaves. You can save them for poultice or just “chop and drop” them near any plant that you wish to add nutrients to.

    Then divide the root base-which is about all there is going to be left of the plant after removing the leaves-into as many pieces as you can given the plant that you have to work with. Cutting the pieces too small may reduce the chances of survival or at least increase the time it will take for the cutting to regrow, try going with pieces about the size of your fingers.

    Next, all you need to do is put the new cuttings in containers with potting soil, keep them moist, but not saturated, and in indirect sun for around two weeks.  When your new cuttings first sprout, it will be only time that these hard plants are vulnerable, so try to keep them on a start table to reduce pests.

    Once established, these plants will continue to produce medicinal leaves and grow more roots, allowing you to easily and exponentially grow your comfrey supply.

    Once you have a hearty supply of comfrey in your garden, turning it into useful medicine for treating burns, bruises, sprangs, and broken bones is just as easy as growing it.

    First, harvest the leaves. Consider leaving at least 20% of each plants leaves intact will help speed regrowth, but if necessary comfrey can recover from being run down with a lawn mower so don’t worry too much.

    Then puree, the leaves in a blender that you don’t use for food-or at least one that you will clean thoroughly before using again for food, since comfrey does contain hepatotoxic pyrrolizidine alkaloids which can cause liver damage if ingested.

    If no blender is available, the leaves can be finely chopped and beaten to a juicy pulp.  The puree or pulp can then be placed directly on the wound site and wrapped with plastic wrap or cellophane, which would in turn be wrapped in an ace bandage to keep it in place.  This can be left in place over night and changed out in the morning.

    This isn’t all this plant has to over though, so check back soon for more information on how, among other things, comfrey can increase food production and help with weed control.

    If you liked that, you might also like:

    Advanced Gardening Course To Accelerate Your Food Production…

    Survival Medicine & Wilderness Survival…

    Survival Techniques From Long Ago, Re-purposed For The Modern Era…

  • The Ultimate Survival Medical Course

    The Ultimate Survival Medical Course

    Most people think the biggest threat during any disaster are the lack of food, water or shelter. But there is a deadly, medical-course
    silent killer that many are not prepared for. This powerful silent killer is disease and infection.

    This video is a must-watch to learn how to protect yourself. Whenever a disaster or major cataclysmic event hits, hospitals are overflowing with diseased, dying and even dead patients as nurses and doctors are overwhelmed with the workload.

    Supplies are low, water is often shut off or contaminated, power lines and communication are down, and thousands hospital-unreliableof people are in need of medical attention.

    We put our faith in our medical industry, but in reality we’re really poorly equipped. Western hospitals are ill prepared for a massive outbreak of disease.

    But there is hope. You simply can’t afford not to learn more about this incredible and bulletproof method that is guaranteed to keep you and your family safe when disaster hits the death toll rises.

    Don’t put your faith in our inadequate and unreliable medical system. Bioterrorism, viral infection, or a natural disaster are all realities we have to face and prepare for. Click the link below to watch this eye-opening presentation and learn how to protect your family and prevent unnecessary death.

    The ultimate survival medical course

  • 2 DIY Skincare Recipes for Any Homesteader

    2 DIY Skincare Recipes for Any Homesteader

    Did you know that you don’t need a ton of chemical-heavy, processed skincare products to look and feel younger and more vibrant? In fact, your homestead and garden could provide all you need to make more effective and healthier skincare products than any of the store-bought products you’ve used in the past.

    Lavender Body Lotion

    For firm, hydrated skin that feels soft and smooth, try this recipe for a calming lavender body lotion. You’ll need:

    • 1/3 cup coconut oil
    • 2 tablespoons beeswax
    • 3-6 drops lavender oil

    Mix the ingredients well and store them in a cool, dark place when not in use.

    Lip Exfoliant

    Throughout the year, thanks to changes in temperature and humidity, the skin on your lips really takes a beating. Regularly exfoliating can prevent chapping and help keep your lips looking gorgeous, even without the use of lip balm (which can be addictive and can cause your lips to dry out whenever you don’t use it).

    First, gather these ingredients:

    • 1 vitamin E capsule
    • 1 teaspoon olive oil
    • 2 teaspoons honey
    • 2 teaspoons brown sugar
    • 4 uncoated aspirin tablets

    Mix all ingredients together, being sure to crush the tablets and capsule so that everything is equally mixed. Apply a layer of the exfoliant to your lips and lightly scrub with your fingers or a soft toothbrush. If you have leftover exfoliant, you can store it in a clean container in a cool, dark place and it should keep for several weeks or months.

    These are just two of the ways you can use ingredients you’ll find around your home and in your garden to keep your skin fresh and beautiful. Remember, along with these, if you eat a diet of whole, organic foods from your garden, and you regularly wash your face with non-detergent soap, you’ll look gorgeous for years to come.

    If you liked that, you might also like:

    Advanced Gardening Course To Accelerate Your Food Production…

    Survival Medicine & Wilderness Survival…

    Survival Techniques From Long Ago, Re-purposed For The Modern Era…