Page 2 of 3
1 2 3
canning – Page 2 – Homesteader Depot

Tag: canning

  • Cold Canning vs Water Bath vs Pressure Canning

    Cold Canning vs Water Bath vs Pressure Canning

    When considering canning as an option to preserve produce from your garden, which method should you choose? You may find that each method (pickling, hot water bath, and pressure) yields different benefits suitable for different veggies or products.

    Cold canning is fast, easy, and great for short-term storage. We pickle cucumbers, squash, peppers, and many other veggies.

    Water Bath Canning gets up to boiling temperature which works great with high acid vegetables like tomatoes. However most vegetables do not have a high enough pH to can with this method without adding an acid source.

    Pressure Canning gets your jar’s internal temperature up to 240 degrees Fahrenheit or higher. This is hot enough to prevent botulism and kill other bacteria that could cause serious health risks.

    Check out this short video to see each method’s pros and cons compared!

    If you liked this, you might also enjoy…

    The Secret to Sustainable Homestead Energy…

    The BEST Diet Hacks for a Primal Lifestyle…

    Defeat Body Pain at Any Age…


  • How to Use Up Extra Tomatoes

    How to Use Up Extra Tomatoes

    Too many tomatoes is a great problem to have! Whether you’ve found a killer deal at the grocery store or farmer’s market, or your garden is overflowing with juicy, ripe, tomatoes just begging to be used up, having too many tomatoes on your hand is awesome, but also poses a big challenge. How on earth can you use up all those delicious tomatoes?

    Well, we’ve got you covered. All it takes is a little creativity! Here are some great suggestions for how to make the most of a big bounty of tomatoes.

    Canning 

    This is the classic way to preserve extra tomatoes, and definitely on the top of the list for a reason. You can can them whole, diced, pureed, or in delicious tomato sauces or even salsas! Then, all winter long, you can add your tomatoes to pastas, casseroles, chili, etc.

    Ferments

    You can of course can up all your tomatoes or tomato sauces, but did you know you can lacto-ferment them too? We’re big fans of lacto-fermentation around here, which not only naturally preserves tomatoes, it will enhance the nutritional content as well! Lacto-fermented salsa (recipe coming soon!) is a great way to make the most of a lot of tomatoes, and preserve them long-term.

    Trade

    Do you live in a big farming and/or gardening area? Try talking to your friends and neighbors and see if their gardens are overflowing with something you don’t have! Trade some tomatoes for delicious cucumbers or zucchini, or even dairy, eggs, manure, whatever they’ve got to spare!

    Freeze

    If canning or lacto-fermenting aren’t your thing, you can of course always just chop them up and freeze them! Frozen tomato can be used much in the same way that canned tomato can be. This is a great option if you don’t have too much time to invest in complex preservation projects but would still like to have a nice supply of tomatoes on hand to use through the winter.


    Tomatoes are delicious, nutritious, and a cornerstone of many great dishes. If you end up with a lot of them, make sure you use them and preserve them well!

    If you enjoyed this, you might also like….
    How to Lock Down Your Homestead…

    The Ultimate Guide to Natural Health…

    Effective Primal Diet Hacks…


  • How to Store Food in Vacuum Packed Canning Jars (Video)

    How to Store Food in Vacuum Packed Canning Jars (Video)

    I’ve had a vacuum sealer for years that has an attachment on it for canning. I never thought much of it, and figured it required a bunch of fancy additional equipment to use. However, it recently just clicked that I can use it for vacuum canning! And it doesn’t take much at all, just a lid for my jars, and I’ve got plenty of canning jars already.

    So, I wanted to learn how to use it. This video is a great tutorial on how and why to use your canning attachment to your vacuum sealer. She explains how long the food will keep, where to find the accessories you’ll need for vacuum canning, how hers works, and gives a demonstration of the whole process. She also demonstrates how to re-open the can once it’s been sealed.

    To me, if you already have a vacuum sealer with a hose attachment, and aren’t already set up for canning (or even if you are), this seems like a really quick, easy, and mess-free way to preserve food through canning. Enjoy!

    If you enjoyed this, you might also like….

    Can You Defend Your Family When SHTF?

    Natural Healing Secrets You Need to Know…

    Effective Primal Diet Hacks…

  • How to Can Butter (Yes, Really!)

    How to Can Butter (Yes, Really!)

    Lately, butter has come raging back as nutritionists reveal it’s actually quite healthy for you. For a few decades, butter was demonized as too fattening and unhealthy, but as vegetable-oil based alternatives were introduced, we saw obesity rates skyrocket. Not sure why no one ever noticed the correlation, but it turns out that in fact, the saturated fats that come from butter are not only better for you, they can ultimately help lose weight when coupled with a balanced diet full of “good” fats, and free of processed foods and sugars.

    I personally love butter, and was really excited to discover that you could, in fact, can it. How cool is that? Not only do you get to enjoy all the deliciously fatty butter you want, (goodbye, margarine!) you can also preserve it at room temperature for your survival or homestead pantry! I’m sold.

    So, here’s how you do it.

    First, you will need: 

    • Butter (you will need roughly 3 jars for each lb of butter)
    • 8-oz canning jars
    • Lids
    • Water bath canning kit
    • Ladle 
    • Canning funnel 

    Directions: 

    1. First, heat your jars up in a 250 degree oven for 20 minutes.
    2. Next, melt your butter in a saucepan over low heat. If you’re using a lot of butter, you might want to do this in batches.
    3. Stir gently to prevent burning, and let the butter melt and simmer a bit until there is a white foam at the top.
    4. As you’re doing this, place your lids in another pot over the stove, cover with water, and bring to a boil. Turn the heat to low to keep them warm while you work.
    5. Once the butter is melted and has a foam lip, ladle it into your jars, using your canning funnel. Leave 3/4″ head space at the top.
    6. Once the butter is poured into the jars, prepared your water bath.
    7. Wipe the jars off with a clean, damp rag to remove any butter that may have spilled on them. They won’t seal if they’re greasy!
    8. Place the lids and rings on the jar, and tighten loosely.
    9. Once the water in your water bath is warm, put the jars in. They need to be in at least 1″ of water.
    10. Once the water boils, set a timer for 10 minutes. When 10 minutes is up, let cool for another 10 minutes.
    11. Now, remove from the bath and place on a towel to dry. As you clean up, try to remember to shake the jars every few minutes, so the butter will remain a uniform consistency.
    12. Once it is cool, it’s ready to store! Keep in a cool, dark place, and enjoy!

    If you enjoyed this, you might also like….

    Are We In The End Times?

    Complete Health Transformation Without Drugs or Surgery…

    Having Trouble Sticking With Paleo?

  • How to Can Hamburger

    How to Can Hamburger

    I’ve been sharing a bit about canning meat lately, and I thought I’d share an actual recipe for how to do it.

    Now, remember that you do need an actual pressure canner to can meat, but given the amount of foods you can preserve with a pressure canner, it’s definitely worth the investment.

    Any way in which you can preserve meat is great to be able to do, since it’s nutritious and caloric. When it comes to canning hamburger in general, this is a great option for meat canning as you can take advantage of sales (ground beef goes on sale often), buy and preserve in bulk, and then have a great little stash for cheap meals or even survival.

    Here’s how:

    What You Need: 

    • sterile canning jars and lids
    • ground beef (1 lb of beef fits pretty well in one pint canning jar, to give you an idea of how much of both you will need)
    • stovetop and skillet
    • pressure canner
    • beef or chicken stock or broth
    • salt

    Directions: 

    1. To start, make sure your jars are properly sterile, your meat is ready to go, your kitchen is clean, and your pressure canner is ready.
    2. Preheat your skillet and brown your meat gently. It doesn’t have to be entirely cooked, just browned a bit.
    3. As your browning the meat, but your lids in very hot water and set aside.
    4. When the meat is done browning, pack it into the jars, leaving 1″ at the top. When you’re finished, drain the grease from the jars.
    5. Next, pour in your stock or broth, leaving 1″ at the top.
    6. Add a teaspoon of salt to each jar.
    7. Using a clean, warm cloth, gently wash the lids of your jars to prepare for sealing.
    8. Place the lids on the jars and tighten until finger tip tight.

    The Canning Process

    Now that you have your meat in jars and ready to be canned, it’s time to move on.

    1. Place your pressure canner on the stove, with the rack on the bottom.
    2. Fill with 3 quarts of hot water.
    3. Add as many jars as you can fit in the canner, so that they are not touching.
    4. Put the lid on according to your model’s instructions, and set the oven to high. Do not put the gasket on yet.
    5. Wait about 10-15 minutes, until there is steam coming out of the steam vent.
    6. Once you see steam, set your timer for 10 minutes. After 10 minutes of exhausting steam has passed, then put on your gasket.
    7. Keeping your oven on a high setting, wait until the “topper” pops up, which should take about 5-10 minutes. Once the pressure gauge shows designated pressure of 11 lbs, gently lower your stove to keep it there, and set your timer for 75 minutes. Check periodically to make sure the pressure is maintained.
    8. After 75 minutes, turn off the stove and carefully remove your canner from the burner.
    9. Once the pressure has dropped to zero and the topper has gone back down, you can carefully remove the jars and place them on the counter to “pop”/seal.
    10. Once your jars are cooled and sealed, label them and store them.

    Your canned meat will last in a cool, dry pantry for 2-5 years.

    If you enjoyed this, you might also like….
    Can You Defend Your Family When SHTF?

    Natural Healing Secrets You Need to Know…

    Effective Primal Diet Hacks…

  • How to Can Beef Soup (Video)

    How to Can Beef Soup (Video)

    I recently discovered that a really great homestead blog, Homestead Acres, has a YouTube channel that is packed with great videos on this homeschooling, homesteading family sharing their experiences on their thriving homestead.

    This is one video on a series on homesteading, and I think it’s a really useful recipe for one who is trying to build up a good stockpile for your home or homestead. What’s cool about this recipe is that you start baking broth out of beef bones, which is not only a really economical way to store calories, it’s also insanely nutritious.

    The beef soup is canned using a pressure canner, which is a bit of an investment, but well worth it if you want to seriously expand your stockpile with nutritious and caloric canned foods. Pressure canning allows you to preserve things like beans and meat, so while water bath canning, which can be done without a pressure canner, is great for fruit and vegetables, a pressure canner is what you want if you want to store protein and fat, which you’ll need for serious long-term survival or self-reliance.

    That’s why I love this recipe: it uses the very affordable base of bones and vegetables for a hearty, healthy soup that will provide serious sustenance, whether you want to produce a lot of meals in a short period of time or prepare for hard times ahead. Enjoy!

    If you liked this, you might also enjoy…

    The Sinister Future of the US…

    Pure, Natural Healing…

    Donald Trump’s Words of Warning…

  • How to Preserve Flour for Up to Five Years (Instructions and Video)

    How to Preserve Flour for Up to Five Years (Instructions and Video)

    Did you know there’s such a thing as canning flour? Neither did I, but I recently came across a video with instructions on how to do it. I’ve dealt with both weevils and pantry moths in the past, so I was pretty intrigued by this method, and it definitely seems like a surefire way to store flour for a long time.

    It’s not really as complicated as canning other types of food, but it follows the same principles. Here is what you need:

    Supplies: 

    Flour that you want to preserve

    Half-gallon canning jars and lids

    Canning funnel (very useful, but optional)

    Paper towels and dish towels

    Labels or marker

    Instructions: 

    1. Before you begin, start with properly sanitized jars. You can do this by washing, drying, and baking in the oven for about 20 minutes.
    2. When you’re ready to can your flour, preheat your oven to 215 degrees
    3. Using the canning funnel (if you’ve got one), fill your jars with flour. Make sure they’re packed in well, you can gently tap the car on the counter to let the flour settle in the jars.
    4. When your oven is preheated, move your oven racks so you will be able to fit the jars, and place them on a sheet in the oven, without the lids.
    5. Leave in the oven for 1-2 hours. This will dry out the flour and prepare the jars for the “canning” effect.
    6. After 1-2 hours has passed, take the jars out (carefully!) and place on a dish towel on your counter
    7. Wipe down the rims of the jars with a damp paper towel, then attach the lids as tightly as you can
    8. Leave the jars out overnight on the counter. In this time, they will cool and pop the lids out, completing the canning process.
    9. In the morning, label the jars with the date you canned them.
    10. Store in a cool, dark places, for up to five years.

    That’s it! Pretty cool huh? Check out the video if you’d like to see more:

    If you enjoyed this, you might also like….
    Home Defense in the End Times…

    Natural Healing Secrets You Need to Know…

    Eat Like Your Ancestors…

  • Canning Stone Fruits (Infographic)

    Canning Stone Fruits (Infographic)

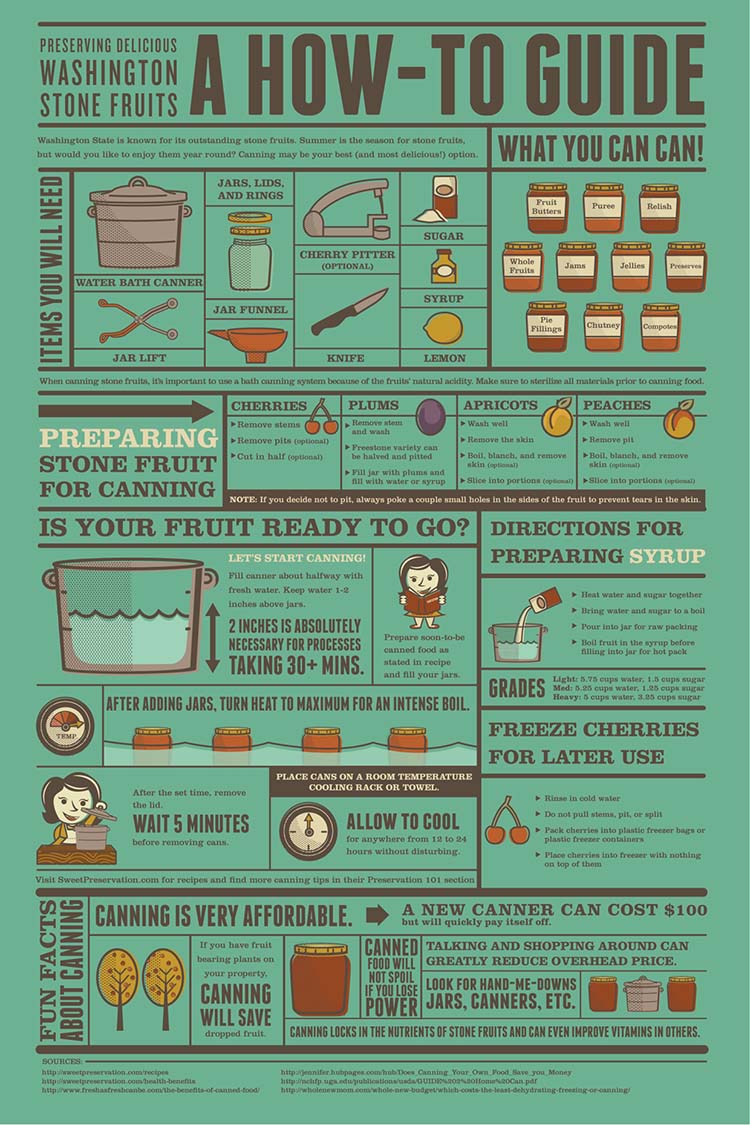
    I have always been fascinated by canning, and I’d love to do more of it myself. It always seems kind of intimidating, but it’s really not too complicated, and this handy infographic from SurvivalLife.com breaks canning stone fruits down into simple steps.

    Stone fruits are some of the easiest items to can, and the steps taken in this guide can be followed with a $10 canning kit from Walmart or any grocery store. Cherries, plums, apricots, and peaches, make great preserves, from jams and jellies to easy pie fillings.

    I think my favorite thing about canning is how long preserves last, up to several years when stored properly, and how an afternoon of canning can produce months of delicious preserves. If you don’t have a local supply of seasonal stone fruits, you could always wait until they’re on sale at your grocery store, buy a bunch and try your hand at canning them!

    Canning Info


    Natural Healing Techniques Doctors Don’t Want You to Know…

    The Weight-Reducing Magic of Yoga…

    The Ultimate Woodworking Course..