Page 1 of 2
1 2
homemade – Homesteader Depot

Tag: homemade

  • Why Do You Need a Greenhouse and Things to Look for

    Why Do You Need a Greenhouse and Things to Look for

    Many avid gardeners have considered putting a greenhouse in their yards. There’s just something about having the ability to grow tropical and warm-weather loving plants year-round that really appeals to them. If you’re one of these people, then you need to read this primer about greenhouses. It contains just about everything that you need to know about them.

    What Is A Greenhouse?

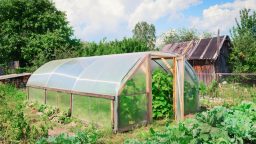
    Let’s start by defining exactly what a greenhouse is. These are structures of various sizes that have clear walls and roofs. Some of the fancier greenhouses have glass walls, although you can use clear, plastic polycarbonate sheeting as well. A greenhouse is designed to provide a respite from the outdoor weather. It’s warm year-round so that plants easily grow inside of them. The clear walls let in plenty of sunlight, although the greenhouse might be built with an electrical system and some grow lights as well. This really allows the owner to control the overall temperature indoors. Some have a hydration system built-in as well, but it really is easy to use a hose, if you want a simple do-it-yourself greenhouse that your custom made on your own.

    Greenhouse Sizes

    One of the best things about greenhouses is that they come in various sizes. This means that you really can have one that fits your yard perfectly. You aren’t limited to the large commercial sized ones. Some come as small as a basic coat closet and hold seedlings. They work well if all that you want to do is plant seeds and allow them to grow slightly before the soil warms up in the spring. If you want something that can handle multiple plants and allow them to grow year-round, then you’ll want one that’s larger than that. Again, it all depends on the plants your overall vision for your greenhouse.

    Click here for some other projects you can build TODAY>>>

    Pick a Good Location

    Location matters, even with greenhouses. Yours should be located in an area of your yard that receives plenty of sunlight. Otherwise, your plants won’t grow properly – even if you have a grow light installed inside. You never want to have your greenhouse placed in a shady area of your yard. In addition to this, you need to run electric lines to it and possibly even water lines. If you can, place your greenhouse within ten to twenty feet of your own house, in order to make these things easier to install.

    What about Amenities?

    You need to think about your greenhouse as if it’s actually a house. By this, we mean that you need to consider which amenities you want it to have. Your two main options include lighting that will give your plants a boost and promote growth, even when the weather isn’t very sunny outside and a filtration system that waters the plants. Yes, you could use a portable grow light and a hose, but you also have the option of running electric lines and setting up an irrigation system. It all depends on your budget and just what you want to use the greenhouse for. There’s nothing wrong with installing a simple one that lacks these amenities.

    Building Your Greenhouse

    Just like with the amenities, you have two options to choose from here. You can either build your greenhouse yourself, which includes developing plans and literally making it from scratch or purchasing a commercial greenhouse. This latter option might involve having the greenhouse trucked to your yard and installed, or having a kit arrive in the mail that you need to build yourself. Either way, you end up with the perfect greenhouse for your needs.

    Ted is offering over 16,000, step by step, woodworking plans…check them out here>>>

  • 10 Substitutes for Baking Powder

    10 Substitutes for Baking Powder

    Baking powder is a widely used ingredient that makes your baked goods lighter and fluffier. The problem is, you might not always have it available to you. Instead of skipping the recipe altogether, discover some great substitutes that can be used in its place.

    Baking Powder Defined

    The composition of baking powder is sodium bicarbonate. It is known in the world of chemistry as a base that gets paired with an acid like cream of tartar or filler such as cornstarch. The leavening agent is used commonly in a variety of baking recipes.

    When the baking soda is mixed with water, the acidic component and the sodium bicarbonate react with one another allowing the release of carbon-dioxide gases. This reaction makes bubbles form, and that’s what adds the volume to baked goods, bread, cakes, and other foods.

    Baking soda and baking powder are two different ingredients that get confused frequently. Baking soda doesn’t have the acidic component however and must be blended with an acid to produce the same results as baking powder.

    If you run out of baking powder, try using one of these alternatives.

    1.    Plain Yogurt

    Plain yogurt has an acidic pH that adds the same effect as baking powder to your recipe. Mix ¼ teaspoon of baking soda and a ½ cup of yogurt and replace one teaspoon of baking powder. Be sure to reduce your liquid ingredients in an amount equal to your yogurt addition.

    2.    Buttermilk

    Buttermilk is similar to plain yogurt in makeup and can be used in the same manner when you don’t have baking powder as an option for your recipe.

    Suggested Article:  “Super Easy Homemade Buttermilk”

    3.    Cream of Tartar

    A two-to-one ratio of cream of tartar to baking soda creates the best finishes when using it as a substitute. ¼ teaspoon of baking soda and a ½ teaspoon of cream of tartar equals one teaspoon of baking powder.

    4.    Molasses

    Molasses is high in sugar and when using a ¼ of the liquid combined with a ¼ teaspoon of baking soda you can leave out a teaspoon of baking powder.

    You Are Not Failing Your Diet, Your Diet Is Failing YOU — Learn how To Create Quick & Easy Fat Burning Recipes That Will Taste Just Like Your Favorite Meals…Click here>>>

    5.    Vinegar

    White vinegar has a natural taste, and when paired with baking soda in cakes and cookies a leavening effect is produced. When your recipe calls for a teaspoon of baking soda, use a ¼ teaspoon with a ¼ teaspoon of baking soda and a ½ teaspoon of vinegar as a replacement.

    6.    Sour Milk

    Acidification has occurred in sour milk so using a ½ cup along with a ¼ teaspoon of baking soda can be used to replace a teaspoon of baking powder. Reduce your liquids by whatever addition of sour milk you’re using.

    7.    Club Soda

    Baking soda is found in club soda in the form of sodium bicarbonate. Use it to replace any liquids in your recipes that only require a small amount of lightness and volume. It can be used instead of milk or water for instance.

    8.    Lemon Juice

    Use ¼ teaspoon of baking soda, ½ teaspoon of baking soda, and ½ teaspoon of lemon juice to replace a full teaspoon of baking soda. There are high levels of citric acid in lemon juice that allow for the acid-based reaction that comes with baking soda.

    Related Article:  “10 Amazing Uses for Lemons”

    9.    Whipped Egg Whites

    Whipped egg whites create tiny bubbles that contribute to the rising of many baked goods. Pancakes, meringues, and soufflés often call for whipped egg whites. Beat them slowly until they foam and then increase the speed of your mixer until soft peaks start forming.

    10.    Self-Rising Flour

    Baking powder, salt, and all-purpose flour all makeup self-rising flour making it a good option if you run out of baking powder and baking soda. Just take out the baking powder, baking soda, and regular flour in your recipe and replace it with self-rising flour to help your baked goods rise.

    Never BUY Papertowels Again…Use THESE Instead>>>


  • Super Easy Homemade Buttermilk

    Super Easy Homemade Buttermilk

    Buttermilk isn’t something that you only need to buy at the store. Instead, you can make it yourself. The results will be much tastier and better for you. The buttermilk that you find in the dairy section (if your grocery store even carries it) is cultured. This type takes at least 24 hours to make, and you need to start with cultured buttermilk, making it a bit redundant, or active buttermilk culture. This process is fairly labor intensive. However, if you have a recipe that requires buttermilk and you don’t have any on hand, these quick methods will work nicely. You’ll have your own buttermilk within minutes. Are you ready?

    Option Number One

    This method produces buttermilk quickly and easily. It all starts with either lemon juice and vinegar, as well as some milk. For every cup of milk, add one tablespoon of lemon juice or vinegar to it. Place them in the same glass and let it sit on your counter for ten minutes. While the results aren’t properly cultured buttermilk (this is actually an acidified version), you’ll end up with a type that will work nicely in recipes. The acid in the milk will work to activate the baking soda or baking powder in the batter, just like it’s supposed to.

    Option Number Two

    You’ll need a few more ingredients for this buttermilk. It all starts with yogurt or sour cream and some milk. Heck, even the milk is optional – you can use water instead. The ratios are 3/4 of a cup of yogurt or sour cream to a ¼ cup of milk or water. As with the previous recipe, combine the liquid and the semi-solid in a cup and let it sit on your counter for ten minutes. You may have to stir them a bit to make everything smooth, but in the end, you’ll end up with enough buttermilk for any recipe.

    Now For Something Different

    The two previous methods described how you could make buttermilk just by letting your dairy products curdle for a few minutes. The next two are more complicated, as you’ll be making actual cultured buttermilk, just like the kind that you see in the grocery store.

    Option Number Three

    This recipe starts with cultured buttermilk. Yes, this is the same thing that you’ll be making, only you’ll end up with much more it. Think of it as a good way to never run out of buttermilk. Pour six ounces of cultured buttermilk into a glass jar. A quart jar will work perfectly. Then add in three cups of whole milk. The fresher the buttermilk, the better, since the cultures will be more effective and the process will work properly. Once you have the buttermilk and the milk in the jar, put the lid on and shake it well. Then, find a safe spot to place it. The mixture needs to sit out for 24 hours at room temperature.

    At the end of that time period, check your buttermilk. It should be thick enough to coat the walls of glass and taste just like typically cultured buttermilk. If you don’t need to use it right away, place it in the refrigerator. It should last for several weeks in there.

    Option Number Four

    This method is very similar to the previous one; only you use active buttermilk cultures instead of the buttermilk itself. The mixture needs to sit out for between 12 and 24 hours, and you need to get the ratio of cultures to milk correct. This usually is written on the packaging.

    Ideally, you’ll never run out of buttermilk thanks to these helpful methods.

    HOW TO START A HIGH-PERFORMANCEHOMESTEAD FROM THE GROUND UPLearn More Here>>>

    Here is a great video showing how simple and easy making your own buttermilk really is…

    https://youtu.be/zJbw9rXQjYI

  • 3 All Natural Homemade Flea Repellents

    3 All Natural Homemade Flea Repellents

    Fleas are miserable little creatures that can cause all kinds of discomfort and health problems for the beloved 4-legged creatures we call family. Not only do they cause uncontrolled itching and scratching they can also lead to other issues that could cost lots of money to remediate.


    Why Fleas Are More than Just a Nuisance


    Besides the obvious discomfort made by itchy flea bites, there are several other ailments that can result from them.  They include:

    • Flea allergies that can result in skin rashes and other issues.
    • Fleas feed on your fluffy friends’ blood. Excessive numbers can lead to anemia and even death from blood loss.
    • Fleas are tapeworm carriers. When your pets lick and bite at flea bites, there is the risk of them ingesting the fleas and becoming infected with these parasites.

    Want a way to repel fleas from your furry friends and your home without having to risk exposure to harsh chemicals?  Here are a few recipes that will help you accomplish this when paired with other diligent tasks.


    Vinegar Flea Repellant Spray


    Fleas don’t like vinegar.  So any pet that has its flavor isn’t going to taste as good to fleas.

    What You’ll Need:

    1. Clean Spray Bottle
    2. Apple Cider Vinegar or White Vinegar
    3. Water

    Mix 1-part water with 1-part vinegar.  Soak your pet’s fur and skin from head to toe and let them air dry in a warm area to keep them comfortable.  Repeat as often as you need to.


    Lemon Flea Repellant Spray


    What You’ll Need:

    1. Clean Spray Bottle
    2. 1-3 Lemons
    3. 16 OZ of Water
    4. Large Pan

    Slice your unpeeled the lemons as thinly as possible. In your large pan, add the lemon slices and water and bring to a boil.

    Remove from the heat and let the lemon water steep overnight.  The next day, soak your pet’s fur and skin with the spray and let air dry in a warm place to keep them comfortable.  Repeat as often as you need to.


    Discover the “terrifying truth” about commercial dog foods.  Learn More Here


    Flea Repellent Powder


    As this recipe creates a repellent in powder form, please be cautious when making and applying it. You can use these guidelines to keep you and your pet safe:

    • Do not inhale the powder.
    • Use only in well-ventilated areas.
    • Keep away from your pet’s and your own nose and mouth when applying.
    • Avoid applying around a strong wind or other drafts.

    What You’ll Need:

    1. ¼ Cup Neem Powder
    2. ¼ Cup of Powdered Yarrow
    3. ½ Cup of Food Grade Diatomaceous Earth
    4. Cedar Essential Oil
    5. Jar with a Good Lid

    Put ten drops of the Cedar essential oil into your jar with the other ingredients. Put on the lid tightly enough to form a good seal.  Shake the jar well until all ingredients are mixed thoroughly.

    To apply shake the powder into your hand and rub it well and liberally into your pet’s fur everywhere, keeping clear of the nose and mouth. Store any remaining powder in the jar with the lid fastened.


    Other Ways to Protect from Fleas


    One thing you should be aware of when choosing natural methods for flea control, these methods are not pesticides and will not kill the fleas on contact.

    However, with diligence and care, they are a good non-chemical way to protect your pet and your home from the ravages of fleas when combined with other control methods.

    These include:

    • Washing all of your pet’s bedding frequently with hot soapy water.
    • Washing and treating area rugs your pet likes to rest or sleep.
    • Vacuuming every day taking care to get into all the corners and between cushions on furniture.
    • Using a Flea Comb when grooming your pet.

    With consistent use of these precautions, both you and your pet will be able to live much more comfortably.


    [Brand New] Clean your entire home spotless and “eliminate odors” all without breathing in toxic fumes or leaving any hazardous chemical residues behind Find Out More Here >>>


  • Building Your Very Own Smokehouse

    Building Your Very Own Smokehouse


    There are a number of DIY smoker methods, ranging all sizes and prices.  If you only need to smoke small items or one medium item at a time, like a Christmas turkey, all you need is a large terracotta pot or unused metal trash can.

    But, if you need a good-sized smokehouse to help you prepare for winter on a homestead or other rural area, this design based on pallet wood should provide what you need without breaking the bank.  Its also designed so that you only need the most basic of woodworking skills to complete it.

    An important note about using pallets, most are treated with industrial chemicals. You’ll need to make sure that any pallets you use for this project are food grade wood.

    If you can get your hands on enough leftover wood from friends or other projects you’ve done, you can still use this plan; you’ll just need to adjust a little when the word “pallet” is mentioned.

    Materials List

    • 20-30 Deconstructed Food Grade Pallets or other Food Grade Wood
    • 4’ x 3’ Raw Corrugated Tin (this metal must be raw, do not use galvanized)
    • 3 Hinges
    • Aluminum Flashing
    • Aluminum Screening
    • Handle (for the door)
    • Heavy Duty Tin Foil
    • Screws – 2 1/2 inch stainless steel or other weather resistant screws
    • Screws 1 1/4 inch stainless steel or other weather resistant screws


    Select Your Materials

    Whether you are using actual pallets or sourcing your wood another way, there can be some challenges if you are working with low-cost or free materials.

    The wood you get will probably have some issues such as warping and splitting. But, if its free (especially if its free) it can be worth the hunting and sorting to keep expenses down.  Just consider that time spent as sweat equity.  If you are using pallets, you will need at least 20-30 for this plan.

    If you are using pallets, you’ll want to get your length from the middle of the panels, so the ends are trimmed off.  Doing this will help avoid splitting and remove most of the nail pieces you’ve just cut through. If you are using other wood sources, use the wood cut list below to create your pieces.


    Wood Cut List

    Make the following Cuts from 2x4s unless otherwise noted.

    1. 2 each 33”
    2. 2 each 70”
    3. 2 each 29”
    4. 2 each 6’ (Front End of Side Wall)
    5. 2 each 5’ 6” (Back End of Side Wall)
    6. 8 each 33” 2 x 2 (Used 2x2s or cut 2x4s in half lengthwise
    7. 8 each 32 ¾”
    8. 8 each 30 ½“

    Cut this from a 1×1 sized piece

    1. 2 each 5’4” (part 6)

    Cut these from Pallet Panels:

    1. 36 ¼“ pieces, enough to cover the left and right sides (part 10 and 11)
    2. 35 ¾” pieces, enough to cover the front and back (part 12 and 13)
    3. 38” pieces for the roof (part 14)
    4. 2 each 18” to 24” vent (part 15)
    5. 1 each 36” (Part 16)

    As a precaution against your wood splitting as you work, it’s a good idea to pre-drill and countersink each screw.

    Smoking your food is a great way to preserve your meat.  Check out this other method that will allow your food to last for up to 2 years.  Learn More Here>>>

    Getting Started

    Begin by putting together the 2 sides wall frames of the house that include the rack supports.

    Take one piece from the cut pieces listed above for the first side unless otherwise noted:

    #4 – 6’ Wall frame front

    #5 – 5’6” Wall back

    #6 – 4 pieces of 33”

    Make sure the bottom of your #4 and #5 pieces are squared at the bottom then attach the 33” pieces across at 24” from the bottom, 36” from the bottom, 44” from the bottom, and 52” from the bottom.

    NOTE:  Secure the cross pieces to the 6’ upright flush to the end, BUT secure the cross pieces on the 5’6” upright 1.5” in from the end.  This is to leave room for the #9 pieces later.

    Create the first side with the 6’ (front) board on the right and the 5’6” (back) board on the left.

    Create the other side with the 6’ (front) board on the left and the 5’6” (back) board on the right.

    When you’ve completed the 2 sides, you’ll have mirror image sections that resemble ladders with one side higher than the other.  The Difference in heights from front to back provides support for a slatted roof.

    The cross pieces become the rack (shelf) supports on the inside of the smokehouse.


    Making the Door Frame

    Next, you’ll need the two pieces each from #2 – 70” and #3 – 29”.  Simply connect them to make a 37” x 70” rectangle.


    Attach the 3 Sides Together

    To make the next steps easier, screw the door frame to the face of the walls for better stability. There will be a 2-inch difference at the top between the highest point of the side walls and the top of the door frame

    Related Article:  “Cooking Skills Every Homesteader Should Cultivate”

    Cut the Roof Angle

    Using a spare panel or another straight edge, draw a line from the back of the side panel to the front to create the slat line for the roof and cut off the excess.  Do this on both sides.

    Use the pieces from #1 to (33”) to span the width of the smokehouse at the front and back ends of each wall.


    Add the Rear Support Frames

    Attached both #9 pieces 5’4” to the backs of the side walls, under the roof supports.


    Adding the Paneling

    Starting with the Back, fill in your walls with paneling from the ground up, then move on to the left and right sides.


    Finishing the Door

    1. Unscrew the door from the smokehouse after the side and back paneling is in place.
    2. Add the hinges to one side
    3. Install the door frame to the house.
    4. Add paneling to the door in such a way that the door has clearance to swing open.
    5. Add the handle to the side opposite the hinges.


    Put on the Roof

    Attach paneling from the front to the back of the house, across the pieces that span the width.

    Screw on the corrugated tin.


    Building Your Smoke Rack Shelves

    Create wooden frames that fit inside your smokehouse and can slide on and off the supports constructed on the interior.

    Stretch your metal screening across and around the wooden frame to complete your “shelf.”


    In Conclusion

    With the most basic woodworking skills, scrap pallets and some determination, you could have your own smokehouse build by none other than yourself.

  • Homemade Suet Cakes for Chickens

    Homemade Suet Cakes for Chickens

    Suet cakes are a great treat for your chickens, especially as the summer heat creeps in and they have a hard time sticking to their normal activities.

    Chickens love to peck and scratch, it’s truly what they live for. If you have chickens in a coop who can’t freely forage this way, they might end up getting bored and unhappy. And bored and unhappy chickens means less eggs and less delicious meat! It is vital not just for the animal’s quality of life but also for the “services” they provide you to keep them occupied and entertained.

    Homemade suet cakes are a great way to do this! The tightly packed little cakes full of delicious treats (well, treats to a chicken) will keep them happily busy pecking away to get them.

    This recipe is a very easy and healthy way to provide your chickens with this diversion. It contains coconut oil, which is a great source of fat for your chickens, as well as naturally antifungal and antibacterial, which is super crucial for keeping their digestive systems, feathers, and feet clean and healthy.

    A note: this is just a treat for your chickens, and shouldn’t be used as a replacement for their regular feed or time spent outdoors if you’re able to let them roam at all. It’s just a fun way to supplement their regular diet and daily activities.

    Do Laundry With NO DETERGENT…Heres How>>>

    Ingredients and supplies 

    • coconut oil
    • mix of grains (pre-mixed chicken feed, or any combination of grain or seed your chickens enjoy)
    • Muffin tin
    • Room in your freezer for the muffin tin

    Directions 

    1. In a saucepan over low heat, melt your oil. How much you need will depend on the volume of the grain you use, but you can start with about 2-3 cups.
    2. Once the oil is liquid, stir in your grains.
    3. You will want to completely coat the grains with oil, so that there’s hardly any oil pooling around them. However, you don’t want there to be any dryness in the mixture. Try to think of the oil hardening; you’ll want a ratio that will allow for the oil to hold all the grains in place and form a cake.
    4. Spoon your mixture into the muffin tins. Flatten with a rubber spatula at the top.
    5. Freeze for about an hour, then remove.
    6. Tip your muffin pan upside down to remove the cakes. At this point, you can give one to your chickens and put the rest in a ziplock bag to keep in the freezer.

    In the summer heat, your bored chickens will love this healthy, fun, and not to mention cold, treat!

  • Simple Yet Healthy Homemade Ketchup

    Simple Yet Healthy Homemade Ketchup

    Ketchup is an American staple, but did you know you can make it very easily at home? Unfortunately, a lot of store-bought ketchup is made with loads of sugar and sometimes even artificial coloring and flavoring.

    If you’re craving some delicious ketchup but want a healthy, whole-food version that doesn’t sacrifice health for taste, I’ve got the perfect recipe! This recipe uses all natural, easy-to-find ingredients, and instead of lots of cane sugar like regular ketchup typically has, it requires just a bit of honey and coconut sugar, which are much healthier and both have a very low GI index compared to other sweeteners.

    At the end, I’ve got a suggestion for an easy fermented version, if you’d like to make this ketchup even healthier by adding some natural probiotics.

    Give it a try today and you’re sure to be making it regularly.

    Effective Primal Diet Hacks…

    Ingredients
    • 2 6-ounce cans of tomato paste
    • 12 ounces filtered water
    • 6 tbs apple cider or white vinegar
    • 6 tbs honey
    • 1 tbs coconut sugar
    • 2 tsp salt
    • ¼ tsp garlic powder
    • ¼ tsp onion powder
    Directions
    1. Empty the tomato paste out into a medium saucepan.
    2. Adding a few tbs of water at a time, blending completely with the tomato paste before adding any more water. This will make it easier
    3. Add the rest of the ingredients once all the water is blended completely with the tomato paste, and stir until smooth.
    4. Put the saucepan over medium heat, and bring to a simmer.
    5. Reduce heat, keeping it a simmer, and cook for 10-20 minutes, stirring frequently. Watch for splattering, it’s virtually unavoidable, but try to keep the simmer as low as you can to avoid a big mess.
    6. Remove from heat, and let cool to room temperature.
    7. Once cool, pour into a jar or bottle, cover, and keep in the refrigerator.
    8. For a very easy fermented version, before refrigerating, stir in a few tablespoons of whey. Then, cover and let culture at room temperature for 12-24 hours before refrigerating.

    That’s it! Enjoy your delicious homemade ketchup on french fries and burgers or any other way in which you use ketchup.

    Natural Healing Secrets You Need to Know…

  • How to Make Raw Cat Food (Video)

    How to Make Raw Cat Food (Video)

    Wait! I know this sounds pretty gross, but it’s actually really cool. If you’re a cat person, you probably understand the desire to feed your feline friends something nutritious and delicious. Cats are notoriously picky eaters, and part of the reason this may be is that the majority of the time, they’re being fed cooked, grain-based foods they’re simply not meant to eat!

    Some of my favorite health-focused homesteaders on YouTube shared this video recently of how they make their raw, super affordable cat food.

    They start the video by explaining why they don’t enjoy making it, so if you think it’s gross, you’re not alone! But they also describe precisely why they continue to make this food, and how great it is for their cats.

    Cars are amazing homestead animals to have, and you want to keep them happy and healthy! Raw, homemade food is not only great for them, it’s cheap for you to make as well. Healthy and frugal is always a great alternative to store-bought, especially when it comes to keeping our furry homestead helpers satisfied. Enjoy!

    If you enjoyed this, you might also like….

    Can You Defend Your Family When SHTF?

    Natural Healing Secrets You Need to Know…

    Effective Primal Diet Hacks…