Page 1 of 4
1 2 3 4
recipes – Homesteader Depot

Tag: recipes

  • Homemade Cottage Cheese (Video)

    Homemade Cottage Cheese (Video)

    I love all things homemade, especially if it’s easy! This recipe for healthy homemade cottage cheese looks totally amazing, and I can’t wait to try it myself.

    The cool thing about recipes like this is that they are really simple and easy, and most of the time it takes to make them is spent straining the cheese. This cottage cheese is also very nutritious and an excellent source of healthy fat and protein.

    Check it out:

    If you enjoyed this, you might also like….

    Long-Term Survival for Homesteaders…

    Natural Healing Secrets You Need to Know…

    Effective Primal Diet Hacks…

  • Dandelion Jelly Recipe

    Dandelion Jelly Recipe


    Dandelions are so useful! You can use the leaves, flowers, and roots for all kinds of nutritional and medicinal benefits. However, it’s not all leafy greens and home remedies! You can make a deliciously sweet jelly with it, too, that’s great to use in place of jelly, jam, or honey to top toast or sweets.

    The first step is to collect your dandelions. You will need 4 cups of just the flowers, so it’s actually easiest to simply pick the flowers off the stems when gathering them, rather than just cutting the whole stem and having to go through the arduous process of removing the stems later.

    So, once you’ve gathered up your dandelion flowers, you can proceed with the recipe:

    Ingredients

    • 4 cups dandelion flowers
    • 4 1/2 cups sugar
    • 2 Tbs lemon juice
    • 1 box powdered pectin


      Are you sick of depending on other people for your freedom?  With an open mind, I urge you to take a second and listen to this video.  Learn how you can manifest and snag the life of your dreams.  Everything you’ve been asking the universe for could be yours starting today.  <<<Click Here>>>


    Equipment

    • canning jars, lids, and rings
    • large glass bowl
    • canning funnel

    Directions

    1. Once your dandelion flowers are processed, with no stems, and washed and patted dry, place them in a large, sturdy, heat-proof glass jar.
    2. Boil a large kettle or pot of water, and pour over the dandelion flowers. At this point, you should let brew for several hours until you have a nice, dark, tea.
    3. Once you have your tea, you are ready to proceed to the jelly. You will need 3 cups of the tea (you can just drink the extra as tea if you like! It’s great iced)
    4. Add tea, lemon juice, and pectin in a saucepan and bring to a boil.
    5. Add the sugar, and bring back to a boil. Let boil for 1-2 minutes.
    6. Fill your jars, and leave on the counter until the jelly has set, before storing in the refrigerator. Or, if you want to can them, you can at this point process in a water bath for 10 minutes.

    That’s it! This makes a delicious gift for family and friends, or you can keep it all for yourself. Enjoy!

  • 6 Creative Ways to Use Bone Broth

    6 Creative Ways to Use Bone Broth


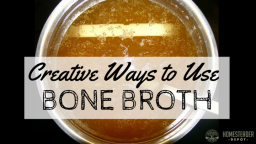
    You’ve probably heard of the growing popularity of bone broth lately, and if you haven’t, you should definitely know about it.

    It’s not really anything new, but recent trendy diets have emphasized the regular consumption of hearty, super-nutritious bone broth as a way to get essential vitamins, minerals, and, most importantly, gelatin. 

    Gelatin is a wonderful addition to any healthy diet, but particularly beneficial for anyone concerned about bone or joint health.

    The great thing is it’s very cheap and easy to make, unfortunately, it’s not always so easy to find creative ways to consume it! Especially this time of year, sipping on a warm, frothy cup of broth might not sound so appealing to you.

    So we’ve come up with some clever ways to consume broth in your diet that you might not have thought of. Let’s begin:

    Soups and Stews

    Using bone broth as the base for hearty soups and stews is, of course, the most obvious way to get this hearty, healthy broth into your diet. You can use as you would chicken broth or even water. But, since the weather is warming up this time of year, if warm tomato soup or hot, spicy chili isn’t sounding too appealing to you, don’t forget there are great cold summer soups like gazpacho and vichyssoise that bone broth can be used for too.

    Related Article:  How to Cook Bone Broth in Your Slow Cooker

    Steaming Vegetables

    If you are one to enjoy some simple steamed vegetables in a quick weeknight dinner, you’ll be happy to know that you can use bone broth in place of water! Steaming vegetables with bone broth infuse the veggies with the health benefits of the broth and add a rich, deep, flavor as well.

    Cooking rice, pasta, beans, etc. 

    As with steaming vegetables, you can use your bone broth in place of water when cooking rice, pasta, beans, quinoa, lentils, or other legumes or grains. It will add a rich flavor as well as the nutrients and minerals of the broth.

    Sauteeing Vegetables

    You can always throw a little bone broth in when you are sauteeing vegetables or making a stir-fry. It will help the vegetables cook faster as well as lend it’s rich flavor to your dish.

    Related Article:  How to Make Bone Broth (Video)

    Sauces and Gravies 

    Many sauces require a fatty broth or milk to be reduced, and bone broth can almost always be used for that. It makes a wonderful base for a wide range of sauces and is always ideal for gravy.

    Egg Dishes

    Use bone broth in place of water or milk when cooking scrambled eggs, frittatas or quiches.

    Get Creative!

    Hopefully, this has given you an idea of just how many options there are for using bone broth! Try to see if there are other creative ways to incorporate bone broth into your daily life. Happy cooking!

    If you enjoyed this, you might also like….

    Cooking Skills Every Homesteader Should Cultivate

    Effective Primal Diet Hacks…


  • How to Make Natural, Raw Sour Cream

    How to Make Natural, Raw Sour Cream

    Sour cream is a delicious staple condiment of American cooking, that can greatly enhance the taste of many delicious dishes, from potato pancakes, to baked potatoes, to nachos.

    Most people will be familiar with the store-bought version, a thick, gooey cream that comes in a plastic container and often with additives and even artificial flavoring. But did you know you can very easily make your own at home?

    Like pickles, homemade sodas, yogurt, and sourdough, sour cream is one of the many delicious, healthy, and easy home fermentation products that anyone can try themselves. And it just so happens to be one of the easiest! You don’t need anything at all but raw milk. However, that the milk you use be raw is essential. Pasteurized milk, that has been heated to very high temperatures to kill the bacteria that naturally occurs in the milk, simply won’t sour the way cream from raw milk will, and it is also homogenized, meaning the cream won’t naturally separate for you to harvest.

    When you buy fresh, raw milk, if you let it sit for awhile, cream will naturally separate on the top, and this is what you can use to make sour cream. Here’s what it looks like:

    As you can see there is a distinct line between the cream on top, and the milk. That cream is what you use to make sourcream. Also, if you have milk that has naturally soured before you were able to use it up, you can use the cream on top for sour cream. This is a great way to use up soured milk!

    Here’s what you do: 

    Skim the cream off the top of your raw milk, and place in a small jar. I find a metal measuring cup works best for this, but you can use anything you can dip into the cream and extract it, without mixing the milk in with the cream.

    If you get a small amount of milk in with the cream you’re skimming, don’t worry, it will naturally separate later.

    Once you’ve collected all your cream and put in a separate jar, cover loosely with the lid, and leave on your countertop for 24 hours. After 24 hours, taste and smell it, to see if it has soured. It should have thickened in this time, although it won’t be as thick as store-bought sour cream. Depending on the weather, it might need another 24 hours, just use your own judgment and preference.

    When soured, tighten the lid, and put in the refrigerator, will it will thicken even more. Use as you would regular sour cream, and enjoy!

    If you enjoyed this, you might also like….

    Do You Have What You Need to Hold Down the Fort?

    Natural Healing Secrets You Need to Know…

    Effective Primal Diet Hacks…


  • How to Make Whey Ricotta (Video)

    How to Make Whey Ricotta (Video)

    I mentioned whey, recently in my article on healthy homemade probiotic lemonade, so if you’ve read that already you’ll be familiar with it. Whey is what separates from curds when milk curdles, or what comes off of cheese or yogurt during the straining process.

    One of the coolest ways you can use up extra whey (and if you’ve ever made cheese, you’ll know how much you get) is to make homemade ricotta cheese. When whey first forms, it is full of protein strands, and you can essentially “harvest” these through a simple process to make delicious ricottta cheese. It’s a great way to make the most of a gallon of milk. I like to make yogurt with my milk, strain it, and then make ricotta cheese with the leftover whey! Much cheaper, not to mention significantly healthier, than buying these products individually.

    This video gives an easy-to-follow tutorial on how to make ricotta cheese at home. Enjoy!

    If you enjoyed this, you might also like….

    Long-Term Survival for Homesteaders…

    Natural Healing Secrets You Need to Know…

    Effective Primal Diet Hacks…

  • How to Make Pickles at Home

    How to Make Pickles at Home

    Pickles are one of the most classic and widely recognized forms of brine preservation. While the term “pickled” can apply to various forms of preserving various kinds of vegetables, what most of us think of when we think of “pickles” is the classic, brine-preserved cucumber that has become a staple of delis and diners across America. It most famously made its way into the American diet through Jewish delis in New York City, and, like any classic food, it can be made easily at home.

    While the formula is simple, however, there can be a bit of trial and error involved, and anyone who’s successfully made pickles can probably attest to this. There have probably been hoards of gray-haired European grandmothers throughout the ages who have perfected the art of delicious, crunchy, perfectly-pickled cucumbers, but for those who didn’t grow up learning at their Bubbie’s knee, it take a bit of practice.

    Fortunately, we can still learn from the masters, even if they’re not in our own family. Sandor Ellix Katz, author of Wild Fermentation: The Flavor, Nutrition, and Craft of Live-Culture Foods is not only an expert in the field of home fermentation, he also grew up in a Jewish community in Brooklyn, so he knows a good pickle when he, well, makes one.

    One of the most common mistakes made by first-time pickle makers is by only using a brine. This will result in mushy, soft pickles. What Katz discovered the hard way is that by adding fresh grape leaves, you can naturally preserve the crunchiness of the cucumber, as it absorbs the brine and takes on the delicious, salty sweetness that can only be acheived through pickling.

    To find fresh grape leaves is another story, however, and you might have some trouble, depending on where you live. Of course, if you grow grapes, you won’t even be worrying about this, but if you don’t, you can see if any homestead neighbors do. You can also check or ask at Middle Eastern restaurants or markets, or simply order dried ones online, which are a good substitute. You can also use black tea leaves. While grape leaves are the classic, black tea will perform the same function.

    This Odd Therapy Will Revolutionize Your Well-Being…

    The other crucial component is your equipment. We’ve included Katz’ suggestions, but there’s still room for improvisation. The important thing is to have a cyllindrical container and some way of weighing down the pickles so they remain submerged in the brine. See what you can come up with!

    So without further ado, here is Sandor Ellix Katz’ recipe for classic kosher deli pickles!

    Ingredients 

    Yields 1 gallon 

    • Approximately 4 lbs cucumbers, pickling variety preferable
    • 3/4 cup salt (kosher or sea salt is best)
    • Dill, either fresh and flowering, or the dried leaves and/or seeds (whatever you can find)
    • Several cloves of garlic
    • Grape leaves (these help the pickles retain their crunchiness)
    • Black peppercorns

    Equipment

    • Ceramic fermentation crock, or food-grade bucket, both cylindrical
    • Fermenting weight or large plate that fits inside the bucket
    • Either: 1-gallon bottle filled with water OR a large rock that has been boiled
    • Clean cheesecloth or dish towel for covering

    Directions 

    1. Rinse the cucumbers carefully, to avoid bruising. If you are using cucumbers that haven’t been picked fresh that day, soak them for a few hours in chilled water.
    2. Bring half a gallon of water to a boil on the stove, then remove from heat and stir in the salt, making sure it dissolves completely. This creates the 5% brine solution.
    3. Let the brine mixture cool until you can leave your finger in it for at least 10 seconds without it burning.
    4. As you are waiting for the brine to cool, clean your crock or bucket thoroughly using hot water and non-antibacterial soap, as well as your weight or plate.
    5. Peel and crush your garlic cloves, and place those along with the dill, peppercorns, and grape leaves at the bottom of your crock or bucket.
    6. Next, place your cucumbers in the crock or bucket, and then follow with the brine.
    7. Place your weight or plate on top, and weigh that down with the jug filled with water or the boiled rock. If the brine doesn’t cover the plate or weight, add more brine with the ratio of 1 tbs salt to each additional cup of water.
    8. Cover your crock or bucket with the cheesecloth or dish towel. This will keep dust, bugs, and any other small debris out of the pickels.
    9. Store in a cool, dark place.
    10. Check daily. Scum may start to appear on the surface, so remove this.
    11. After a few days, taste your pickles to see if they’re ready. This part is largely up to your own taste, once they taste good to you, they’re done! There’s no rule here; as long as they’re fermenting well and you like the taste, you can remove them when you please.
    12. You can let them continue to sit for one to four weeks, taking some out to enjoy as you go. At some point they will become fully sour, at which point you’ll want to move them to the fridge to slow the fermentation process.
    13. To safely move them to the fridge, transfer to a jar if you don’t have room for your whole crock or bucket in the fridge, but DO NOT COVER for a few days, leaving the cheesecloth, dish towel, or a paper towel secured with a rubber band on the jar. After a few days, you can cover with the jar lid.
    14. These will keep for a long time in the fridge, so you’ll probably eat them all up before they ever go bad! Such is the beauty of fermented foods.

    Enjoy!

    The ONLY Reason You’re Failing the Paleo Diet...

  • Dandelion Pesto Recipe

    Dandelion Pesto Recipe

    Dandelion is a wonderful plant, that the majority of Americans just think of as a weed. If you’re not already foraging your yard’s dandelion for natural remedies or food, you definitely should be.

    Dandelion grows virtually everywhere, and I can almost guarantee it’s growing somewhere near you, either in your backyard, local park, or any field or meadow nearby. It was a staple of Depression-era cooking, and it’s tasty, nutritious leaves can be prepared in a number of ways.

    You can easily eat them raw, but if you’d like to enjoy them in a very delicious way, try this amazing and tasty dandelion pesto. You can make a fancy, gourmet pasta dish out of foraged leaves, how cool is that?

    To harvest dandelion leaves, be sure to use a knife. The tough, stubborn roots can make it hard to harvest the whole plant, so you’ll want to dig in with a paring knife to uproot it properly.

    After harvesting, make sure to wash extremely thoroughly. Dandelion can retain a lot of dirt, so you’ll want to rinse it all under cold water, then soak it all in water with a dash of vinegar.

    After about 20 minutes of soaking, vigorously shake the dandelion leaves all around the water, then pour out the water, rinse, and fill your bowl with water again, shake the leaves out one more time, and rinse again. This should do it, but inspect the leaves as you prepare your pesto, just to be safe.

    Ingredients

    • 1/2 pine nuts
    • 3 garlic cloves
    • 2 bunches freshly harvested dandelion leaves.
    • 1 Tbs lemon juice
    • 1/2 cup olive oil
    • 1/2 tsp salt
    • 1/2 tsp black pepper
    • 1/4 cup Parmesan cheese
    • salt to taste

    Instructions

    1. Roughly chop your freshly washed dandelion leaves, so that they equal a loosely packed 2 cups.
    2. Roughly chop your garlic.
    3. Place the garlic, dandelion leaves, pine nuts, lemon juice, olive oil, salt, and pepper in a blender or food processor.
    4. Blend or pulse until smooth. You might need to stop and scrape down the sides with a rubber spatula a few times.
    5. Stir in the parmesan cheese until evenly incorporated.
    6. Serve fresh or refrigerate and eat within 3 days.

    Bon appetit!

    If you enjoyed this, you might also like….

    Do You Have What You Need to Hold Down the Fort?

    Natural Healing Secrets You Need to Know…

    Effective Primal Diet Hacks…

  • Simple Yet Healthy Homemade Ketchup

    Simple Yet Healthy Homemade Ketchup

    Ketchup is an American staple, but did you know you can make it very easily at home? Unfortunately, a lot of store-bought ketchup is made with loads of sugar and sometimes even artificial coloring and flavoring.

    If you’re craving some delicious ketchup but want a healthy, whole-food version that doesn’t sacrifice health for taste, I’ve got the perfect recipe! This recipe uses all natural, easy-to-find ingredients, and instead of lots of cane sugar like regular ketchup typically has, it requires just a bit of honey and coconut sugar, which are much healthier and both have a very low GI index compared to other sweeteners.

    At the end, I’ve got a suggestion for an easy fermented version, if you’d like to make this ketchup even healthier by adding some natural probiotics.

    Give it a try today and you’re sure to be making it regularly.

    Effective Primal Diet Hacks…

    Ingredients
    • 2 6-ounce cans of tomato paste
    • 12 ounces filtered water
    • 6 tbs apple cider or white vinegar
    • 6 tbs honey
    • 1 tbs coconut sugar
    • 2 tsp salt
    • ¼ tsp garlic powder
    • ¼ tsp onion powder
    Directions
    1. Empty the tomato paste out into a medium saucepan.
    2. Adding a few tbs of water at a time, blending completely with the tomato paste before adding any more water. This will make it easier
    3. Add the rest of the ingredients once all the water is blended completely with the tomato paste, and stir until smooth.
    4. Put the saucepan over medium heat, and bring to a simmer.
    5. Reduce heat, keeping it a simmer, and cook for 10-20 minutes, stirring frequently. Watch for splattering, it’s virtually unavoidable, but try to keep the simmer as low as you can to avoid a big mess.
    6. Remove from heat, and let cool to room temperature.
    7. Once cool, pour into a jar or bottle, cover, and keep in the refrigerator.
    8. For a very easy fermented version, before refrigerating, stir in a few tablespoons of whey. Then, cover and let culture at room temperature for 12-24 hours before refrigerating.

    That’s it! Enjoy your delicious homemade ketchup on french fries and burgers or any other way in which you use ketchup.

    Natural Healing Secrets You Need to Know…